How to Add a New Connector to Your Framework
- After you install the Connector Framework, you set up a connection and access your content repository using the BA Insight Connector.
- See the following topics for a general guide of adding a new connector to your Connector Framework. Details vary by connector. See the Connectors Help for details about your Connector.
- Once you are finished adding your connection, Connector Framework is installed.
- Post-installation, you must run a Datastores Type Load job to fetch properties from the source system. See How to Manage Tasks (Jobs)How to Run a Datastore Type Load Task.
How to Add a New Connector to Your Connector Framework
The following topics offer a general guide of how to add a new connector to your Connector Framework.
The settings detailed below are GENERIC, and apply to all BA INSIGHT Connectors.
Details vary per each individual connector.
For connector settings NOT covered in the steps below, see the Connectors Help documentation for your specific connector.
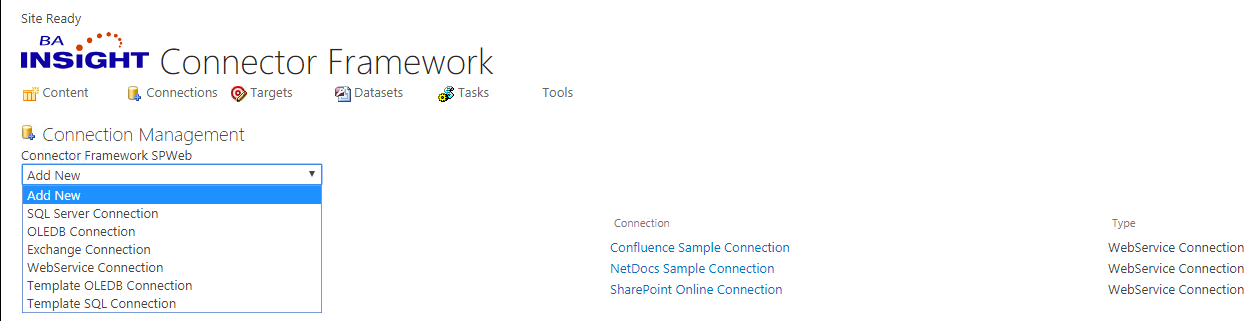
Add a New Connection
- Click the Connections link from the top horizontal string of icons.
- Select Add New from the drop-down list to see both built-in and external connectors.
- Select the appropriate connection for your connector.
- The Connection page opens (in the example below, a WebService connection is shown. The fields for a Database connections are different).
- Enter the appropriate information in the required fields, marked with a red *, such as Title*. See the graphic below.
- Title: The title of your connection.
- Content Owner: Enter a valid domain account that has FULL rights to your search results.
- Discovery Group: Optional. Enter a valid domain group that has FULL rights to your search results.
- Max Concurrent Requests:
- Web Service: The URL of your web service data connector in the format http://<server:port>/dataconnector.asmx.
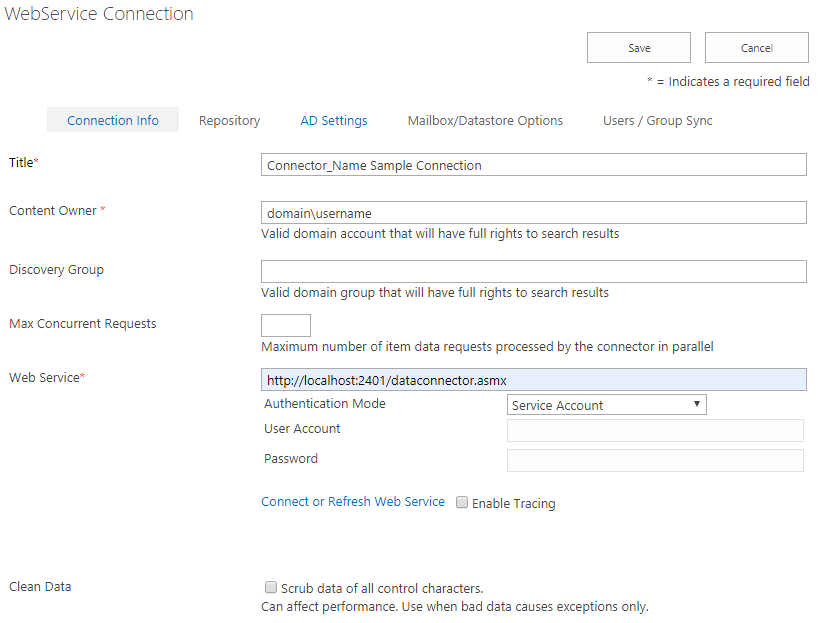
- Next click Connect or Refresh Web Service in the middle of the page.
- The page refreshes and additional options appear. Note that these options vary depending on the connector you are installing. Additional options may include Access Token, Time Zone, etc..
- Fill-in all required fields (marked with a *) with the appropriate information.
Configure AD Settings
- Click the AD Settings tab.
- The Default Domain is the only required field. Carefully read the instructions under each field.
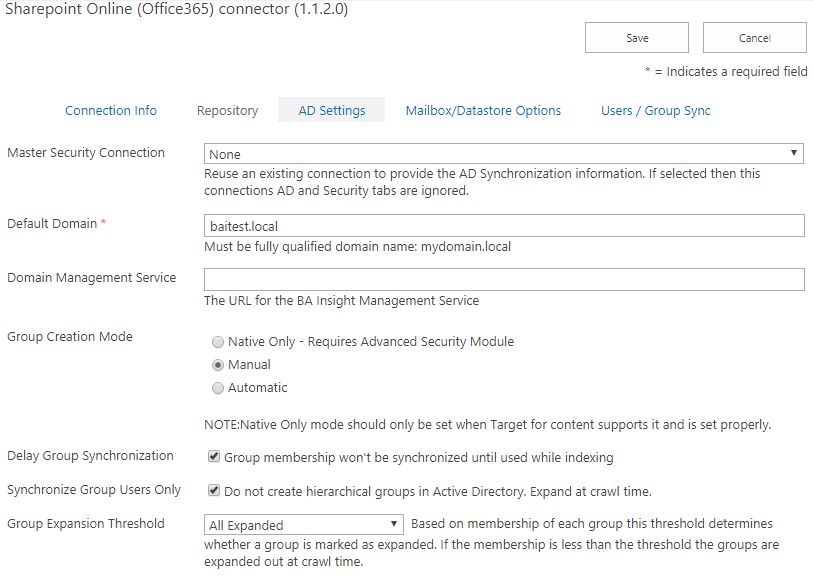
- Next complete all remaining fields. The Group OU Location and Group Naming Format are the only required fields. Carefully read the instructions under each field.
Note: If you select "Service Account," as your Authentication Mode, leave the Domain Account and Password fields empty.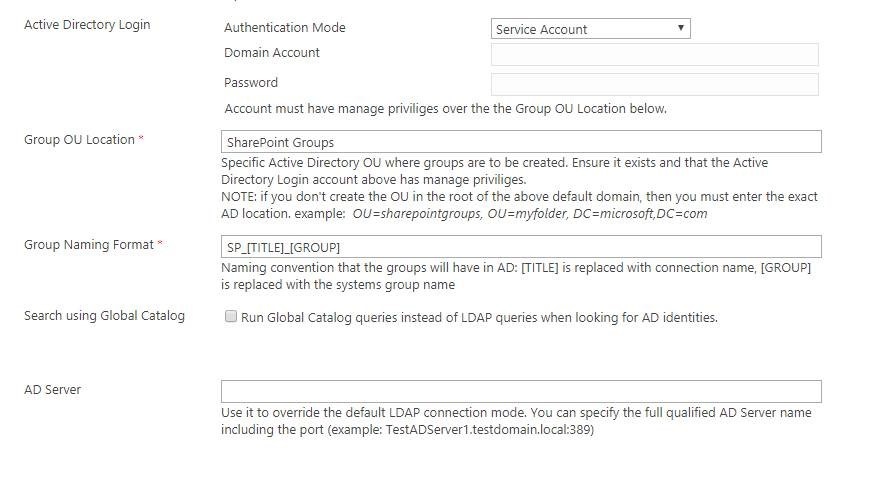
-
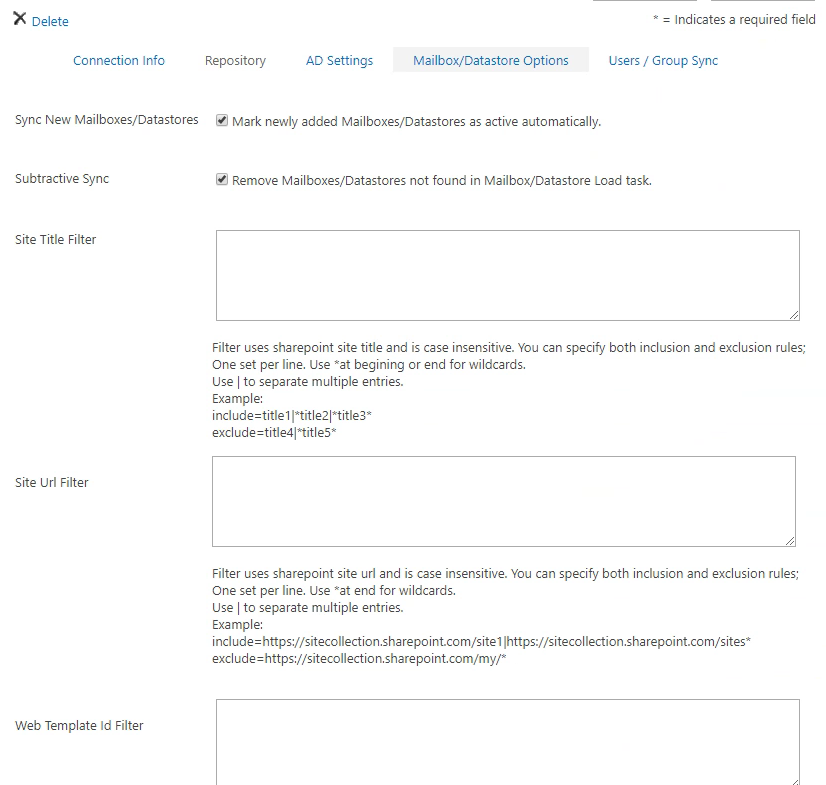
Click the Mailbox/Datastore Options. Configure as described in the following section.
- When done, click Save.
Configure Mailbox/Datastore Filters
To specify what Mailboxes/Datastores should be returned during the ‘Mailboxes/Datastores Load” task, use the settings on the Mailbox/Datastore Options page.
- All connectors have the options:
- Sync New Mailboxes: Mailboxes found during the mailbox load job are automatically activated and crawled.
- Subtractive Sync:
- Sync New Mailboxes: Mailboxes found during the mailbox load job are automatically activated and crawled.
- Individual connectors may have one or more filter options.
- For example, the SharePoint Online Connector has three additional filters.
These filters are available on the Mailbox/Datastore Options page in the Connection configuration:
- Site Title Filter: Uses the SharePoint site title as a filter
- Site Url Filter: Uses the SharePoint site URL as a filter
- Web Template Id Filter: Uses SharePoint site templates (ex:
STS,MPS,SRCHEN…). Template IDs must not include the number. For exampleSPSis accepted,SPS#1is not accepted
Most users who enable Autofetch site collections from the Connection Info tab also choose to enable Mark newly added Mailboxes/Datastores as active automatically.
All filters are case-insensitive and support the wildcard (*) character at the end of the filter.
You can also specify both inclusion and exclusion rules. If both inclusion and exclusion filters are specified, only one set per line must be used. Multiple entries are separated by the pipe character (|).
Configure Custom Filters for Mailbox Loading
Custom filters can be applied on the indexed items during crawl time.
The filter is configurable on the Content configuration page of the Connector.
Available filters types:
- LISTURL: Filtered items are not be retrieved or marked as deleted
LISTURL=url1|url2 - LISTTITLE: Filtered items are not be retrieved or marked as deleted
LISTTITLE:title1|title2 - FOLDERURL: Filtered items are not be retrieved or marked as deleted
FOLDERURL=url1|url2
- RECORDSONLY: Filter used to decide if an item should be treated as metadata only or the binary content should also be retrieved. This filter is applied on the item metadata.
RECORDSONLY=[metadata name][=/<>][‘expected value’/Null]
Multiple entries must be separated by comma, different filter types must be separated by the pipe character (|).
Filters support the trailing wild card (*) sign.
To exclude a container the LISTURL, LISTTITLE and FOLDERURL filters must be preceded by the ‘-‘ operator.
Important!A Full crawl is required if filters have changed.
Configure Security Settings
- Synchronized Domain: Used to specify the default Active Directory name used during Security Sync to map users and groups to the local Active Directory. This value is only used when the Active Directory name cannot be extracted from the ID or Name of the user/group.
-
Disable security: Select this setting to mark all content as public
- Enable Azure AD Group Expansion: Select this setting to automatically expand Azure AD groups during the Security Sync.
To enable group expansion, the Azure Application requires Microsoft Graph API permissions to retrieve the group members.
To do this, repeat steps 8 through 11 from Register and Configure the Azure Applications and, during step 9, select the "Microsoft Graph API" instead of "Office 365 SharePoint Online" (Microsoft.SharePoint).
The API requires the following permissions:
- Read all groups
- Read all users' full profiles
Configure Metadata Settings
- Native Properties - Select this option to enable all metadata/properties to be returned directly as native SharePoint crawled properties. This simulates the built-in SharePoint crawled and does not use our metadata mapping page.
- Compound Properties - Provide a comma separated list of properties that you want returned as a single appended string from multiple values. This is typically useful for displaying in search results.
- Compound Delimiters - Select a delimiter, from the drop-down list, that will be used to separate the values inside the compound properties.
Run the Datastore Types Load Job
Next you run the Datastore Types Load job to fetch properties from the source system.