How to Use and Manage Taxonomies
Access and Use Taxonomies
- Manage Taxonomies: Click the Manage Taxonomies entry on the left navigation to see the Manage Taxonomies page:
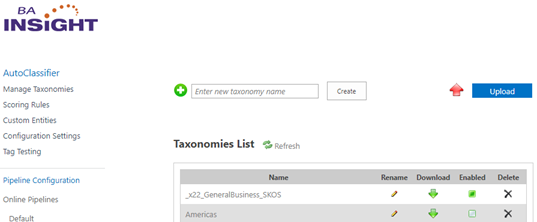
- Taxonomies List: See all of the taxonomies that currently exist in AutoClassifier.
-
Use the operations on this page to create new taxonomies, upload taxonomies, rename, enable/disable taxonomies, and so on.
Tip: If you are using SharePoint, go to the Taxonomy operations and SharePoint section of this page.
- Click the name of one of your taxonomies, such as
_x22_GeneralBusiness_SKOSin the example above, to access the test bench where you can access and edit your taxonomy.
How to Create a New Taxonomy
Create a New Taxonomy
- From the Manage Taxonomies page (shown above):
- Enter the name of your new taxonomy
- Click the Create button to create the taxonomy.
- The Taxonomy appears in the "Taxonomies List" shown on the bottom of the page.
- Click the Refresh icon above the Taxonomies List table if you do not see your new taxonomy listed in the table.
How to Upload Your Taxonomies
Upload/Download Operations and File Types
You can upload a taxonomy using an .xml or a .csv file.
If you try to use another file type, the upload operation fails.
- XML:
You can:- Download a taxonomy from the taxonomies page in
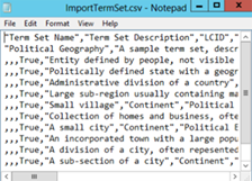
.xmlformat only, and re-upload this.xmlwith a new name. - Read the information about the CSV file specifications in Excel or choose another format:
- You can also view, edit, and save this file using WordPad, Notepad, and similar programs.
- Create an XML file in Simple Knowledge Organization System (SKOS) format
- Download a taxonomy from the taxonomies page in
- CSV: Create in SharePoint, only:
- Upload a CSV file into your SharePoint Term Store
-
You can also add synonyms to your
.csvfile. -
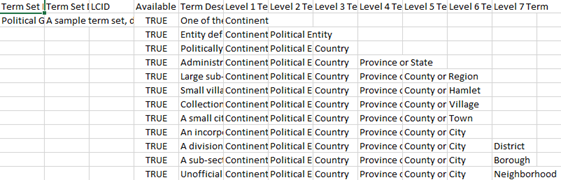
To add synonyms, append columns such as
Synonym 1,Synonym 2, andSynonym 3as the last columns in the file.-
For example:
,,,True,"Entity
 defined by people, not visible to the naked eye","Continent","Political
 Entity",,,,,,"Pretend this is a synonym for Political Entity"
-
-
Save your
.csvfile to a folder on your machine.
Download/Create an XML file in SKOS Format
- Download/Create a taxonomy in
.xmlfile format that is similar to the downloaded example shown below:
- Save this file, in SKOS format, with an
.xmlextension.
Upload a CSV File into Your SharePoint Term Store
The Managed Metadata Service (MMS) lets you import or export Comma Separated Value (.csv) files that contain metadata.
-
The CSV file is imported into the Term Store.
-
The Taxonomy Manager automatically creates term rules based on the term names used in the file.
-
AutoClassifier supports an extended version of the CSV import file format.
-
This format includes a column that contains synonyms.
Note: If you do not use the SharePoint-specified CSV file format, your import or export operation might fail.
To import a CSV file into the SharePoint Term Store, follow these steps:
- Go to your site collection:
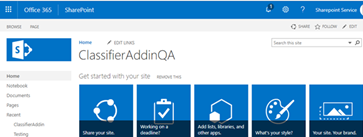
- Click the sprocket icon
 and select Site Settings.
- On the Site Settings page that appears, go to Term store management > Term Store Management:
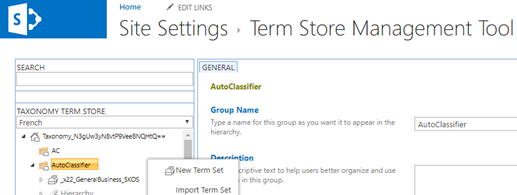
- Right-click on a node such as AutoClassifier and select
Import Term Setfrom the sub-menu that appears.- Import your CSV file.
Taxonomy Operations and SharePoint
Each of the taxonomies listed below the Taxonomies List on the Manage Taxonomies page are located in a SharePoint Term Store.
For this reason, each entry corresponds to a term set in the SharePoint Managed Metadata Service (MMS).
- Change a taxonomy name:
- When you change the name of a taxonomy, the name of the corresponding term set in SharePoint also changes.
- Rename the selected taxonomy.
- For example, type
GeneralBusiness_SKOS
- For example, type
- Expand the AutoClassifier node to see the name change for the taxonomy.
- Rename the selected taxonomy.
- When you change the name of a taxonomy, the name of the corresponding term set in SharePoint also changes.
- Delete a taxonomy:
- When you delete a taxonomy, this taxonomy is also removed from the Term Store Management Tool page.
- When you delete a taxonomy, this taxonomy is also removed from the Term Store Management Tool page.
-
Enable a taxonomy:
-
Enabled taxonomies are used by the auto-tagging engine to tag documents.
-
If a taxonomy is disabled, you can use the taxonomy in ways that are similar to an ordinary SharePoint term set.
-
You can also test a disabled taxonomy and see accurate test results in the test bench.
-
However, the term set is not included in the auto-tagging operation for documents.
-
Note: By default, all the taxonomies loaded when you installed AutoClassifier (and create taxonomies), are enabled.