How to Set Up and Configure the Confluence Cloud Connector
After running the MSI installation wizard, complete your installation using the manual steps for your type of Confluence connector below.
All BA Insight connectors can be downloaded from the Upland Right Answers Portal under Knowledge > BA Insight > Product Downloads > Connectors. This connector is installed with the same generic steps as any BA Insight connector. You must satisfy the Prerequisites for your connector before installing. The configuration specifics are detailed below.
-
Configuring Confluence Connector for the On-Premise version of Confluence with OAuth
-
Configuring Confluence Connector for the On-Premise version of Confluence with Basic Authentication
-
Configuring Confluence Connector for Confluence in Atlassian Cloud
Install and Deploy the Confluence Add-On
The Confluence connector uses a Confluence add-on to help gather the data that is necessary for crawling. This add-on is provided by BA Insight as part of the installation package.
- Log in to Confluence as a System Administrator.
- Click the sprocket icon and select Add-ons.
- Click the Upload Add-on button.

- Upload the BAInsightAddIn.jar file that is provided with the Confluence Connector zip file. This file is deployed by the installer to the Addin subfolder of installation target A Target is a "pointer" to a specific instance of a search application, such as Elasticsearch.
- (A Search application instance has one or more indexes) location.
- Click Logging and Profiling from the left side menu.
- Class/Package Name: Type BAInsightConnector in this field.
- Add entry: Click the Add entry button.
Note: Steps 5 through 7 are required because the add-on writes messages to the Confluence log file.
Selecting the Appropriate Sub-Connector
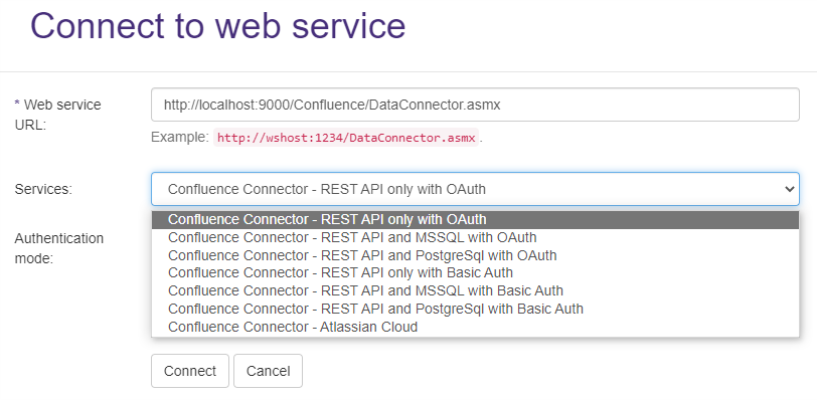
When the connection Connection defines the how Connectivity Hub connects to your Source System (which contains your documents, graphics, etc.,). Your Connection includes identifying elements such as: URL of the BA Insight web service connector you are using, (File Share connector, SharePoint Online connector, etc.), Authentication mode, User Accounts and Credentials, Database information (for database connectors) is created, a sub-connector must be selected. If Confluence is running in Atlassian cloud, then there is one option only. The sub-connector must be selected using the following considerations:
- The connector can use the REST API only to get content from Confluence, but it has some limitations (see the limitations section in About the Confluence Connectors). To avoid those limitations, direct database access configuration is needed according to the database type used by Confluence.
Configuring the Confluence Connector for the Data Center version of Confluence with OAuth
Install and Deploy the Confluence Add-On
The Confluence connector uses a Confluence add-on to help gather the data that is necessary for crawling. This add-on is provided by BA Insight as part of the installation package.
- Log in to Confluence as a System Administrator.
- Click the sprocket icon and select Add-ons.
- Click the Upload Add-on button.

- Upload the BAInsightAddIn.jar file that is provided with the Confluence Connector zip file. This file is deployed by the installer to the Addin subfolder of installation target location.
- Click Logging and Profiling from the left side menu.
- Class/Package Name: Type BAInsightConnector in this field.
- Add entry: Click the Add entry button.
Note: Steps 5 through 7 are required because the add-on writes messages to the Confluence log file.
Generate the Authorization Token
Before generating the authorization token, verify the following:
In Connectivity Hub, navigate to the Connection settings. If the Crawl content as anonymous setting is set, then no authorization is needed and this section can be skipped. For more information, see How to Deploy the Confluence Connector.
To create an authorization token that enables the Confluence Connector to access Confluence while crawling, follow these steps:
- On the server where the Connector is installed, navigate to:
https://<host>:<port number>/OAuth Specifies a process for resource owners to authorize third-party access to their server resources without providing credentials..aspx- <host>: This is the FQDN, Host name, or IP of the server where the Connector is installed.
- <port number>: This is the port number that you selected during the Connector installation (by default, 2401).The connector must have a https binding for the authorization to work.
- Follow the instructions in the configuration page opened in previous step.
- Read the notes carefully, because the Confluence user interface is not straightforward.
-
Follow the on-screen prompts to log in using the credentials of the crawling user account (see Confluence Connector Prerequisites).
Create and Register the Application Link in Confluence
- From within Confluence, click the sprocket icon in the top left corner and select the General configuration page:
- from the left-side navigation, under ADMINISTRATION, select Application Links.
- Enter a name for your application link and click the Create new link button.
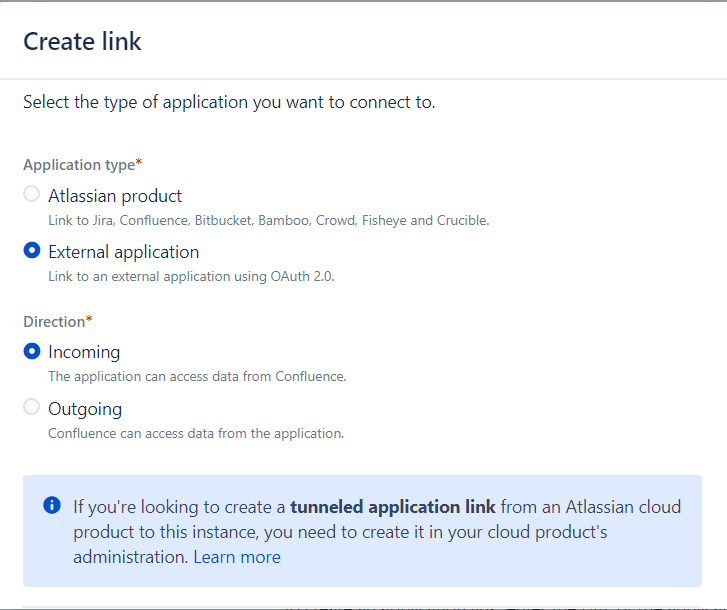
- On the Create link page, specify the following
- Set the Application type to External application.
- Set the Direction to Incoming.
- Click Continue.
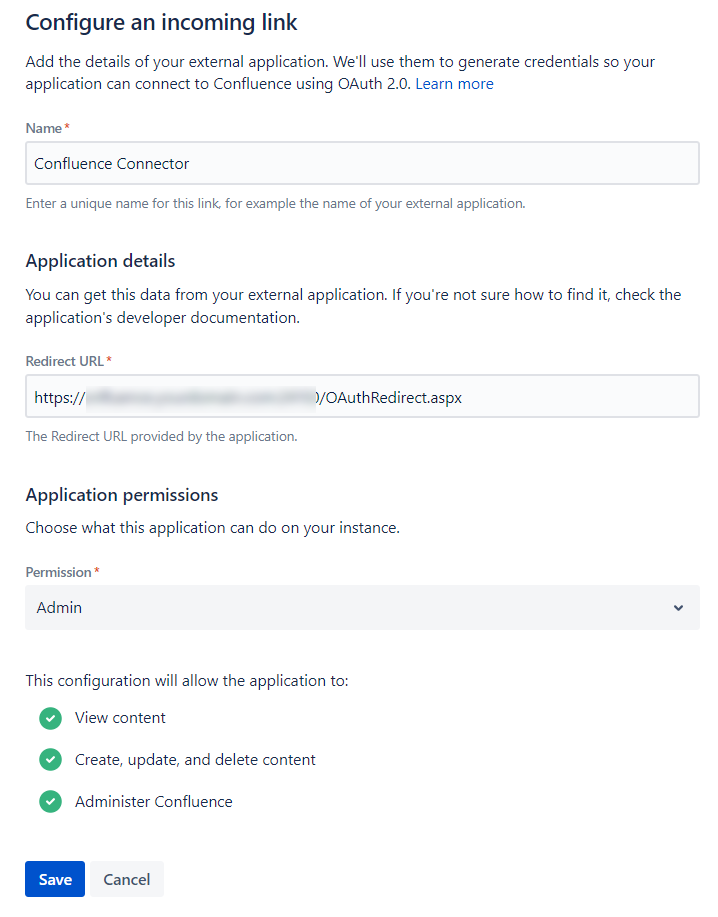
- On the Configure an incoming link page, enter a name for you application link.
- In the Redirect URL field, enter https://<host>:<port number>/OAuthRedirect.aspx. The <host> and <port number> values must exactly match the values that were set for the Confluence connector https binding.
- From the Permission drop-down list, select Admin.
- Click Save.
- The Application link is now created. Make sure that you store the Client Id and Client Secret to be used in the next steps.
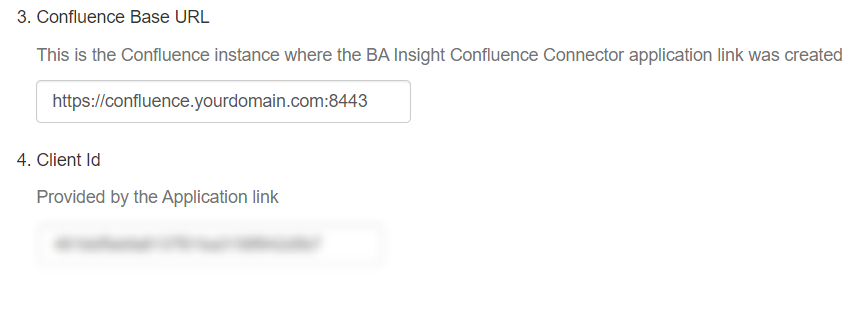
- Continue with the instructions provided in Confluence, which includes entering your Confluence base URL, including port. Ensure you are using the https protocol.
- Click Next.
- Read the instructions that appear and click the URL link shown on the screen. LEAVE THIS TAB OPEN. Do not click Next or fill out the next fields yet.

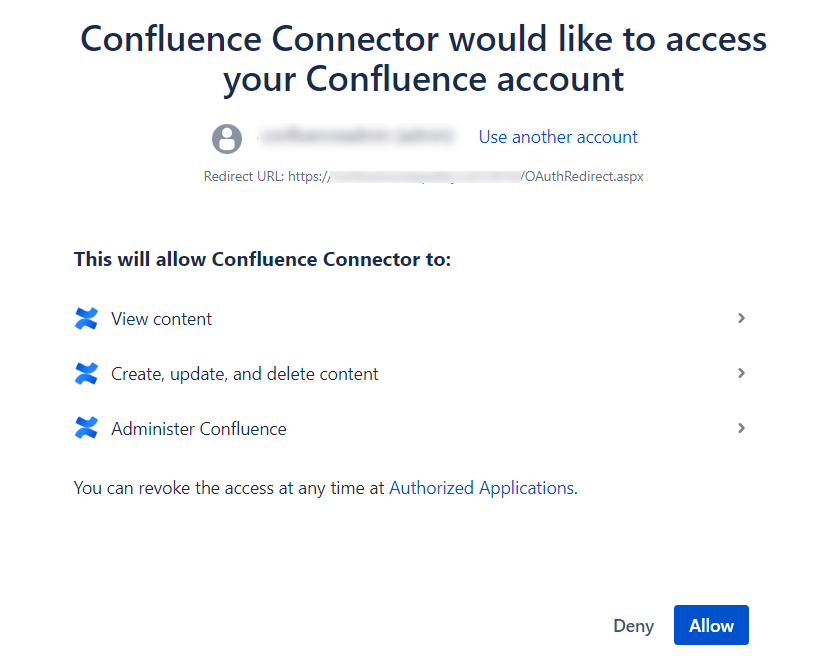
- A new tab opens where you must log in with an account that has admin permissions.
- Click Allow to give the connector app access to confluence.
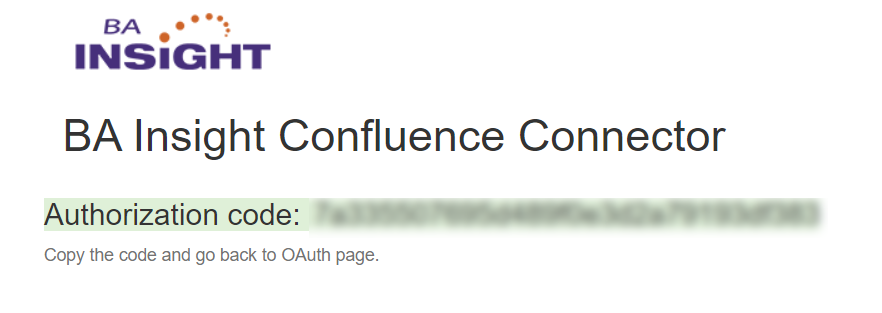
- You will be redirected to OAuthRedirect.aspx that contains the Authorization code. Copy the authorization code and close this tab.
- Go back to the BA Insight Confluence Connector tab and paste the authorization code and client secret that you noted in step 11.
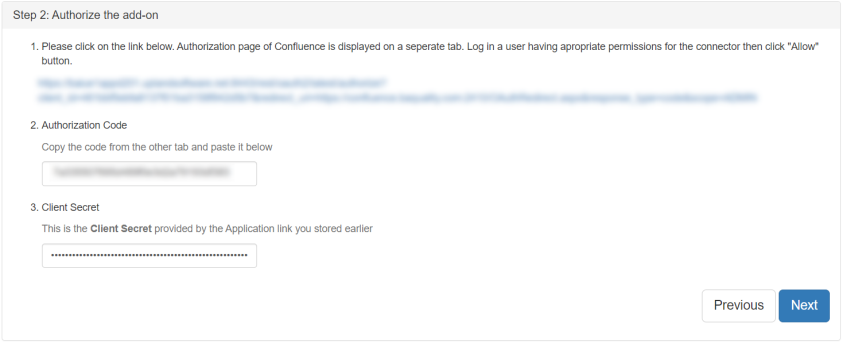
- Click Next.
- A confirmation message should be displayed. The authorization is now completed.

- Open Connectivity Hub in a local browser. If you are using the server Connectivity Hub is installed on, the address is https://localhost:port. (55001 is the default local port).
- Navigate to the Connections page.
- Edit your Confluence connector.
- If you do not have a Confluence connector, create one by a creating a new Web Service connection.
- Read and enter values (or check) for all available fields:
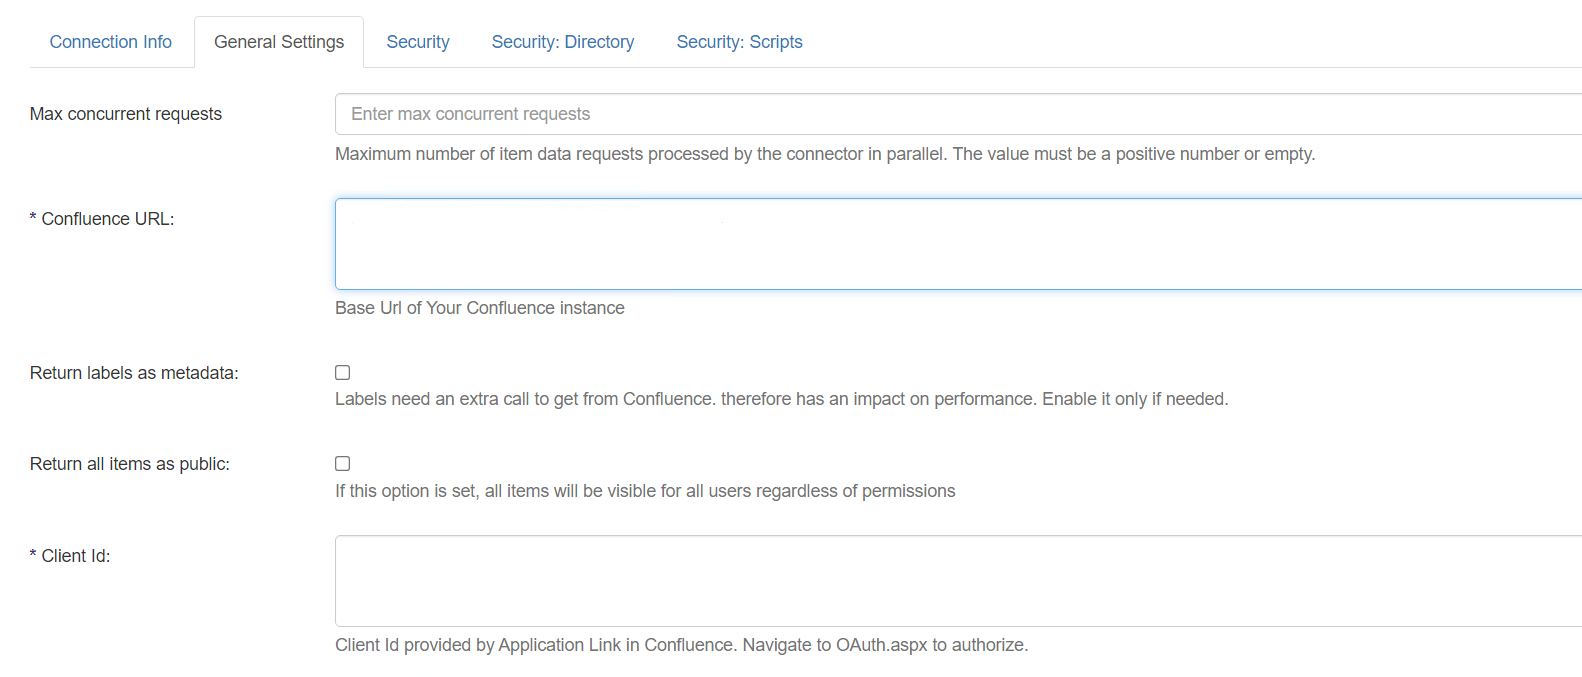
- Click the Save button at the top of the page.
- Navigate to Content Sources.
- Select New > Web service content using the drop-down menu.
- The Wizard appears.
- Follow the wizard to configure your Connection and Target.
Configuring Confluence Connector for the Data Center version of Confluence with Basic Authentication
- Open Connectivity Hub in a local browser. If you are using the server Connectivity Hub is installed on, the address is https://localhost:port. (55001 is the default local port).
- Navigate to the Connections page.
- Edit your Confluence connector.
- If you do not have a Confluence connector, create one by a creating a new Web Service connection.
- Read and enter values (or check) for all available fields:
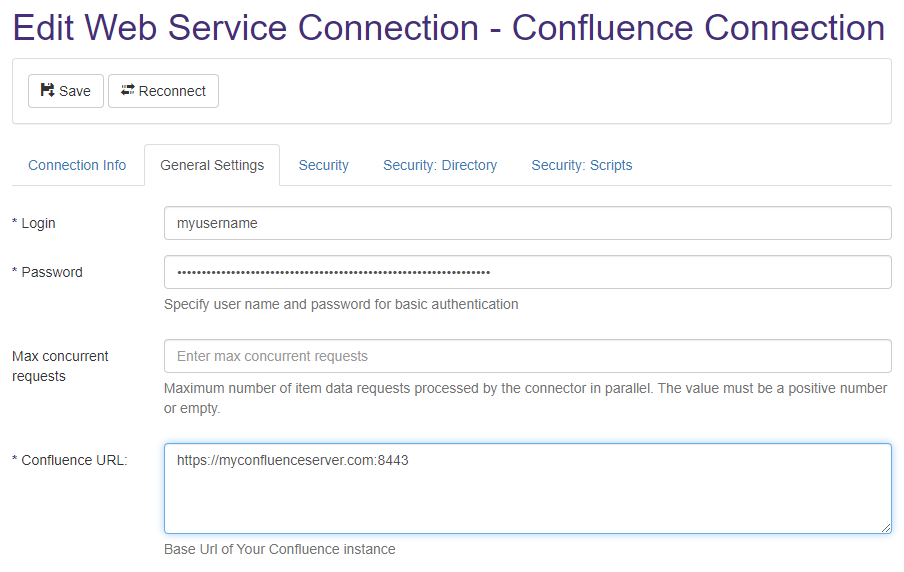
- Select the Security tab.
- If you have configured another Connector and wish to use the same security mapping, Select the existing connection that will serve as the master for this connection from the Master Security Connection drop-down list.

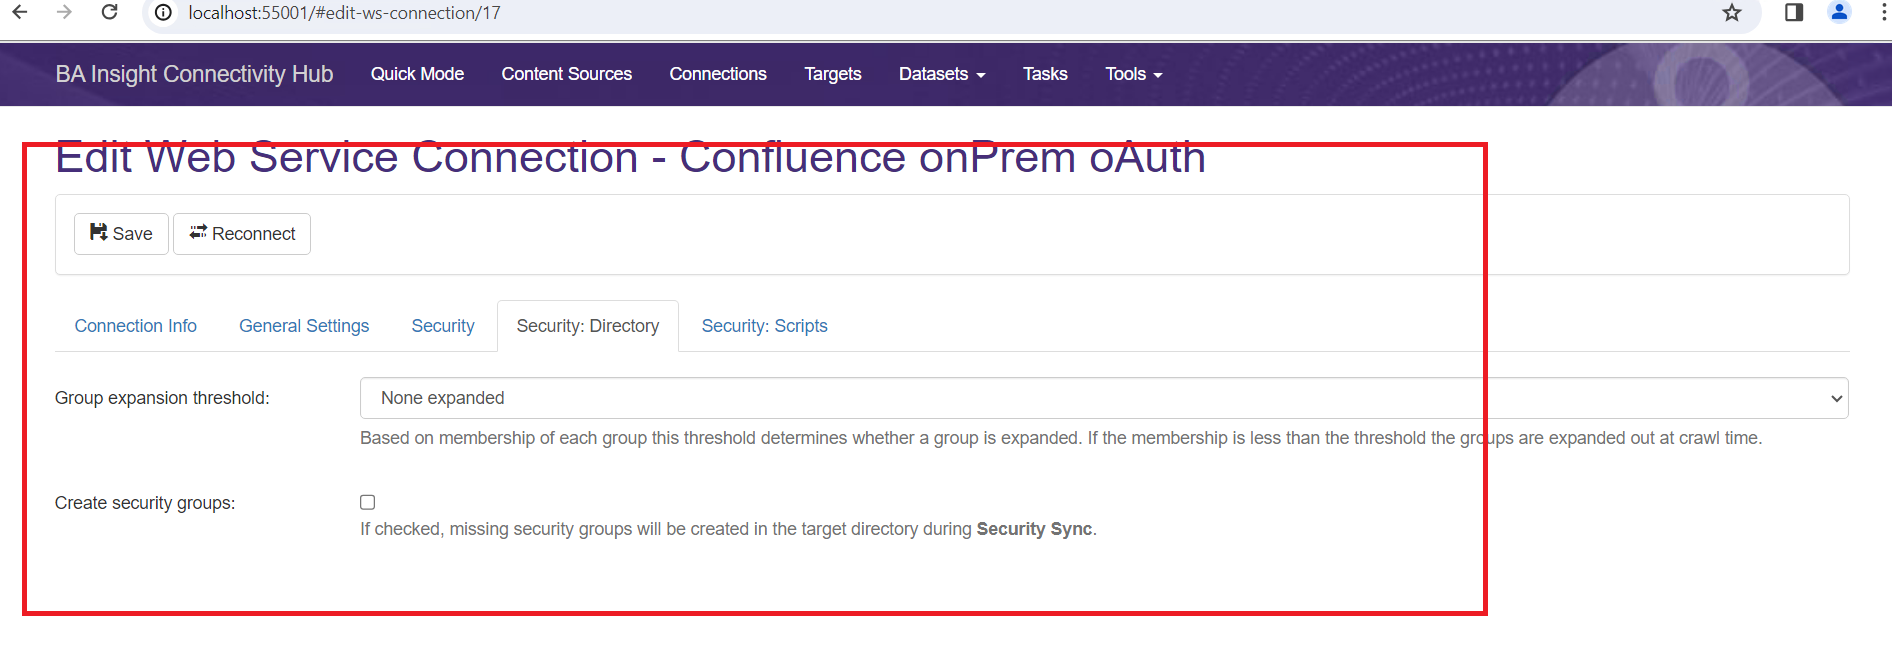
- Select the Security: Directory tab.
- In the Group expansion threshold field, you can specify the threshold to determine if a group is expanded. At crawl time, users in expanded groups are added to the item ACL as individuals.
- In the Create security groups field, enable the checkbox to create missing security groups in the target directory during a security sync Loads User and Group tables and executes the mapping based on the connector configuration..
- Click the Save button at the top of the page.
- Navigate to Content Sources.
- Select New > Web service content using the drop-down menu.
- The Wizard appears.
- Follow the wizard to configure your Connection and Target.
Configuring Confluence Connector for Confluence in Atlassian Cloud
The Confluence Cloud connector uses the REST API which has the following limitations:
- The Confluence Cloud connector does not enumerate all content from a space where the admin user doesn't have access.
Create an API token
The connector needs an API token to authenticate to the Atlassian cloud.
A Token can be generated using the following steps:
- Log in to https://id.atlassian.com/manage/api-tokens as an administrator.
- Click Create API token.
- From the dialog that appears, enter a memorable and concise label for your token and click Create.
- Click Copy to clipboard and save it somewhere for later use in the connection settings.
Create Connection
- Open Connectivity Hub in a local browser. If you are using the server Connectivity Hub is installed on, the address is https://localhost:port. (55001 is the default local port).
- Navigate to the Connectionspage.
- Edit your connection settings.
- If you do not have a Confluence connection, create a connection by a creating a new Web Service connection.
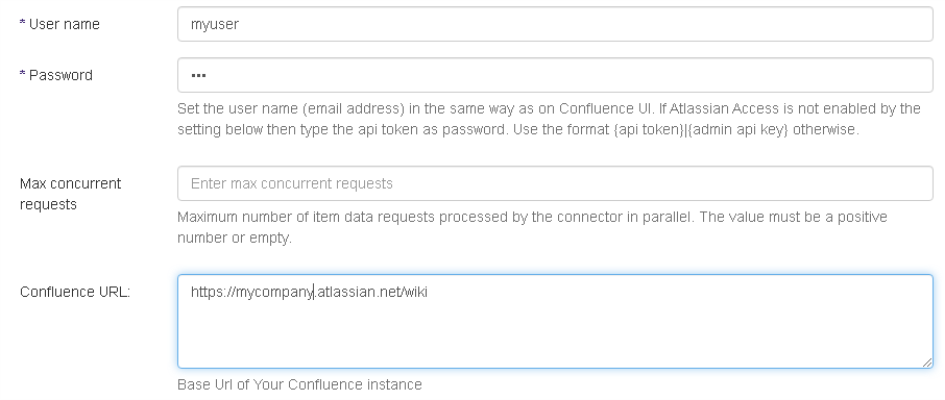
- Enter values (or check) into all available fields.
- User name:
- Login name of the administrator who generated the API token.
- Password:
- API token based to the checkbox at the end.
- Token and key can be generated as described in previous sections.
- Confluence URL:
- Use this URL in Web browsers to reach the Confluence UI.
- Use this URL in Web browsers to reach the Confluence UI.
- User name:
- Click the Save button at the top of the page.
- Navigate to Content Sources.
- Select New > Web service content using the drop-down menu.
- The Wizard appears.
- Follow the wizard to configure your Connection and Target.
