How to Upgrade Smart Previews for SmartHub
Prerequisite Operations
Before you run an upgrade operation for Smart Previews, perform the actions described below.
Database Backup
In a production environment, back up any production Smart Previews databases before continuing.
Collect Required Information
-
To save time, gather the following information to use during the upgrade procedures below.
-
Most of this information can be found from the web admin console. See below.
Transfer Folder
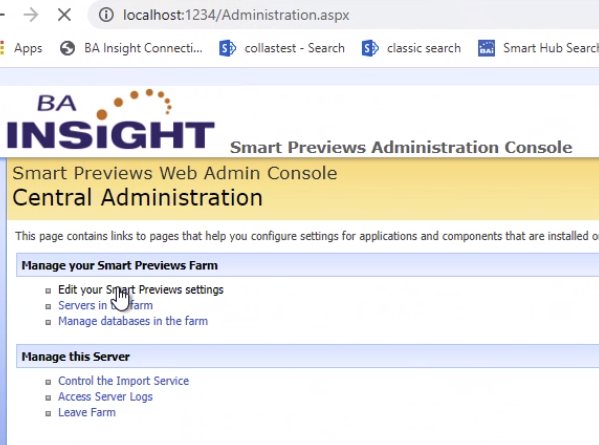
- On your Smart Previews Settings page:
- Record the path of your current transfer folder.
- Note the example below:
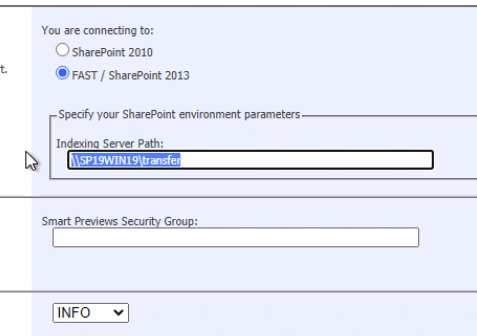
- Record the path of your current transfer folder.
Collection Database String
- Under Manage databases in the farm:Record the "Configuration database" string.

Smart Previews Windows Services
- In the Windows Services console, note the accounts listed for either:
- Smart Previews Indexing Monitoring Service
- Smart Previews Preview Generation Service

PreviewDataRepository Value
- Navigate to the directory <SmartPreviews_Install_root>/Previews Components/Previews CEWS/.
- Open the file CewsWindows.exe.config and note the "PreviewDataRepository" value:

Configure Environment Variables
If you are upgrading from Smart Previews v3.1 or older, note the changes to the way passwords are encrypted.
-
Review the section Environment Variables for more details.
Upgrade the Import Server
Uninstall the Import Server
- Navigate to the Services page on your server.
- Stop the following Smart Previews Services:
- Smart Previews Indexing Monitoring Service
- Smart Previews Preview Generation Service
- Control Panel > Programs > Uninstall a program and uninstall Smart Previews Import Server.
Install the Import Server
- Open a Command Prompt as an administrator and run the following command:
msiexec /i "path\ImportServer.msi" - Follow the instructions in the installation wizard.
- During the installation, the following information is required:
|
Parameter |
Description |
|---|---|
|
<Install Directory> |
|
|
<Service Account> |
The Import Server service account runs as this user.
|
Configure the Databases
Note: If a database upgrade is required, you are prompted to upgrade the database.
-
Proceed to upgrade before continuing.
- Go to Smart Previews Web Admin Console site from IIS Manager and select Connect to existing Configuration Database.

-
Provide the Database Server Name and the Database Name.

Note: If it is required, upgrade the database.
Upgrade the Fast Proxy Service
Uninstall the Fast Proxy Service
- Navigate to the Services page on your server. Stop the Smart Previews Fast Proxy service.
- Navigate to the Previews Components folder.
- Open the FAST Proxy folder.
- Right-click the
unregisterproxy.batfile and select "Run as administrator" from the sub-menu that opens.
Install the Fast Proxy
- Navigate to where your Smart Previews upgrade package is and extract the contents of Previews Components.zip.
- Navigate to the Fast Proxy folder from Previews Components.
- Edit the file
BA_insight.FastProxyService.exe.config. - Locate the applicationSettings\BAInsight.FastProxyService.Properties.Settings\ConfigurationDbConnectionStringsection and add the:
- Data Source: Add the server name as the value.
- Initial Catalog: Add the Configuration Database name as the value.
- Locate the applicationSettings\BAInsight.FastProxyService.Properties.Settings\FastIncomingFolder and replace
%LocalLow%with the path of the BA-Insight Fast Proxy Incoming folder. - Run registerproxy.bat as an administrator. During the installation, an admin account is required.
- The user name must be filled in using the following format: Domain Name\User Name. You must also specify a password for this user.
- Start the service.
Upgrade the Previews CEWS Service
Uninstall the Previews CEWS service
- Navigate to the Services page on your server.
- Stop the Smart Previews CEWS service.
- Navigate to the Previews Components directory.
- Open the Previews CEWS folder.
- Right-click the
unregistercews.batfile and run as administrator.
Install the Previews CEWS service
- Navigate to the Previews CEWSfolder from Previews Components.
- Edit the file CewsWindows.exe.config.
- Locate the system.serviceModel\services\service\host\baseAddressesand add or replace the server name (servername).
- Locate the applicationSettings\BAInsight.LongitudeCews.Properties.Settings\PreviewDataRepositoryand replace
%LocalLow%with the path of the BA-Insight Fast Proxy Incoming folder. - Run registercews.bat as an administrator.
- During the installation, an admin account is required.
- The user name must be filled in using the following format: Domain Name\User Name.
- You must also specify a password for this user.
- Start the service.
Upgrade Smart Previews Hybrid
Uninstall Smart Previews Hybrid .msi
- Go to the Control Panel > Programs > Uninstall a program.
- Right-click BA Insight Smart Previews Hybrid and select Uninstall.
Install Smart Previews Hybrid .msi
Open a command prompt as an administrator and run the following command:
msiexec /i "path\ SmartPreviewsHybrid.msi"
During the installation, the following information is required:
|
Field |
Description |
|---|---|
|
<InstallDir> |
Specify the path where the Smart Previews site will be installed.
|
|
<Port> |
|
|
<Certificate FriendlyName> |
|
|
<ServiceAccount> |
|
Configure Smart Previews Hybrid
Web.config file settings migration
DO NOT reuse your old web.config file when doing a product update or upgrade. The new web.config file contains new information.
Existing web.config settings can be preserved by using the following steps:
- Open your existing web.config file
- Open the new web.config file
- In your existing web.config file, copy your (modified from original) settings.
- Overwrite the new settings with the old in the new web.config file. Ensure new sections and content is not overwritten unnecessarily.
- Navigate to the Smart Previews Hybrid web site folder.
- Edit the web.config file.
- Locate the section appSettings\CloudServiceAddress.
- Replace the sample server address with your Smart Previews Web Resources URL, including the port number.
- You must include the path …./Services/PreviewProxyService.svc in your edited URL.
Example:
Default: https://previewapp.bainsight.com/Services/PreviewProxyService.svc
After editing: https://webresources:4321/Services/PreviewProxyService.svc
- Navigate to the Configuration page for Smart Previews Hybrid site: https://[SmartPreviewsAddress]/Pages/Configure.aspx
- Complete the fields on the page with the information from the following table:
|
Field |
Description |
|---|---|
|
<Certificate Friendly Name> |
Note: Since the request and responses must be encrypted and decrypted with the same certificate, make sure that you specify the same certificate in the Smart Previews Web Resources Configuration page.
For information on how to generate a self-signed certificate, go to How to Create a Self-Signed Certificate. |
|
<Database Connection String> |
This is the connection string for the Smart Previews Configuration database.
|
|
<Preview Generation Service Address> |
Specify the Previews Generation Service Address.
|
|
<Fetchers> |
Required only if you are generating Previews using Connector Framework or the Cloud SSA.
|
Upgrade Smart Previews’ Web Resources
Update the Resources
- Navigate to IIS Manager.
- Expand Sites.
- Right-click the BAInsight SmartPreviews site and click Explore.
- Replace the content of this folder with the content of the unzipped SmartPreviewsFrontEnd-*.zip file.
Configure Smart Previews Web Resources Site
By default, Smart Previews Hybrid is configured to use Redis as a caching store for increased performance.
If you do not have access to a Redis cache connection, follow these steps to replace this cache with an in-memory cache:
- Open the web.config file.
- Locate the unity\containers\container\types\type section.
- Change the mapping to:
SmartPreviewAppWeb.Caching.InMemoryStore, BAInsight.SmartPreviewsHybrid.Cloud
- Change the mapping to:
- Change the
map toparameter as follows:
From: “SmartPreviewAppWeb.Caching.RedisStore, BAInsight.SmartPreviewsHybrid.Cloud”
To: “SmartPreviewAppWeb.Caching.InMemoryStore, BAInsight.SmartPreviewsHybrid.Cloud”
- Smart Previews Web Resources site must be configured to reference the SmartHub URL that is accessible from the server where the Smart Previews Web Resources are being installed.
- Open the web.config file.
- Locate the appsettings\SmartHubAddress section and change the address to match your SmartHub URL using this format: https://contoso.com
- Locate the appsettings\SetupModesection and change the value to SmartHub.
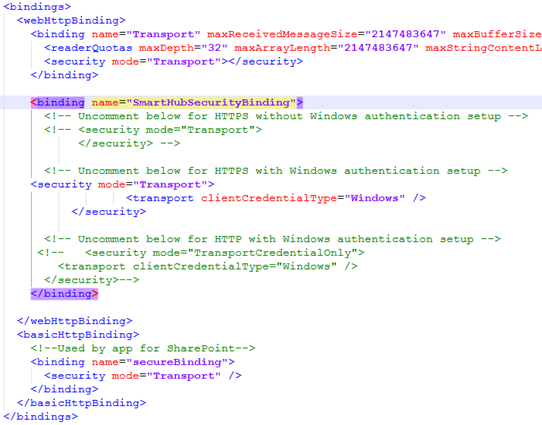
- Locate the system.serviceModel\bindings\webHttpBinding section and change the SmartHubSecurityBinding by uncommenting the SmartHub security section and commenting the other two sections.
- Navigate to the Configure page for Smart Previews Web Resources: https://[SmartPreviewsWebResourcesAddress]/Pages/Configure.aspx
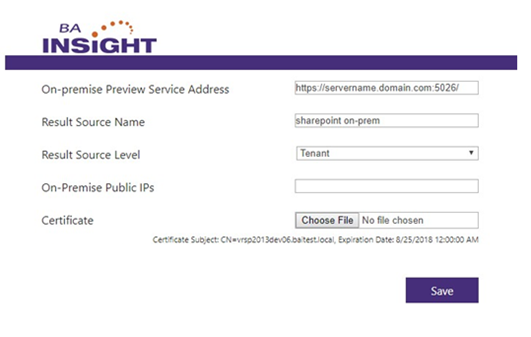
Enter the information that is required to establish the connection with the SharePoint 2013/2016/19 component:
- On-premise Preview Service Address: Enter the Smart Previews Hybrid site address followed by the port where the Smart Previews Hybrid site is running.
- Result Source Name: Enter the local SharePoint results source name, which you created to return local results.
- The result source name is required to execute valid queries in order to confirm the rights of the current user who is requesting the Preview.
- The default value is Local SharePoint Results.
- Result Source Level: Specify, or leave the default value "Tenant".
- Certificate: Upload the .CER file.
Upgrade the Enrichment Component
Note: If Previews are generated with the SharePoint 2013/16/19 perform this step, else skip it.
Open a SharePoint Management Shell as administrator and run the following:
$endpoint = "http://servername:1237/ContentProcessingService"   $ssa = Get-SPEnterpriseSearchServiceApplication –Identity $ssaName - wa silentlycontinue
   $config = New-SPEnterpriseSearchContentEnrichmentConfiguration
   $config.Endpoint = $endpoint
   $config.DebugMode = $true
   $config.Timeout = 30000
   $config.InputProperties
 = "IsDocument", "body", "Author", "Filename",
"FileType","MimeType","FileExtension","OriginalPath",
"url","ContentType","contentclass","LastModifiedTime","Size",
"escbasecrawlurl"   $config.SendRawData = $True
   $config.MaxRawDataSize = 71680
   $config.FailureMode = "Warning"   Set-SPEnterpriseSearchContentEnrichmentConfiguration –SearchApplication $ssa –ContentEnrichmentConfiguration $config
For Users Upgrading Connectivity Hub
If upgrading Connectivity Hub from version 2.0 to 2.1 or later, run the following script against your Smart Previews database before the upgrade to keep previews and content indexed synchronized.The script can be found in the following Connectivity Hub installation directory:
- <ConnectivityHubInstallDir>\DatabaseCreationScript\UpdateSmartPreviewsDatabases.sql
Before running the script, replace the following tokens:
- #SmartPreviews_Configuration_DB#
- Put confiugration database name here.
- #SmartPreviews_PreviewCache_DB#
- Put preview cache database name here.
- If your installation of Smart Previews uses multiple preview cache databases, run the script for each preview cache database separately.
- #SmartPreviews_UserProfile_DB#
- Put user profiles database name here.
The script below is provided for reference.
Run the script which is deployed by Connectivity Hub installer.
DECLARE @batchSize int = 1000;

DECLARE @ids TABLE(Id int);
DECLARE @lastId int = 0;

USE #SmartPreviews_Configuration_DB# -- Put Configuration database name here.

PRINT 'Updating [ProcessedDocuments] table.'
WHILE @lastId = 0 OR EXISTS(SELECT 1 FROM @ids)
BEGIN
    DELETE FROM @ids;
    INSERT INTO @ids
        SELECT TOP(@batchSize) ProcessedDocumentId
        FROM ProcessedDocuments
        WHERE DocumentUri LIKE 'spworks://%' AND ProcessedDocumentId > @lastId
        ORDER BY ProcessedDocumentId;

    SELECT @lastId = MAX(Id) FROM @ids;

    UPDATE ProcessedDocuments
        SET DocumentUri = REPLACE(REPLACE(REPLACE(REPLACE(DocumentUri, '&id=&', '&'), '&subid=&', '&'), '&fid=&', '&'), '&fsubid=&', '&'),
            UriHash = CONVERT(binary(16), HASHBYTES('MD5', REPLACE(REPLACE(REPLACE(REPLACE(DocumentUri, '&id=&', '&'), '&subid=&', '&'), '&fid=&', '&'), '&fsubid=&', '&')))
        WHERE ProcessedDocumentId IN (SELECT Id FROM @ids);
END

USE #SmartPreviews_PreviewCache_DB# -- Put PreviewCache database name here.

PRINT 'Updating [DocumentContainer] table.'
SET @lastId = 0;
WHILE @lastId = 0 OR EXISTS(SELECT 1 FROM @ids)
BEGIN
    DELETE FROM @ids;
    INSERT INTO @ids
        SELECT TOP(@batchSize) DocumentContainerId
        FROM DocumentContainer
        WHERE DocumentUri LIKE 'spworks://%' AND DocumentContainerId > @lastId
        ORDER BY DocumentContainerId;

    SELECT @lastId = MAX(Id) FROM @ids;

    UPDATE DocumentContainer
        SET DocumentUri = REPLACE(REPLACE(REPLACE(REPLACE(DocumentUri, '&id=&', '&'), '&subid=&', '&'), '&fid=&', '&'), '&fsubid=&', '&')
        WHERE DocumentContainerId IN (SELECT Id FROM @ids);
END

USE #SmartPreviews_UserProfile_DB# -- Put UserProfiles database name.

PRINT 'Updating [ResearchNotebooks] table.'
SET @lastId = 0;
WHILE @lastId = 0 OR EXISTS(SELECT 1 FROM @ids)
BEGIN
    DELETE FROM @ids;
    INSERT INTO @ids
        SELECT TOP(@batchSize) ProcessedDocumentId
        FROM ResearchNotebooks
        WHERE DocumentUri LIKE 'spworks://%' AND ProcessedDocumentId > @lastId
        ORDER BY ProcessedDocumentId;

    SELECT @lastId = MAX(Id) FROM @ids;

    UPDATE ResearchNotebooks
        SET DocumentUri = REPLACE(REPLACE(REPLACE(REPLACE(DocumentUri, '&id=&', '&'), '&subid=&', '&'), '&fid=&', '&'), '&fsubid=&', '&')
        WHERE ProcessedDocumentId IN (SELECT Id FROM @ids);
END

PRINT 'Crawl URLs have been updated.'
Validate Your Upgrade
Go to your search center and run a query to see the documents that have kept the generated previews.
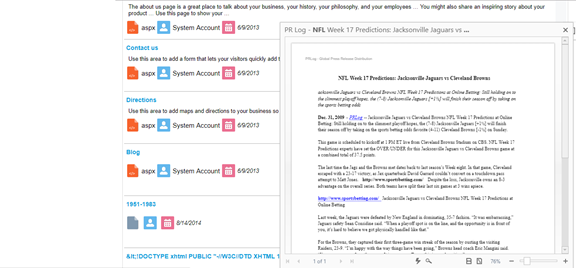
Verify your previews.
