How to Upgrade Connectivity Hub
To upgrade your version of Connectivity Hub, use the topics below.
Environments using SmartHub and ConnectivityHub
To upgrade your version of Connectivity Hub, use the topics below.
For environments using both BA Insight Connectivity Hub and SmartHub, there may be reduced functionality when using Elasticsearch targets.
See the table below for compatibility:
| Elasticsearch Target | Connectivity Hub v3.x and later | Connectivity Hub v2.2 |
|---|---|---|
| SmartHub v6.0 | Full functionality out-of-the-box |
Configuration required: set the For details, see "Elasticsearch backend configuration" in the SmartHub documentation. |
| SmartHub v5.5+ |
Configuration required: set the For details, see "Elasticsearch backend configuration" in the SmartHub documentation. |
Full functionality out-of-the-box |
Azure Target, Kendra Target, Solr Target, and MS Search Target offer full functionality out-of-the-box for any combination of Connectivity Hub v2.2 and v3 with SmartHub v5.5 and v6.
Before Upgrading
Note the following before you upgrade you version of Connectivity Hub:
-
In Connectivity Hub 4.0, the default authentication mechanism was changed from Windows Authentication to Basic Authentication. When upgrading to Connectivity 4.0, you must enable the Basic Authentication role service. See the prerequisites for more information.
-
As of Connectivity Hub 4.0, a single Quartz scheduler will handle all of your crawl jobs for your entire Connectivity Hub farm. To ensure a successful upgrade of your crawl jobs from Connectivity Hub 3.0 to Connectivity Hub 4.0, you must do the following:
-
Ensure that you have completed all existing crawl jobs.
-
Ensure that you do not have any crawl jobs paused in Connectivity Hub 3.0 before upgrading.
-
Resume all of the job schedules that you completed pre-upgrade.
-
Upgrading your Environment
Upgrading Connectivity Hub is done by uninstalling and reinstalling the Connectivity Hub runtime files and reconnecting to the Connectivity Hub database.
Capture Environment-specific Settings
-
Database Settings:
-
These settings can be found within the Connectivity Hub UI.
-
Click the Tools link (from the top navigation bar) > Configuration > Configuration Database tab.
-
Close the browser.
-
-
-
App Pool Account:
On the server that hosts Connectivity Hub:-
Open IIS Manager.
-
Select Application Pools in the Connections pane of the window.
-
Open the Connectivity Hub entry and record all the information that is displayed, including the account shown in the Identity column.
-
-
IIS Port number (ex. 55001)
-
Like App Pool Account above, this can also be found in IIS Manager.
-
Select Connectivity Hub from the list of Sites in the Connections pane.
-
In the Actions pane on the right side, port number is shown under Browse Website.
-
-
Upgrade your Connectivity Hub Runtime
-
Open Connectivity Hub Admin site, go to Configuration Settings and click Leave the Farm.
-
Close your browser.
-
Navigate to your Windows Control Panel.
-
Click Programs > Uninstall a program.
-
Select your current version of Connectivity Hub.
-
Click Uninstall at the top of the page.
-
Before you install Connectivity Hub, ensure the .zip file you downloaded from the BA Insight Customer Portal has been unblocked by right-clicking on the file and clicking the Unblock button. If the button does not appear, the file has already been unblocked. Proceed.
-
Install the new version of Connectivity Hub by double-clicking the MSI installation file (requires an admin user account).
-
Use the same app pool account and IIS port of your previous version of Connectivity Hub.
-
Open Connectivity Hub. This can be done a number of ways.
-
From the Start menu, type "Connectivity Hub Administration" and click the entry when it appears to launch your Connectivity Hub site
-
-
A web browser opens and the Configuration Settings page appears.
-
Complete the fields with the information that you captured in the Capture Environment-specific Settings section.
Due to a vulnerability fix on the SQL Client, the default encryption for SQL Connections has been set to true. This applies to both basic and advanced connection modes. If you do not support encryption in your databases, you must reconfigure your databases to use the advanced connection mode in order to specify Encrypt=false in the connection string, as well as the SQL Connector database and SQL Datasets connectors pages, if needed.
Additionally, if you have any cache databases that were configured in Connectivity Hub 2.0, you must update the connection string to specify Encrypt=false on the Cache Databases tab prior to upgrading to Connectivity Hub 3.0 and later. This is because when Connectivity Hub 3.x or later connects to the configuration database, it must be able to connect to your cache databases to upgrade them. -
Click the Connect button to connect your new Connectivity Hub instance to your existing database.
Post-upgrade Configuration Settings
Update Your Secrets
If you are upgrading from Connectivity Hub v2.1, follow the instructions in the topic Filters. You are required to retype your secrets for:
-
Connections
-
Database setup
-
Target directory
-
Target and Content Sources
Adjust your authentication method
In Connectivity Hub 4.0, support was added for the Azure Application Gateway V2 load balancer. This load balancer does not support NTLM authentication, which was the default mechanism for Connectivity Hub 3.x and earlier. As a result, the default authentication mechanism when you install Connectivity Hub has been changed from Windows Authentication to Basic Authentication.
If you don't want to use a load balancer for Multi-Server Configuration, and you want to use Windows authentication, you must perform the following steps:
-
Open IIS and click on your Connectivity Hub website.
-
In the middle panel, click Authentication.
-
In the Authentication list, do the following:
-
Click Windows Authentication, then select Enable from the Actions panel.
-
Click Basic Authentication, then select Disable from the Actions panel.
-
Edit your registry settings path for custom settings
If you are upgrading from Connectivity Hub 3.x or earlier and you have specified timeout values in your crawls, you must edit the registry settings path for Connectivity Hub:
-
In Windows, navigate to the Registry Editor.
-
After installing Connectivity Hub 4.0, navigate to the HKEY_LOCAL_MACHINE\SOFTWARE\Upland BA Insight\Connectivity Hub folder.
-
Copy all of your custom registry settings, such as ConnectorServiceJobsTimeout and ConnectorServiceTimeout, from the HKEY_LOCAL_MACHINE\SOFTWARE\BA Insight\Connectivity Hub folder to the HKEY_LOCAL_MACHINE\SOFTWARE\Upland BA Insight\Connectivity Hub folder.
Elasticsearch Index Updates
Compatibility with Elasticsearch
There are new features in Connectivity Hub v3.x and later that enable built-in text extraction for documents.
-
Previous versions of Connectivity Hub relied on the Ingest Attachments elastic plugin to process the full-text extraction of documents.
-
With this new functionality the Ingest Attachments plugin is no longer required.
New requirements include:
-
Changes to the existing elastic indexes (details below in this section)
-
Changes to the metadata settings for the content sources (details in the next section "Update your Configuration Settings to Leverage the New Embedded Text Extraction Capability")
Update Existing Elastic Indexes
Two changes must be made to your existing elastic indexes.
-
The new Connectivity Hub embedded text extraction writes the full text of the document into the
escbase_fulltextcontentproperty.-
This is the same property used previously for any metadata marked Full Text Index in your content source metadata configuration.
-
To maintain the searchability of your content, update the indexes:
-
Merge the previously used
FileContentvalue with theescbase_fulltextcontent.This is done using either: -
PowerShell script below
-
Kibana, or any tool you are comfortable using to make such a request
-
-
-
Once complete, the index then identifies the Connectivity Hub version.
-
This can be done with the below PowerShell script, or through Kibana, or any tool you are comfortable using to make such a request.
-
PowerShell Script
Below is a sample script using PowerShell to make both changes.
Modify to fit your environment and run the script against each index.
-
Both the Elastic URL and index name must be set in the first two lines, accordingly.
$elasticurl = 'http://localhost:9200'
$indexname = 'myindex'
# update each record to merge FileContent data into escbase_fulltextcontent, then remove FileContent
Invoke-WebRequest $elasticurl'/'$indexname'/_update_by_query' -Method 'POST' -ContentType 'application/json' -Body '{"script":{  "source": "ctx._source.escbase_fulltextcontent += ctx._source.FileContent.content;ctx._source.remove(\"FileContent\");",  "lang": "painless"},"query":{   "exists": { "field": "FileContent" }} }'
# update the mapping to identify the version of ConnectivityHub
Invoke-WebRequest $elasticurl'/'$indexname'/_mapping' -Method 'PUT' -ContentType 'application/json' -Body '{ "_meta": { "creator": "BA Insight Connectivity Hub", "version": "4.0" }}'
Update your Configuration Settings to Leverage the New Embedded Text Extraction Capability
Connectivity Hub v3.x and later has an embedded TIKA service that performs the full text extraction for documents.
-
Previous versions of Connectivity Hub utilized external services, such as a CEWS service or the AutoClassifier to perform this task.
-
If you were using an external CEWS service we highly recommended it be removed and replaced with the out-of-the-box test extraction capability of ConnectivityHub.
-
If you are doing something more than text extraction, contact BA Insight Support for assistance in changing the configuration.
Metadata Changes
-
External CEWS services may provide various properties back to Connectivity Hub to be used as the body property - commonly these were mapped to
ESC_body. -
The new embedded text extraction feature will write full text of the document into the escbase_fulltextcontent property.
-
Additional properties from the Embedded Text Extraction are available.
Content Source Changes
-
If using CEWS for only text extraction:
-
Remove the CEWS configuration from your content sources; it is no longer needed.
-
-
If using AutoClassifier with Tika and other stages for text extraction:
-
Disable or remove the TIKA stage.
-
In the Content Source configuration >> CEWS settings, remove the property configured for the item body. It is no longer needed.
-
-
Note: If you are using TIKA to extract more than just the content body, or are doing any kind of manipulation on the body after TIKA stage, contact BA Insight Support.
There are additional configurations that may be needed.
Index Changes
Expect the following index changes:
-
The document body will be indexed with the
escbase_fulltextcontentproperty.-
If you previously used a different property, such as
esc_body,it will be empty for any future crawled items. -
Items previously indexed with Connectivity Hub v2.2 will continue to have values in the
esc_body -
Newly crawled items will not have anything in the
esc_bodyproperty.
-
-
A full crawl is not required, however you will have some content with the full text in
esc_body, and some content with the full text inescbase_fulltextcontentuntil the content is recrawled.-
This should not pose a problem for search results, as each property is searchable.
-
Troubleshooting
If you encounter error(s) after the installation process is complete, use the following information:
Error: No HTTP resource was found that matches the request URI "http://localhost:<port>/api/healthcheck/dbversion"
If you receive this error, do the following:
-
Refresh your web browser page
-
Restart your web browser if refreshing the page had no effect
Error: The selected database is already used for something else. The scripts to connect the Connectivity Hub tables will not run. Create a new database or connect to an existing one with a different name.
If you receive this error, do the following:
-
Perform all of the actions in the bullets listed under the error above.
-
Ensure you have entered the correct database name.
-
Ensure your database server is running, and you are logged in as a user with sufficient privileges.
How to Upgrade AutoClassifier
Upgrade Steps
- Optional: Uninstall BA Insight AutoClassifier SharePoint app from your SharePoint Site collection (this is required only when upgrading from a version that is equal or older than 5.0.2-9146)
- Uninstall AutoClassifier Engine
- Uninstall AutoClassifier Add-in
- Reinstall AutoClassifier Engine
- Reinstall AutoClassifier Add-in
- Optional: Reinstall BA Insight AutoClassifier SharePoint apps
- Optional: Reconfigure your Scheduled Annotation Jobs and Tagging Settings (this is required only when upgrading from a version that is equal or older than 5.0.2-9146)
How to Uninstall AutoClassifier
- Open the Windows Control Panel.
- Under "Programs," select uninstall a program.
- Uninstall "BA Insight AutoClassifier" and "BA Insight AutoClassifier SharePoint Add-in".
- Optional: Use the "Everything" search tool and ensure that after uninstalling AutoClassifier that no DLL files related to AutoClassifier remain on your computer.
After uninstalling AutoClassifier, you must reinstall the applicable AutoClassifier elements. For installation help, follow the instructions in the following topics:
- How to Install the AutoClassifier Engine
- How to Install AutoClassifier for SharePoint Online
- How to Install AutoClassifier for SharePoint 2016/19
- How to Install AutoClassifier for Elasticsearch
SharePoint App Install/Uninstall/Upgrade
Note: If you are upgrading from AutoClassifier version 5.0.2-9146 or earlier, it is mandatory to uninstall and reinstall the Upland BA Insight AutoClassifier SharePoint apps.
You must reconfigure your Scheduled Annotation Jobs and Tagging Settings. See the optional seventh step in the upgrade steps.
When installing or uninstalling the BA Insight AutoClassifier SharePoint apps on multiple sites we recommend that you use the SideLoader tool for greater efficiency.
This tool was designed to install/uninstall an app on multiple sites at the same time.
Prerequisites Before Upgrade
Password Encryption
-
If you are upgrading from version 6.0.1.0-17704 or earlier, read How to Secure Passwords to safeguard passwords using encryption.
-
If you are upgrading from version 6.3.1.0-cd89f9c or earlier and you are using Microsoft Azure Machine Learning for tagging, read upgrade section in MS Azure Machine Learning Prerequisites.
Connectivity Hub compatibility
- BA Insight recommends you save a copy of both Engine and Add-in web configuration files (found in C:\Program Files\BA Insight\BA Insight AutoClassifier).
- Copy the configuration files back into your installation directory after upgrading AutoClassifier.
- Copy the configuration files back into your installation directory after upgrading AutoClassifier.
- Alternatively, use the following method to save the required AutoClassifier information for your specific environment:
- Create a text file (see the graphic below) to store the information required to install the AutoClassifier Engine and Add-in:
- Both Engine and Add-in configuration files are found in the default installation location: C:\Program Files\BA Insight\BA Insight AutoClassifier
- Create a text file (see the graphic below) to store the information required to install the AutoClassifier Engine and Add-in:
-
- User Name / Password
- Client ID
- Client Secret (Applicable only for O365)
- Issuer ID (Applicable only for On-Premise)
- Client Signing Certificate Serial Number (applicable only for On-Premise)
- AutoClassifier Engine Service Url
- Domains for Engine and Add-in (information is found in IIS Server)
- SQL Server connection
2. Copy the AppRepackager configuration file that was used for installation.
3. Proceed to IIS Manager and save the domain host name for the AutoClassifier Engine and Add-in from bindings.
AutoClassifier Database Upgrade
Note the following before upgrading your AutoClassifier database:
-
As of AutoClassifier v6.0, any database settings specified within the MSI are automatically applied upon launching the AutoClassifier Site (in IIS). If the automated process fails due to a permissions issue, timeout, or invalid database settings specified in the MSI, the user is automatically re-directed to the Database Settings page, where they can manually correct the issue and re-apply the settings
-
If you are upgrading to AutoClassifier 6.3.1 or later, you are required to use SQL Server 2019.
-
Due to a vulnerability fix on the SQL Client, the default encryption flag for SQL Connections has been changed to true. When upgrading to AutoClassifier 7.0, you must specify Encrypt=false in your database connection string if you do not support encryption in your database. For example,
Data Source=.;Initial Catalog=AutoClassifier_DB;Integrated Security=True;Encrypt=False. For more information, see Initialize Azure SQL database and configuration. -
If you are upgrading to AutoClassifier 7.0, you must also have Connectivity Hub 4.0 installed.
When accessing the AutoClassifier Engine a check is performed to ensure the installed database is up-to-date. If your installed database version does not match the latest database version you are automatically redirected to the Database Configuration page.
- Click Upgrade to upgrade the database to the latest version.
How to Upgrade SmartHub
Use the following instructions to upgrade BA Insight SmartHub.
Warnings and Special Notices
WARNING! When you upgrade SmartHub, your local SmartHub files are overwritten.
-
You must save or backup your local files to avoid losing any critical data or customizations.
Known limitations when upgrading SmartHub from 6.0.x or earlier to 6.1.0.0 or later
Due to the changes made to support vector search, any Microsoft Azure search engines that are already configured will not work after upgrading SmartHub from 6.0.x to 6.1.0.0 or later, due to the changes needed to support Vector Search. To fix the Microsoft Azure search engines, follow the steps:
-
Create a backup of your FederatorConfiguration.xml file found at <SH_root>\Configuration. This step is only a safety measure in case something goes wrong in the steps below.
-
Navigate to the SmartHub Administration page found at <SH_address>/_admin.
-
Select the General Settings page.
-
Scroll down to the Import/Export Settings section.
-
Click EXPORT SETTINGS.
-
Click IMPORT and select the newly downloaded FederatorConfiguration.xml file. The FederatorConfiguration.xml file must be decrypted.
-
Verify that Microsoft Azure search engine settings are correct and that they contain a new Query Tuning stage named AzureTranslator.
For example, if you use Elasticsearch v8.6, you must also use Kibana v8.6.
Note: The Custom Settings file was also upgraded and it should follow the following format:
-
SH.ModuleName= SH.ModuleName|| {};
-
SH.ModuleName.CustomSettings = {};
-
SH.ModuleName.PathsToExclude = [];
SH.ContentIntelligence = SH.ContentIntelligence || {};
SH.ContentIntelligence.CustomSettings = {};
SH.ContentIntelligence.PathsToExclude = [];
The Plugins module has been changed to follow the same pattern:
-
SH.Plugins = SH.Plugins || {};
-
SH.Plugins.CustomSettings = {};
Note:The following components have their configuration overwritten when you upgrade SmartHub.
Make sure to back up their configuration and manually re-add them after SmartHub is updated.
-
Learn-To-Rank Scheduled Task
-
Any tool under the /Tools folder (Example: Analytics Exporter, TaxonomyPreloader, etc)
Before You Start
Customizations and Backup
- The upgrade process overwrites local files, including files that contain any customizations you may have created.
- Move your customized files to an outside directory and then copy them back into your active SmartHub directory when your SmartHub directory contains the new, v7.x SmartHub files.
- Create a backup of your entire SmartHub installation directory to ensure you can restore your settings and do not loose any important customization information.
- Create a backup of your entire Analytics installation directoryfor the same reason as above.
- Backup any modified native files, such as web.config BEFORE PROCEEDING.
Download New Version of SmartHub
-
Download and unzip the latest release of SmartHub (a single .zip file) from the Right Answers Portal if you have not already done so.
-
Navigate to Upland Community > Knowledge > BA Insight > Product Downloads > SmartHub.
-
Save the file to the server to host SmartHub.
-
Right-click the downloaded .zip file and check the Unblock checkbox.
-
Click OK.
-
Extract the contents of the .zip file.
-
Upgrade Details
The following table displays the SmartHub HTML page structure: v5.x vs. v6.x or later
-
SmartHub v5.x uses a component to declare various SmartHub modules
-
These components are not supported by SmartHub v6.x
-
These components are defined as
<div classes>.-
Example:
<div class="CoveoSearchbox">
-
-
Settings (parameters) for each component are defined, nested, within each <div>
-
-
SmartHub v6.x and later uses a component to declare various SmartHub modules
-
These components are defined as
<div classes>.-
For example,
<div class="sh-search-section">
-
-
Settings (parameters) for each component are defined in the settings (.js) file for each of your SmartHub site's HTML page
-
Example
-
HTML page: Results.html
-
Page Settings: ResultsPageSettings.js
-
Custom Page Settings: ResultsCustomSettings.js
-
-
-
SmartHub Component Comparison table: v5 vs v6
| SmartHub Page | v5.x Component | v6.x Component |
|---|---|---|
|
CoveoResultList | sh-result-list |
| CoveoContentBySearch | sh-content-by-search | |
| CoveoSearchBox | sh-search | |
| CoveoSort | sh-sort | |
| CoveoQuerySummary | sh-query-summary | |
| CoveoPager | sh-pager | |
| CoveoErrorReport | sh-error-report | |
| CoveoSmartPreviews |
|
|
| raw | result | |
| coveo-result-frame | sh-cbs-item | |
| CoveoResultLink | sh-result-link | |
| CoveoActionBar | cbs-action-bar | |
| CoveoFieldValue | sh-field-value |
Upgrade Procedure
Read and satisfy all of the bullets in the topic "Before You Start," above.
Use the following procedure to upgrade your instance of SmartHub:
- Open IIS Manager and click Application Pools from the left navigation pane.
- Select your SmartHub Application Pool, which was setup and named when you first installed SmartHub, and click Stop from the Actions menu on the right side pane.
-
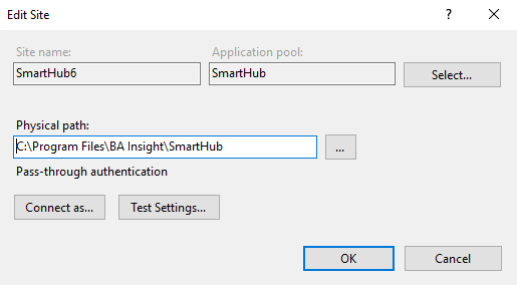
Click Edit Site > Basic Settings to instruct IIS to use the clean SmartHub 6.x unzipped directory path.
- Copy the configuration folder and customization folder into the new SmartHub folder.
- Make sure that your configuration is either decrypted or encrypted using the environment variables. If it is not, use the encryption tool to apply the correct encryption or decrypt the configurations.
-
Open IIS Manager and click Application Pools.
-
Select your SmartHub Application Pool, which was set up and named when you first installed SmartHub, and then click Start from the Actions menu.
-
If your HTML pages use any of the unsupported components you must update them. See the sections below.
-
To test if the upgrade was successful, open a new browser window, enter your SmartHub URL and run a test query.
-
At this point you will see either:
-
Your SmartHub site landing page
-
A blank page
-
-
If you see a blank page an upgrade is required, and you must update the Federator configuration.
-
For more information, see How to Add the Content Containers Module.
-
- For help with any installation errors, contact BA Insight support.
- Proceed to the next section.
Update Federator Configuration
A manual update for the Federator Configuration file (FederatorConfiguration.xml) is required if any of the following tunings are used:
-
PersonalizedQuery
-
SPOnlineRefinerMapper
-
SPOnPremRefinerMapper
The required steps are:
-
Navigate to the configuration folder and open the FederatorConfiguration.xml file in a text editor.
-
Search and replace:
-
Find:
-
<ClassDefinitionName>Personalized Query</ClassDefinitionName>
-
-
Replace with:
-
<ClassDefinitionName>PersonalizedQuery</ClassDefinitionName>
-
-
-
Search and replace:
-
Find:
-
<ClassDefinitionName>SharePoint Online Refiner Mapper</ClassDefinitionName>
-
-
Replace with:
-
<ClassDefinitionName>SPOnlineRefinerMapper</ClassDefinitionName>
-
-
-
Search and replace:
-
Find:
-
<ClassDefinitionName>SharePoint OnPremise Refiner Mapper</ClassDefinitionName>
-
-
Replace with:
-
<ClassDefinitionName>SPOnPremRefinerMapper</ClassDefinitionName>
-
-
-
Search and replace:
-
Find:
-
<ClassDefinitionName>Property Mapper</ClassDefinitionName>
-
-
Replace with:
-
<ClassDefinitionName>PropertyMapper</ClassDefinitionName>
-
-
-
Search for and remove:
-
<ClassDefinition xsi:type="InternalClassDefinition" Name="PubMedBackend" ClassName="BAInsight.PubMedSearch.FederatorExtension.Backends.PubMedBackend" AssemblyName="BAInsight.PubMedSearch.FederatorExtension, Version=1.0.0.0, Culture=neutral, PublicKeyToken=null" />
-
-
Search for and remove:
-
<ClassDefinition xsi:type="InternalClassDefinition" Name="PseudoRandom" ClassName="BAInsight.Longitude.Federator.Runtime.PseudoRandomMixingAlgorithm" AssemblyName="BAInsight.Longitude.Federator.Runtime, Version=1.0.0.0, Culture=neutral, PublicKeyToken=8f7c569a7e8bde81" />
-
-
Search for and remove:
-
<ClassDefinition xsi:type="InternalClassDefinition" Name="Expertise Locator" ClassName="BAInsight.ExpertiseFinder.FederatorExtension.Backends.ExpertiseBackend" AssemblyName="BAInsight.ExpertiseFinder.FederatorExtension, Version=1.0.0.0, Culture=neutral, PublicKeyToken=bd5ed2e4b6962cd0" />
-
Migrate User Profile Providers and User Picture Providers
You must reconfigure them.
If you don't remember the settings that you need to use then check the current configuration in 5.x.
-
Go to SmartHub Administration page → User Profile Settings.
-
Remove current providers
-
Click Configure to add new providers
Upgrade Your Result Display Templates
Procedure:
-
Open the SmartHub Administration page at http(s)://<web-app-url>/_admin
-
Click the link UI Editor on the left-side navigation.
-
On the desired directory, click the sprocket icon, select NewPage.
-
Choose DisplayTemplate Page and enter a name for the page.
-
In the new HTML templates replace:
-
"raw" with "result"
-
"coveo-result-frame" with "sh-result-item"
-
"CoveoResultLink" with "sh-result-link"
-
"CoveoActionBar" with "sh-action-bar"
-
"CoveoFieldValue" with "sh-field-value"
-
HTML Templates Sample
-
For the script that has data-condition="isUserProfile != 'true'"
-
The template will be saved as an HTML file name "myItemTemplate"
-
The name of the template and the location it is saved to is your choice.
<!-- <div class="coveo-result-frame core-result"> becomes next line instead -->
<div class="sh-result-item core-result">

    <div class="core-result-info-wrapper">
        <div class="core-result-info">
            <div class="core-info" >

                <!-- <a class="CoveoResultLink" rel='noreferrer' data-always-open-in-new-window="true"></a>  becomes next line instead -->
                <a class="sh-result-link analytics-track-openItem" href="<%= result.clickUri %>" title="<%= result.title %>"><%= result.title %>

            </div>
            <div class="core-info" >
                <!-- <div class="CoveoFieldValue result-summary" data-field="@excerpt" data-caption="Excerpt" data-html-value='true'></div>  becomes next line instead -->
                <div class="sh-field-value">
                    <div><%= result.excerpt %></div>
                </div>
            </div>
            <div class="core-info widgets-placeholder" ></div>
        </div>

        <!-- <div class="CoveoActionBar core-action-bar" >  becomes next line instead  -->
        <div class="sh-action-bar core-action-bar" >

               <!-- <a class='CoveoResultLink prettyURL sh-float-left' rel='noreferrer' target="_blank"> becomes next line instead -->
            <a class='sh-result-link prettyURL sh-float-left' target="_blank" href="<%= result.clickUri %>">

                <span title="<%= (result.filetype||'document') + " from " + (result.contentsource || result.clickUri || 'Source') %>"><%= (SH.utils.getSourceSystemImage(result.clickUri, result.ContentSource) || result.ContentSource) %></span>
                <span title="<%= result.clickUri %>"><%= SH.utils.prettifyURL(result.clickUri) %></span>
            </a>
            <div class="open-preview-button hidden  sh-float-right">
                <i class="sh-icon-button far fa-eye"></i>
                <span>Preview</span>
            </div>
        </div>
    </div>
</div>
For the script that has the code data-condition="isUserProfile == 'true'", see the following:
-
The template is saved as an HTML file name "myPeopleTemplate".
-
The name and save location is your choice.
!-- <div class="coveo-result-frame core-result">  becomes next line instead -->

    <div class="CoveoPreview sh-float-left" data-small="true" data-shape="round"><img src="<%= result.blobUrl %>"></div>
    <div class="core-result-info-wrapper sh-float-left">
        <div class="core-result-info">
            <div class="core-info" >

                !-- <a class="CoveoResultLink" rel='noreferrer' data-always-open-in-new-window="true"></a> becomes next line instead -->
                <a class="sh-result-link analytics-track-openItem" href="<%= result.clickUri %>" title="<%= result.title %>"><%= result.title %></a>

            </div>
            <div class="core-info" >

                !-- <div class="CoveoFieldValue" data-field="@AboutMe" data-caption="AboutMe" data-html-value='true'></div> becomes next line instead -->
                <div class="sh-field-value"><%= result.AboutMe %></div>

            </div>
        </div>
        <div class="core-action-bar" >
            <span class="prettyURL sh-float-left">
                <span>

                    !-- <span class="CoveoFieldValue" data-field="@Department" data-caption="Department" data-html-value='true'></span> becomes next line instead -->
                    <span class="sh-field-value"><%= result.Department %></span>

                </span>
                <span> › </span>

                <!-- <span class="CoveoFieldValue" data-field="@JobTitle" data-caption="JobTitle" data-html-value='true'></span> becomes next line instead -->
                <span class="sh-field-value"><%= result.JobTitle%></span>


            </span>
            <div class="sh-float-right action-bar-button">

                !-- <a class='CoveoResultLink' rel='noreferrer' data-href-template='sip:${WorkEmail}'>  becomes next line instead -->
                <a class='sh-result-link' data-href-template='im:<sip:${"<%= result.WorkEmail %>"}' href='im:<sip:<%= result.WorkEmail %>>'>

                    <i class="sh-icon-button far fa-comments"></i>
                    <span>Skype</span>
                </a>
            </div>
            <div class="sh-float-right action-bar-button">

                <!-- <a class='CoveoResultLink' rel='noreferrer' data-href-template='mailto:${WorkEmail}'> becomes next line instead -->
                <a class='sh-result-link' data-href-template='mailto:${"<%= result.WorkEmail %>"}' href='mailto:<%= result.WorkEmail %>'>

                    <i class="sh-icon-button far fa-envelope"></i>
                    <span>Mail</span>
                </a>
            </div>
        </div>
    </div>
</div>
Upgrade your sort and results per page mechanism
When upgrading to SmartHub 7.0, you must update the following controls if you use custom control templates:
-
Sort
-
ResultsPerPage
These controls are defined in the control template for your content containers. When upgrading, you must update the template that is defined in the ControlTemplatePath of your ContentContainer settings. for more information, see Adding the Content Containers Module.
Sort control
To update your sort control, replace your existing code with the following:
<% if (containerSettings.ShowSort) { %>
                <div class="shDropdown-section sh-sort-section" data-automation-id="ccSortCriteria">
                    <div class="shDropdown-wrapper">
                        <div class="shDropdown-label">
                            <%= containerSettings.SortLabel %>
                        </div>
                        <div class="shDropdown-values-wrapper sort-values-wrapper">
                            <div class="shDropdown-selectedValue-wraper sh-selected">
                                <div class="shDropdown-selectedValue sh-sort-selectedValue"></div>
                                <i class="dropdown-arrow-dd-down-svg"> </i>
                            </div>
                            <div class="shDropdown-values sort-values" name="sort">
                                <%
                                    let sortProperties = window.SH.ContentContainers.GetSortProperties(containerSettings);
                                    sortProperties.forEach(function(sortProperty) {
                                     %>
                                    <div class="shDropdown-value sort-property" data-sort-property="<%= sortProperty.Name %>" data-sort-direction="<%= sortProperty.Direction %>">
                                        <%= sortProperty.Label %>
                                    </div>
                                <% }); %>
                            </div>
                        </div>
                    </div>
                </div>
            <% } %>
Additionally, in SmartHub 7.0, the standalone SortDirection property no longer exists. Sort direction is now controlled and specified by the SortProperties parameter in your content container settings.
-
The SortProperties parameter use the following format: Property1#Label1#Direction1,Property2#Label2#Direction2.
-
If no direction is specified, descending order is used.
-
If no label is specified, it will use the property name.
-
By default, this parameter uses 'Rank#Most Relevant#descending,date#Newest#descending,date#Oldest#ascending'
ResultsPerPage control
To update your ResultsPerPage control, replace your existing code with the following:
<% if (containerSettings.ShowRowsPerPage) { %>
            <div class="shDropdown-section sh-resultsPerPage-section" data-automation-id="ccRowsPerPage">
                <div class="shDropdown-wrapper">
                    <div class="shDropdown-label">
                        <%= containerSettings.RowsPerPageLabel %>
                    </div>
                    <div class="shDropdown-values-wrapper resultsPerPage-values-wrapper">
                        <div class="shDropdown-selectedValue-wraper">
                            <div class="shDropdown-selectedValue resultsPerPage-selectedValue">
                                <%= SH.ContentContainers.GetActiveRowsPerPageOption(id,containerSettings) %>
                            </div>
                            <i class="dropdown-arrow-dd-down-svg"> </i>
                        </div>
                        <div class="shDropdown-values resultsPerPage-values" name="resultsPerPage">
                            <% SH.ContentContainers.GetRowsPerPage(containerSettings).forEach(function(value) { %>
                                <div class="shDropdown-value" data-resultsPerPage="<%= value %>">
                                    <%= value %>
                                </div>
                                <% }); %>
                        </div>
                    </div>
                </div>
            </div>
            <% } %>
Upgrade Your Pages
Procedure:
-
Open the SmartHub Administration page at http(s)://<web-app-url>/_admin
-
Click the link UI Editor on the left-side navigation.
-
From the left side panel navigate to your custom page.
-
Later in the process, you will need the original HTML for the page, so you should duplicate the page or use the backup created at the start of the upgrade process. To duplicate the page, click the sprocket icon and select Duplicate.
-
Open the page in the editor and click Upgrade when the Upgrade notification appears.
-
The deprecated elements will be replaced with the equivalent ones and a basic set of settings will be created
Example
SmartHub 5.6 Page Pre-upgrade
<!DOCTYPE html>
<html lang="en">

<head>
    <meta charset="UTF-8" />
    <meta name="viewport" content="width=device-width, initial-scale=1" />
    <meta http-equiv="X-UA-Compatible" content="IE=edge" />
    <link href="/image/favicon.jpg" rel="shortcut icon" />

    <script>
        {
            /*

                To add custom js/css files or exclude / modify the parameters of those loaded by default,
                use /modules/SmartHubResourceLoader/CustomSettingsTemplate.js as a template for your custom settings file.

            */
                window.SHRootLevelURL = "%LANGUAGE%".replace("%LANGUAGE%", "");

                    const customSettingsFile = SHRootLevelURL + "/modules/SmartHubResourceLoader/CustomSettingsTemplate.js";

                    const neverCachedJS = [

                        SHRootLevelURL + "/modules/SmartHubResourceLoader/ResultsPageSettings.js",
                        customSettingsFile,
                        SHRootLevelURL + "/modules/SmartHubResourceLoader/SmartHubResourceLoader.js"
                    ]

                    const now = new Date().getTime()

                    neverCachedJS.forEach(function (src) {
                        const existing = document.querySelector("script[src^='" + src + "?']");
                        if(existing) {
                            existing.remove();
                        }
                        const script = document.createElement('script')
                        script.src = src + '?' + now
                        script.async = false
                        document.head.appendChild(script)

                    })
        }
    </script>

</head>

<body hidden id="search" class="sh-grid CoveoSearchInterface BAInsightCustom" data-run-empty-query="false" data-hide-until-first-query="false"
    data-enable-duplicate-filtering="true" data-enable-history="true" data-design="new">
    <div class="sh-row-header sh-header-grid">
        <div class="sh-header-top sh-column-left">
            <a href="/">
                <img class="logo" src="/image/logo.png" />
            </a>
        </div>
        <div class="coveo-search-section sh-header-top sh-column-middle">
            <div class="CoveoSearchbox" data-placeholder="Search..." data-add-scoped-search="true" data-show-keep-refiners="true"></div>
        </div>
        <div class="sh-header-top ribbon-container sh-column-right"></div>
        <div class="sh-header-bottom sh-column-left"></div>
        <div class="sh-header-bottom sh-column-middle">
            <div id="menu"></div>
            <div class="CoveoSettings" data-caption="Tools" data-show-icon="false">
                <div class="CoveoShareQuery"></div>
                <div class="CoveoExportToExcel" data-number-of-results="500" data-batch-size="500"
                    data-template-path="~/Templates/ExportToExcelTemplate.xlsx" data-start-cell="A1"
                    data-property-mappings="title,Title;author,Author;excerpt,Summary;filetype,Result Type;date,Last Modified Time;ContentSource,Content Source;clickUri,Document Path;Size,File Size(in bytes)">
                </div>
            </div>
        </div>
        <div class="sh-header-bottom sh-column-right"></div>
    </div>
    <div class="sh-row-body sh-body-grid coveo-main-section hidden">

        <!-- Left column -->
        <div class="sidebar sh-column-left responsive-grid-facets-container">
            <div class="coveo-facet-column">
                <div class="CoveoFacet" data-default-state="collapsed" data-title="Display Author"
                     data-field="@DisplayAuthor" data-lookup-field="@DisplayAuthor"
                     data-available-sorts="occurrences,alphaascending,alphadescending"
                     data-enable-settings="false" data-searchbox-position="bottom"></div>
                <div class="CoveoFacet" data-default-state="collapsed" data-title="Result type" data-field="@filetype"
                     data-lookup-field="@filetype" data-available-sorts="occurrences,alphaascending,alphadescending" data-enable-settings="false" data-searchbox-position="bottom">
                </div>
                <div class="CoveoFacet" data-default-state="collapsed" data-title="ContentSource"
                     data-field="@ContentSource" data-lookup-field="@ContentSource" data-enable-settings="false" data-searchbox-position="bottom"></div>
                <div class="CoveoFacetDatePicker" data-start="auto" data-end="auto" data-default-state="collapsed" data-title="Modified Date"
                     data-field="@date" data-lookup-field="@date" data-slider-graph-steps="20" data-range-slider="true"
                     data-date-field="true" data-available-sorts="occurrences,alphaascending,alphadescending" data-enable-settings="false"></div>
            </div>

            <div class="coveo-tab-section">
                <a class="CoveoTab" data-icon="sh-icon-button fas fa-globe" data-id="b29924a9-ec32-4c10-8892-a544b69ee121" data-expression='{searchboxquery} FederatorBackends:"*"' data-caption="Everything"></a>
                <a class="CoveoTab" data-icon="sh-icon-button fas fa-users" data-id="b09a7990-05ea-4af9-81ef-edfab16c4e31" data-expression='{searchboxquery} FederatorBackends:"*"' data-caption="People"></a>
                <a class="CoveoTab" data-icon="sh-icon-button fas fa-comments" data-id="459dd1b7-216f-4386-9709-287d5d22f568" data-expression='{searchboxquery} FederatorBackends:"*"' data-caption="Conversations"></a>
            </div>
        </div>

        <!-- Center column -->
        <div class="coveo-results-column sh-column-middle">
            <div class="bot-autocorrect-message-root"></div>
            <div class="bot-loading"></div>
            <div class="CoveoBreadcrumb"></div>
            <div class="bot-injected-results">
                <div class="CoveoContentBySearch botCBS" data-results-per-page='3' data-enable-duplicate-filtering="true" data-query-text='' data-source-id="b29924a9-ec32-4c10-8892-a544b69ee121" data-auto-trigger-query="false" data-hide-until-first-query="false" data-display-condition="false">
                    <div class="botCBS-card-header">
                        <div class="botCBS-card-title-wrapper">
                            <div id="MyInterests" class="botCBS-card-title">Suggested results: </div>
                        </div>
                    </div>
                    <div class="CoveoResultList"></div>
                    <a class="CoveoTab" data-id="b29924a9-ec32-4c10-8892-a544b69ee121"
                       data-expression='{searchboxquery} FederatorBackends:"*"'></a>
                </div>
            </div>
            <div class="coveo-summary-section">
                <span class="CoveoQuerySummary"></span>
            </div>
            <div class="CoveoResultList" data-caption="List" data-layout="bailist" data-fields-to-include="@clickUri,@Title,@excerpt,@title,@JobTitle,@Department,@AboutMe,@escbasecrawurl,@WorkEmail">
                <script type='text/underscore' class='result-template' data-condition="isError == true">
                    <div class="coveo-result-frame core-result">
                        <div class="core-result-info-wrapper">
                            <div class="core-result-info">
                                <div class="core-info" >
                                    <div class="CoveoFieldValue result-summary" data-field="@HitHighlightedSummary" data-caption="Error" data-html-value='true'></div>
                                </div>
                            </div>
                        </div>
                    </div>
                </script>
                <script type='text/underscore' class='result-template' data-condition="raw.isAuth == true">
                    <div class="coveo-result-frame core-result">
                        <div class="core-result-info-wrapper">
                            <div class="core-result-info">
                                <div class="core-info" >
                                <i class="sh-icon-button fas fa-info-circle"></i>
                                    <a class="auth-title" onClick="<%=raw.clickUri%>" data-backend-name="<%=raw.backendName%>"  > <%= raw.title %> </a>
                                    <div class="CoveoFieldValue result-summary" data-field="@HitHighlightedSummary"  data-html-value='true'></div>
                                </div>
                                 <div class="core-info" >
                                    <div class="CoveoFieldValue result-summary" data-field="@excerpt" data-caption="Excerpt" data-html-value='true'></div>
                                </div>
                            </div>
                        </div>
                    </div>
                </script>
                <script type='text/underscore' class='result-template' data-condition="isUserProfile != 'true'">
                    <div class="coveo-result-frame core-result">
                        <div class="CoveoOpenPreviewAction"></div>
                        <div class="core-result-info-wrapper">
                            <div class="core-result-info">
                                <div class="core-info" >
                                    <a class="CoveoResultLink" rel='noreferrer' data-always-open-in-new-window="true"></a>
                                </div>
                                <div class="core-info" >
                                    <div class="CoveoFieldValue result-summary" data-field="@excerpt" data-caption="Excerpt" data-html-value='true'></div>
                                </div>
                                <div class="core-info widgets-placeholder" ></div>
                            </div>
                            <div class="CoveoActionBar core-action-bar" >
                                <a class='CoveoResultLink prettyURL sh-float-left' rel='noreferrer' target="_blank">
                                    <span title="<%= (raw.filetype||'document') + " from " + (raw.contentsource || raw.clickUri || 'Source') %>"><%= (SH.utils.getSourceSystemImage(raw.clickUri, raw.ContentSource) || raw.ContentSource) %></span>
                                    <span title="<%= raw.clickUri %>"><%= SH.utils.prettifyURL(raw.clickUri) %></span>
                                </a>
                                <div class="open-preview-button hidden  sh-float-right">
                                    <i class="sh-icon-button far fa-eye"></i>
                                    <span>Preview</span>
                                </div>
                            </div>
                        </div>
                    </div>
                </script>
                <script type='text/underscore' class='result-template' data-condition="isUserProfile == 'true'">
                    <div class="coveo-result-frame core-result">
                        <div class="CoveoPreview sh-float-left" data-small="true" data-shape="round"></div>
                        <div class="core-result-info-wrapper sh-float-left">
                           <div class="core-result-info">
                                <div class="core-info" >
                                    <a class="CoveoResultLink" rel='noreferrer' data-always-open-in-new-window="true"></a>
                                </div>
                                <div class="core-info" >
                                    <div class="CoveoFieldValue" data-field="@AboutMe" data-caption="AboutMe" data-html-value='true'></div>
                                </div>
                            </div>
                            <div class="core-action-bar" >
                                <span class="prettyURL sh-float-left">
                                    <span>
                                        <span class="CoveoFieldValue" data-field="@Department" data-caption="Department" data-html-value='true'></span>
                                    </span>
                                    <span> › </span>
                                    <span class="CoveoFieldValue" data-field="@JobTitle" data-caption="JobTitle" data-html-value='true'></span>
                                </span>
                                <div class="sh-float-right action-bar-button">
                                    <a class='CoveoResultLink' rel='noreferrer' data-href-template='sip:${WorkEmail}'>
                                        <i class="sh-icon-button far fa-comments"></i>
                                        <span>Skype</span>
                                    </a>
                                </div>
                                <div class="sh-float-right action-bar-button">
                                    <a class='CoveoResultLink' rel='noreferrer' data-href-template='mailto:${WorkEmail}'>
                                        <i class="sh-icon-button far fa-envelope"></i>
                                        <span>Mail</span>
                                    </a>
                                </div>
                            </div>
                        </div>
                    </div>
                </script>
            </div>
            <div class="CoveoContentBySearch cbs-tab-container" id="top-results" data-query-text='* FederatorBackends:"*"' data-source-id="b29924a9-ec32-4c10-8892-a544b69ee121" data-results-per-page='3' data-hide-until-first-query="false">
                <div class="content-by-search-title header-results-message">Top results from web</div>
                <div class="CoveoResultList tab-container top-result-list" data-layout="bailist" data-fields-to-include='@Title,@ContentSource,@date,@clickUri,@filetype'>
                    <script type='text/underscore' class='result-template'>
                        <div class="coveo-result-frame core-result table-core-result core-top-result">
                            <div class="core-result-info-wrapper">
                                <div class="core-table-result-info">
                                    <div class="core-cell col-one file-type-preview">
                                        <img src="<%= SH.utils.getIconUrl(raw.filetype) %>" />
                                    </div>
                                    <div class="core-cell col-two">
                                        <div class="cell-title">
                                            <a class="CoveoResultLink ResultTitle cell" rel='noreferrer' target="_blank"></a>
                                        </div>

                                        <div class="cell-info col-three">
                                            <div class="CoveoFieldValue" data-field="@date" data-caption="date" data-helper='date'></div>
                                            <div class="CoveoFieldValue" data-field="@ContentSource" data-caption="Content source" data-html-value='true'></div>
                                        </div>
                                    </div>
                                </div>
                            </div>
                        </div>
                    </script>
                </div>
            </div>
            <div class="footer-zone">
                <div class="CoveoPager"></div>
            </div>
        </div>

        <!-- Right column -->
        <div class="chatbot-sidebar sh-column-right">
            <div class="smartAutomations"></div>
        </div>
    </div>
    <div class="sh-row-footer">
    </div>
</body>

</html>
SmartHub 5.6 Page Post-upgrade
<!DOCTYPE html>
<html lang="en">

<head>
    <meta charset="UTF-8" />
    <meta name="viewport" content="width=device-width, initial-scale=1" />
    <meta http-equiv="X-UA-Compatible" content="IE=edge" />
    <link href="/image/favicon.jpg" rel="shortcut icon" />

    <script>
        {
            /*

                To add custom js/css files or exclude / modify the parameters of those loaded by default,
                use /modules/SmartHubResourceLoader/CustomSettingsTemplate.js as a template for your custom settings file.

            */
                window.SHRootLevelURL = "%LANGUAGE%".replace("%LANGUAGE%", "");

                    const customSettingsFile = SHRootLevelURL + "/_bai/v1.0/pagesettings";

                    const neverCachedJS = [

                        SHRootLevelURL + "/modules/SmartHubResourceLoader/ResultsPageSettings.js",
                        customSettingsFile,
                        SHRootLevelURL + "/modules/SmartHubResourceLoader/SmartHubResourceLoader.js"
                    ]

                    const now = new Date().getTime()

                    neverCachedJS.forEach(function (src) {
                        const existing = document.querySelector("script[src^='" + src + "?']");
                        if(existing) {
                            existing.remove();
                        }
                        const script = document.createElement('script')
                        script.src = src + '?' + now
                        script.async = false
                        document.head.appendChild(script)

                    })
        }
    </script>

</head>

<body hidden id="search" class="sh-grid CoveoSearchInterface BAInsightCustom" data-run-empty-query="false" data-hide-until-first-query="false"
    data-enable-duplicate-filtering="true" data-enable-history="true" data-design="new">
    <div class="sh-row-header sh-header-grid">
        <div class="sh-header-top sh-column-left">
            <a href="/">
                <img class="logo" src="/image/logo.png" />
            </a>
        </div>
        <div class="sh-header-top sh-column-middle sh-search-section">

        </div>
        <div class="sh-header-top ribbon-container sh-column-right"></div>
        <div class="sh-header-bottom sh-column-left"></div>
        <div class="sh-header-bottom sh-column-middle">
            <div id="menu"></div>
            <div class="CoveoSettings" data-caption="Tools" data-show-icon="false">
                <div class="CoveoShareQuery"></div>
                <div class="CoveoExportToExcel" data-number-of-results="500" data-batch-size="500"
                    data-template-path="~/Templates/ExportToExcelTemplate.xlsx" data-start-cell="A1"
                    data-property-mappings="title,Title;author,Author;excerpt,Summary;filetype,Result Type;date,Last Modified Time;ContentSource,Content Source;clickUri,Document Path;Size,File Size(in bytes)">
                </div>
            </div>
        </div>
        <div class="sh-header-bottom sh-column-right"></div>
    </div>
    <div class="sh-row-body sh-body-grid coveo-main-section hidden">

        <!-- Left column -->
        <div class="sidebar sh-column-left responsive-grid-facets-container">
            <div class="coveo-facet-column">
                <div class="CoveoFacet" data-default-state="collapsed" data-title="Display Author"
                     data-field="@DisplayAuthor" data-lookup-field="@DisplayAuthor"
                     data-available-sorts="occurrences,alphaascending,alphadescending"
                     data-enable-settings="false" data-searchbox-position="bottom"></div>
                <div class="CoveoFacet" data-default-state="collapsed" data-title="Result type" data-field="@filetype"
                     data-lookup-field="@filetype" data-available-sorts="occurrences,alphaascending,alphadescending" data-enable-settings="false" data-searchbox-position="bottom">
                </div>
                <div class="CoveoFacet" data-default-state="collapsed" data-title="ContentSource"
                     data-field="@ContentSource" data-lookup-field="@ContentSource" data-enable-settings="false" data-searchbox-position="bottom"></div>
                <div class="CoveoFacetDatePicker" data-start="auto" data-end="auto" data-default-state="collapsed" data-title="Modified Date"
                     data-field="@date" data-lookup-field="@date" data-slider-graph-steps="20" data-range-slider="true"
                     data-date-field="true" data-available-sorts="occurrences,alphaascending,alphadescending" data-enable-settings="false"></div>
            </div>

            <div class="coveo-tab-section">
                <a class="CoveoTab" data-icon="sh-icon-button fas fa-globe" data-id="b29924a9-ec32-4c10-8892-a544b69ee121" data-expression='{searchboxquery} FederatorBackends:"*"' data-caption="Everything"></a>
                <a class="CoveoTab" data-icon="sh-icon-button fas fa-users" data-id="b09a7990-05ea-4af9-81ef-edfab16c4e31" data-expression='{searchboxquery} FederatorBackends:"*"' data-caption="People"></a>
                <a class="CoveoTab" data-icon="sh-icon-button fas fa-comments" data-id="459dd1b7-216f-4386-9709-287d5d22f568" data-expression='{searchboxquery} FederatorBackends:"*"' data-caption="Conversations"></a>
            </div>
        </div>

        <!-- Center column -->
        <div class="coveo-results-column sh-column-middle">
            <div class="bot-autocorrect-message-root"></div>
            <div class="bot-loading"></div>
            <div class="CoveoBreadcrumb"></div>
            <div class="bot-injected-results">

            </div>
            <div class="coveo-summary-section">

            </div>
            <div class="sh-main-results-container analytics-track-itemsContainer"></div>
            <div class="CC1"></div>

             <div class="footer-zone">

            </div>
        </div>

        <!-- Right column -->
        <div class="chatbot-sidebar sh-column-right">
            <div class="smartAutomations"></div>
        </div>
    </div>
    <div class="sh-row-footer">
    </div>
</body>

</html>The upgrade process makes the following changes to the HTML page.
Components that no longer exist are removed and sets them as settings if applied.
Example: "CoveoPager"It changes the structure for the components that have a new structure.
Example:CoveoContentBySearchbecomes<div class="CC#"></div>with additional settings that can be seen in the "Advanced settings edit" tab underSH.ContentContainers
The upgrade process does not automatically create the item templates for your existing items. After the upgrade, the "Advanced settings edit" tab from the Advanced mode will also become available. You should ensure that the folder structure is the same before attempting to Upgrade.
-
Go to "Advanced settings edit" tab from the Advanced mode
-
Update the ItemTemplatePicker functions to use the newly created DisplayTemplates.
-
In ContentContainers configuration, you must confirm that the ControlTemplatePath and ItemTemplatePicker parameters are configured and the default values are not used.
SH.ContentContainers.CustomSettings Sample
ContentContainers: {
        SampleContentContainerWithDefaultValues: {
            ParentContainerSelector: '.sh-main-results-container',
            Title: '',
            ControlTemplatePath: SH.RootLevelURL + "/modules/ContentContainers/templates/controlResultTemplate.html",
            ItemTemplatePicker:  function (result) {
                    if (result.isUserProfile == 'true') /* These are the same conditions used in on the scripts inside the ResultList component */
                        return SH.RootLevelURL + "/myFolder/myPeopleTemplate.html";
                    return SH.RootLevelURL + "/myFolder/myItemTemplate.html";,
            QueryText: '',
            QueryTemplate: '{searchboxquery} FederatorBackends:"*"',
            SourceId: 'b29924a9-ec32-4c10-8892-a544b69ee121',
            RowsPerPage: 5,
            EnablePagination: false,
            EnableCountTotal: false,
            EnableSmartPreviews: true,
            EnableContentIntelligence: true,
            EnableResultFeedback: true,
            EnableRatings: false,
            ShowSort: false,
            SortProperties: 'Rank,Date',
            SortDirection: 'Descending,Ascending',
            IsMainResults: true,
            FieldsToInclude: 'clickUri,title,Rank,ContentSource,FileExtension,excerpt,SDFUrl,LastModifiedTime,DisplayAuthor,isUserProfile,WorkEmailclickUri,Title,JobTitle,Department,AboutMe,escbasecrawurl,WorkEmail,UserName',
            TriggerNewQueryOn: 'deferredQuerySuccess'
        },
        SampleContentContainerWithDefaultValues: {
            ParentContainerSelector: '.sh-cbs-container',
            Title: 'MyCBS',
            ControlTemplatePath: SH.RootLevelURL + "/modules/ContentContainers/templates/cbsControlTemplate.html",
            ItemTemplatePicker:  function (result) {return SH.RootLevelURL + "/myFolder/myTemplate.html";,
            QueryText: '',
            QueryTemplate: '{searchboxquery} FederatorBackends:"*"',
            SourceId: 'b29924a9-ec32-4c10-8892-a544b69ee121',
            RowsPerPage: 5,
            IsMainResults: false,
            FieldsToInclude: 'clickUri,title,Rank,ContentSource,FileExtension,excerpt,SDFUrl,LastModifiedTime,DisplayAuthor,isUserProfile,WorkEmailclickUri,Title,JobTitle,Department,AboutMe,escbasecrawurl,WorkEmail,UserName',
            TriggerNewQueryOn: 'load'
        }
    }
Update or preserve your custom CSS
After updating SmartHub to version 7.0 or later, you must update your custom pages to preserve your existing CSS, or upgrade to the out-of-the-box SmartHub 7.0 page layouts:
-
Open the SmartHub Administration page at http(s)://<web-app-url>/_admin
-
Click the link UI Editor on the left-side navigation.
-
From the left side panel, navigate to your custom page.
-
Click the Advanced settings edit tab from the Advanced mode.
-
To exclude the out-of-the-box SmartHub 7.0 page layouts, update the SH.Loader.PathsToExclude setting with the following:
SH.Loader.PathsToExclude = [
    [SH.RootLevelURL + "/css/SmartHub7.css"]
]; -
If you want to update your custom pages to match the out-of-the-box SmartHub 7.0 page layouts, update the SH.Loader.PathsToExclude setting with the following:
SH.Loader.PathsToExclude = [
    [SH.RootLevelURL + "/css/CoveoFullSearchNewDesign.css"]
];
This method may require additional changes to CSS and HTML to achieve desired results. -
All of your custom settings pages and integrations must be updated to exclude the CSS file of your choice.
Other Breaking Changes
-
QueryTerms (response.detail.results.queryTerms) from the response of 'querySuccess' event:
-
SmartHub 6.x: this is an object
-
SmartHub 5.x: this is an array
-
-
If you use any custom module, and you use queryTerms, you must update the code to use queryTerms as object:
-
For example: SHSmartPreviewsLoader.js
-
-
Some event names have changed in SmartHub v6.x. Refer to the list of supported events in the SmartHub UI Events page.
-
Some class names frequently used in scripting have changed:
-
BAInsight.Longitude.Federator.Runtime.Security.SecurityUtil → BAInsight.Longitude.Federator.Runtime.Security.SecurityPermissions
-
BAInsight.Longitude.Federator.Common.Util.OAuthUserContext → BAInsight.SmartHub.Core.Security.Context.JWTUserContext
-
Claims are not public now.
-
Instead, the get/set method is used:
-
var email = userContext.GetProperty("email", "");
userContext.SetProperty("email", email);
How to Upgrade Smart Previews for SmartHub
Prerequisite Operations
Before you run an upgrade operation for Smart Previews, perform the actions described below.
Database Backup
In a production environment, back up any production Smart Previews databases before continuing.
Collect Required Information
-
To save time, gather the following information to use during the upgrade procedures below.
-
Most of this information can be found from the web admin console. See below.
Transfer Folder
- On your Smart Previews Settings page:
- Record the path of your current transfer folder.
- Note the example below:
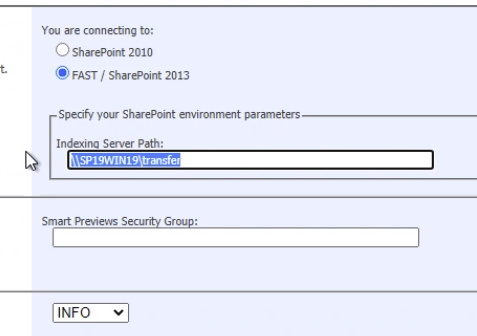
- Record the path of your current transfer folder.
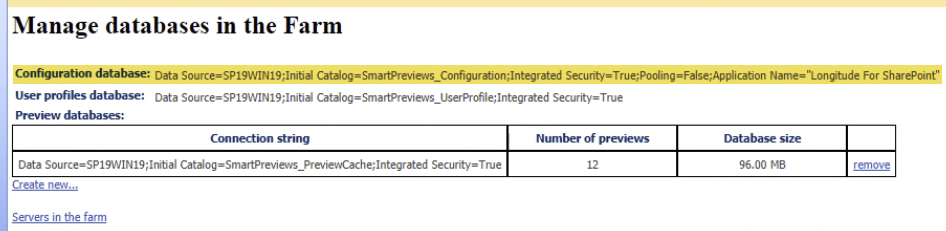
Collection Database String
- Under Manage databases in the farm:Record the "Configuration database" string.
Smart Previews Windows Services
- In the Windows Services console, note the accounts listed for either:
- Smart Previews Indexing Monitoring Service
- Smart Previews Preview Generation Service

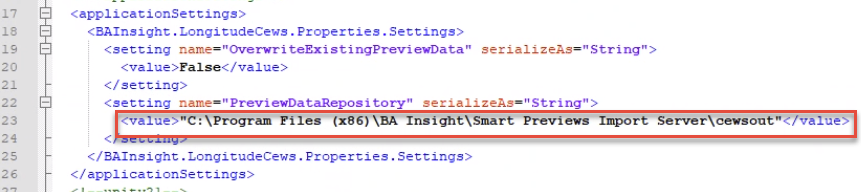
PreviewDataRepository Value
- Navigate to the directory <SmartPreviews_Install_root>/Previews Components/Previews CEWS/.
- Open the file CewsWindows.exe.config and note the "PreviewDataRepository" value:
Configure Environment Variables
If you are upgrading from Smart Previews v3.1 or older, note the changes to the way passwords are encrypted.
-
Review the section Environment Variables for more details.
Upgrade the Import Server
Uninstall the Import Server
- Navigate to the Services page on your server.
- Stop the following Smart Previews Services:
- Smart Previews Indexing Monitoring Service
- Smart Previews Preview Generation Service
- Control Panel > Programs > Uninstall a program and uninstall Smart Previews Import Server.
Install the Import Server
- Open a Command Prompt as an administrator and run the following command:
msiexec /i "path\ImportServer.msi" - Follow the instructions in the installation wizard.
- During the installation, the following information is required:
|
Parameter |
Description |
|---|---|
|
<Install Directory> |
|
|
<Service Account> |
The Import Server service account runs as this user.
|
Configure the Databases
Note: If a database upgrade is required, you are prompted to upgrade the database.
-
Proceed to upgrade before continuing.
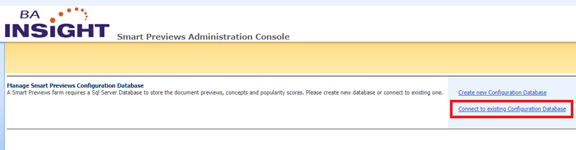
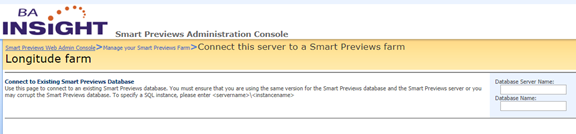
- Go to Smart Previews Web Admin Console site from IIS Manager and select Connect to existing Configuration Database.
-
Provide the Database Server Name and the Database Name.
Note: If it is required, upgrade the database.
Upgrade the Fast Proxy Service
Uninstall the Fast Proxy Service
- Navigate to the Services page on your server. Stop the Smart Previews Fast Proxy service.
- Navigate to the Previews Components folder.
- Open the FAST Proxy folder.
- Right-click the
unregisterproxy.batfile and select "Run as administrator" from the sub-menu that opens.
Install the Fast Proxy
- Navigate to where your Smart Previews upgrade package is and extract the contents of Previews Components.zip.
- Navigate to the Fast Proxy folder from Previews Components.
- Edit the file
BA_insight.FastProxyService.exe.config. - Locate the applicationSettings\BAInsight.FastProxyService.Properties.Settings\ConfigurationDbConnectionStringsection and add the:
- Data Source: Add the server name as the value.
- Initial Catalog: Add the Configuration Database name as the value.
- Locate the applicationSettings\BAInsight.FastProxyService.Properties.Settings\FastIncomingFolder and replace
%LocalLow%with the path of the BA-Insight Fast Proxy Incoming folder. - Run registerproxy.bat as an administrator. During the installation, an admin account is required.
- The user name must be filled in using the following format: Domain Name\User Name. You must also specify a password for this user.
- Start the service.
Upgrade the Previews CEWS Service
Uninstall the Previews CEWS service
- Navigate to the Services page on your server.
- Stop the Smart Previews CEWS service.
- Navigate to the Previews Components directory.
- Open the Previews CEWS folder.
- Right-click the
unregistercews.batfile and run as administrator.
Install the Previews CEWS service
- Navigate to the Previews CEWSfolder from Previews Components.
- Edit the file CewsWindows.exe.config.
- Locate the system.serviceModel\services\service\host\baseAddressesand add or replace the server name (servername).
- Locate the applicationSettings\BAInsight.LongitudeCews.Properties.Settings\PreviewDataRepositoryand replace
%LocalLow%with the path of the BA-Insight Fast Proxy Incoming folder. - Run registercews.bat as an administrator.
- During the installation, an admin account is required.
- The user name must be filled in using the following format: Domain Name\User Name.
- You must also specify a password for this user.
- Start the service.
Upgrade Smart Previews Hybrid
Before you uninstall your Smart Previews instance, perform the following steps:
- Open your IIS server.
- Collect the following information
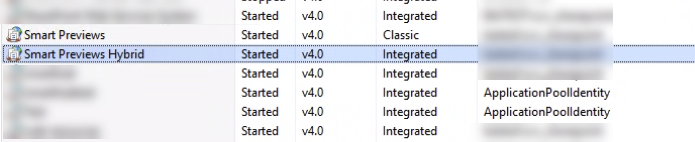
- In IIS, click Application Pools
- In the Application Pools list, note the domain\username value in the Identity column of your Smart Preview Hybrid site.
- In IIS Click Sites > Smart Previews Hybrid site.
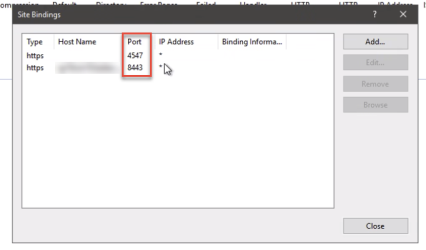
- Click Bindings in the Actions panel.
- Note the values for the Port and Host Name columns for your bindings.
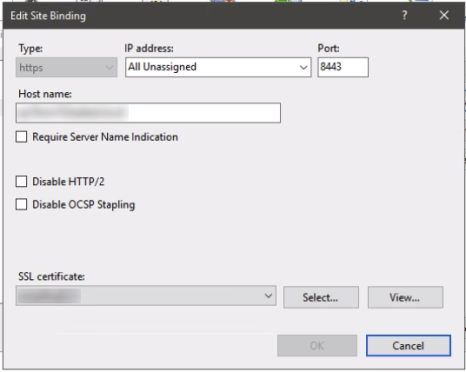
- Click on your bindings, then select Edit
- Note the SSL certificate used for the hybrid site (blurred out below):
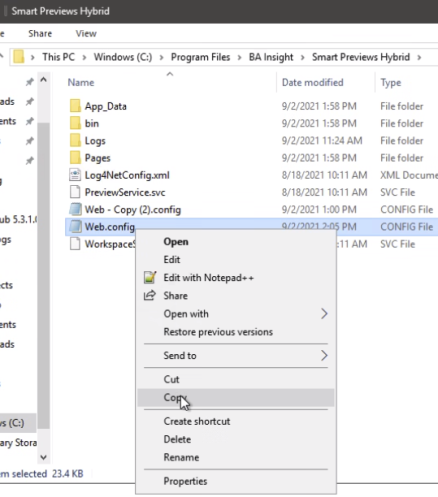
- Navigate to your Smart Previews Hybrid installation folder.
- Make a copy of your existing Web.config file.
- Navigate to the App_Data folder in your Smart Previews Hybrid installation folder.
- Make a copy of your existing FetcherConfiguration.xml file. After re-installation, follow the steps in Migrate your previous file information.
Uninstall Smart Previews Hybrid .msi
- Go to the Control Panel > Programs > Uninstall a program.
- Right-click BA Insight Smart Previews Hybrid and select Uninstall.
Install Smart Previews Hybrid .msi
Open a command prompt as an administrator and run the following command:
msiexec /i "path\ SmartPreviewsHybrid.msi"
During the installation, the following information is required:
|
Field |
Description |
|---|---|
|
<InstallDir> |
Specify the path where the Smart Previews site will be installed.
|
|
<Port> |
|
|
<Certificate FriendlyName> |
|
|
<ServiceAccount> |
|
Migrate your previous file information
After upgrading, you will need to migrate files and information from your previous installation of Smart previews.
-
Migrating web.config file information
DO NOT reuse your old web.config file when doing a product update or upgrade. The new web.config file contains new information.Existing web.config settings can be preserved by using the following steps:
- Open your existing web.config file
- Open the new web.config file
- In your existing web.config file, copy your (modified from original) settings.
- Overwrite the
CloudServiceAddress(around line 138) with the value from your old web.config file copy.
-
Migrating your FetcherConfiguration.xml file
-
In Smart Previews 4.0, the Hybrid installation path was updated. As a result, the fetcher configuration file will not remain after the hybrid component is uninstalled.
-
After installing the new version of Smart Previews, you must paste the FetcherConfiguration.xml that you copied in the Upgrade Smart Previews Hybrid steps to the C:\Program Files\Upland BA Insight\Smart Previews Hybrid\app_data folder.
-
If you do not update this file, you will have to re-configure your hybrid fetcher configuration.
-
Configure Smart Previews Hybrid
- Navigate to the Smart Previews Hybrid web site folder.
- Edit the web.config file.
- Locate the section appSettings\CloudServiceAddress.
- Replace the sample server address with your Smart Previews Web Resources URL, including the port number.
- You must include the path …./Services/PreviewProxyService.svc in your edited URL.
Example:
Default: https://previewapp.bainsight.com/Services/PreviewProxyService.svc
After editing: https://webresources:4321/Services/PreviewProxyService.svc
- Navigate to the Configuration page for Smart Previews Hybrid site: https://[SmartPreviewsAddress]/Pages/Configure.aspx
- Complete the fields on the page with the information from the following table:
|
Field |
Description |
|---|---|
|
<Certificate Friendly Name> |
Note: Since the request and responses must be encrypted and decrypted with the same certificate, make sure that you specify the same certificate in the Smart Previews Web Resources Configuration page.
For information on how to generate a self-signed certificate, go to How to Create a Self-Signed Certificate. |
|
<Database Connection String> |
This is the connection string for the Smart Previews Configuration database.
|
|
<Preview Generation Service Address> |
Specify the Previews Generation Service Address.
|
|
<Fetchers> |
Required only if you are generating Previews using Connector Framework or the Cloud SSA.
|
Upgrade Smart Previews’ Web Resources
Update the Resources
- Navigate to IIS Manager.
- Expand Sites.
- Right-click the BAInsight SmartPreviews site and click Explore.
- Replace the content of this folder with the content of the unzipped SmartPreviewsFrontEnd-*.zip file.
Configure Smart Previews Web Resources Site
By default, Smart Previews Hybrid is configured to use Redis as a caching store for increased performance.
If you do not have access to a Redis cache connection, follow these steps to replace this cache with an in-memory cache:
- Open the web.config file.
- Locate the unity\containers\container\types\type section.
- Change the mapping to:
SmartPreviewAppWeb.Caching.InMemoryStore, BAInsight.SmartPreviewsHybrid.Cloud
- Change the mapping to:
- Change the
map toparameter as follows:
From: “SmartPreviewAppWeb.Caching.RedisStore, BAInsight.SmartPreviewsHybrid.Cloud”
To: “SmartPreviewAppWeb.Caching.InMemoryStore, BAInsight.SmartPreviewsHybrid.Cloud”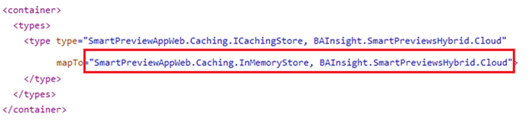
- Smart Previews Web Resources site must be configured to reference the SmartHub URL that is accessible from the server where the Smart Previews Web Resources are being installed.
- Open the web.config file.
- Locate the appsettings\SmartHubAddress section and change the address to match your SmartHub URL using this format: https://contoso.com
- Locate the appsettings\SetupModesection and change the value to SmartHub.
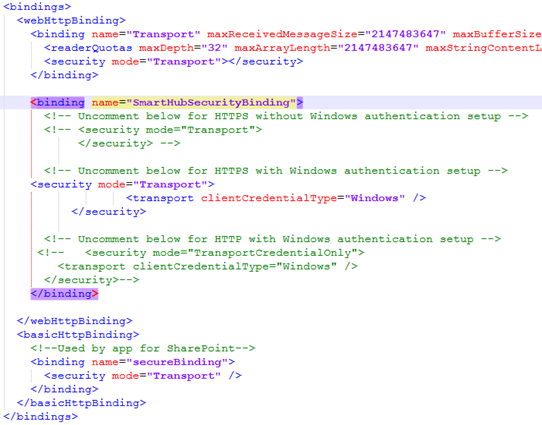
- Locate the system.serviceModel\bindings\webHttpBinding section and change the SmartHubSecurityBinding by uncommenting the SmartHub security section and commenting the other two sections.
- Navigate to the Configure page for Smart Previews Web Resources: https://[SmartPreviewsWebResourcesAddress]/Pages/Configure.aspx
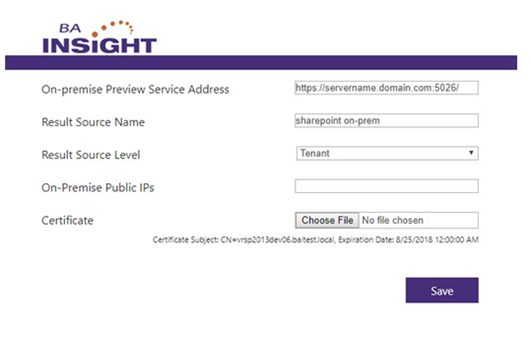
Enter the information that is required to establish the connection with the SharePoint 2013/2016/19 component:
- On-premise Preview Service Address: Enter the Smart Previews Hybrid site address followed by the port where the Smart Previews Hybrid site is running.
- Result Source Name: Enter the local SharePoint results source name, which you created to return local results.
- The result source name is required to execute valid queries in order to confirm the rights of the current user who is requesting the Preview.
- The default value is Local SharePoint Results.
- Result Source Level: Specify, or leave the default value "Tenant".
- Certificate: Upload the .CER file.
Upgrade the Enrichment Component
Note: If Previews are generated with the SharePoint 2016/19 perform this step, else skip it.
Open a SharePoint Management Shell as administrator and run the following:
$endpoint = "http://servername:1237/ContentProcessingService"   $ssa = Get-SPEnterpriseSearchServiceApplication –Identity $ssaName - wa silentlycontinue
   $config = New-SPEnterpriseSearchContentEnrichmentConfiguration
   $config.Endpoint = $endpoint
   $config.DebugMode = $true
   $config.Timeout = 30000
   $config.InputProperties
 = "IsDocument", "body", "Author", "Filename",
"FileType","MimeType","FileExtension","OriginalPath",
"url","ContentType","contentclass","LastModifiedTime","Size",
"escbasecrawlurl"   $config.SendRawData = $True
   $config.MaxRawDataSize = 71680
   $config.FailureMode = "Warning"   Set-SPEnterpriseSearchContentEnrichmentConfiguration –SearchApplication $ssa –ContentEnrichmentConfiguration $config
For Users Upgrading Connectivity Hub
If upgrading Connectivity Hub from version 2.0 to 2.1 or later, run the following script against your Smart Previews database before the upgrade to keep previews and content indexed synchronized.
The script can be found in the following Connectivity Hub installation directory:
- <ConnectivityHubInstallDir>\DatabaseCreationScript\UpdateSmartPreviewsDatabases.sql
Before running the script, replace the following tokens:
- #SmartPreviews_Configuration_DB#
- Put confiugration database name here.
- #SmartPreviews_PreviewCache_DB#
- Put preview cache database name here.
- If your installation of Smart Previews uses multiple preview cache databases, run the script for each preview cache database separately.
- #SmartPreviews_UserProfile_DB#
- Put user profiles database name here.
The script below is provided for reference.
Run the script which is deployed by Connectivity Hub installer.
DECLARE @batchSize int = 1000;

DECLARE @ids TABLE(Id int);
DECLARE @lastId int = 0;

USE #SmartPreviews_Configuration_DB# -- Put Configuration database name here.

PRINT 'Updating [ProcessedDocuments] table.'
WHILE @lastId = 0 OR EXISTS(SELECT 1 FROM @ids)
BEGIN
    DELETE FROM @ids;
    INSERT INTO @ids
        SELECT TOP(@batchSize) ProcessedDocumentId
        FROM ProcessedDocuments
        WHERE DocumentUri LIKE 'spworks://%' AND ProcessedDocumentId > @lastId
        ORDER BY ProcessedDocumentId;

    SELECT @lastId = MAX(Id) FROM @ids;

    UPDATE ProcessedDocuments
        SET DocumentUri = REPLACE(REPLACE(REPLACE(REPLACE(DocumentUri, '&id=&', '&'), '&subid=&', '&'), '&fid=&', '&'), '&fsubid=&', '&'),
            UriHash = CONVERT(binary(16), HASHBYTES('MD5', REPLACE(REPLACE(REPLACE(REPLACE(DocumentUri, '&id=&', '&'), '&subid=&', '&'), '&fid=&', '&'), '&fsubid=&', '&')))
        WHERE ProcessedDocumentId IN (SELECT Id FROM @ids);
END

USE #SmartPreviews_PreviewCache_DB# -- Put PreviewCache database name here.

PRINT 'Updating [DocumentContainer] table.'
SET @lastId = 0;
WHILE @lastId = 0 OR EXISTS(SELECT 1 FROM @ids)
BEGIN
    DELETE FROM @ids;
    INSERT INTO @ids
        SELECT TOP(@batchSize) DocumentContainerId
        FROM DocumentContainer
        WHERE DocumentUri LIKE 'spworks://%' AND DocumentContainerId > @lastId
        ORDER BY DocumentContainerId;

    SELECT @lastId = MAX(Id) FROM @ids;

    UPDATE DocumentContainer
        SET DocumentUri = REPLACE(REPLACE(REPLACE(REPLACE(DocumentUri, '&id=&', '&'), '&subid=&', '&'), '&fid=&', '&'), '&fsubid=&', '&')
        WHERE DocumentContainerId IN (SELECT Id FROM @ids);
END

USE #SmartPreviews_UserProfile_DB# -- Put UserProfiles database name.

PRINT 'Updating [ResearchNotebooks] table.'
SET @lastId = 0;
WHILE @lastId = 0 OR EXISTS(SELECT 1 FROM @ids)
BEGIN
    DELETE FROM @ids;
    INSERT INTO @ids
        SELECT TOP(@batchSize) ProcessedDocumentId
        FROM ResearchNotebooks
        WHERE DocumentUri LIKE 'spworks://%' AND ProcessedDocumentId > @lastId
        ORDER BY ProcessedDocumentId;

    SELECT @lastId = MAX(Id) FROM @ids;

    UPDATE ResearchNotebooks
        SET DocumentUri = REPLACE(REPLACE(REPLACE(REPLACE(DocumentUri, '&id=&', '&'), '&subid=&', '&'), '&fid=&', '&'), '&fsubid=&', '&')
        WHERE ProcessedDocumentId IN (SELECT Id FROM @ids);
END

PRINT 'Crawl URLs have been updated.'
Validate Your Upgrade
Go to your search center and run a query to see the documents that have kept the generated previews.
Verify your previews.