Bulk Update - Time Entries
The "Bulk Update - Time Entries" feature gives administrators the ability to update multiple Resource Time Entries at once by uploading a comma-separeted values (CSV) file into Eclipse PPM. This saves users from having to manually navigating to individual Projects in order to edit them.
Tip: This is especially helpful for organizations that wish to integrate time entry data from another application into Eclipse PPM as they can export their data into a spreadsheet and quickly upload it. If Resources track their time using another application, an administrator can export the time data into a spreadsheet and upload it into Eclipse PPM. This prevents users from having to manually add their time to multiple applications at once. Additionally, the time can be automatically approved upon submission. If another application is used to approve time, this prevents time approvers from having to review time submissions more than once.

Note: Users will need the "Bulk Update - Time Entries" permission from an Application Policy in order to use this feature.
Importing Time Entries consists of four components:
Navigate to the Bulk Update - Time Entries page
Administrators can access the Bulk Update - Time Entries page from the "Other" menu on the Administration page.
To navigate to the Bulk Update - Time Entries page:
Before You Start: Users will need the new "Bulk Update - Time Entries" permission from an Application Policy to access this page.
-
Select the Administration icon from the Icon Bar.

-
Select Bulk Update - Time Entries from the "Other" menu.

After selecting Bulk Update - Time Entries, the page will open. From here (if your import file is ready), you can configure the process options and upload the import file.
Creating the Time Entry import file
Users must prepare a CSV file that contains all of the time entry information that they wish to import.
Tip: A CSV (comma-separated values) file is any text file that allows data to be saved in a table-structured format. The most common way to create a Bulk Update file is by using Microsoft Excel. However, the file must be saved as a ".csv" file before it can be uploaded into Eclipse PPM.
Each row of the import file represents a Resource's time entered toward a Project Task on a single day. The following columns must be included on the file.
Tip: Click here to download a sample Excel file that contains each column header.

-
Project: Identify the Project that the Resource is entering time against. While configuring process options, use the "Project Identifier" field to determine which values should be entered under this column (Project Names, Project Numbers, Project Property values, etc.).
-
Task: Identify the Task that the Resource is entering time against. While configuring process options, use the "Task Identifier" field to determine which values should be entered under this column (Task Names, Task Numbers, Task Property values, etc.).
Note: If no "Task" value is entered for the Time Entry column, the hours will be applied to the "Project Time".
-
Resource: Identify the Resource that is entering time. While configuring process options, use the "Resource Identifier" field to determine which value should be entered under this column (First Name + Last Name, Resource ID, Resource email, etc.).
-
Date: Identify which day the Resource is entering time for. The date should be formatted dd/mm/yyyy.
-
Hours: Enter the number of hours that the Resource is entering against the Project Task for the day.
-
Notes: Enter a Daily Task Note for the time entry.
Note: See Add and View Timesheet Notes for more information on Daily Task Notes.
Once you have finished preparing your update file, save it to your computer as a ".csv" file.

Once it is saved, select the Choose File button to open up your computer's file manager and navigate to the file.

The name of the selected file will replace the "No file chosen" text, indicating that the update file is ready for upload.

Before uploading the file into Eclipse PPM, be sure to review all of the processing options.
Configuring Processing Options
Administrators can configure the following options to determine how the file will be imported into Eclipse PPM.

-
Approvals: Determine how the submission status of the Time Entries once they are imported into Eclipse PPM.

-
Do not submit: The Time Entries will be saved to each Resource's Timesheet, but they will not be submitted.
-
Submit: The Time Entries will be saved to each Resource's Timesheet and submitted. They can be approved by the configured time approver on the Approvals page.
-
Submit & Approve: The Time Entries will be saved to each Resource's Timesheet and submitted. They will be automatically approved upon import.
-
-
Import Mode: Determine how the Time Entries will be imported into Eclipse PPM.

-
Insert/Overwrite: The Time Entry values on the import file will replace any existing entries on the same days/Project Tasks.
-
Insert/Sum: The Time Entry values on the import file will be added to the existing entries on the same days/Project Tasks.
-
-
Project Identifier: Determine how Projects will be identified under the "Project" column of the import file.

-
Project Id: Project IDs must be entered under the "Project" column to identify Projects.
-
Project Name: Project names must be entered under the "Project" column to identify Projects.
Note: Project names do not have to be unique. If another Project shares the same name as the identified Project, the row will fail to be imported.
-
Project Number: Project Numbers must be entered under the "Project" column to identify Projects.
Note: Project Numbers do not have to be unique. If another Project shares the same Project Number as the intended Project, the row will fail to be imported.
-
Project Property: Select one of the listed Project Properties to identify Projects by the property's values.
Note: Multiple Projects can have the same Project Property values. If another Project has the same value as the intended Project, the row will fail to be imported.
-
-
Task Identifier: Determine how Tasks will be identified under the "Task" column of the import file.

-
Task Id: Task ID numbers must be entered under the "Task" column to identify Tasks.
-
Task Name: Task names must be entered under the "Task" column to identify Tasks.
Note: Task names do not have to be unique. If another Task on the same Project has the same name on the current Work Plan, the row will fail to be imported.
-
Task Number: Task Numbers must be entered under the "Task" column to identify Tasks.
-
Task Property: Select one of the listed Task Properties to identify Tasks by the property's values.
Note: Multiple Tasks can have the same Task Property values. If another Task on the Project has the same value on the current Work Plan, the row will fail to be imported.
-
-
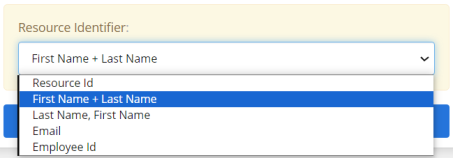
Resource Identifier: Determine how Resources will be identified under the "Resource" column.

-
Resource Id: Resource ID numbers must be entered under the "Resource" column to identify Resources.
-
First Name + Last Name: The Resource's first and last name (in that order) must be entered under the "Resource" column to identify the Resource (i.e. Tim Stutzle).
Note: If more than one Resource shares the same first and last name, the row will fail to be imported.
-
Last Name, First Name: The Resource's last and first name (in that order, separated by a comma) must be entered under the "Resource" column to identify the Resource (i.e. Stutzle, Tim).
Note: If more than one Resource shares the same first and last name, the row will fail to be imported.
-
Email: The Resource's email address must be entered under the "Resource" column to identify the Resource.
-
Employee Id: The Resource's Employee ID must be entered under the "Resource" column to identify the Resource.
Note: If more than one Resource shares the same Employee ID, the row will fail to be imported.
-
Uploading the import file
Once all of the process options have been reviewed and configured, the file can be uploaded into Eclipse PPM. Select the Upload button at the bottom of the page to import the Time Entries.

After uploading, a window will appear to indicate how many Time Entries were successfully imported in total, how many failed to import, and how many were imported with warning messages.

Note: The "Success" result displays a total of all the Time Entries that were successfully uploaded, including those that uploaded as "Success With Warnings". This is why the sum of these numbers may not add up to the number of Time Entries in your upload file.
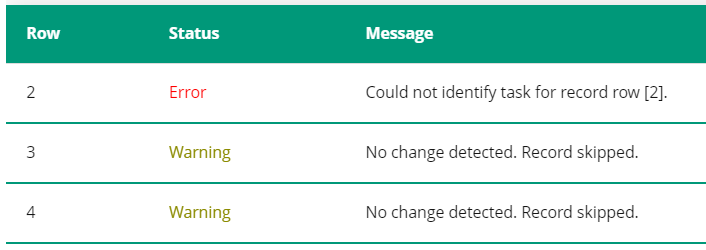
Directly below the results, a table will list all of the warnings and failures as well as a description of the issues.
