Using Swagger and Calling APIs
Since 2012, Eclipse PPM has been using an XML-based API. All of the documentation for this API was stored in .docx files. However, the new JSON-based API documentation can now be found directly on the web through Swagger.
Swagger is an online application that documents and organizes API endpoints. While Eclipse PPM developers create the API, Swagger automatically documents the endpoints so users can easily access up-to-date versions of them through Eclipse PPM. Swagger allows developers and Eclipse users to ensure the API works correctly before building an integration.
Caution: Beginning with the Eclipse PPM 2020R3 Release, a new set of JSON-based API endpoints have been made available. The Legacy XML-based endpoints will be deprecated as part of the 2024R2 release expected later this year. When this release is deployed, these endpoints will no longer be functional.
All new integrations should be created using the new endpoints, and any existing integrations should be migrated to them.
There is an easy way to differentiate between the old and new API endpoints. The old endpoints contain "services" in the URL:
None of the new endpoints contain the word "services":
This article covers the following topics:
Accessing Swagger
Swagger is the new home of Eclipse PPM API documentation. From here, Eclipse users can identify and test out all of the API endpoints. It can be accessed easily through your web browser's URL.
To access the API documentation on Swagger:
-
Log into Eclipse PPM.
-
Delete everything after "...eclipseppm.com/" in the URL.
-
Type in "help/index.html" at the end of the URL.

-
Press Enter on your keyboard.
You have now reached the Eclipse PPM API documentation page, hosted by Swagger:
From here, you can access and test out all of the Eclipse PPM endpoints.
API Endpoints in Swagger
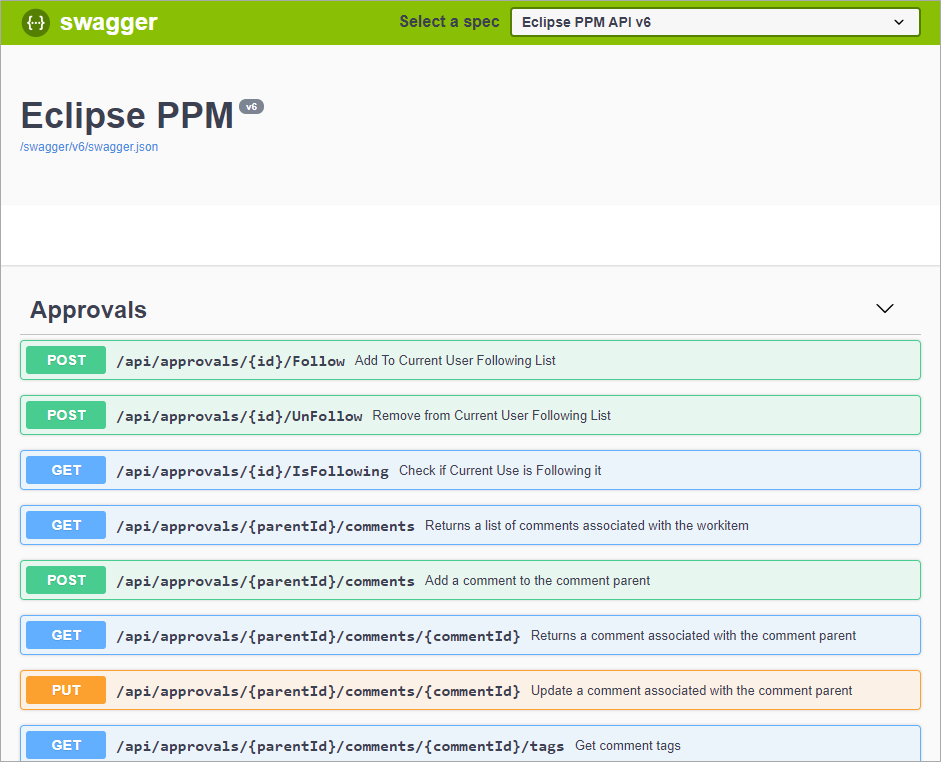
Swagger stores all of Eclipse PPM's API endpoints. They are all organized alphabetically by objects in Eclipse PPM (Projects, Risks, Tags, Resources, etc.). Each object can be collapsed or expanded by clicking the downwards arrow  .
.
When you click on one of the endpoints, it will display further information about the endpoint:
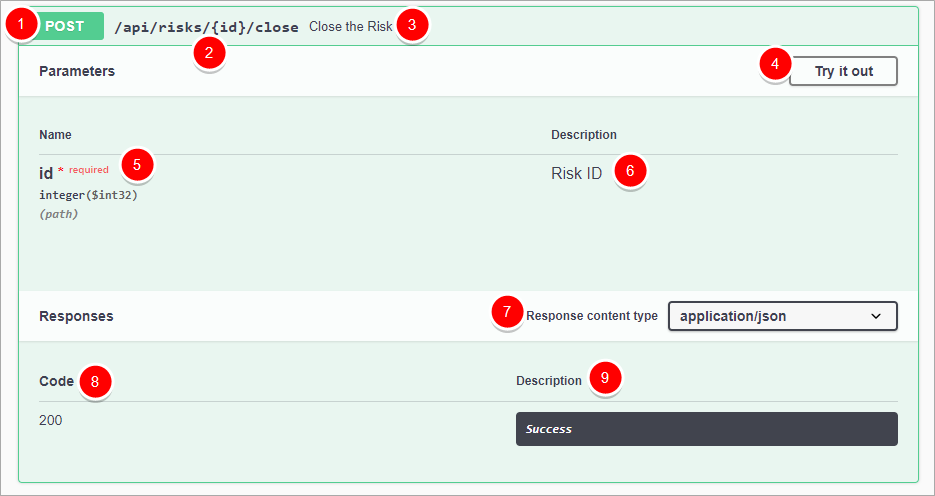
1. API Verb: This indicates the method of work carried out by the endpoint. There are four types of verbs: GET, PUT, POST, and DELETE. For more information on API verbs and what they do, click here.
2. Endpoint URL: This is the URL that the endpoint uses to carry out its function. Values within curly brackets "{ }" represent parameters that should be inserted into the endpoint.
Note: The URL becomes full once it is added to the end of your Eclipse PPM URL after "...eclipseppm.com".
3. Endpoint description: This explains the task carried out by calling the endpoint.
4. Try it out: Clicking this button allows the user to test out the API endpoint. For more information on testing out endpoints in Swagger, see below.
Parameters
5. Parameter Name: This indicates the name of the parameter as well as the data type. In the above example, the "id" of the risk is a required parameter that needs an "integer" data type. For more information on Data Types, see below.
6. Parameter Description: This explains the parameter. In the example above, the description indicates that the "id" represents the Risk ID number.
Responses
7. Response content type: This indicates the format of the API Response.
8. Response Status Code: The HTTP status code indicates the status of the Response. This indicates whether or not the API call was successful. If it was not successful, it will indicate why. Below is a table of the response codes that will likely be returned while using the Eclipse PPM API:
| Type of Response | Response Code | Description |
|---|---|---|
| Successful responses (200-299) | 200 OK | General indication that the response has returned successfully. This will often occur in the case of a GET when the requested data has been returned. |
| 201 Created | The request has been fulfilled and something new has been created. This should occur in the case of a POST or a PUT when new data generated for Eclipse. | |
| 204 No Content | The request has been fulfilled, but no body needs to be returned. This might appear if metainformation has been updated. | |
| Client (user) errors (400-499) | 400 Bad Request | The request could not be processed due to invalid syntax. For example, you might have sent the wrong JSON body while executing a POST. You should not resend the request without making modifications. |
| 401 Unauthorized | This request requires the user to authenticate itself. When this happens, it usually means that the user did not include the proper credentials in the WWW-Authenticate header field. For more information, see Security Requirements. | |
| 403 Forbidden | The server understands the user's request, but refuses to fulfill it. In this case, not even modifying the authorization will help. | |
| 404 Not Found | The server cannot find anything that matches the request URL. For example, this will occur during a GET for a Resource if the user enters a Resource ID that does not exist in Eclipse. | |
| 409 Conflict | The request could not be completed because a conflict exists between the request and the current state of the entity. This code will only be shown if the user can resolve the conflict and resubmit the request. If this is the case, the response body included with the error should indicate the problem. In the case of a PUT to add a new Resource in Eclipse, for example, a 409 might be returned with a body that indicates "'StatusID' must be greater than '0'." | |
| Server errors (500-599) | 500 Internal Server Error | The server encountered an unexpected problem that prevented it from fulfilling the request. In this case, the server is at fault, not the user who made the request. |
9. Response Description: This explains what the Response Status Code means. In the example above, the description indicates that the 200 code means the request has succeeded.
Once the endpoint is executed, more response objects become available:
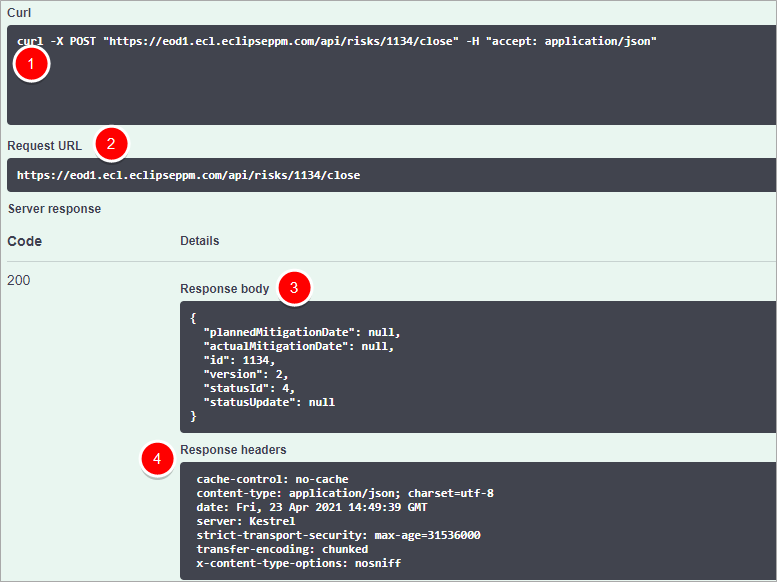
1. Command Line (cURL - Client URL): This line instructs the API on how to deal with the endpoint. In the example above, the cURL is instructing the API to POST the new closed Risk.
2. Request URL: This is the endpoint URL in full after the appropriate parameter(s) have been added. In the example above, the Risk ID has been added to the URL in the place of "{id}" to identify which Risk is being closed.
3. Response body: This contains the set of data returned with the request. When running a GET, this data is the purpose of the call. However, other HTTP methods will return data as well as confirmation. In the example above (a POST to close a Risk), the body contains data on the new Closed Risk.
4. Response headers: This contains the metadata behind the API request.
Testing API Endpoints in Swagger
From the Swagger page, you can test out all the API endpoints. Testing an API endpoint is a great way to find out what the expected response of calling that endpoint will be, as well as how the cURL and Request URL should be structured.
Caution: Executing API calls in Swagger can result in real data changes to your Eclipse PPM environment. For example, is you successfully POST a new Resource in Swagger, that Resource will exist in Eclipse. Likewise, if you run a DELETE in Swagger, it will delete Eclipse data and make it very difficult to recover. Make sure you do not run any API calls in Swagger that you do not want replicated in Eclipse PPM.
To test out an API endpoint in Swagger:
- Click on an API endpoint to open it up.
- Click the Try it out button on an API endpoint.
-
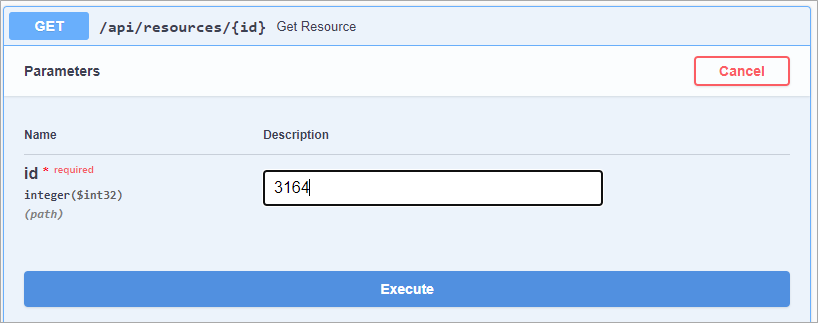
Enter the parameters into the text boxes.
Example: In the case of a "GET" for a single Resource, only a Resource ID number is required:
In the case of a POST or a PUT, the endpoint may require you to enter data into a JSON body. Fortunately, Swagger already outlines the JSON body in the Edit Value field, which means all you need to do is replace the default values: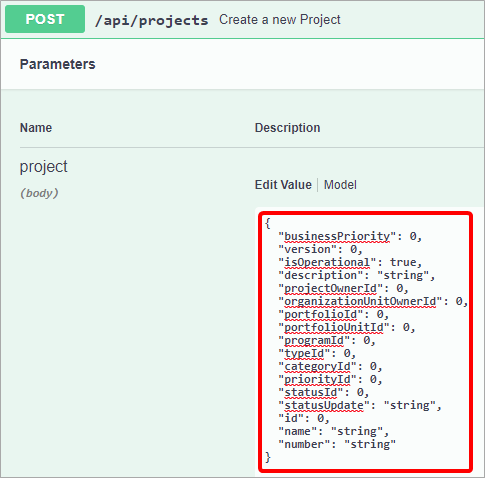
To see the expected data types instead of the default values, click Model: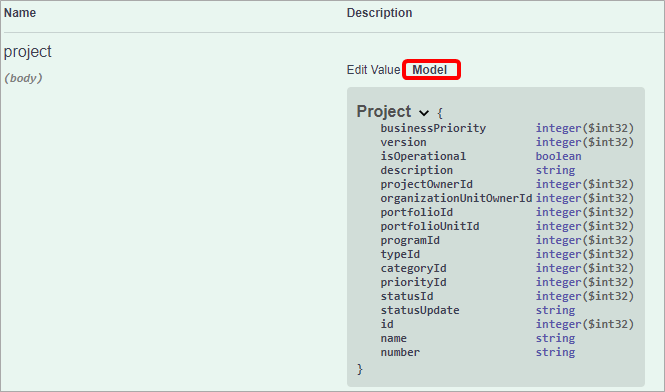
For more information on data types, scroll down.Tip: When entering information into a JSON body, null can be entered as a value for unnecessary data that you would like to leave blank. The response should let you know if this field requires an actual entry.
-
Click the Execute button.
If the request is successful, the Responses section should display a "200" success code as well as a response body containing the requested data in JSON format. It should also display the command line (cURL - client URL) and the request URL.
Example: In the case of a GET for a resource, the return will display a "200" code and all of the data for the specified resource within the Response body: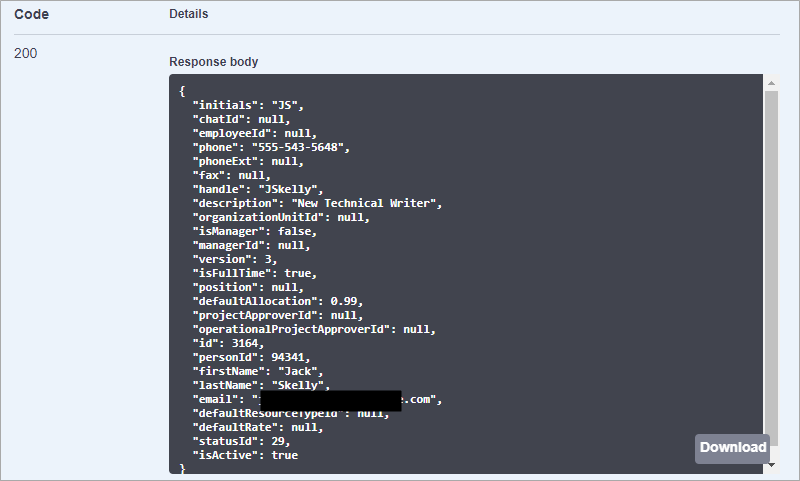
This same data can be seen in Eclipse PPM on the resource's page: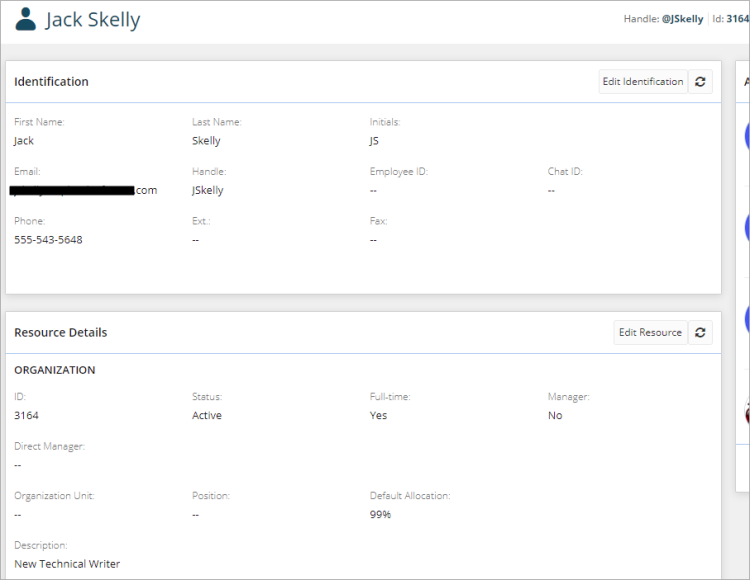
Above the body, Swagger also displays the cURL and the request URL: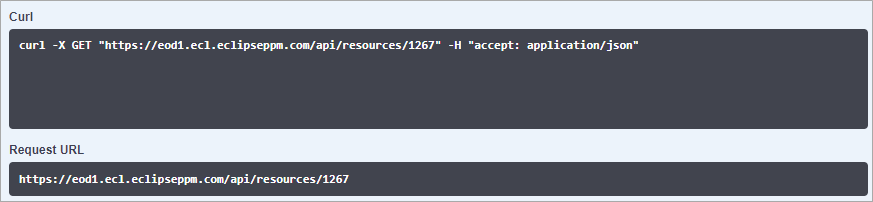
Data Objects
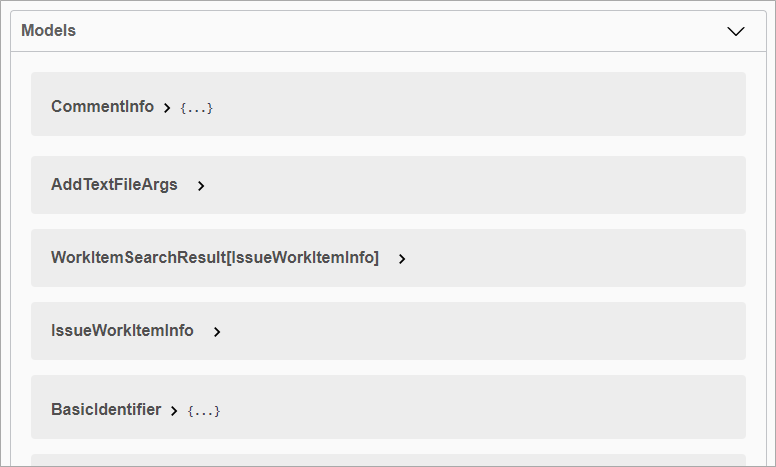
Below all of the API endpoints in Swagger is an expandable list of all of the data objects. Each data object can be opened up by clicking the arrow  to reveal the fields that are returned with it, as well as the data type of each field.
Example: Opening up the "Resource" data object will display all of the relevant JSON fields for a "Resource," like the example above.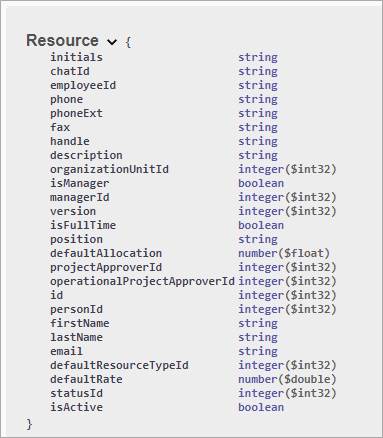
Tip: While testing out an endpoint that requires a JSON body (usually either a POST or a PUT), you can click Model to display the expected data types:
Data Types
Each field under a data object in Swagger has its own data type that indicates the type of data that will be returned (string, integer, etc.). The different data types are as follows:
-
String: A collection of any characters (letter, numbers, etc.). Strings will always return surrounded by quotation marks.
Note: If you are entering a null in the place of a string (which instructs the API to leave a value blank), the word null should not be in quotation marks.
-
Integer: A whole number, positive or negative. This excludes any numbers with decimals.
-
Number: Any number, with or without decimals.
-
Boolean: Either a "true" or a "false" value. These are often used to answer "Yes/No" questions in Eclipse PPM.
Example: For a Resource, a boolean value is used to indicate whether or not the resource is a manager:

Additional Information
Although Swagger simplifies working with the API, certain aspects might still cause confusion. This portion of the Eclipse PPM API support documentation covers the complicated areas that might seem unclear.
The following areas are covered:
Running Searches with the API
Aside from retrieving specific data, the Eclipse PPM API can use GETs to run searches for a collection of data based on the parameters provided.
Example: You can easily search for people in Eclipse PPM using the "Search Items by token" endpoint under the PersonToken object in Swagger:
Once the endpoint is opened up, you can enter what you would like to search for: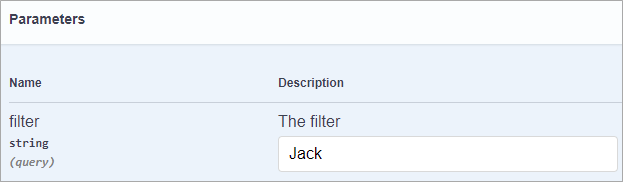
Running this search will retrieve data for every "item" that matches what was searched: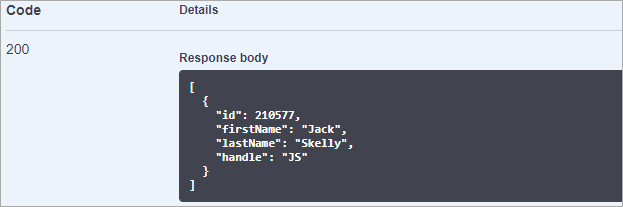
Advanced Searches
The Eclipse PPM API enables users to perform Advanced Searches just like they would from the "Search" page in the Eclipse application. This allows custom and pre-configured filters to be added to a search, as well as the user's choice of returned fields (ID, Start and End dates, Owners, etc.).
In the Legacy API (XML-based), search filters could be applied to API searches by providing the name of the filter or search type. For example, to simply search for active projects, the name "[Active Projects]" is all that needed to be provided within the "...search/projects/..." endpoint. While this same search can still be executed using the API, the ID number is required instead of the filter name. Unfortunately, ID numbers for pre-configured search filters cannot simply be found within the Eclipse PPM application.
In order to find search filter IDs using the API, the "Lookup Searches" GET endpoint must first be called to display each filter's ID number. For pre-configured search filters (identified by square brackets "[ ]"), however, you can refer to the Advanced Search API Reference Sheet.
Tip: The ID numbers of custom search filters (those without square brackets) can be identified within the Eclipse PPM application. To do this, the you must enter Edit mode for a particular custom filter: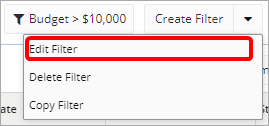
Once in Edit mode, the ID of the filter will be revealed in the URL:
The pre-configured search filters (identified by square brackets "[ ]") cannot be edited, so their ID numbers cannot be identified in the Eclipse PPM application.
To find out the ID of a search filter:
-
Navigate to the "Lookup Searches" endpoint.

Tip: Using Ctrl+F (Command+F on a Mac) to search the page for "Lookup Searches" is the quickest way to find this endpoint.
Note: This endpoint is not to be confused with the "Lookup Search" endpoint directly below it.
-
Click on the endpoint to open it up.
-
Click the Try it out button.
-
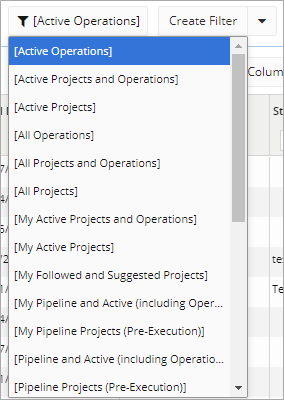
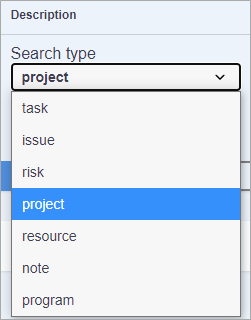
Use the "Search Type" drop down menu to select an entity for your Advanced Search.
-
Click Execute.
-
Scroll through the "Response body" to find your desired search filter by name.
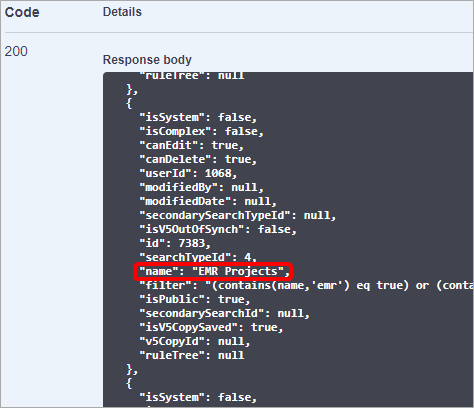
Tip: Using Ctrl+F (Command+F on a Mac) to search for the name of your filter is the quickest way to find it.
-
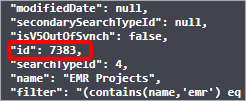
Take note of the search filter's ID.
Once the search filter ID is determined, it can be applied to an Advanced Search endpoint.
To execute an Advanced Search with the API:
-
Navigate to the "Search" object.
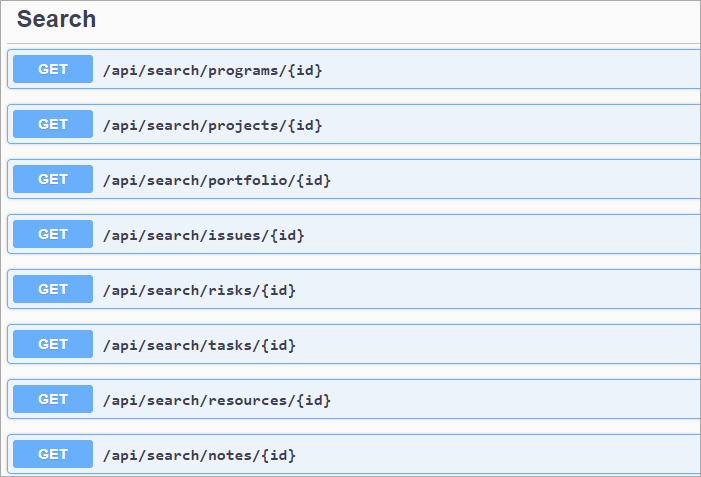
Tip: The "Search" object is the last object on the page.
-
Click on the endpoint that matches the entity you would like to Search for.
Example: If you are executing an Advanced Search for Projects, select the ".../projects" endpoint:

-
Click the Try it out button.
-
Enter information into the parameters:
-
Filter ID: Enter the search filter ID:

In this example of a Project search, the selected filter ID is "10". In the "Project Search Filter IDs" table from the Advanced Search API Reference Sheet, you will see that "10" is the ID for [Active Projects].
Note: The search filter ID can be determined by viewing the Advanced Search API Reference Sheet (pre-configured search filters), by viewing the URL of a search filter in Edit mode (custom search filters), or by calling the "Lookup Searches" GET endpoint (all search filters).
-
Selected fields: Enter which fields you would like to be returned. Separate each field by commas, but no spaces.

In this example of a Project search, the Project name, ID, start date, and category will all be included in each Project search result.
Note: A full list of returnable fields is available on the Advanced Search API Reference Sheet.
-
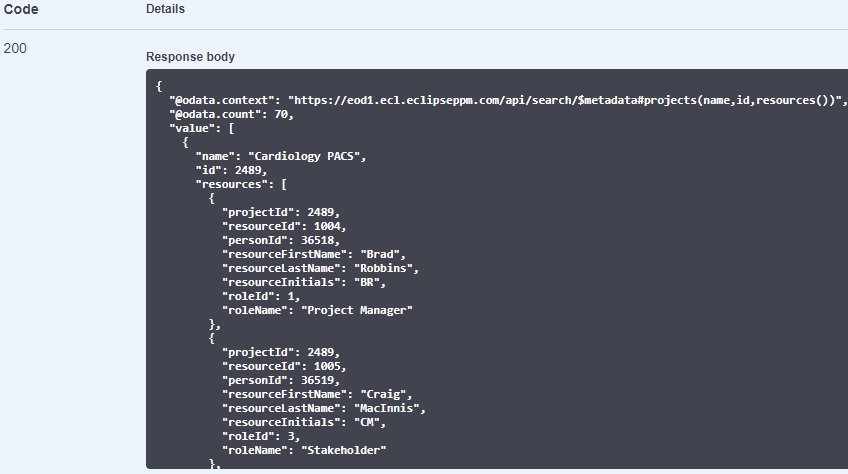
Expanded fields: Enter any expandable fields. As opposed to "Selected fields", the "Expanded fields" will retrieve further information about the field in regard to the search topic. Separate each field by commas, but no spaces.

For example, you can include "resources" as an "Expanded field" during a Projects search in order to retrieve some Project-related information about the Project's Resources:
The expandable fields for each search type are as follows:
-
Programs: PropertyValues
-
Projects: Resources, PropertyValues
-
Portfolio: Resources, PropertyValues
-
Issues: Resources
-
Risks: Resources
-
Tasks: Resources
-
Resources: Projects, Managers, Types
-
Notes: Tags
Note: You do not need to repeat any of the expanded fields in "Selected fields".
-
-
Order by fields: Enter one or more fields that can be entered into "Selected fields" to determine how the results will be ordered. Separate each field by commas, but no spaces.
Note: Only "Selected fields" can be used to determine the order. However, you can order by other selected fields that you have not entered into "Selected fields". "Expanded fields" cannot be used to determine the order.
Note: If you enter multiple fields, the results will be ordered by the first field. Fields that come after the first will only factor in if there are duplicates in the fields before it.

In this example of a Project search, the results will be ordered alphabetically by Project name. If there are duplicate names, the Project ID number will determine which Project(s) come first.
-
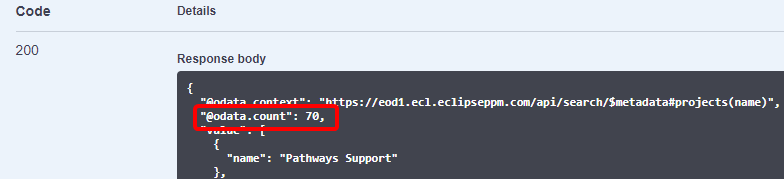
Include total counts: Select "true" from the drop-down menu to include a tally of results in the response body.

If "true" is selected, the result count will be included at the top of the response body, preceded by "@odata.count":
Note: There are two more search parameters that can be inserted into the URL that will help with paging and sorting: $top and $skip.
The "$top" parameter limits the returned results to a specific number. For example, "$top=2" in the URL below indicates that only the first two results will be returned in the response body.
The "$skip" parameter determines how many of the ordered results will be "skipped" over. For example, "$skip=4" in the URL below indicates that the response body will begin with the fourth result and "skip" over the first three.
Example: https://eod1.ecl.eclipseppm.com/api/search/tasks/38?$count=true&$select=id,taskname&$orderBy=id&$top=2&$skip=4
The Swagger documentation will soon be updated to include both of these parameters within the "Search" endpoints. -
-
Click Execute.
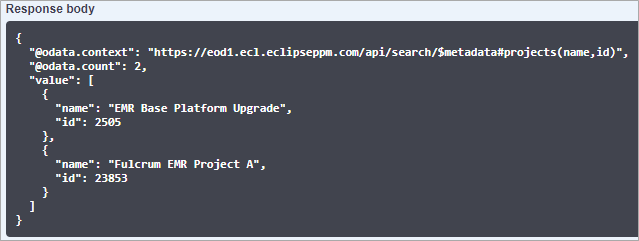
A successful Advanced Search will return a number of entities with the specified selected field in the JSON response body:
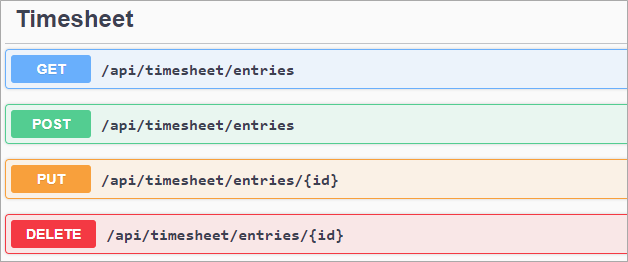
API Timesheet Entries
The Eclipse PPM API can be configured to manage timesheet entries. There are endpoints to GET, POST, PUT, and DELETE timesheet entries.
Before running these endpoints, it is important to understand the rules that surround them:
GET
The "GET" endpoint will return information on time entries based on the supplied parameters. The parameters are as follows:
-
startDate, endDate
-
Both of these parameters are required.
-
They must represent a valid date range of up to 60 days.
-
They must be formatted as "YYYY-MM-DD."
-
They can be the same date.
-
Note: Although the three parameters below are technically optional, at least one of them must be provided.
-
projectId
-
All entries for the specified Project will be included.
-
Entries for the Project's child Tasks will also be included.
-
-
taskId
-
All entries for the specified Tasks will be included.
-
Because "taskId" is more specific than "projectId," the latter will become irrelevant when included in a request with the former.
-
-
resourceId
-
All entries made by a specific resource will be included.
-
If the Resource ID provided does not belong to the API user, the API user must have "Impersonate All on Timesheet" permissions.
-
If "resourceId" is not specified, time entries for all users will be returned if the API user has "Impersonate All on Timesheet" permissions. If the API user does not have these permissions, only the API user's time entries will be returned.
-
Modifying Endpoints (POST, PUT, and DELETE)
The three endpoints that can alter Eclipse PPM data are subject to the following rules:
-
API users must have "Project View" permissions on the specified Project.
-
API users must have "Impersonate All on Timesheet" permissions to change time entries of other Resources.
-
Time Entry must be enabled on the specified project.
-
The specified Project must be in "Active" status unless its configuration allows for time entry once it has been closed.
-
For time entries that are pending approval, no changes can be made aside from updating the notes.
Additionally, the POST and the PUT endpoints are subject to the following rules:
-
If "taskId" is provided, it must belong to a parent Project ID.
-
When modifying Project time, time entry must be enabled on the specified project.
-
For a POST, the ID of the submitted time entry must be "0".