Add and Manage Project Task Properties
Task Properties are user-defined fields that can be used to capture information that would otherwise not be captured with any fields defined by Eclipse PPM.They can be used to accommodate each organization's Task classification and reporting needs

Note: Eclipse PPM users require the "Basic Task Update" permission to add and manage Task Properties.
This page covers the following topics:
About Task Properties
Once a new Task Property is created from (or added to) the Project Configuration page, it can be "filled in" while editing a Project Task.
Note: Task Properties can only be filled while editing a Task, not while creating a new one. Once the Task is created, you can address the Task Properties while editing the Task details.
The following types of Task Properties can be created and attached to Tasks:
-
Date: The information will be captured as a calendar date.

-
Flag: The information will be captured as a "Yes/No" value.

-
Multiple Select: The information will be captured as one or more values out of multiple options.

-
Number: The information will be captured as a number.

-
Single Select: The information will be captured as one value out of multiple options.

-
Text: The information will be captured as a string of text.

Task Properties are available for use in:
-
Adhoc Reports
-
Excel Add-in
-
Report Templates
-
Filters
-
Dashboards
Note: Task Properties are not yet available for use in Upland Analytics, nor are they updatable through a Bulk Update. Both of these features are currently being worked on and will be available soon.
Creating Task Properties from the Project Configuration Page
Task Properties can be created directly from the Project Configuration page. Once a Task Property has been created, it will be "fillable" on every one of the Project's tasks.
Note: Administrators can also create new Tasks from the Administration page under the "Work Plan" menu. These Task Properties can be added to any Project in Eclipse PPM.
To create a new Task Property:
-
Open up the Project Configuration page.
-
Scroll down to "Task Properties."
-
Click on the "Add" drop-down menu.
-
Select one of the Task Property types:

-
Enter the information for the new Task Property:

-
Name: Enter a name for the new Task Property.
-
Description (optional): Enter a description of the new Task Property.
-
Default (optional): Chose a default value that will automatically appear when the Task Property gets attached to a Task.
Note: This drop-down menu only applies to Date, Flag, Number, and Text Task Properties.
-
Values: Add one or more value options to choose from. Click on the Add button (
 ) to add a new value option, select the "Default" checkbox next to the default value (optional), and use the Drag and Drop icon (
 ) or the Up and Down arrows (
 ) to rearrange the order of the values (also optional).
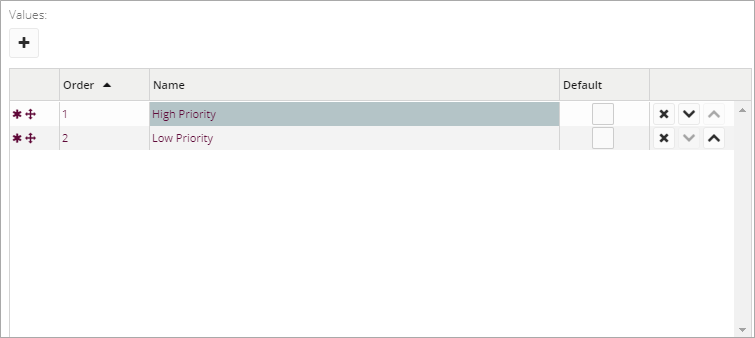
Note: These only apply to Single Select and Multiple Select Tasks Properties.
-
-
Click the Save button.
-
(Optional) Click the "Mandatory" checkbox in the "Task Properties" table to make the Task Property a required field:

Note: When a Task Property is marked mandatory, it must be filled in on a Task before that Task is saved again.
-
Click the Save button at the bottom of the Project Configuration page.
After clicking the Save button, the new Task Property will be created. Task Properties created from (and added to) the Project Configuration page will be added to the "Properties" tab of every Task on the Project:

Note: Once saved, a Task Property can be accessed and used by other users in Eclipse PPM.
Adding Existing Task Properties to a Project
Eclipse PPM users do not always need to create brand new Task Properties for their Projects; they can also add existing Task Properties to their Project Tasks.
To add existing Task Properties to a Project:
-
Open up the Project Configuration page.
-
Scroll down to "Task Properties."
-
Click on the "Add" drop-down menu.
-
Select "Add Existing":

-
Select the existing Task Properties to add to the Project:

-
Click theSave button.
-
(Optional) Click the "Mandatory" checkbox in the "Task Properties" table to make the Task Property a required field:
Note: When a Task Property is marked mandatory, it must be filled in on a Task before that Task is saved again.
-
Click the Save button at the bottom of the Project Configuration page.
After clicking the Save button, the Task Property will be added to the "Properties" tab of every Task on the Project:
Filling In Task Properties
Once a Task Property is added to a Project, it will automatically be attached to all Project Tasks. Task Properties can then be "filled-in" (given values) by editing the Project.
Note: This step can be avoided by choosing a "Default" value while creating or editing a Task Property. Just be sure to change the values of Task Properties that deviate from the default.
Tip: Task Properties can be updated in bulk through the Tasks page in Eclipse PPM.
To "fill-in" Task Properties:
-
Click on a Task.
Note: Project Tasks can easily be found by opening the "Project Menu" and selecting Tasks.
-
Select the "Properties" tab:

-
Scroll to the bottom to find the Custom Task Properties.
-
Select or insert values for the Task Properties:

-
Click the Save button.