Task Bulk Actions
The Tasks List page (through Advanced Search) allows Eclipse PPM users to take action on multiple Tasks at once. This saves users from having to visit each individual Task in order to make their desired changes.
The following bulk actions can be taken on Tasks:
Update the Percent Complete of Multiple Tasks
The percent complete of multiple Tasks can be simultaneously updated at once. Each selected Task will share the same percent complete value.
Tip: If you would like to update the percent complete of multiple Tasks to 100%, see Complete Multiple Tasks below.
To update the percent complete value of multiple Tasks:
Before You Start: Users require the "Basic Task Update" permission on a Project's Policy to update the percent complete of its Tasks. User will only be able to update the percent complete of Tasks from Projects that they have been given this permission on.
-
Select the Search icon from the Icon Bar.

-
Select Tasks.

-
(Optional) Apply a filter to the Tasks page to narrow down the Tasks to choose from:
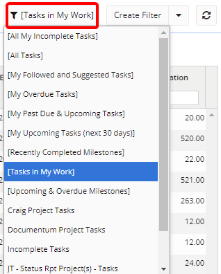
Tip: See Filter Tasks for more information.
-
Select the Bulk Actions button.

-
Select the checkboxes of the Tasks you would like to update.
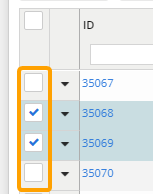
Note: Selecting the checkbox in the column header will automatically select every Task on the page.
-
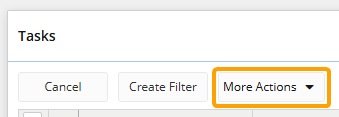
Open the More Actions menu.
-
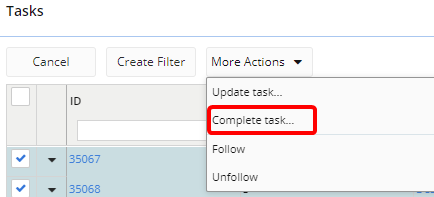
Select Update task....
-
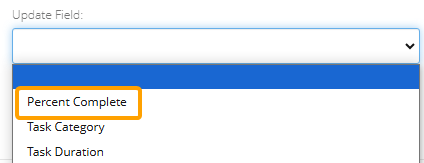
Select Percent Complete from the "Update Field" drop-down menu.
-
Adjust the "New Value" percent complete bar to the percent complete value that you would like to apply to each selected Task.

-
(Optional) Click the Add a Comment? button to attach a comment to each selected Task.

-
Select the Save button.

After clicking Save, the percent complete of your selected Tasks will be updated. A green banner will appear if each Task update was a success.

Note: Any errors that might occur are most likely due to permissions. Ensure that you have been given the "Basic Task Update" permission on a Project's Policy on each Task's Project.
Complete Multiple Tasks
Users can update the percent complete of multiple Tasks to 100% at once using Bulk Actions.
Tip: If you would like to update the percent complete of multiple Tasks to a value other then 100%, see Update the Percent Complete of Multiple Tasks above.
To complete multiple Tasks at once:
Before You Start: Users require the "Basic Task Update" permission on a Project's Policy to update the percent complete of its Tasks. User will only be able to update the percent complete of Tasks from Projects that they have been given this permission on.
-
Select the Search icon from the Icon Bar.

-
Select Tasks.

-
(Optional) Apply a filter to the Tasks page to narrow down the Tasks to choose from:

Tip: See Filter Tasks for more information.
-
Select the Bulk Actions button.

-
Select the checkboxes of the Tasks you would like to update.

Note: Selecting the checkbox in the column header will automatically select every Task on the page.
-
Open the More Actions menu.

-
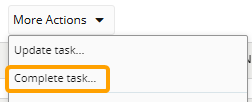
Select Complete task...
-
(Optional) Click the Add a Comment? button to attach a comment to each selected Task.

-
Select the Save button.

After selecting Save, the percent complete of each selected Task will be updated to 100%. A green banner will appear if each Task update was a success.

Note: Any errors that might occur are most likely due to permissions. Ensure that you have been given the "Basic Task Update" permission on a Project's Policy on each Task's Project.
Update the Categories of Multiple Tasks
The Task Categories of multiple Tasks can be simultaneously updated at once using Bulk Actions. Each selected Task will receive the same Task Category.
To update the Task Categories of multiple Tasks:
Before You Start: Users require the "Basic Task Update" permission on a Project's Policy to update the Task Categories of its Tasks. User will only be able to update the categories of Tasks from Projects that they have been given this permission on.
-
Select the Search icon from the Icon Bar.

-
Select Tasks.

-
(Optional) Apply a filter to the Tasks page to narrow down the Tasks to choose from:

Tip: See Filter Tasks for more information.
-
Select the Bulk Actions button.

-
Select the checkboxes of the Tasks you would like to update.

Note: Selecting the checkbox in the column header will automatically select every Task on the page.
-
Open the More Actions menu.

-
Select Update task....

-
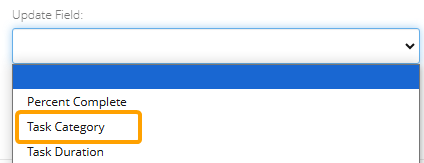
Select Task Category from the "Update Field" drop-down menu.
-
Select which Task Category you would like to apply to the selected Tasks using the "New Value" drop-down menu.

Note: The Task Categories available in this menu can be created and edited by Eclipse PPM administrators. See Add and Manage Task Categories for more information.
-
(Optional) Click the Add a Comment? button to attach a comment to each selected Task.

-
Select the Save button.

After selecting Save, the Task Category of each Task will be updated to the selected value. A green banner will appear if each Task update was a success.

Note: Any errors that might occur are most likely due to permissions. Ensure that you have been given the "Basic Task Update" permission on a Project's Policy on each Task's Project.
Update the Duration of Multiple Tasks
The Planned Durations of multiple Tasks can be updated at once using Bulk Actions.
Note: Changes in duration will affect a Task's Planned Start and End Dates based on the Task's "Constraint".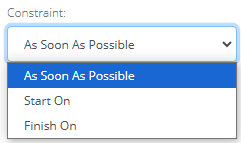
If either As Soon As Possible or Start On is selected, the Task's Planned End Date will be changed to accommodate the new Planned Duration. For example, imagine a Task with a Planned Start Date of December 4th and a Planned End Date of December 6th. The Planned Duration is currently 3 days. When the Planned Duration is changed to 4 days, the Planned Start Date stays the same and the Planned End Date gets pushed back to December 7th to accommodate it.
If Finish On is selected, the Task's Planned Start Date will be changed to accommodate the new Planned Duration. For example, imagine a Task with a Planned Start Date of December 4th and a Planned End Date of December 6th. The Planned Duration is currently 3 days. When the Planned Duration is changed to 4 days, the Planned End Date stays the same and the Planned Start Date gets pushed forward to December 3rd to accommodate it.
To update the Planned Duration of multiple Tasks:
Before You Start: Users require the "Basic Task Update" permission on a Project's Policy to update the durations of its Tasks. User will only be able to update the durations of Tasks from Projects that they have been given this permission on.
-
Select the Search icon from the Icon Bar.

-
Select Tasks.

-
(Optional) Apply a filter to the Tasks page to narrow down the Tasks to choose from:

Tip: See Filter Tasks for more information.
-
Select the Bulk Actions button.

-
Select the checkboxes of the Tasks you would like to update.

Note: Selecting the checkbox in the column header will automatically select every Task on the page.
-
Open the More Actions menu.

-
Select Update task....

-
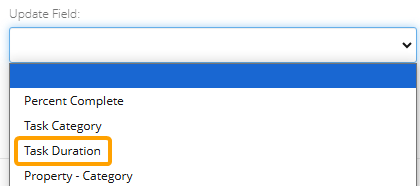
Select Task Duration from the "Update Field" drop-down menu.
-
Enter the new Planned Duration (in days) for each selected Task into the "New Value" field.

Note: Changes in duration will affect a Task's Planned Start and End Dates based on the Task's "Constraint". See the note above for more information.
-
(Optional) Click the Add a Comment? button to attach a comment to each selected Task.

-
Select the Save button.

After selecting Save, the new Planned Duration will be implemented to the selected Tasks. A green banner will appear if each Task update was a success.

Note: Any errors that might occur are most likely due to permissions. Ensure that you have been given the "Basic Task Update" permission on a Project's Policy on each Task's Project.
Update Task Property Values of Multiple Tasks
The Task Property values of multiple Tasks can be simultaneously updated at once using Bulk Actions. Each selected Task will receive the same value for the selected Task Category.
Note: The selected Tasks will only be affected by Task Property updates if they have the Task Property attached to them. Selected Tasks without the property will not be affected.
Note: Task Properties can be created and edited by Eclipse PPM administrators (or users with the "Configuration Administration" permission from an Application Policy). Task Properties will appear on Tasks when the Project is configured to include them.
To update the Task Property values of multiple Tasks:
Before You Start: Users require the "Basic Task Update" permission on a Project's Policy to update the Task Properties of its Tasks. User will only be able to update the properties of Tasks from Projects that they have been given this permission on.
-
Select the Search icon from the Icon Bar.

-
Select Tasks.

-
(Optional) Apply a filter to the Tasks page to narrow down the Tasks to choose from:

Tip: See Filter Tasks for more information.
-
Select the Bulk Actions button.

-
Select the checkboxes of the Tasks you would like to update.

Note: Selecting the checkbox in the column header will automatically select every Task on the page.
-
Open the More Actions menu.

-
Select Update task....

-
Select the Task Property you would like to update values for.
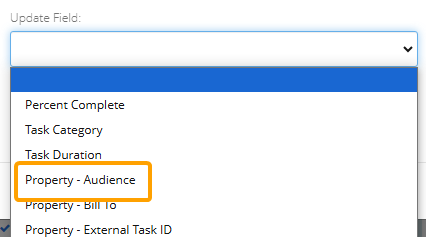
Note: All of the Task Properties are prefaced with "Property - ".
Note: The Task Properties available in this menu can be created and edited by Eclipse PPM administrators. See Add and Manage Task Properties for more information.
-
Select/enter a value for the Task Property.

Note: Multiple Select property types allow users to select more than one value. Additionally, they will offer two ways to implement the values to Tasks.
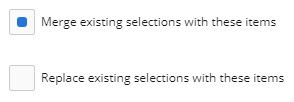
Merge existing selections with these items: None of the Task's existing property values will be removed and the selected values will be added. Any selected values that already exist on the Task will remain.
Replace existing selections with these items: The Task's existing property values will be completely replaced by the selected values. Any existing values on the Task will be removed and the selected values will be added. -
(Optional) Click the Add a Comment? button to attach a comment to each selected Task.

-
Select the Save button.

After selecting Save, the Task Property values will be implemented to the selected Tasks. A green banner will appear if each Task update was a success.

Note: Any errors that might occur are most likely due to permissions. Ensure that you have been given the "Basic Task Update" permission on a Project's Policy on each Task's Project.
Note: Tasks that did not originally have the selected Task Property will not be affected. Properties can be added to Tasks through Project Configuration.
Add or Remove Tasks to or from your "My Work" Panel
Multiple Tasks can be added or removed from your "My Work" panel using Bulk Actions. Each selected Task will be either added or removed from your "My Work".
Note: Adding a Task to your "My Work" panel does not assign you to the Task.
Tip: The "My Work" panel is generally reserved for Tasks that you are responsible for. If you are only interested in keeping track of the Task, consider following it instead.
To add or remove multiple Tasks to or from your "My Work" panel:
Before You Start: In order to see a Project's Tasks on the Tasks List page, users require the "Project Schedule - View" permission on one of the Project's Policies.
-
Select the Search icon from the Icon Bar.

-
Select Tasks.

-
(Optional) Apply a filter to the Tasks page to narrow down the Tasks to choose from:

Tip: See Filter Tasks for more information.
Tip: If you are removing Tasks from your "My Work" panel, it might be wise to select the "[Tasks in My Work]" filter.
-
Select the Bulk Actions button.

-
Select the checkboxes of the Tasks you would like to add/remove.

Note: Selecting the checkbox in the column header will automatically select every Task on the page.
-
Open the More Actions menu.

-
Select Add to My Work to add the selected Tasks to your "My Work" panel
OR
Select Remove from My Work to remove the selected Tasks from your "My Work" panel.
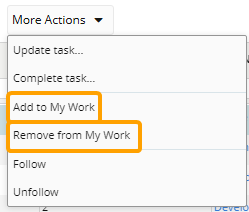
After selecting Add to My Work or Remove from My Work, the selected Tasks will be added to or removed from your "My Work" panel. A green notification will appear in the top right-hand corner of the screen.

Follow or Unfollow Multiple Tasks
Multiple Tasks can be followed or unfollowed at once using Bulk Actions. Followed Tasks will appear on your Home page's "Following" tab and unfollowed Tasks will be removed from it.
To follow or unfollow multiple Tasks:
Before You Start: In order to see a Project's Tasks on the Tasks List page, users require the "Project Schedule - View" permission on one of the Project's Policies.
-
Select the Search icon from the Icon Bar.

-
Select Tasks.

-
(Optional) Apply a filter to the Tasks page to narrow down the Tasks to choose from:

Tip: See Filter Tasks for more information.
Tip: If you are unfollowing Tasks, it might be wise to select the "[My Followed and Suggested Tasks]" filter.
-
Select the Bulk Actions button.

-
Select the checkboxes of the tasks you would like to follow/unfollow.

Note: Selecting the checkbox in the column header will automatically select every Task on the page.
-
Open the More Actions menu.

-
Select Follow to follow the selected Tasks
OR
Select Unfollow to unfollow the selected Tasks.
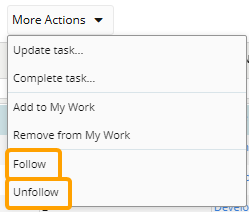
After selecting Follow or Unfollow, the selected Tasks will either be added to your "Following" tab or removed from it. A green notification will appear in the top right-hand corner of the screen.
