Edit Task Details
Eclipse PPM users can update a task's schedule dates, properties, resources and predecessors from one place on Eclipse. They can also add a description of any task as well as important comments.
Eclipse PPM users can edit task details directly on from the Work Plan simply by double-clicking on the field. For example, a task's Planned End date can easily be changed by double-clicking on the "Planned End" cell:
Click image to play.
To edit other details that are not displayed on the Work Plan spreadsheet, click on a task's black arrow  to open up its drop-down menu:
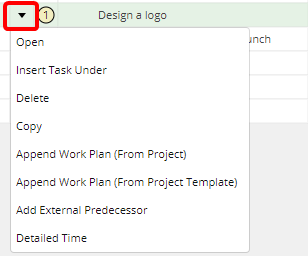
Selecting Open from the drop-down menu will open up the same Edit Task Panels that you can find by clicking on a task from the Project Work Panel of the Project Menu.
Selecting Insert Task Under will add a new task directly under the task. This task will become a subtask of the original task, which means the original task cannot be set as "Complete" until completion of the subtask(s).

The "Buy paint for the logo" task was created as a result of the Insert Task Under selection.
Note: Existing tasks can become subtasks by clicking on the tasks and then clicking the Indent Task button  . This will make it a subtask of the closest task above it that is "outdented" by one level. For example, if the "Develop Press Release for Launch" task in the image above was indented once, it would become a subtask of the "Design a logo" task along:
If it was indented again, it would become a subtask of the "Buy Paint for the logo" task:
Notice how the "% complete" changes when subtasks are added to tasks; if a task contains any subtasks, its "% complete" is totally dependent on the "% complete" of its subtasks. A tasks will only be marked 100% complete after its subtasks are marked 100% complete.
Selecting Delete will simply delete the task from the Work Plan. The task will also be deleted from the Project Menu.
Tip: If you mistakenly delete a task, simply click the Undo button  to bring it back.
Selecting Copy will copy the task to the Work Plan clipboard, where it will stay until it gets pasted somewhere (or until Copy is selected for another task). Once a tasks is copied, a new Paste option will appear on the drop-down menu for all tasks:
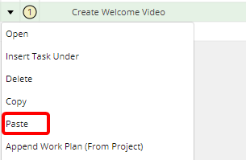
Selecting Paste will place the copied task next to the selected task. The "Paste" window will appear, allowing users to provide further details:
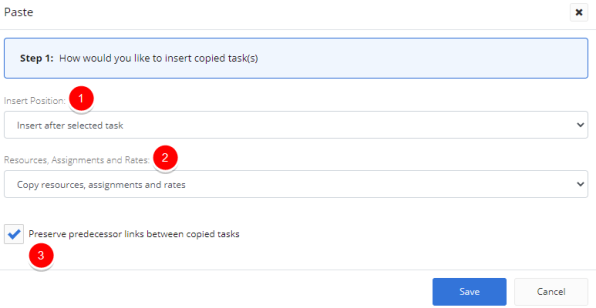
1. Insert Position: Indicate where the copied task should be pasted in relation to the selected task.
2. Resources, Alignments and Rates: Indicate how Resources, Alignments and Rates should be carried over from the original task to the copied one.
3. Preserve predecessor links between copied tasks: When this is selected, copied tasks will keep their predecessor relationships.
Note: This option is only relevant when two or more tasks are being copied at once using the Copy button  on the toolbar. The drop-down menu can only copy one task at a time, so this option is irrelevant in this case.
After clicking Save, a copy of the task will be placed beside the task that had Paste selected for it:

Selecting Append Work Plan (from Project) allows users to copy all tasks from the Work Plan of another Project directly into their own Work Plan. The "Append Work Plan (from Project)" window will appear:
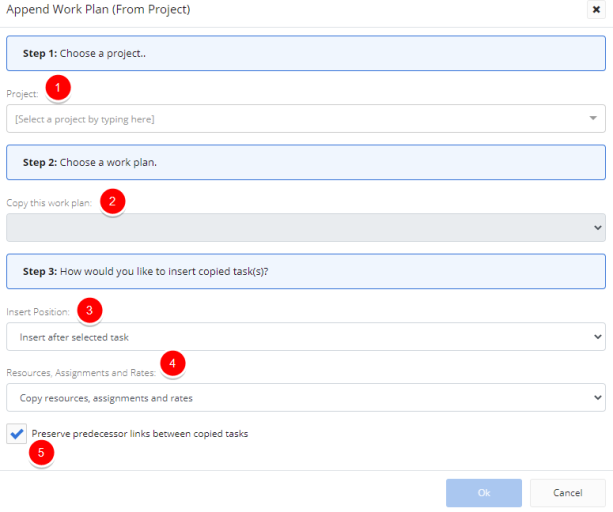
1. Project: Choose a Project that contains the Work Plan you would like to append.
2. Copy this work plan: Choose the Work Plan that you would like to copy tasks from.
3. Insert Position: Indicate where the appended tasks should be pasted in relation to the selected task.
4. Resources, Assignments and Rates: Indicate how Resources, Alignments and Rates should be carried over from the original tasks to the copied ones.
5. Preserve predecessor links between copied tasks: When this is selected, copied tasks will keep the same predecessor relationships that they had in their original Work Plan.
After clicking OK, every task from the chosen Work Plan will appear on your own Work Plan.
Selecting Append Work Plan (from Project Template) allows users to copy all tasks from the Work Plan of a Project Template directly into their own Work Plan. The "Append Work Plan (from Project Template)" window will appear:
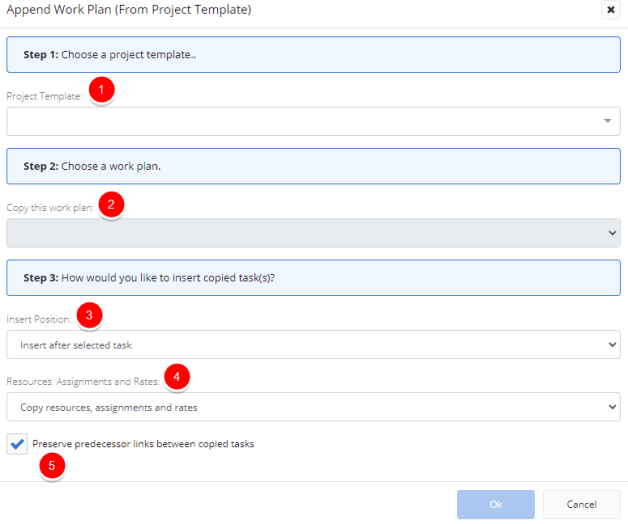
1. Project Template: Choose a Project Template that contains the Work Plan you would like to append.
2. Copy this work plan: Choose the Work Plan that you would like to copy tasks from.
3. Insert Position: Indicate where the appended tasks should be pasted in relation to the selected task.
4. Resources, Assignments and Rates: Indicate how Resources, Alignments and Rates should be carried over from the original tasks to the copied ones.
5. Preserve predecessor links between copied tasks: When this is selected, copied tasks will keep the same predecessor relationships that they had in their original Work Plan.
After clicking OK, every task from the chosen Work Plan will appear on your own Work Plan.
Selecting Add External Predecessor allows you to add predecessor tasks from external Projects. This option is useful if any of your Project tasks should not be worked on before a task from a separate Project is completed first.
After selecting this option, the "Add External Predecessor" window will appear:

1. From this project: Choose the external Project with the desired predecessor task.
2. Task List: Chose which task will serve as a predecessor.
3. Predecessor Type: Indicate what type of predecessor the selected task will be:
-
End - Start: Once the external predecessor task ends, the selected task should begin.
-
Start - Start: Once the external predecessor task begins, the selected task should begin.
After clicking OK, the predecessor will be added to the task. You can see a layout of your Project's external predecessors by selecting "External Predecessors" from the More drop-down menu:
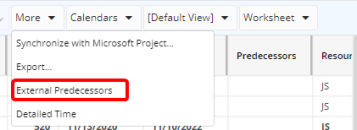
This layout will display all of the external predecessors that have been added to your Work Plan:

In this example, the Work Planner has two tasks with external predecessors from another Project.
Whenever the dates of a predecessor task change, you will receive an indicator on your Work Plan:

For more information, see Link/Unlink Tasks (Task Dependencies).
Selecting Detailed Time will open a Detailed Time window for the task. This window allows you to manage the effort allocated to the task:
Click to enlarge.
This window allows you to manage the allocated effort towards a task in much greater detail. By default, a Resource's effort will be set uniformly across each working day from the task's start date to end date (for example, if a Resource has 50% of their effort allocated to a task, 50% of each of their working days will be automatically attributed to the task). The Detailed Time window allows Project Managers to customize these allocations by days, weeks, or months. This creates a more comprehensive, realistic look at how the Resources' time will be attributed to the task.
See View and Manage the Detailed Time for more information on using the Detailed Time window.

