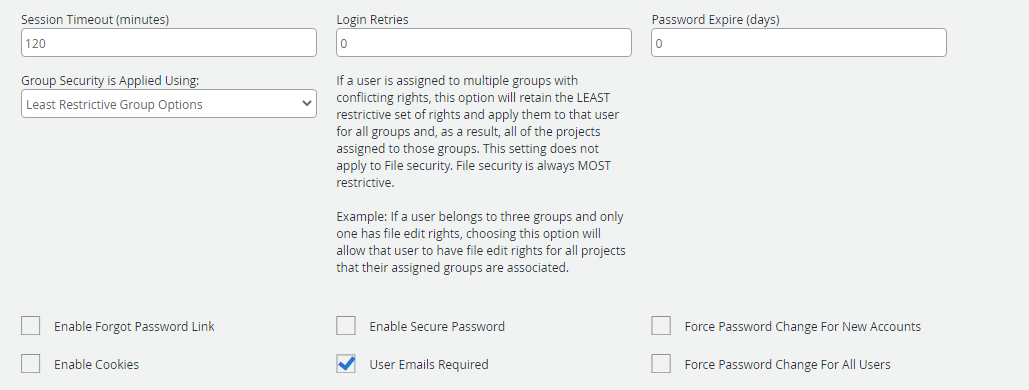
Session Timeout (minutes): The duration of time, after which users are automatically logged out of FileBound due to inactivity.
Note: For FileBound Cloud customers, the maximum supported session timeout is 20 minutes.
Note: This setting is ignored when FileBound uses Active Directory to handle user authentication for logging on to FileBound. After 90 minutes of inactivity, the screen will need to be refreshed to re-authenticate.
Login Retries: The number of times a user can try logging in again after a log in fails. When the number of retries reaches the specified limit, a message is displayed. The user account is locked, and the user is not allowed to log in until the System Administrator or Access Administrator enables the user to log on to again.
You can view the User Login Report to see log in failure details. The report includes the user name, failure date and time, and IP address of the user's machine used for logging in to the system.
Password Expire (days): The number of days after which
Group Security is Applied Using: It can be common for a single user to be a member of multiple groups where the rights from one group to another can be different. Determining which rights control user access is influenced by choosing either a least restrictive or most restrictive setting for Groups.
-
Least Restrictive Group Options: If a user is assigned to multiple groups with conflicting rights, this option will retain the LEAST restrictive set of rights and apply them to that user for all groups and, as a result, all of the projects assigned to those groups. This setting does not apply to File Security. File Security is always MOST restrictive.
Example: If a user belongs to three groups and only one has file edit rights, choosing this option will allow that user to have file edit rights for all projects that their assigned groups are associated with.
Consider the following scenario:
Group A Group B User’s Rights File Add File Edit File Add File Search File Delete File Search File Edit File Delete -
Most Restrictive Group Options: If a user is assigned to multiple groups with conflicting rights, this option will retain the MOST restrictive set of rights and apply them to that user for all groups and, as a result, all of the projects assigned to those groups. This setting does not apply to File Security. File Security is always MOST restrictive.
Example: If a user belongs to three groups and only one has file edit rights, choosing this option will not allow this user File Edit rights for any of the projects that their assigned groups are associated with.
Consider the following scenario:
Group A Group B User’s Rights File Add File Add File Add File Search File Delete File Edit File Transfer
Enable Forgot Password Link: Enables the Help! I forgot my password. link on the sign in page. This sends a one-time password to the user's email address. Users can sign in to FileBound using the one-time password and then reset their password.
Enable Secure Password: Implements strict rules for choosing a password. The secure password requirements are:
- At least 8 characters in length
- At least one uppercase letter (A,B,C,etc.)
- At least one lowercase letter (a,b,c,etc.)
- At least one special character ( !,@,#,%,etc.)
- At least one number (1,2,3,etc.)
- Cannot be the same as the user name
- Cannot be identical to any of the previous ten passwords for the user
Force Password Change For New Accounts: Makes it mandatory for new users to change their password after their first login.
User Emails Required: Makes it mandatory to provide an email address when adding a new user in FileBound.
Force Password Change For All Users: Makes it mandatory for all users to change their password the next time they log in to FileBound.
Active Directory

On-premise FileBound installations can utilize Active Directory for the authentication of users into FileBound. Active Directory is required to be installed and configured on the network.
Note: Active Directory is only for on-premise FileBound installations. It cannot be implemented for FileBound Cloud sites.
Enable Active Directory: Turns on Active Directory authentication for the site.
AD Path: The full Lightweight Directory Access Protocol (LDAP) string required to query the Active Directory system. This defines the root of the active directory domain. It is used to automatically discover the nearest domain controller to run against. When there is a need to add additional sections to the path, repeat "DC=" for as many parts of the domain as are needed. For example, LDAP://mycomp.int/DC=mycomp,DC=int.
Domain: The NetBIOS name of the domain that will be used. Multiple domains can be added if they are child nodes of a single root domain. You can specify multiple domains separated by a comma.
Encryption

FileBound allows you to encrypt documents while they are stored within the FileBound document storage location, and while transferring the documents through Secured Socket Layer (SSL). This helps to keep the data safe from hackers. After you set up the document encryption, it is applied to the new documents that are created and saved. The previously saved documents are not encrypted. You can open and save previously saved documents to apply encryption.
FileBound provides AES 128-bit and TripleDES encryption to encrypt documents.
Note: Once encryption is applied to documents, it cannot be removed, only decrypted.
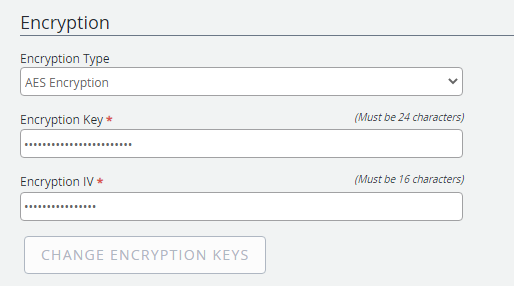
Encryption Type: The type of encryption applied to documents while they are stored in FileBound. The following options are available:
- No Encryption
- AES Encryption
- TripleDES Encryption
Encryption Key: A key used to encrypt the document when it is stored. The key needs to be 24 alpha or numeric characters long.
Encryption IV: The encryption initialization vector (IV) needs to be 8 alpha or numeric characters long when using the TripleDEs encryption type. The IV needs to be 16 alpha or numeric characters long when using the AES encryption type.
Change Encryption Keys: Allows you to modify the encryption keys set for your site.
Tip: Copy the keys and save them in another location because if these keys are lost, there is no way to decrypt the documents.
Activity Logging

All user activities are tracked by FileBound. Select an option from the Select Audit level list to specify the level of activity logging. This impacts the data that is fetched in the Audit Reports. See Activity Audit Log for more information.
Custom Headers

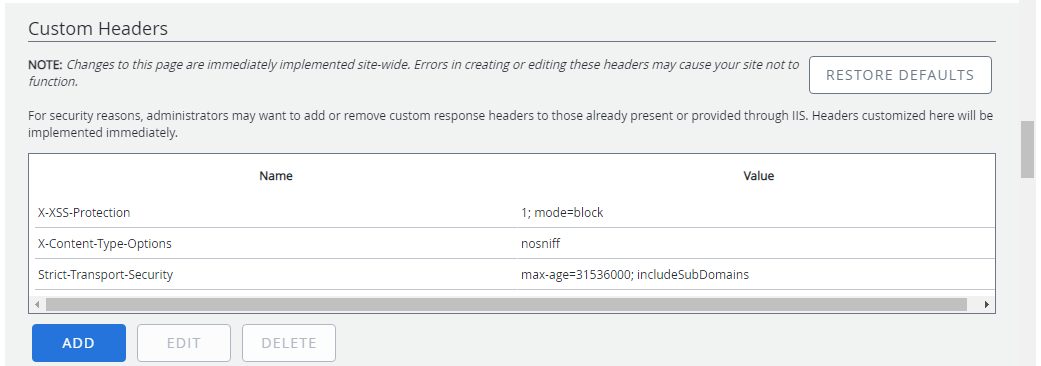
A Response Header is information that a web server sends back to a client’s browser in response to receiving an HTTP request. Response headers contain information such as the size and type of file that the server is sending back to the client, as well as data about the server itself. These headers can also be used to instruct browsers to apply different security settings. A Custom Header allows you to add headers to each response in FileBound.
By default, there are three custom headers that FileBound uses. System Administrators have the option to add, edit or delete these headers. For security reasons or independent audits, Administrators may want to add to or remove the already present or provided through IIS. All customized headers are implemented immediately.
Example: Let’s say you want to prevent your FileBound site from being embedded into another site. There’s a specific header that can be applied to tell browsers to not allow the page to be embedded within another. This header is called “X-Frame-Options” and can have a value of “DENY”, “SAMEORIGIN”, or “ALLOW-FROM https://example.com”. You could add this header, with one of the appropriate values, to add this extra layer of security. More info on this header can be found here
Click Restore Defaults to restore custom headers to system defaults.
SAML Configuration
Administrators can configure FileBound access using a third-party single sign-on (SSO) provider. FileBound is compatible with most SSO providers who are SAML 2.0 compliant. SSO simplifies the user experience for end-users.
Security Assertion Markup Language (SAML) is a standard protocol for web browser Single Sign-On (SSO) using secure tokens. SAML eliminates all passwords used in FileBound and instead uses standard cryptography and digital signatures to pass a secure sign-in token from an identity provider to a SaaS application.
Requirements to work with FileBound SSO:
- You MUST have an existing/configured SSO Identity Provider (IdP) that is SAML 2.0 compliant.
- The Identity Provider MUST Sign the Assertion.
- You MUST have IT staff familiar with SSO/SAML with permissions to make changes to your Identity Provider. FileBound does not configure your identity provider. All documentation and configuration information should come from the identity provider.
Limitations:
- The Identity Provider MUST accept Authentication Requests and send Assertion Responses with the Subject NameID Format="urn:oasis:names:tc:SAML:1.1:nameid-format:emailAddress"
- Assertion Encryption only supports SHA-1 at this time.

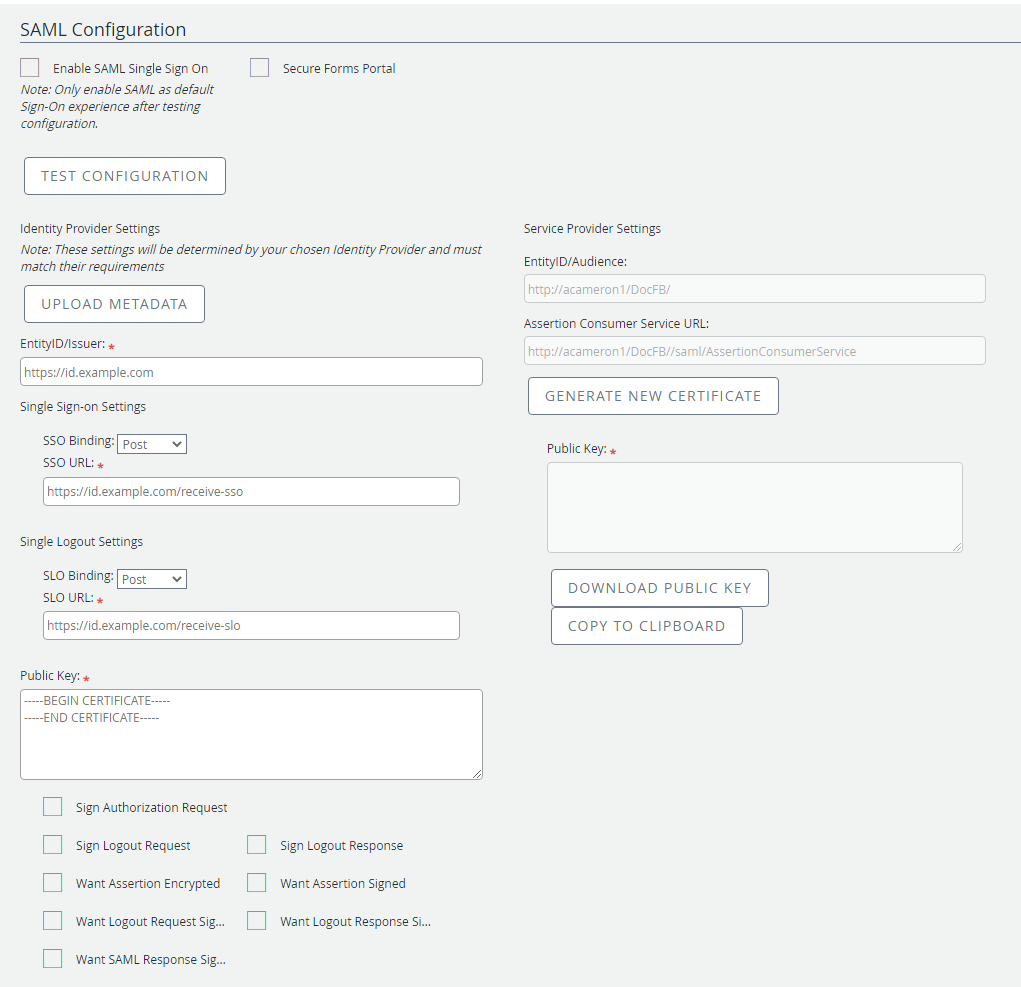
Enable SAML Single Sign On: Enables SSO authentication for the site. This check box should not be selected until SSO is configured correctly. In case SSO was enabled by accident, navigate to <siteurl>/LogOn.aspx for the standard sign-in page.
Secure Forms Portal: Secures the Forms Portal with SSO authentication. All forms will be inaccessible until the Forms Portal is authenticated.
Note: The security mode for forms on the Forms Portal must be 'Public' in order for the Forms Portal to be secured with SSO authentication.
Test Configuration: Tests your configuration once metadata has been exchanged between FileBound and your Identity Provider. This clears your current session, forces the web server to pull the latest settings from the database, and directs you down the SSO login path. You can test the configuration manually with this URL: <siteurl>/saml/SingleSignOn?forceNew=true.
If you see an error, and your browser shows the URL to your Identity Provider, check Identity Provider logs. If you see an error, and your browser shows the URL to FileBound, check FileBound error log.
Identity Provider Settings
Your Identity Provider will provide the information for these settings. Export metadata from your Identity Provider, then import the settings into FileBound.
Upload Metadata: Allows you to import metadata from your Identity Provider. Ensure that information was imported correctly and make manual adjustments as necessary. Information can also be entered manually into these fields.
Security Settings: Signatures assure integrity of the message. All of the check boxes with 'Sign' or 'Want' refer to signatures. A few items of note:
- Want Assertion Signed is recommended to ensure integrity. Make sure your Identity Provider is signing assertions first.
- Want Assertion Encrypted is an additional layer to ensure confidentiality. Make sure your Identity Provider is sending assertions encrypted first.
- If Want Assertion Signed is not selected, we will accept BOTH signed and unsigned assertions from an Identity Provider. If it is selected, we will ONLY accept signed assertions.
Service Provider Settings
The settings in this section are provided to your Identity Provider.
EntityID/Audience: This field is auto-generated based on your site name and should be copied to your Identity Provider to create a new Service Provider/Relying Party entity.
Assertion Consumer Service URL: This field is auto-generated based on your site name and should be copied to your Identity Provider. This may also be called single sign-on URL or endpoint.
Certificate Password: Any random string. This password will not need to be remembered or used at a later time. It adds randomness to the public key. Once the certificate password has been entered, click Generate New Certificate to populate the public key.
Public Key: This field is auto-generated and should be provided to your Identity Provider. Click Copy to Clipboard to copy the public key and paste it into your Identity Provider, or click Download Public Key to create a certificate (.cer) file that can be uploaded to your Identity Provider.
IP Range

Administrators can restrict users outside of a defined IP range from accessing their FileBound site.
Example: As an Administrator, you want to restrict users from accessing the system when they are not in the office. Adding the office IP address to the allowed list prevents them from accessing the system from home.
Note: IP restrictions are implemented when your current session ends, so ensure that you are not restricting your own access when configuring an IP range.
- Click Add.
- Enter the lowest number in the range of IP addresses in the Start IP box.
- Enter the highest number in the range of IP addresses in the End IP box.
- Enter a description for the IP restriction in the Description box.
- Click Save.