Workflow routes a document to a user or group of users for the purpose of completing an action or set of actions through a predefined set of steps called a process. Documents can enter a workflow when they are scanned or imported into FileBound, or when a form is generated. When using automation processes, a Scheduled Workflow process can also automatically route a document down workflow process.
In addition to routing documents to users to complete an action, here are a few examples of other things that workflows can do:
- Make decisions
- Update information
- Send emails
- Create new forms
- Perform checks and validations
FileBound workflow provides many different opportunities to automate processes as well as standardize a repeatable process that a document, or type of documents, must always be processed by. Workflow processes can be as simple as just a couple of standard user steps or very complex with multiple linked processes and automatic escalations.
Topics include:
Edit workflow process properties
Edit a workflow process diagram
View workflow process revisions
Refresh the Workflow Processes page
Add a workflow process
Workflow processes are created and configured by a System Administrator or a Project Administrator. A workflow process usually consists of one or more Workflow steps. You must have at least one workflow step in the workflow.
When a document is routed to a user or a group of users through a workflow process, a user is able to take action on the document depending on the Workflow tasks that have been configured in the workflow process. Depending on the action taken by the user, the document is then routed to a predefined step in the workflow.
- Click Administration, then click Projects.
- Click Edit next to the project you want to add a workflow process to.
- Select Workflow Processes in the Configuration list.
-
Click Add.

- Configure the new workflow process, then click Save.
Process Settings tab

Process Name: A name for the workflow process.
ID: A unique ID for the workflow process. This ID is automatically assigned by FileBound.
Use Business Days During Due Date Calculations: Excludes weekends from due date calculations.
Enable Out of Office Delegation: Allows the workflow to look for users that have Turn on Out of Office selected on their User Information page and assign the workflow task to the user that is selected as the Out of Office user Delegate instead. See Update User Information for more information.
Exception User or Group: Documents will automatically be assigned to the selected user or group if an error or exception occurs for any step. The exception user needs to be a assigned to a group with access to the project.
Show Group list: Select this option to toggle the Exception User or Group list from users to groups.
Note: When creating a new workflow, by default the first active System Administrator is selected as the Exception User. If this System Administrator user is deleted, then the next active System Administrator will get selected as the Exception User.
Default Workflow Email: An email address to serve as the "From" email for all workflow email notifications. If left blank, then the system will use the email of the user who routed the item as the “From” email by default. If no email is listed for the Default Workflow email, and the User who routed the item does not have an email, the email address specified in the System Emails box in Main Options - General Settings will be the “From” email by default.
Rights: The users that are able to submit documents down the workflow. The following options are available:
-
All: All users are able to submit documents to the workflow process.
-
Admin: Only administrators are able to submit documents to the workflow process.
-
Groups: Only users that belong to the selected group(s) are able to submit documents to the workflow process. When this option is selected, click Edit to select assigned groups.
Custom Workflow Email tab
Workflow email messages are sent to a user when documents arrive on the different steps of the workflow process. If the Notify users via E-mail option is enabled for the step, then users will receive an email message alerting them that a new document has been assigned to the workflow step.
The custom email message that is configured within this tab will replace the standard message that would normally be sent for any workflow step in the process that has the Notify users via E-mail option enabled for the step.
1. Click Administration, then click Projects.
2. Click Edit next to the project you want to edit a workflow process for.
3. Select Workflow Processes in the Configuration list.
4. Click Edit next to the workflow process you want to edit properties for.
5. Click the Custom Workflow Email tab.
6. Configure the custom workflow email, then click Save.
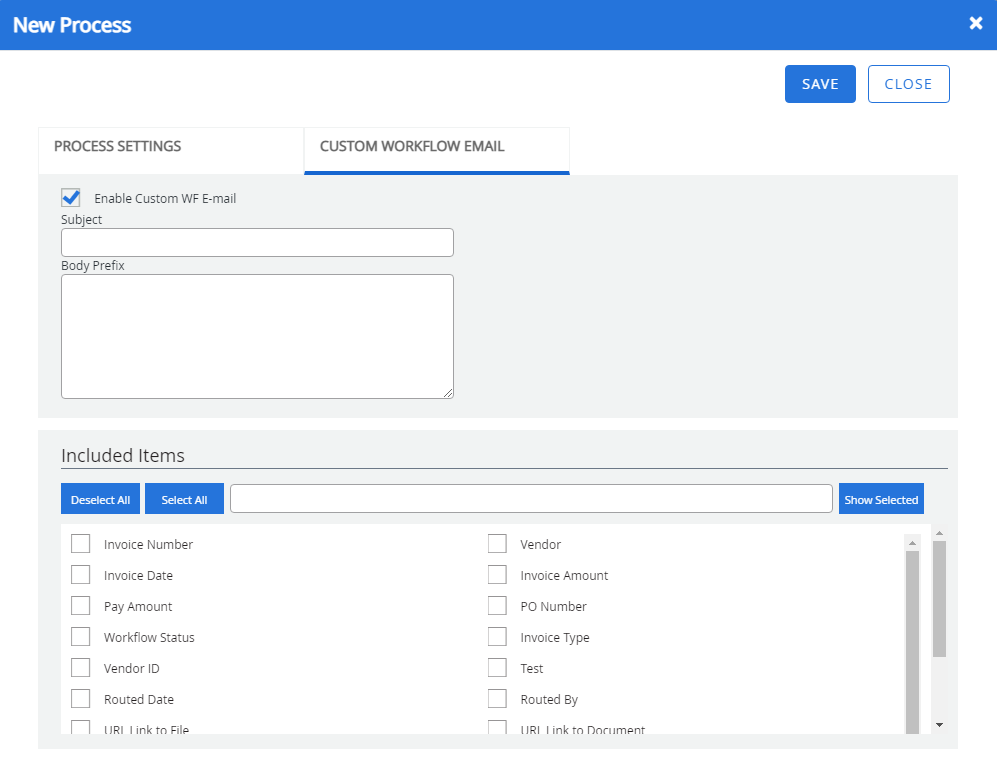
Enable Custom WF E-mail: Turns on custom workflow email messages.
Subject: The text that will be used as the subject of the email.
Body Prefix: The text that will be used for the body of the email.
Included Item(s) The items that will be added to the bottom of the email message. The following options are available:
- Index Fields: A separate check box is available for each index field that is configured for the project.
- Routed Date: The date the document was routed to the step.
- Routed By: The user that routed the document to the step.
- URL Link to File: The hyperlink to the file that the document is contained in.
- URL Link to Document: The hyperlink to the document in FileBound. Clicking the link will open the document in the Viewer.
- Document Divider: The divider name that the document is contained in.
- Document Separator: The separator name that the document is contained in.
- Routed Item Due Date: The date that the workflow step needs to be completed by.
- Routed Documents as Attachments: Includes the routed document as attachment with the email notification.
- Workflow Comments: Includes the comments entered when a document is assigned to a workflow step.
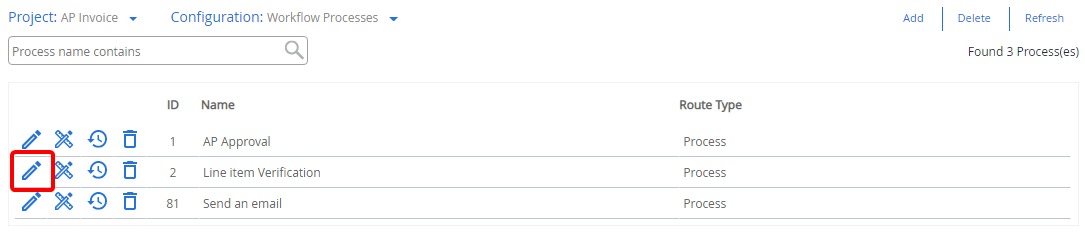
Edit workflow process properties
- Click Administration, then click Projects.
- Click Edit next to the project you want to edit a workflow process for.
- Select Workflow Processes in the Configuration list.
-
Click Edit next to the workflow process you want to edit properties for.
-
In the Edit Process dialog box, edit workflow process properties as needed, then click Save. For more information about the different tabs, see Add a workflow process.
Edit a workflow process diagram
-
Click Administration, then click Projects.
-
Click Edit next to the project you want to edit a workflow process for.
-
Select Workflow Processes in the Configuration list.
-
Click Design next to the workflow process you want to edit in the Process Designer.

-
In the Process Designer, edit the workflow process as necessary.
View workflow process revisions
- Click Administration, then click Projects.
- Click Edit next to the project you want to view workflow process revisions for.
- Select Workflow Processes in the Configuration list.
-
Click Revisions next to the workflow process you want to view revisions for.


Version: Every time that a process is saved or published, a new version is created. You can think of each version as being its own workflow process. When a document is started in a workflow process, it is started in the latest version of the process. There are also ways in which a document can be started into an earlier version of a process. Once a document starts in a version of the process, it will stay in that version until it is completed.
If a new version of process is created while there are documents in the current version of a process. Those documents will remain in the current version of the process and are not automatically moved to the newly published version of the process.
There are two types of versions:
When an Administrator saves an existing workflow process in the Process Designer, and then closes the Process Designer window, a minor version of the workflow process is created. A minor version of a workflow process is not created each time the Save button is clicked in the Process Designer window. This allows an Administrator to save the work within the designer without creating a minor version every time the Save button is clicked. A minor version is only created when the Process Designer window is closed after saving the workflow process.
When a minor version is created, the version number of the workflow process is in a format X.Y. The X is the major version number and Y is the minor version number. The minor version number is incremented by 1 each time a minor version is created. For example, if the current minor version number is 1.1, the next major version number will be 1.2, and the next will be 1.3, and so on.
When an Administrator publishes a workflow process in the Process Designer, a major version of the workflow process is created.
When a major version is created, the version number of the workflow process is in a format X.0. The X is a number that is incremented by 1 each time a major version is created. For example, if the current major version number is 1.0, the next major version number will be 2.0.
Date: The date and time the workflow version was created.
Was Published: If a checkmark is present, the workflow process has been published at some point. An unpublished workflow is not available during a project export.
Hidden: Select this check box to hide the workflow process. The workflow process will not appear to users and new documents cannot be routed down the workflow process. Any documents that are currently routing within the process will continue to follow the process. A hidden workflow is not available during a project export.
Current Docs: The number of documents currently routed within the workflow process. You can view the number of documents in each workflow step by clicking on this number. You can also:
You can cancel all documents in a workflow step easily from the revisions page.
-
Click the Current Docs number.

-
Select the workflow step you want to cancel items from, then click Cancel.
-
Click Yes to confirm the cancellation.
You can cancel all documents in a workflow step and reroute them to a different workflow step easily from the revisions page.
-
Click the Current Docs number.
-
Select the workflow step you want to cancel items from, then click Cancel & Start in a New Process.

-
Select the workflow process that you want to start the canceled items in, then click OK.
-
Select the workflow step that you want to start the canceled items in, then click OK.
Display Name: The name that the workflow process is displayed as within FileBound.
Published Route ID: A unique ID for the published workflow route. This ID is automatically assigned by FileBound.
Notes: Click in this field to add notes applicable to the workflow version.
Published By: The name of the user that published the workflow.
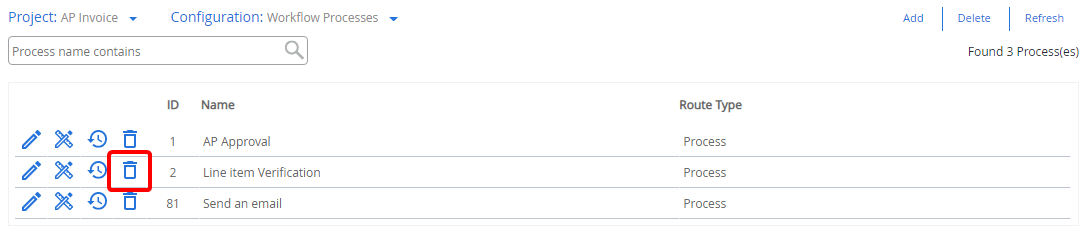
Delete a workflow process
Note: You are unable to delete a workflow process that currently has documents routed within the process.
-
Click Administration, then click Projects.
-
Click Edit next to the project you want to delete a workflow process from.
-
Select Workflow Processes in the Configuration list.
-
Click Delete next to the workflow process you want to delete.
-
Click Yes to confirm the deletion.
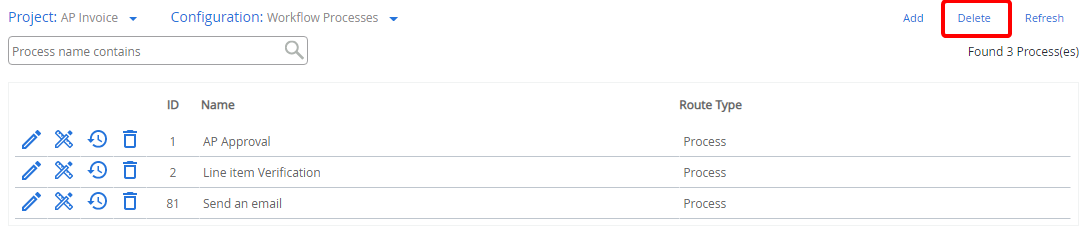
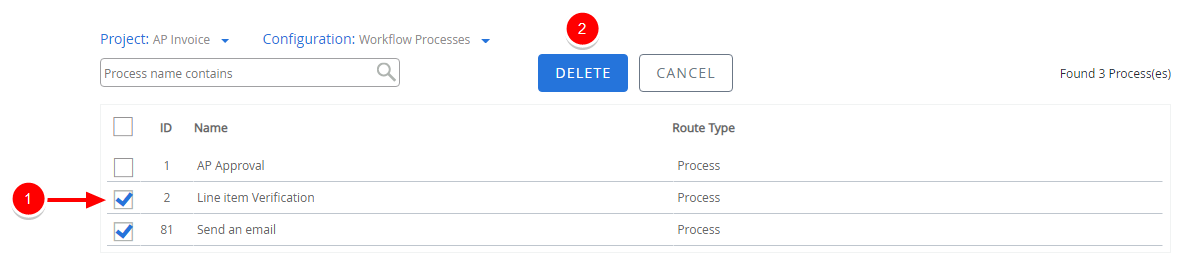
Delete multiple workflow processes
-
Click Delete.
-
Select the check box next to the workflow process(es) you want to delete, then click Delete.
-
Click Yes to confirm the deletion.
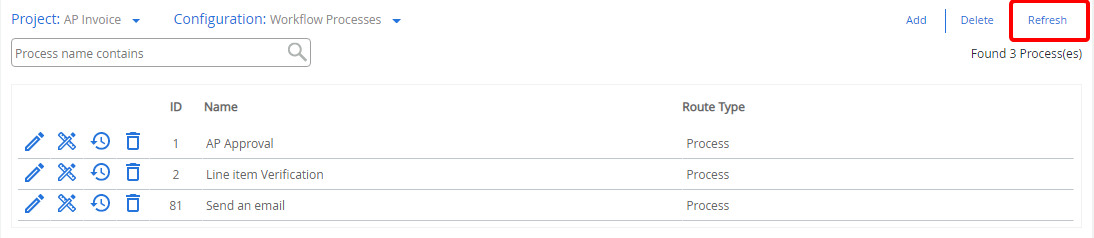
Refresh the Workflow Processes page
To ensure that your Workflow Processes page is up to date, you can refresh it.
-
Click Administration, then click Projects.
-
Click Edit next to the project you want to view workflow processes for.
-
Select Workflow Processes in the Configuration list.
-
Click Refresh.