Client Name: The name of the company for whom FileBound is installed. This client name can also refer to the name of a department, depending on the implementation of FileBound.
Website URL: The URL that users will use to access FileBound.
Server Time Zone: The time zone for the server.
Default User Time Zone: The default time zone for users logging in to FileBound.
Global Form User: You can use external forms to submit data into FileBound. A new file is created and a new document is populated with the submitted information and added to that file. The submission process also allows a new document to be created within an existing file. The Global Form User is the user account that is used by the system to create this new file and document. If the selected Global Form User does not have the proper rights to add a new file or document, the submission process will be unsuccessful. This is how you can allow external form submissions for some projects, and not others.
Note: If the Global Form User is deactivated, their group permissions will still apply until a different user is selected.
Show all User Preferences Screen: If selected, users can access all User Preferences tabs. If cleared, users will can only access the Preferences and Saved Searches tabs. See Edit your preferences for more information about User Preference tabs.
Enable Recycle Bin: If selected, the Recycle Bin is displayed in the Navigation menu and files and documents are sent to the Recycle Bin when they are deleted. If cleared, files and documents will be permanently removed from FileBound when they are deleted. See Recycle Bin for more information.
Enable File Details Page: If selected, users can access the File Details page by clicking File Details ![]() on the Search results page or the Clipboard.
on the Search results page or the Clipboard.
Enable Document Grouping: If selected, users can group single page JPEG, PDF, and TIFF documents into a document group in the Web Viewer. The multiple pages will display as a single document node in the File Tree.
Edit Documents using Office365 Integration: If selected, and you have a commercial Microsoft® Office 365® subscription, users will be able to edit Microsoft Word (.docx), Excel (.xlsx), and PowerPoint (.pptx) documents online in Office 365 from the Web Viewer. See Edit a Microsoft Office document from the Web Viewer.
Note: .doc, .xls, and .ppt file formats are not supported.
Group Projects by Type: If selected, a Project Type drop-down is available on the Project Search and Add Content pages which allows users to filter the project list based on the Project Type selected during project configuration.
Document Locations

The document storage location is the location where all uploaded files are physically stored. This location needs to be accessible by the web server that is hosting the FileBound website. You are able to specify multiple storage locations for saving the files and documents. These storage locations can be folders on a local drive, or folders on a network that is accessed using a UNC path. It is most common that only a single document storage location is used.
A document location can also be added at the project level to store documents for a project in a specific location. See Project Settings - General Tab for more information.
Note: When using FileBound Cloud you will not see this section, and do not need to configure the document storage location. This is handled by the FileBound Cloud Administrators.
-
In the Document Locations section, click Add.
-
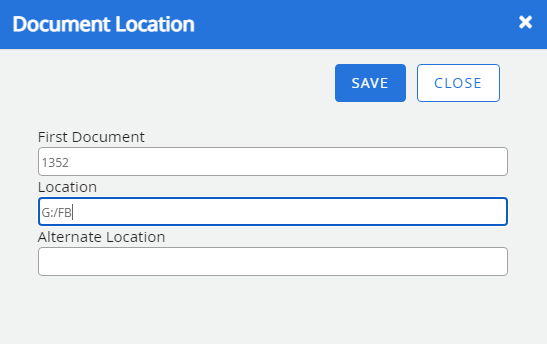
Specify document location details, then click Save.

First Document: All documents are referred by a unique documentation identification number. The next document identification number that the system will use is displayed in the First Document box. You can specify a different number if needed. If you are specifying a different number in the First Document box, then the number must be greater than the number you are replacing.
Location: The folder location, where you want the files and documents to be saved. If the folder does not exists, it is created by FileBound.
Alternate Location: It is optional, but recommended, that you specify an alternate location to save the documents. This will save an identical copy of all the documents that are uploaded into both the standard location and the alternate location. The document will be named with the same document ID number in each location.
Note: When specifying an alternate location, both the storage locations are required to be online and available, when a user tries to save a document to the FileBound server. If one of the locations is unavailable, then the user will not be able to save the documents. However, the user will be able to retrieve documents from the location that is still available.
-
In the Document Locations section, select the storage location that you want to edit, then click Edit.
-
Edit the document storage location as needed, then click Save.
-
In the Document Locations section, select the storage location that you want to delete, then click Delete.
- Click Yes to confirm the deletion.
SMTP Settings

SMTP Server: The SMTP server used to send outgoing email messages
SMTP Port: The SMTP port used to send outgoing email messages.