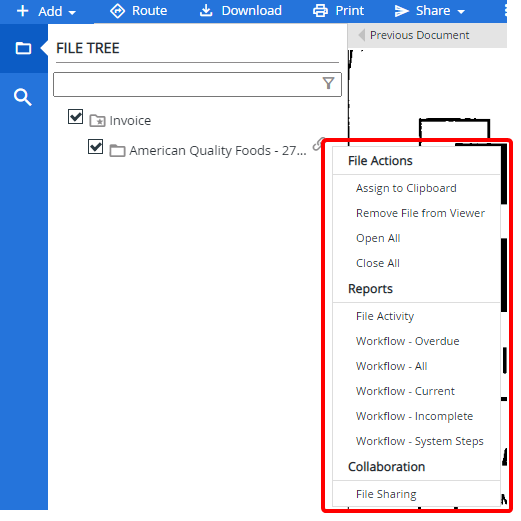
File actions are the functions that can be carried out at the file level.
To access File Actions, right click a file in the File Tree.

You can assign the file to your clipboard or to the Clipboard of other users that belong to the same group.
1. In the File Actions menu, click Assign to Clipboard.
2. In the Select User dialog box, click the user that you want to assign the file to.
3. View the confirmation message.
This option removes the selected file from the Web Viewer.
- In the File Actions menu, click Remove File from Viewer.
You can lock a file so that other users cannot modify or delete the file.
- In the File Actions menu, click Lock File.
Note: This option will only be available if File and Data Lock locking rights are selected in project settings.
This option expands a file to display all separators, dividers, and documents contained within a file in the File Tree.
- In the File Actions menu, click Open All.
This option collapses a file to hide all separators, dividers, and documents contained within a file.
- In the File Actions menu, click Close All.
Reports
You can view workflow and file activity reports for a file from within the Web Viewer.
The following reports are available:
- File Activity: Displays the File Activity report. See File Activity Report for more information.
- Workflow - Overdue: Displays the Workflow Status report for items with a status of Overdue. See Workflow Status Report for more information.
- Workflow - All: Displays the Workflow Status report. See Workflow Status Report for more information.
- Workflow - Current: Displays the Workflow Status report for items with a status of Current. See Workflow Status Report for more information.
- Workflow - Incomplete: Displays the Workflow Status report for items with a status of Incomplete. See Workflow Status Report for more information.
- Workflow - System Steps: Displays the Workflow Status report for items with a status of System Steps. See Workflow Status Report for more information.
Collaboration
Once a file has been shared externally from the Web Viewer, a File Sharing option will be available in the Collaboration section of the File Actions menu. Using this option, you can modify expiration dates, delete external URLs, and view expired external URLs.
- In the File Actions menu, click File Sharing.
-
Edit expiration dates for external URLs as needed, then click Save.

-
To delete an external URL, select the check box next to an external URL and click Delete or click Delete. Once deleted, the URL will be moved to the Expired External URLs section and will no longer be accessible externally.

- Click Cancel to exit the External Sharing Information dialog box.