Stamps

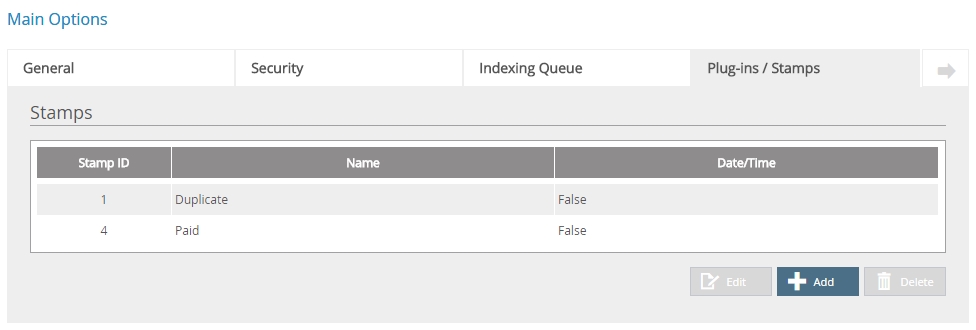
System Administrators can add image stamps that can be used by all FileBound users while annotating documents. You can manage stamps globally for all the FileBound users on the Stamps tab. Any user with permissions to use annotations can apply the stamps to their documents. See Add annotations to a document in the Windows Viewer and Add annotations to a document in the Web Viewer for more information.
- In the Stamps section, click Add.
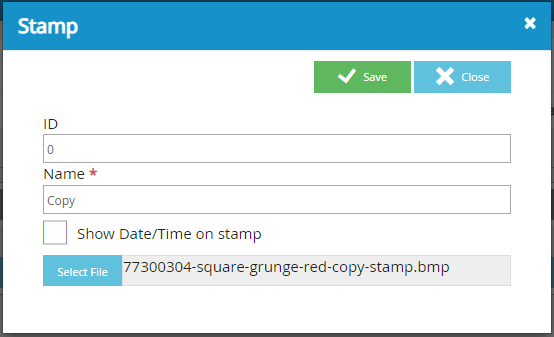
- A unique identification number for the stamp is displayed in the ID box.
- Specify a name for the stamp in the Name box.
- To include the date and time on the image of the stamp, select the Show Date/Time on stamp check box.
- Click Select File to select an image file for the stamp.
- In the Open dialog box, select an image file, then click Open.
-
Click Save.

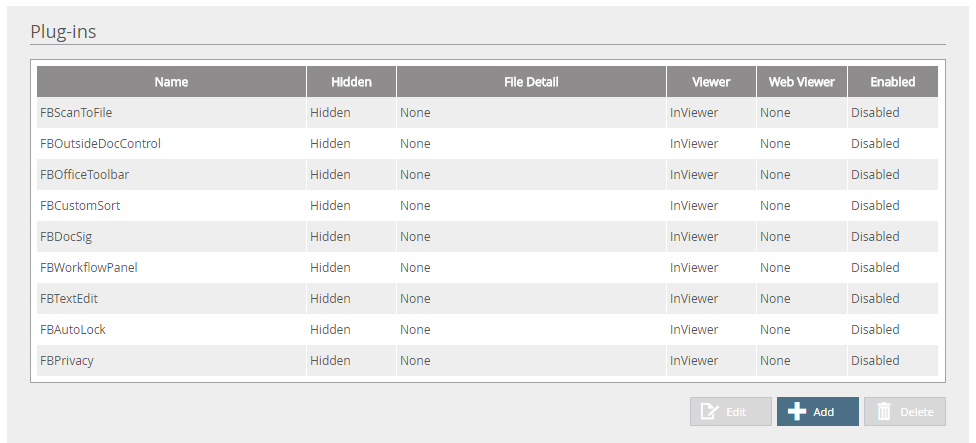
The pre-installed global plug-ins are disabled by default. The plug-ins have already been configured for proper operation, they just need to be enabled by a System Administrator in order for them to function.
-
In the Plug-ins section, select the plug-in that you want to enable, then click Edit.
- Select Yes from the Enabled list, then click Save.
-
In the Stamps section, select the stamp that you want to edit, then click Edit.
- Edit the stamp configuration as needed, then click Save.
-
In the Stamps section, select the stamp that you want to delete, then click Delete.
- Click Yes to confirm the deletion.
Plug-ins

FileBound offers plug-ins that provide additional functionality that allows FileBound to meet a specific requirement of a user, or the system. Plug-ins can be integrated with the FileBound Server in many different areas that meet the requirements of the users. A Global plug-in is one that can provide functionality across all projects that are created in the system.
When the FileBound server is installed, it comes with several pre-installed plug-ins. These plug-ins are not enabled by default and need a System Administrator to enable them. It is recommended that only plug-ins that are going to provide useful functionality to the FileBound users, be enabled. This helps to keep the FileBound interface clean and simple for users, but provide valuable functionality to make their jobs easier.
The following pre-installed plug-ins are available:
| FBScanToFile | When a user is scanning within the Viewer, the user will always be prompted to select a divider as well as separator, if separators have been enabled for the project. |
| FBOutsideDocControl | Automatically locks any document that is opened externally for editing within the Viewer. This prevents other users from making changes to the document while that user has control of it. The user editing the document externally will then utilize the "Save" function in the application that has the document opened. The plug-in also allows the user to have multiple documents opened externally at one time for editing. Additionally, the user can browse other documents in the tree view of the Viewer while they have a document opened externally without losing their changes. |
| FBOfficeToolbar | Sometimes when viewing Microsoft Office documents such as a Word document or an Excel spreadsheet the toolbar for the application is not be displayed. This plug-in provides the use with a toolbar refresh button that displays the hidden Microsoft application toolbar. |
| FBCustomSort | Provides custom sorting options within the Viewer. A user will have an additional user preference that will allow them to specify sorting characteristics for separators, dividers, and pages. A user will be able to specify to use standard sorting methods, or sort alphabetically as well as selecting to display the items in reverse order. Pages will also be given the option to be sorted by date. |
| FBDocSig | Allows for added document signature functionality in addition to the standard FileBound digital signature. Supported types are pen tabled, EPad, and thumbprint scanner authorizations. |
| FBWorkflowPanel | Adds a workflow selection panel similar to the Home Page within the Viewer. Double-clicking an item in the list loads the file and document into the Viewer automatically. This allows a user to stay in the Viewer instead of having to go to the Home Page to process their workflow items. |
| FBTextEdit | Gives users the ability to edit a text document within the Viewer. This ability is not available within the Viewer without this plug-in as all edits of text files are disabled within the Viewer. |
| FBAutoLock | Provides users with an additional user preference to enable Auto-Locking of documents that they are viewing. When the user is done viewing the document, it will be automatically unlocked. A user can also be prompted with an alert when opening a locked document. Note: This plug-in is not compatible with Records Management. |
| FBPrivacy | Provides additional functionality to file notes and document notes allowing a user to have private file notes as well as private document notes that are only viewable to the user that creates and saves the note. The standard file note and document functionality is maintained as well. |
Different plug-ins will have different configuration requirements based on what the function of the plug-in is for. Not all of the options will need to be configured. The developer of the plug-in should provide directions on how it should be configured. For FileBound Cloud customers the FileBound Cloud team will configure these plug-in settings for you.
-
In the Plug-ins section, click Add.
- Configure the plug-in, then click Save.
Plug-In Information tab

Enabled: Determines whether the plug-in is enabled or disabled.
Plugin Name: A name for the plug-in.
Plugin ID: The plug-in ID. The ID is automatically assigned when a plug-in is created. The value of this field cannot be edited.
Replace Page: The FileBound page to be replaced with the plug-in for customization.
Hidden: Determines whether the plug-in will be visible in the Plug-ins panel in the viewers.
Plugin Display Options

Viewer: Determines how the plug-in can be viewed within a viewer. The following options are available:
- In Browser: Opens the plug-in in a new tab within a browser.
- In Viewer: Opens the plug-in within the Viewer.
- Passive Popup: Opens the plug-in in a separate pop-up window that appears on top of the window where the plug-in was activated.
- Forced Popup: Opens the plug-in within the Viewer. When the viewer loads it automatically opens a pop-up window displaying the plug-in.
Web Viewer: Determines how the plug-in can be viewed in the Web Viewer from the Web Viewer list. The following options are available:
- Popup: Opens the plug-in in a separate pop-up window that appears on top of the window where the plug-in was activated.
Drop Down Menu: Determines how the plug-in can be viewed in the Dropdown menu. The following options are available:
- In Browser: Opens the plug-in in a new tab within a browser.
- Popup: Opens the plug-in in a separate pop-up window that appears on top of the window where the plug-in was activated.
File Detail: Determines how the plug-in is displayed on the File Details page from the File Detail list. The following options are available:
- In Browser: Opens the plug-in in a new tab within a browser.
- Popup: Opens the plug-in in a separate pop-up window that appears on top of the window where the plug-in was activated.
Button Icon
Select an icon to be displayed for the plug-in button.
![]()
Plug-in Properties tab

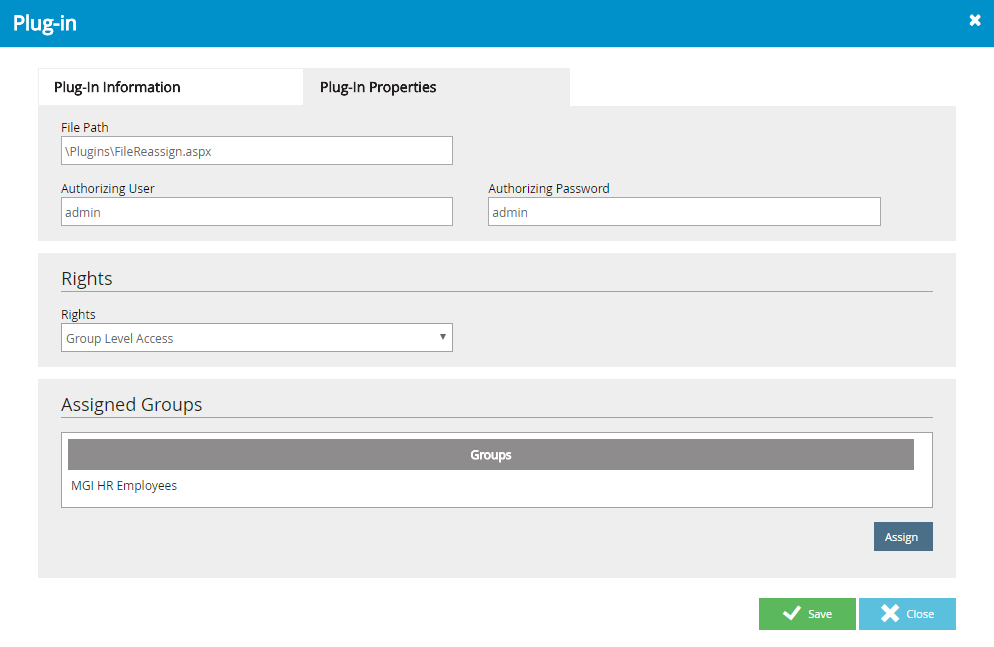
File Path: The location or path of the plug-in file.
Authorizing User: For some specific plug-ins, you may be required to provide an authorized username and password to use the plug-in.
Authorizing Password: For some specific plug-ins, you may be required to provide authorized username and password to use the plug-in.
Rights: The users who will have access to the plug-in. The following options are available:
- All User Access: Access to the plugin is given to all the FileBound users.
- Admin Only Access: Access to the plugin is given to System Administrators and Project Administrators.
- Group Level Access: Access to the plugin is given to the selected groups. If you select this option, you are required to assign one or more groups in the Assigned Groups section. Click Assign to select groups.
-
In the Plug-ins section, select the plug-in that you want to edit, then click Edit.
- Edit the plug-in configuration as needed, then click Save.
-
In the Plug-ins section, select the plug-in that you want to delete, then click Delete.
- Click Yes to confirm the deletion.
Loaded Plug-Ins

The Loaded Plug-Ins section lists all of the plug-ins that are enabled.
Menu