Configure Telephony Profile
The following section takes you through the configuration inside of the InGenius Admin App.
Note: If you have not already, ensure you have created a telephony provider profile as detailed here.
Configure Profile Details
Once you have created the telephony profile, you must enter the appropriate information into the profile fields to configure the connection between the telephony system and InGenius. Refer to the instructions below.
Configure Genesys Inbound Action with Authorization Header
Genesys Cloud will require an Authorization Header to allow interfacing with the Upland Cloud. You will first need to obtain your security key from the InGenius Admin App before configuring the Authorization Header in Genesys.
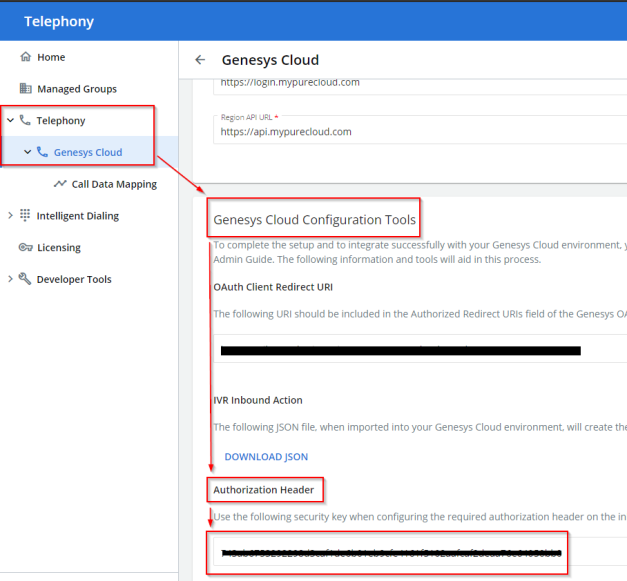
Genesys Cloud Security Key
To obtain the security key required for configuration, follow the instructions below:
-
In the Admin App, select the Telephony tab, and then select the telephony provider profile created for Genesys
-
Navigate to Genesys Cloud Configuration Tools
-
Underneath Authorization Header, select SHOW KEY if hidden
-
Copy the displayed security key for use in the next instruction set.
Configure Inbound Action
An action must be created on the inbound call flow to enable InGenius for SCV to create and populate the voice record in Salesforce. To do this, a JSON snippet customized for your organization can be downloaded through the InGenius Admin app:
Download JSON Code Snippet
-
In the Admin App, select the Telephony tab.
-
Navigate to your Genesys Cloud Telephony Profile | Genesys Cloud Configuration Tools.
-
Underneath IVR Inbound Action, select DOWNLOAD JSON.
Note: If any changes are required to the JSON snippet file, it is recommended that this is done with the Genesys Admin tool. Editing the JSON file manually before importing it into Genesys is not recommended.
The JSON snippet needs to be imported via the Genesys Admin import function. Follow the steps below to import your JSON file into Genesys:
Import JSON Code Snippet
-
Sign into Genesys Cloud and select Collaborate/Communicate.
-
At the menu at the top of the page, navigate to Admin | Integrations| Actions.
-
In the Actions page, click the Import button.
Note: There may be a delay after clicking the Import button before you are presented with the next screen.
-
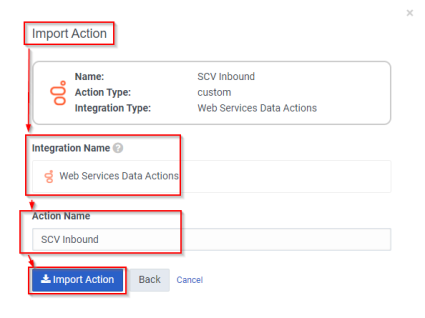
Browse to locate your JSON file and select Import Action, configure the Import Action window as follows:
Note: The Web Services Data Actions integration must be installed and activated in Genesys Cloud before importing the JSON snippet. Ensure this step is complete before proceeding. Refer to the Telephony Configuration page for more information.
-
Select "Web Services Data Actions" as the Integration Name
-
Type in "SCV Inbound" as the Action Name
-
Select Import Action
-
-
Select Save & Publish.
-
Select Yes in the Publish Action popup that appears.
Authorization Header Configuration
To configure the Genesys Cloud Authorization Header, use the security key obtained in the previous step and follow the instructions below:
-
Sign into Genesys Cloud and select Collaborate/Communicate.
-
Navigate to Admin | Integrations and select Actions.
-
Select the SCV Inbound Web Services Action.
-
Navigate to Setup | Configuration tab and find the Vieweing Mode toggler near the bottom of the page, if it is set to Published, click the toggle to switch to the Draft view.

-
Fill in Header with the following:
-
Key = Authorization
-
Value = Security key (Paste the Authorization Header obtained from the Admin App in the previous section)
-
Select Save & Publish.
Configure Genesys Cloud OAuth Connection
This section requires that you have created an OAuth Client in the Genesys Cloud Admin and recorded the Client ID, as detailed previously here.
-
In the Admin App, return to the partially completed telephony provider profile you created for your Genesys telephony in the first step of this section.
-
Under End User OAuth Connection, fill in the 'OAuth application client ID' field with the Client ID of the first Genesys OAuth Client you created in the previous section, the one with Grant Type - Token Implicit Grant.
-
Under Administrative OAuth Connection, fill in the 'OAuth application client ID' and 'Client Secret' fields with the Client ID and Client Secret of the second Genesys OAuth Client you created in the previous section, the one with Grant Type - Client Credentials.
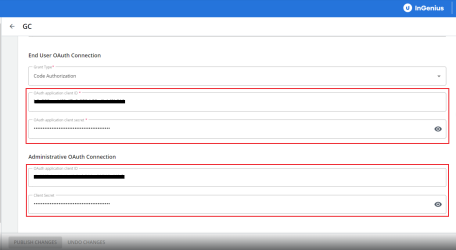
Note: The 'Grant Type' selection will default to 'Code Authorization' and cannot be changed.
-
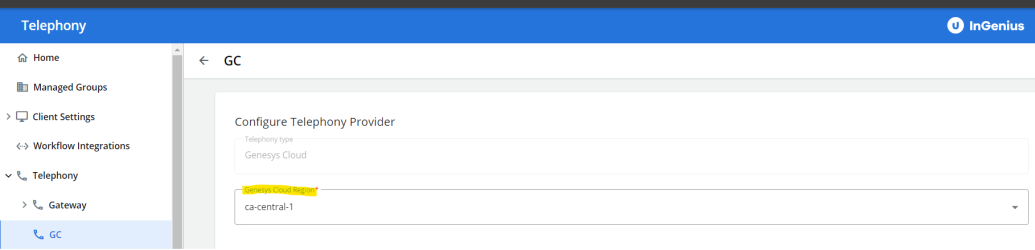
Select your deployment region from the 'Genesys Cloud Region' dropdown box.
-
Select Publish Changes to save the information on the page once all fields have been filled.


-
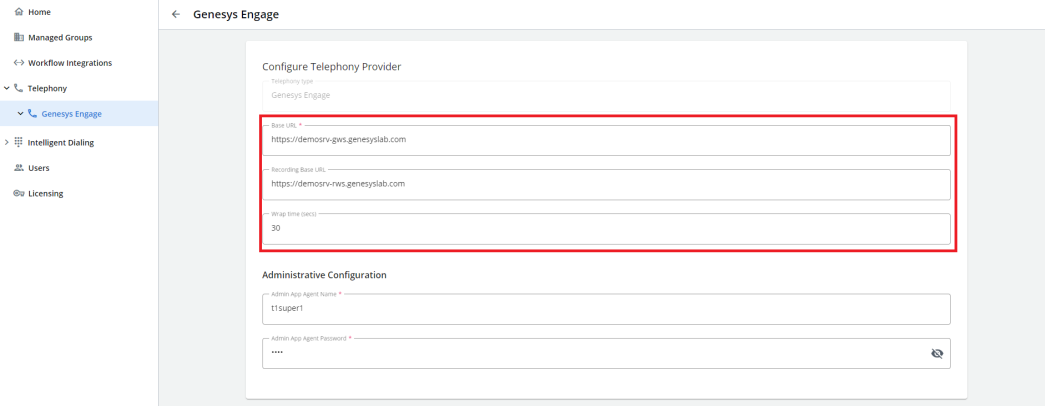
In the Admin App, select the Telephony tab, and then select the telephony profile created for Genesys Engage.
-
Under 'Configure Telephony Provider', fill in the Base URL and Recording Base URL fields for your Genesys server.
Note: To find your base and recording base URLs, you will need to navigate to your Genesys install directory to find the 'application.yaml' file for each, your Genesys HTCC and RWS applications. Viewing in a text editor, find the URL listed under 'externalApiUrlV2'.
-
Under 'Administrative Configuration', set the Admin App Agent Name and Admin App Agent Password fields to a Genesys system administrator's credentials.
-
Set the Wrap Time to the same duration it is set to in your Genesys configuration, or to 0 seconds if it is not enabled in Genesys.
-
Scroll down to the bottom of the page and select Publish Changes.
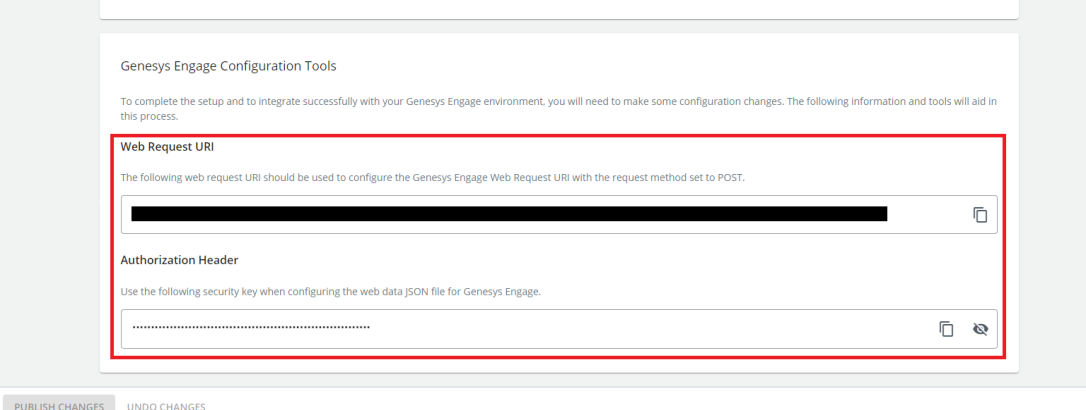
Genesys Engage Security Key & Web Request URI
To integrate Genesys Engage with InGenius, you will need to record the following information for some additional configuration steps. Follow the instructions below:
-
In the Admin App, select the Telephony tab, and then select the telephony provider profile created for Genesys
-
Navigate to Genesys Engage Configuration Tools
-
Record the address under Web Request URI or press the copy (
 ) button to save it onto your clipboard.
 -
Underneath Authorization Header, select SHOW KEY if hidden
-
Record the displayed security key or press the copy (
) button to save it onto your clipboard.
Configure Advanced Telephony Settings
Some additional configuration options, such as setting the keys used to store and read call record IDs, can be accessed through the hidden admin menu. To access hidden admin settings for your telephony, contact InGenius support for assistance.
The call record data variables are explained below:
| initialCallRecordIdKey | The stored voice call record ID, 'InGenius_InitialCallRecordId' by default. If changed, this must also be changed in your IVR configuration. |
| lastCallRecordIdKey | Used to note the last voice call record ID, so a transferring agent receives the right record. |
| agentRecordIdSuffix | Used when an agent creates a voice call record to track the recording agent. |
| recordingKeySuffix |
Tracks the saved recording. Caution: Changing this value means you will not be able to play any previously saved recordings. |
Configure Genesys Multiline
To allow for the use of multiple devices associated to a user, you must first enable the 'extension' option under User settings. Contact InGenius support for assistance.
Allowed Work Modes
An InGenius administrator can set which work mode selections are available to agents. One of five options are available:

Configure Telephony Gateway Profile
Next, you need to link the telephony gateway to InGenius using the gateway URL found in the Configuration Tool.
To link the telephony gateway with InGenius:
- Navigate to the InGenius Configuration Tool.
- Select the Configuration tab, then the General sub-tab.
- Highlight and copy the gateway URL. The URL is located under the HTTPS Service Configuration heading in the Configuration Tool. The location is shown in the image below:
- Navigate back to the gateway telephony profile created in the Admin App.
- Paste the copied gateway URL into the Primary Gateway URL field (location shown in the image below). Ensure to include HTTPS:// before the URL text.
- (Optional) Select the More Options icon
 > Telephony Gateway Settings to configure additional settings, such as the logging level and TAPI lines, if required by your phone system. For more information, refer to the Telephony Gateway Settings section on this page.

Note: If you are using a non-standard port other than 443, ensure to include the port number at the end of the URL, separated by a colon. Example: https://server.domain.tld:800

Telephony Gateway Settings
Depending on your phone system, you can configure the following in the Telephony Gateway Settings:
- Logging level
- View and refresh TAPI lines.
Select More Optionsnext to the desired Gateway URL field to access Telephony Gateway Settings.
You can set the logging level to provide certain amounts of detail found in the gateway logs.
The logging level options include:
- Debug: This is the default setting and records all informational messages from gateway, client and telephony systems.
- Restricted: Records a subset of informational messages from the gateway, client and telephony systems.
- Off: No related call log information is recorded in the data file.
You can view, sort and refresh TAPI lines in the Telephony Gateway Settings.
To display more data related to TAPI lines, select the Advanced View button to display the following additional information:
- Phone ID
- Permanent ID
- ID
- Provider ID: Provider Info
To refresh TAPI lines, select the Refresh TAPI Lines button (Cisco UCM phones only).
