Telephony Configuration
Note: This section is not currently applicable for your configuration. Proceed to the next topic.
This section describes how to install and configure the telephony gateway for your chosen telephony system. The telephony gateway allows you to connect your telephony system to InGenius in your CRM.
The telephony gateway is managed via the InGenius Configuration Tool.
Install the Configuration Tool
The InGenius Configuration Tool allows you to configure your telephony system via a telephony gateway. To install the InGenius Configuration Tool:
- Run the Configuration Tool installation file provided to you by the InGenius deployment specialist.
- Accept the terms in the License Agreement and click Install.
- Select Launch the Configuration Tool.
- Click Finish to complete installation.
Initial Gateway Configuration
Once the Configuration Tool has been installed, follow the steps below for your chosen telephony system:
Initial Avaya Gateway Configuration
This section describes how to select and configure the telephony provider required for your installation of InGenius. Navigate to the Telephony tab in the Configuration Tool to begin.
To configure the Avaya gateway:
- Select the Avaya checkbox on the left-hand side of the Configuration Tool. This brings up Avaya connection information.
- Navigate to the Primary AES sub-tab in the InGenius Configuration Tool.
- Enter the corresponding AES connection information from your Avaya Aura Communications Manager (address, username, password, etc).
- Enter the server name of your Avaya Aura Communications Manager in the Server common name field.
- Select Save.
Note: The server name is case sensitive. It must match whatever is used in the AES server.
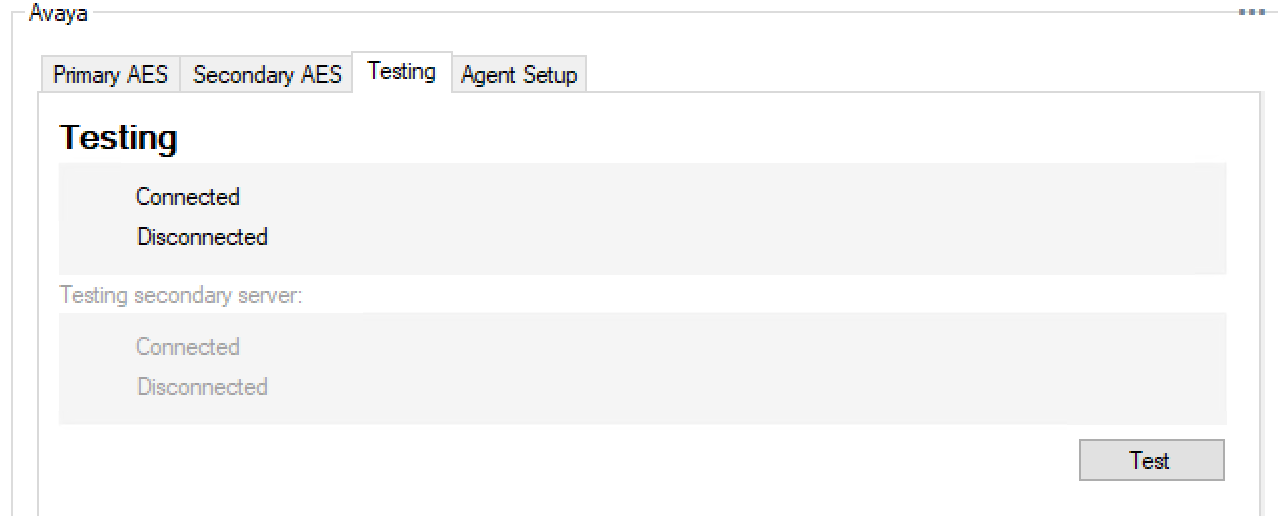
For details on configuring the AES of your Avaya Aura Communications Manager for InGenius, refer to Telephony Configuration.To test your Avaya gateway connection:
- Navigate to the Testing sub-tab in the InGenius Configuration Tool.
- Click Test to verify a successful connection. If the test fails, an error message appears indicating why the connection fails.
- Click Save.
Initial Asterisk Gateway Configuration
This section describes how to select and configure the telephony provider required for your installation of InGenius. Navigate to the Telephony tab in the Configuration Tool to begin.
To configure the Asterisk gateway profile:
- Select the Asterisk checkbox on the left-hand side of the Configuration Tool. This brings up Asterisk connection information.
-
Fill out the following information accordingly:
- Server: Server name or IP address.
- Port: Asterisk AMI port.
- If the Asterisk connection is a secure connection (sslenable=yes in the manager.conf on the Asterisk server), select the Secure Connection checkbox. Ensure the server port is set to the sslbindport that is specified in the manager.conf on the Asterisk server.
- If the Asterisk connection is a not secure connection, the port needs be set to the value specified in the general section of manager.conf.
- To have the server accept all certificates regardless of whether there is an error validating them, select the Accept All Certificates checkbox. A warning is reported in the server log if an invalid certificate has been accepted.
- Fill out the following information accordingly:
- Username: as specified in manager.conf.
- Secret: as specified in manager.conf.
- Test your connection to the Asterisk server using the Test button. Asterisk connectivity is confirmed when the Connected, Logged In, Checked AMI Permissions, and Disconnected options are selected. An X in any of the check-boxes indicates an Asterisk server connection misconfiguration. Review the user configuration data and confirm the Asterisk server AMI settings.
- Select your Channel Driver; either SIP or PJSIP (Asterisk version 16 or greater).
SIP Auto Answer Tab
Navigate to the SIP Auto Answer tab for this section.
To enable Agent Auto Answer:
- Select the Enable checkbox beside the phone models you are using.
To have the answer button appear inside of InGenius:
- Configure Auto Originate on the Asterisk switch. Modify the Asterisk configuration by editing extension.conf. Append the file with the following information:
Settings for SIP Channel Provider (Asterisk version 16 & 18):
[ice-clear-auto-answer]
exten => s,1,NoOp("Clear auto answer macro")
same => n,ExecIf($["${ICE-AUTO-ANSWER-HEADER}" != ""]?SIPRemoveHeader(${ICE-AUTO-ANSWER-HEADER}))
same => n,Return()


[ice-originate-auto-answer]
exten => _autoX.,1,ExecIf($["${ICE-AUTO-ANSWER-HEADER}" != ""]?SIPAddHeader(${ICE-AUTO-ANSWER-HEADER}))
same => n,Dial(SIP/${EXTEN:4},,U(ice-clear-auto-answer))


[ice-clear-auto-answer-and-dial]
exten => _.,1,NoOp("Clear auto answer")
same => n,Gosub(ice-clear-auto-answer,s,1)
same => n,ExecIf($["${ICE-CONTEXT}" != ""]?Dial(Local/${EXTEN}@${ICE-CONTEXT}))
Settings for PJSIP Channel Provider (Asterisk version 16 & 18):
[PJSIP-ice-originate-auto-answer]
exten => _autoX.,1,Dial(PJSIP/${EXTEN:4},,b(PJSIP-set-auto-answer-headers^sub^1))

[PJSIP-set-auto-answer-headers]
exten => sub,1,Set(PJSIP_HEADER(add,Call-Info)=answer-after=0)
exten => sub,2,Set(PJSIP_HEADER(add,Alert-Info)=<http://127.0.0.1>\;info=alert-autoanswer\;delay=0)
same => n,Return()

[PJSIP-ice-clear-auto-answer]
exten => s,1,Set(PJSIP_HEADER(remove,Alert-Info)=)
same => n,Return()

[PJSIP-clear-auto-answer-and-dial]
exten => _X.,1,Gosub(PJSIP-ice-clear-auto-answer,s,1)
same => n,Goto(default,${EXTEN},1)
Initial Cisco UCCE Gateway Configuration
This section describes how to select and configure the telephony provider required for your installation of InGenius. Navigate to the Telephony tab in the Configuration Tool to begin.
To configure the Cisco UCCE gateway:
- Select the Cisco UCCE checkbox on the left-hand side of the Configuration Tool. This brings up CiscoUCCE connection information.
- Fill in the following fields in the Primary CTI Server sub-tab:
- Primary IP Address: This is the IP address of the master CTI server.
- Port: By default this is 42027.
- CTI Server Protocol Version: By default this is 13.
- Click Test to ensure you have the correct settings.
- Click Save.
Alternate CTI Server
- If you have an alternate CTI server for resiliency, fill in the following fields:
- Alternate CTI Server IP Address: This is the IP address of the Slave CTI server.
- Port: By default this is 42027.
- Click Test to ensure you have the correct settings.
- Click Save.
Agent Login
To configure agent login options:
- Navigate to the Agent Login sub-tab.
- Select which of these parameters that your agents will be required to supply on login:
- Agent ID
- Password
- Instrument
- Position ID
- Work Mode
- Skillgroup
- Mobile Agent
- Click Save.
Agent Logout
To configure agent logout options:
- Navigate to the Agent Logout sub-tab.
- Program the Agent Logout codes you want to display to users within the InGenius UI when they log out.
- Log out Agent when Monitor Stopped: If checked, this will automatically log agents out if the monitor has stopped.
- Default Logout Reason Code: This is the reason code that is automatically selected if the agent does not manually select a code in the allotted wrap-up time frame.
- Agent Logout Reason Codes
- Reason codes: A number ideally should match those already programmed into the registry in your Cisco UCCE. If reason codes do not match those already programmed into the registry, reason codes selected by agents will still be captured and available for reporting, however, they will not be defined and consistent with those in the registry.
- Comment: This is the translation of the numbered reason code and is displayed for agents in the UI.
3. Click Save.
Agent Not Ready
To configure agent not ready options:
- Select the Agent Not Ready sub-tab.
- Program the Agent Not Ready codes you want to display to users within the InGenius UI when they are not ready.
- Default Not Ready Reason Code: This is the reason code that is automatically selected if the agent does not manually select a code in the allotted wrap-up time frame.
- Agent Not Ready Reason Codes:
- Reason codes: A number ideally should match those already programmed into the registry in Cisco UCCE. If reason codes do not match those already programmed into the registry, reason codes selected by agents will still be captured and available for reporting, however, they will not be defined and consistent with those in the registry.
- Comment: This is the translation of the numbered reason code and is displayed for agents in the UI.
- Click Save.
Agent Wrap-up
To configure agent wrap-up options:
- Select the Agent Wrap-up sub-tab to configure the Agent Wrap-up reason codes.
- Enter the Agent Wrap-up codes you want available for users in the InGenius UI when they complete a call and go into wrap-up.
- Click Save.
Call Info
To select which Cisco UCCE call parameters appear in the InGenius:
- Select the Call Info sub-tab.
- Select the call parameters you want to display to users in InGenius from the list.
- Click Save.
Single Sign-On (SSO)
Single Sign-On (SSO) is a service which allows users to log into various accounts using one set of credentials. The login process is simplified by providing users with a universal login interface requiring only one username and password.
InGenius supports SSO integration with Cisco UCCE to allow your organization's users to connect via SSO. To enable SSO integration with InGenius, select the Use SSO checkbox.
Note: Note: SSO integration is only available if you have Finesse enabled.
Note: Note: If you are running a failover/secondary server, ensure to allow popups on your browser. Doing so ensures the SSO popup is not blocked by your browser.
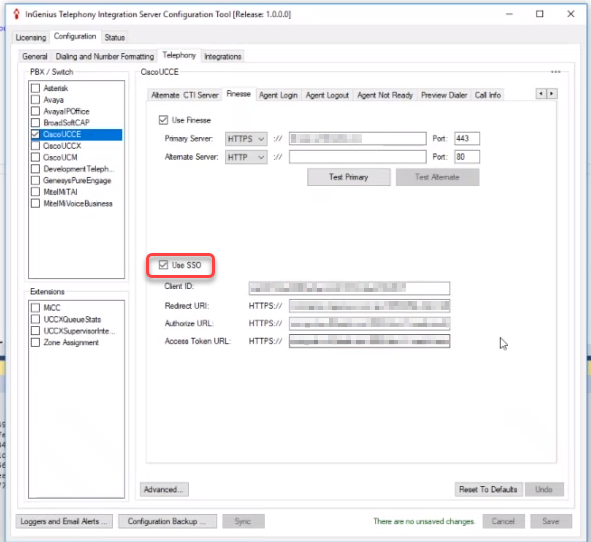
Fill out the following information in the InGenius Configuration Tool to complete the SSO integration:
-
Client ID: In Cisco, navigate to Identity Service Management and create a new Client ID. Copy and paste the Client ID string in to the Client ID field in the InGenius Configuration Tool.
-
Redirect URI: Copy and paste the Redirect URL from Cisco into the Redirect URI field in the InGenius Configuration Tool. (https://<your server>/api/0053d99e-34a7-44fa-bad3-7f0a5275f515/token)
-
Authorize URL: Use the base URL of your Identity Service Management and add: /ids/v1/oauth/authorize. An example of a base Identity Service Management URL is: https://cuic-pub-a-40.berlin.icm:0000
-
Access Token URL: Use the base URL of your Identity Service Management and add: /ids/v1/oauth/access_token.
Initial Cisco UCCX Gateway Configuration
This section describes how to select and configure the telephony provider required for your installation of InGenius. Navigate to the Telephony tab in the Configuration Tool to begin.
To configure the Cisco UCCX gateway:
- Select the CiscoUCCX checkbox on the left-hand side of the Configuration Tool. This brings up Cisco UCCX connection information.
- Choose the Agent information mode you want for the CTI Server Connection:
- Manual: Allows you to configure all the agent settings directly through InGenius.
- LDAP: Takes the agent settings as they are configured on the Cisco switch.
- Finesse: Takes the agent settings as they are configured through Cisco Finesse.
- Fill in the following fields:
- Primary CTI Server IP Address: This is the IP address of the Master CTI server.
- Port: By default this is 12028.
- CTI Server Protocol Version: By default this is 14.
- Primary Finesse URL: The URL address of primary server's Finesse connection. Available only in Finesse mode.
- Port (Finesse): By default this is 8082. Available only in Finesse mode.
- If you have an alternate CTI server for resiliency, fill in the following fields:
- Alternate CTI Server IP Address: This is the IP address of the Slave CTI server.
- Port: By default this is 12028.
-
Alternate Finesse URL: The URL address of alternate server's Finesse connection. This URL is only available only Finesse mode.
- Port (Finesse): By default this is 8082. This port is only available in Finesse mode.
Testing
- Click Test Primary to ensure you have the correct settings.
- If you have an alternate CTI server for resiliency, click Test Alternate to ensure you have the correct settings.
Agent Logout
Available only in Manual mode.
- To program the Agent Logout reason codes, select the Agent Logout tab.
- Program the Agent Logout codes to be displayed to end users in the InGenius UI when they log out.
- Logout Agent when Monitor Stopped: Automatically logs agents out if the monitor has stopped.
- Default Logout Reason Code: This reason code is automatically selected if the agent does not manually select a code in the allotted wrap-up time frame.
- Agent Logout Reason Codes
- Reason codes: Use the same reason code numbers that are configured on the Cisco UCCX registry. If reason codes do not match the Cisco UCCX registry, reason codes selected by agents will still be recorded for reporting but the codes will not be consistent with those in the registry.
- Comment: This is the translation of the numbered reason code and is displayed for agents in the UI.
Agent Not Ready
Available only in Manual mode.
- To program the Agent Not Ready reason codes select the Agent Not Ready tab.
- Program the Agent Not Ready codes to be displayed to agents in the InGenius UI when they are not ready.
- Default Not Ready Reason Code: This is the reason code that is automatically selected if the agent does not manually select a code in the allotted wrap-up time frame.
- Agent Not Ready Reason Codes:
- Reason codes: Use the same reason code numbers that are configured on the Cisco UCCX registry. If reason codes do not match the Cisco UCCX registry, reason codes selected by agents will still be recorded for reporting but the codes will not be consistent with those in the registry.
- Comment: This is the translation of the numbered reason code and is displayed for agents in the UI.
Agent Wrap-up
Available only in Manual mode.
- To program the Agent Wrap-up reason codes select the Agent Wrap-up tab.
- Program the Agent Wrap-up codes to be displayed to end users in the InGenius UI when they complete a call and go into wrap-up.
Wrap-up Text: Various wrap-up codes to indicate how the calls wrap up. Ideally these should match those already programmed into the registry in your Cisco UCCX. If wrap-up codes do not match those already programmed into the registry, wrap-up codes selected by agents will still be captured and available for reporting, however, they will not be defined and consistent with those in the registry.
Call Info
To select which Cisco UCCX call parameters will appear within the InGenius call display, select the Call Info sub-tab.
Single Sign-On (SSO)
Single Sign-On (SSO) is a service which allows users to log into various accounts using one set of credentials. The login process is simplified by providing users with a universal login interface requiring only one username and password.
InGenius supports SSO integration with Cisco UCCE to allow your organization's users to connect via SSO. To enable SSO integration with InGenius, select the Use SSO checkbox.
Note: SSO integration is only available if you have Finesse enabled.
Note: If you are running a failover/secondary server, ensure to allow popups on your browser. Doing so ensures the SSO popup is not blocked by your browser.
Fill out the following information in the InGenius Configuration Tool to complete the SSO integration:
-
Identity Service Client ID: In Cisco, navigate to Identity Service Management and create a new Client ID. Copy and paste the Client ID string in to the Client ID field in the InGenius Configuration Tool.
-
Redirect URI: Fill out the Redirect URI in this format: https://<your server>/api/ae61dbe5-d3f9-4144-a96d-559d27164c2d/token.
-
Authorize URL: Use the base URL of your Identity Service Management and add: /ids/v1/oauth/authorize. An example of a base Identity Service Management URL is: https://cuic-pub-a-40.berlin.icm:0000
-
Access Token URL: Use the base URL of your Identity Service Management and add: /ids/v1/oauth/access_token.
Initial Cisco UCM Gateway Configuration
This section describes how to select and configure the telephony provider required for your installation of InGenius. Navigate to the Telephony tab in the Configuration Tool to begin.
To configure the Cisco UCM telephony gateway:
- Select the CiscoUCM checkbox on the left-hand side of the Configuration Tool.
- No other configuration is required in this section.
Initial Genesys Gateway Configuration
This section describes how to select and configure the telephony provider required for your installation of InGenius. Navigate to the Telephony tab in the Configuration Tool to begin.
To configure the Genesys telephony gateway:
- Select GenesysPureEngage from the left-hand side of the InGenius Configuration Tool.
- Select the Primary Config Server sub-tab. Insert the information from your Genesys server (your Genesys server host, port, username and password).
- If required, set up a backup Genesys telephony gateway. Select the Backup Config Server sub-tab and insert the backup Genesys server information.
- Click Test to verify the connection is successful.
Genesys Engage Configuration
The following configuration steps are necessary for Genesys Engage with Workspace Web Edition to work with InGenius. Your agents will need to have already been set up with a working Genesys Engage WWE environment.
Note: These steps need to be performed by a Genesys admin with full access and privileges to your telephony system.
Genesys CORS Configuration
In order to use InGenius with Genesys Engage, you will need to modify your Web Services configuration file ('application.yaml') to allow your users access to the InGenius apps. Follow the steps below:
-
In your file explorer, search your Genesys install directory for 'application.yaml'
-
Open the file in a text editor and find the crossOriginSettings entry marked by "# CORS"
-
Modify the 'allowedOrigins' field to include 'https://*.ingenius.com' under crossOriginSettings
-
Save your changes
Configure Genesys After Call Work (ACW) Settings
To prevent call routing conflicts between Genesys and Salesforce, ensure that your Salesforce ACW is disabled if you plan to use Genesys ACW instead. For more information on configuring ACW in Salesforce, refer to the documentation here.
Configure Genesys Call Recording
InGenius supports call recording with Genesys Engage. You must set a base recording URL (done in the telephony profile configuration section on the next page), and set a user's permissions appropriately to be able to listen to recordings
Users permitted to find and listen to recordings require, at the annex level:
-
'supervisor' and 'agent' role set in Genesys htcc/roles


Configure SIP CTI Control
In order to ensure your SIP switch is configured to work with all of the functionality offered by integrating with InGenius, configure your DN extension as follows:
-
Navigate to your Genesys Engage Admin page
-
Navigate to Switches | select the SIP Switch that will be used
-
Under DN | Extension, open up the Options tab and add the following values to sip-cti-control:
-
'talk,hold,dtmf'

-
Genesys Cloud Configuration
The Genesys Cloud telephony requires some information to be configured to allow InGenius to manage calls correctly. Your company must have a Genesys system installed and working before the next steps may be completed successfully. The following sub-sections outline the setup required to integrate with InGenius.
Note: These steps need to be performed by a user with full administrator access and privileges to your telephony system.
Create Genesys OAuth Client
An OAuth client app is required to allow users to connect to InGenius. To create the client:
-
Sign into Genesys Cloud and select Collaborate/Communicate.
-
Navigate to Admin | Integrations and select OAuth.
-
Select Add Client and enter the following information:
|
Field |
Value |
Notes |
|
App Name |
Your Company Name |
Any name may be used e.g. InGenius. |
|
Description |
(Optional) |
A description of the client app. |
|
Token Duration |
86400 |
The time (sec) that a client token is active for. It is recommended to set the value to a time longer than the work shift. Otherwise, a token may expire during the user's work shift which can cause errors. |
|
Grant Type |
Token Implicit Grant (Browser) Code Authorization |
Tokens are used to grant access to clients in a secure implementation. |
|
Authorized Redirect URIs |
https://app.ingenius.com/genesys-cloud?orgId={Your SF Org} |
This information can be found in the InGenius Admin app | Telephony profile section or from your IT department. Note: If you have not already, ensure you have created a telephony profile in the InGenius Admin App - you can obtain the Authorization Redirect URI from the created profile. |
Additionally, if "enforce scopes" is enabled, the following scopes are required:
| Required Scope | Details |
| recordings:readonly |
|
| users |
|
| user-basic-info |
|
| external-contacts:readonly |
|
| routing:readonly |
|
| notifications |
|
| presence |
|
| conversations |
|
| organization:readonly |
|
| authorization:readonly |
|
| voicemail |
|
-
Select Save.
After you create the client, record the following information:
-
Authorization URL
-
Client ID
-
Client Secret
These values will be used later to configure the Genesys Cloud telephony profile from within the InGenius Admin App.
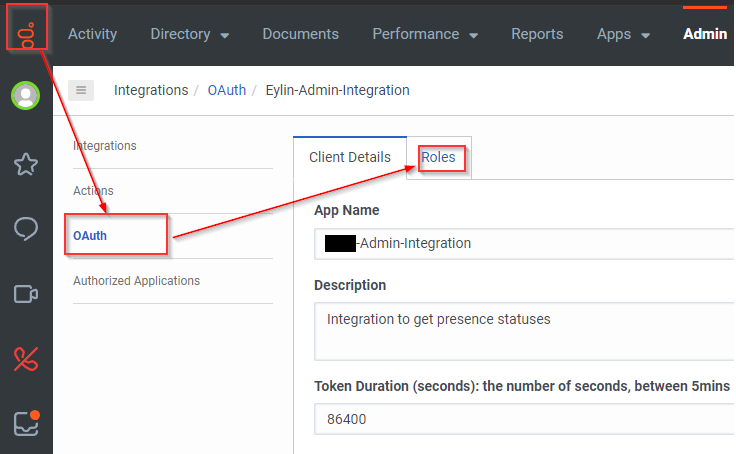
Create Genesys OAuth Client Credentials Integration
An OAuth Client Credentials integration is required for the importing of Genesys Cloud presence statuses into InGenius. Follow the steps below:
-
Sign into Genesys Cloud and select Collaborate/Communicate.
-
Navigate to Admin in the top menu bar, then to Integrations | OAuth.
-
Select the Add Client button above the OAuth table.
-
Set the App Name as '<your-name>-Admin-Integration'
Note: Ensure the App Name you choose is unique to your deployment.
-
Set the Description as 'Integration to get presence statuses', or another brief and appropriate description.
-
Ensure the Token Duration is set.
Note: The Token Duration is how long the login token will last for. This option can be adjusted after the application is created as required, and is useful for testing expiring tokens.
-
Set the Grant Types to 'Client Credentials'
-
Navigate to the Roles tab on the same page.

-
Scroll down to the Trusted External User role and select it by clicking the Assigned switch.

-
Click the Save button.

Required User Permissions
Listed in the table below are the user permissions required and their details:
| Required Permission | Details |
|
recording:recording:view |
|
| directory:user:view |
|
| externalContacts:contact:view |
|
| routing:queue:search |
|
| conversation:transcription:view |
|
| conversation:conference:add |
|
|
routing:queue:join Or routing:queueMember:manage |
|
| conversation:communication:disconnect |
|
| routing:queue:view |
|
| analytics:conversationDetail:view |
|
| analytics:userObservation:view |
|
Other Permissions
Additional permissions that are required for other features that not all users may require access to can be found in the table below:
| Permission | Details |
|
conversation:call:monitor |
|
| conversation:callback:create |
|
Default User Phone
If the user profile does not specify a value in the Default Phone field, the user will not be able to dial out of InGenius. To ensure a default phone is specified:
-
Sign into Genesys Cloud and select Collaborate.
-
Navigate to Admin | People & Permissions | People
-
Navigate to the user's profile.
-
Under the Phone tab, ensure that a value is specified in the Default Phone field.
Create Web Services Data Action
The web services data actions integration will be required later for a call action in the IVR. If you have not already, you will need to add this action to your Genesys integrations. For details on adding and activating a data actions integration, refer to the official documentation page.
Configure SSO (Single Sign-on)
Single sign-on will allow your users to authenticate and log in with a single ID and password, allowing them to access multiple apps with a single login. To enable SSO for InGenius, you will first need to enable Salesforce as an SAML provider.
After enabling Salesforce as an SAML provider, refer to the Genesys instructions on configuring SSO here.
Configure Genesys Queues After Call Work (ACW) Settings
To prevent call routing conflicts between Genesys and Salesforce, ensure that your Salesforce ACW is disabled if you plan to use Genesys ACW instead. For more information on configuring ACW in Salesforce, refer to the documentation here.
Note: The 'Mandatory, Time-boxed no early exit' ACW option in Genesys is currently not supported and will cause significant issues with InGenius.
For more information on how to configure Genesys queues, refer to the official documentation page.
Configure Genesys Cloud Call Recording
If configured to allow your users access, InGenius provides call recording integration with Genesys Cloud. To enable this for your system, follow the steps below:
Enable Line Recording/Dual Channel
Call recording in Genesys Cloud requires that Line Recording and Dual Channel is enabled on the SIP trunk. For more information, refer to the official Enable Line Recording documentation.
Enable Participant Recording
Call recording in Genesys Cloud also requires an 'Enable Participant Recording' action to be set in the IVR flow as shown in the Genesys IVR example. For more information, refer to the official Enable Participant Recording documentation.
Note: This action is set in the coming IVR configuration section, it is recommended to continue following the installation guide in order.
Update Salesforce CSP (Content Security Policy)
As Genesys hosts their recordings externally, you must add it into Salesforce's CSP Trusted Sites. Follow the steps below:
-
Login to your Salesforce Org and navigate to Setup.
-
Enter "CSP" into the Quick Find box and select CSP Trusted Sites.
-
Click on New Trusted Site
-
Name the Trusted Site with a short reference.
-
In the Trusted Site URL, add the following URL:
-
prod-recording-playback.s3.amazonaws.com
-
-
Check the box "Allow site for media-src" and Save.
Create Queued Callback Action in Genesys Architect
InGenius supports queued callbacks with Genesys. To enable this functionality, a queued callback action must first be created in Genesys with the following fields:
| Field | Description |
| Name | A name for the queued callback action. |
| Callee Name (Optional) | The name used on the callback. This is typically a string expression that tells the agent who requested the callback. |
| Callback Number | The number used on the callback. This is typically a string expression that tells the agent the number of the user who requested the callback. This field is required and cannot be blank. |
| Queue | Select the queue that this action would be applied to. |
| Callback Script (Optional) | Select a script to be used when the callback is triggered. |
| Inputs (Optional) | Define the variables the Callback Script displays or processes on runtime. |
For more information on creating data actions in Genesys, refer to the official documentation.
Genesys Cloud Audio Enablement Popout
To interface with your telephony from within Salesforce, InGenius provides an Audio Enablement Popout for Genesys Cloud. Log into the popout when prompted with your Genesys Cloud user credentials.
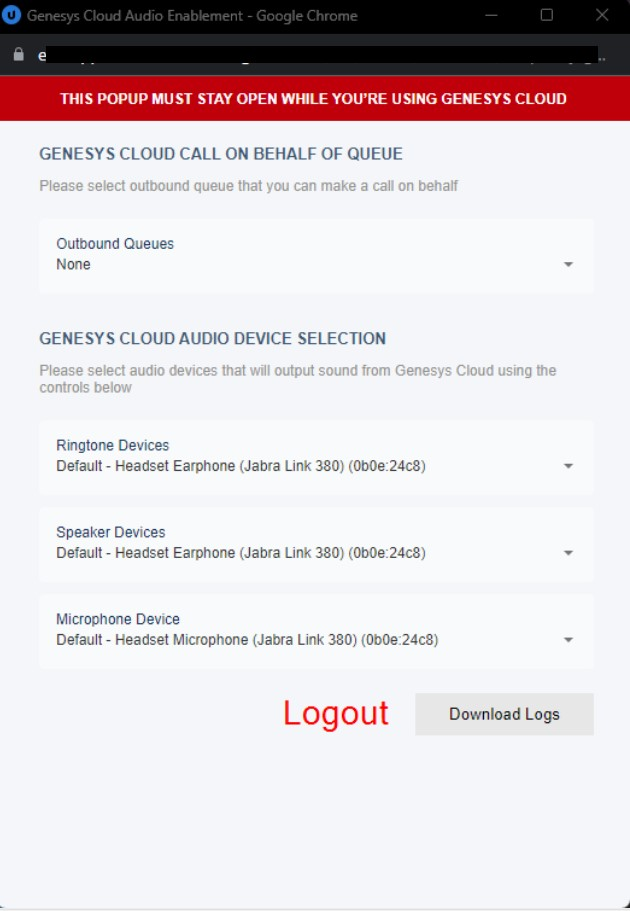
The popout interface allows:
-
Selection of current Outbound Queue for calling on behalf of queue.
-
Audio Device Selection - select the dropdown arrows to set a default device for call notification, and audio input/output.
-
Downloading Genesys Cloud User Logs for troubleshooting and support tickets.