Settings
Are you the primary Localytics go-to in your organization? Then, this is your how-to section for basic day-to-day management of the platform.
In this topic:
- App keys
- Rapid push verification
- Organization
- Permissions
- Events and event attributes
- Scheduled reports
- Custom reports
- Data imports
- Data exports
- API key
- Password policy
Note: If you don’t see what you’re looking for, reach out to our Support team. We’re here for you.
App keys
App keys are one of the best mechanisms for providing top-level separation of data. Best practices dictate one app key for each app, device platform, and environment. Creating separate app keys enables you to easily uncover insights between platforms, send more customized messaging campaigns by platform, and separate test data from production. Use cross-app analytics to compare data across multiple app keys.
Working with app keys
Most of the time creating an app in the Localytics Dashboard will be covered by our onboarding team. If, however, you'd like to add another iOS/Android app, web app, or an API, you can do so from your account menu.
To create or edit your app keys:
-
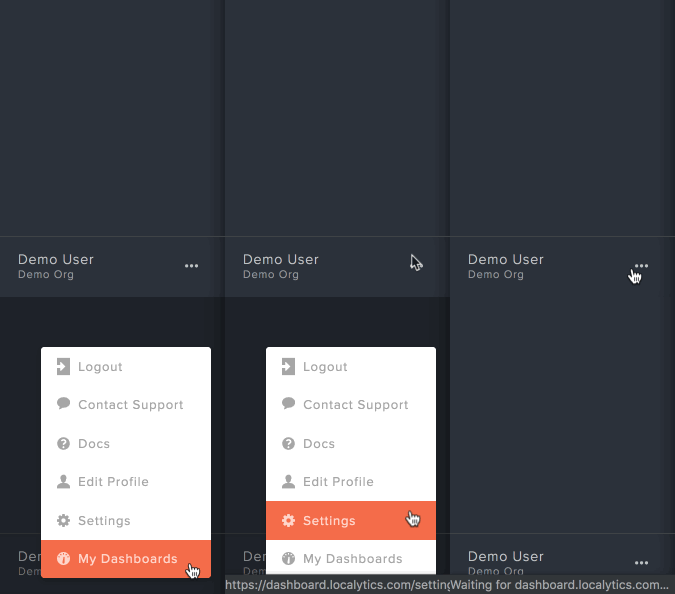
At the bottom of the left pane, select the ellipsis (...) next to your name to open your account menu.

-
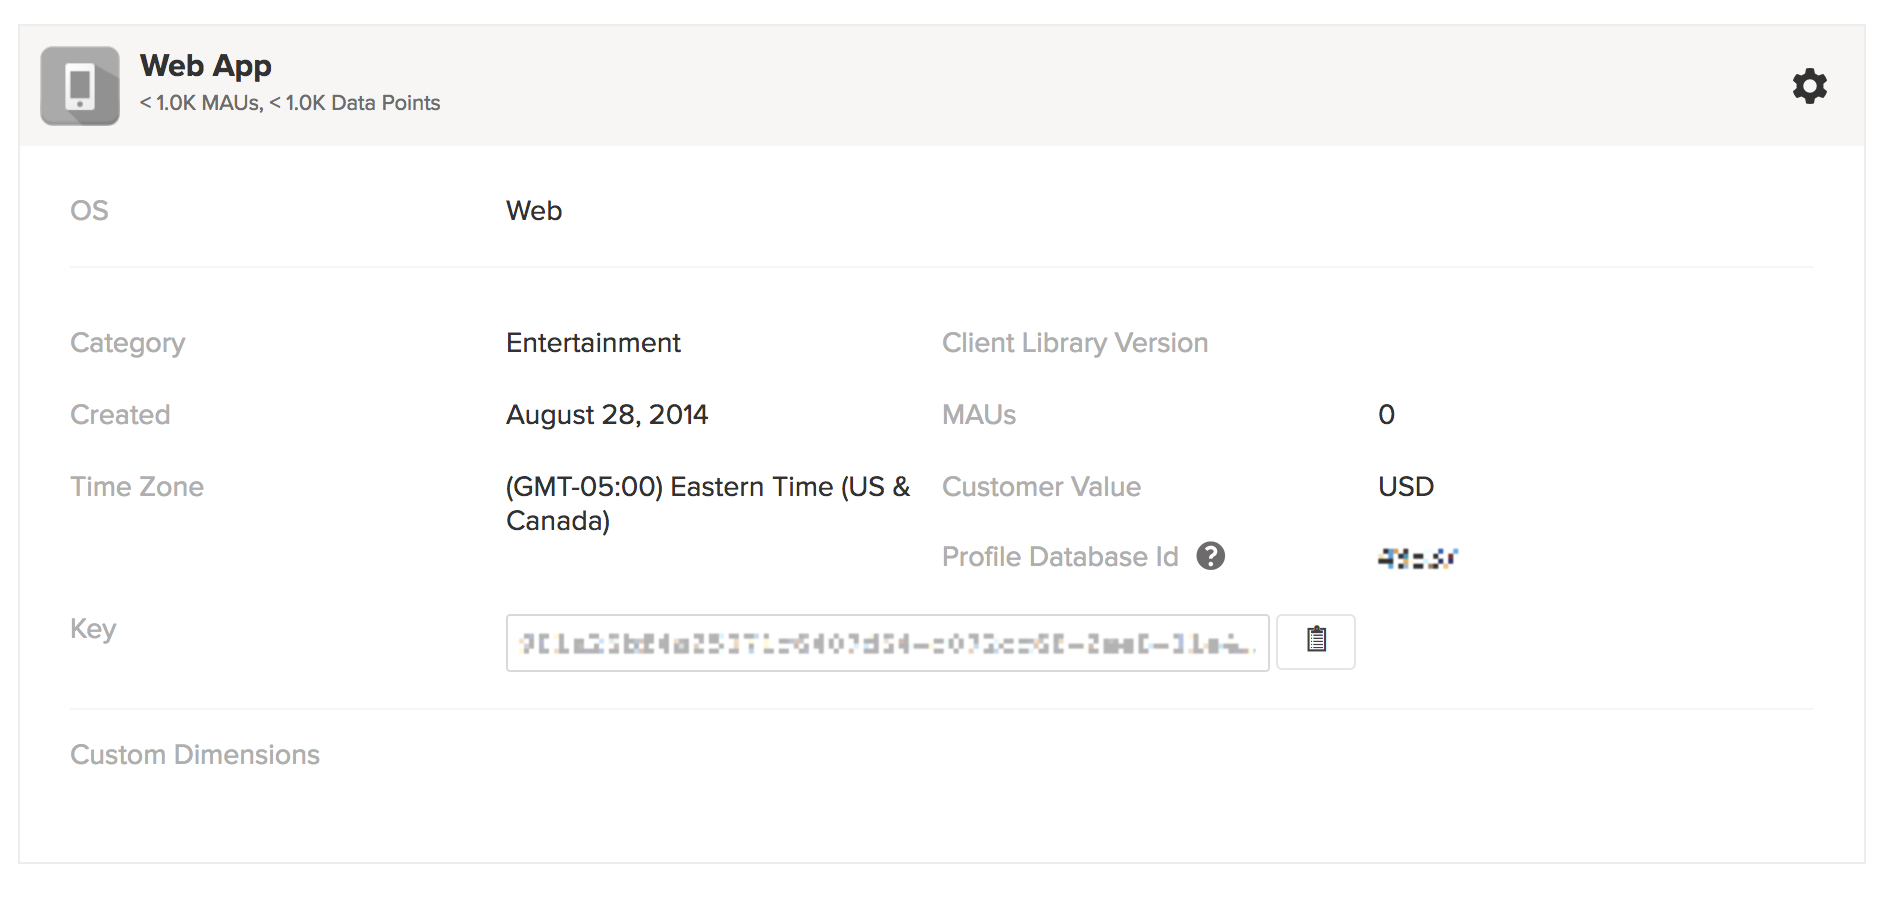
Select Settings. The Manage Applications page opens with a list of all your apps.

- You can create a new app or edit an existing app:
- To create a new app, select the green + Create an App button.
To edit an existing app, locate the app in the list, select the gear icon in the upper-right corner of the section, and then select Edit.

-
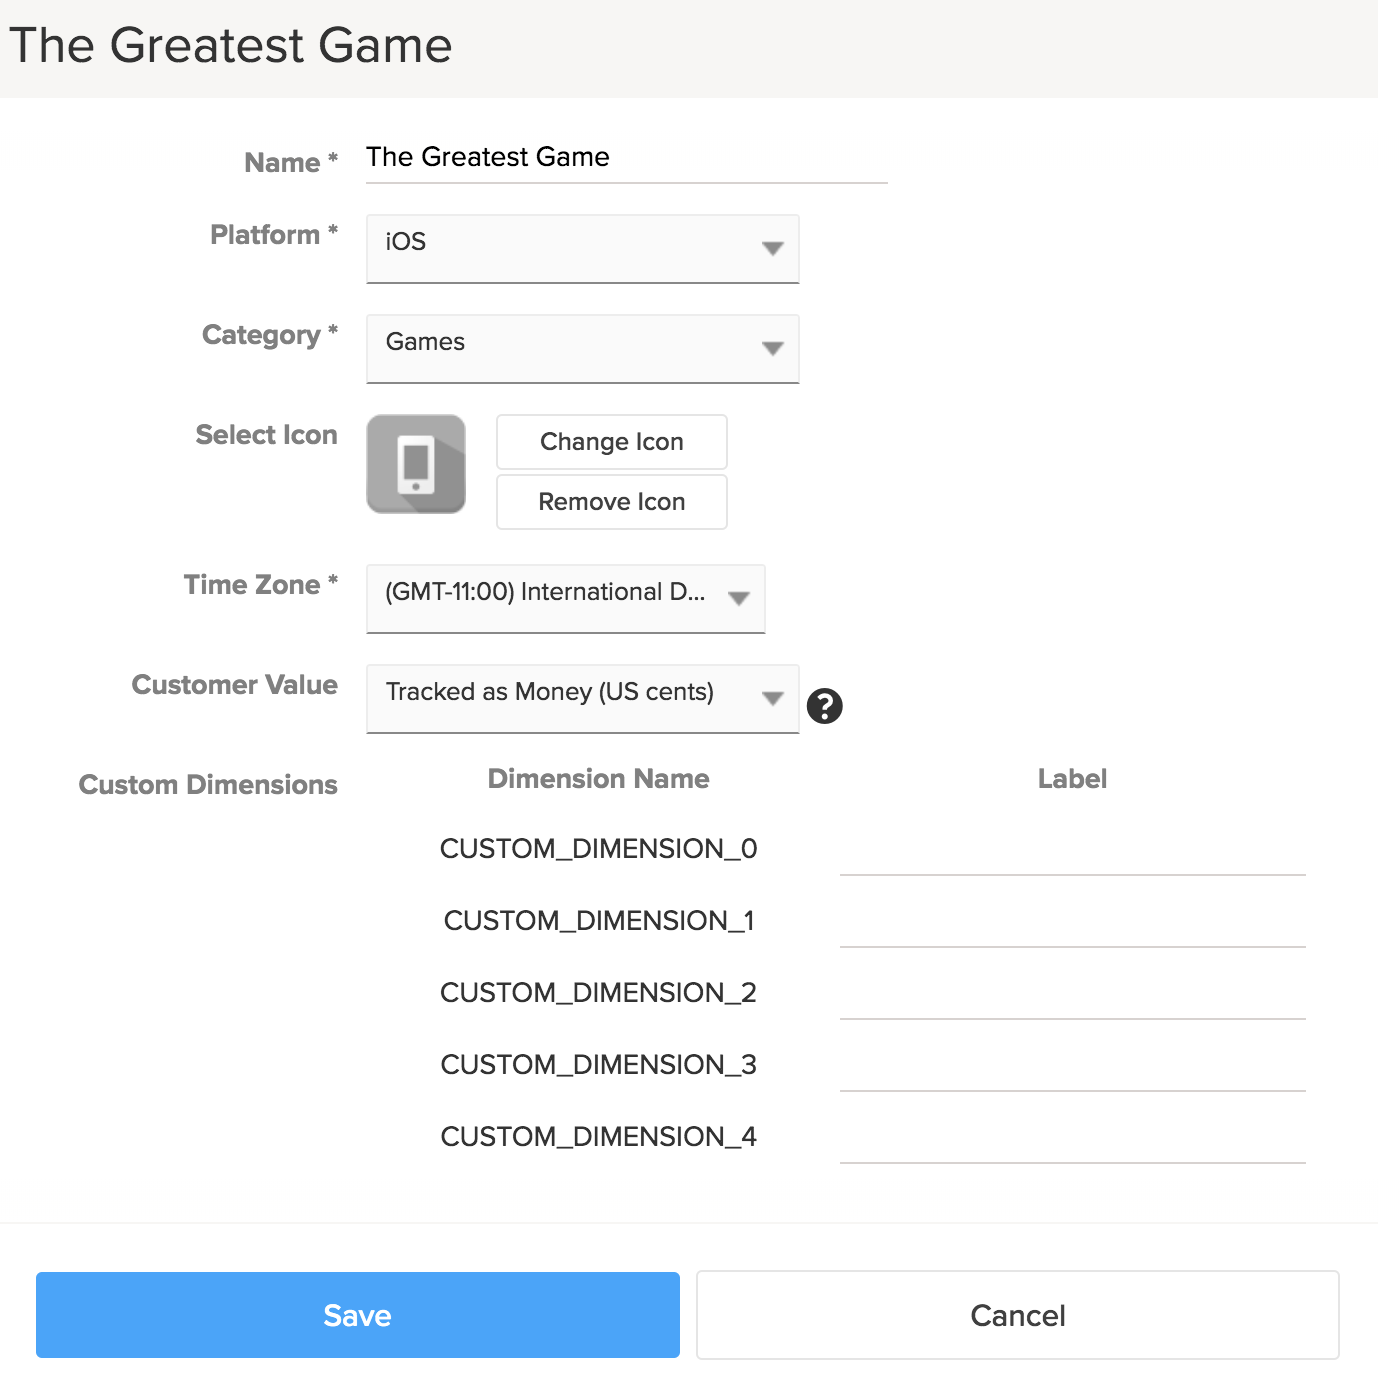
Complete the form, making sure the required fields (Name, Platform, Category, and Time Zone) are filled in.
Setting Description Name For an app platform with both iOS an Android versions, create new app keys with the following names:
- My App [iOS] Test
- My App [iOS] Production
- My App [Android] Test
- My App [Android] Production
Platform Select the appropriate device platform. Category Select the appropriate category. The Usage report will include data for benchmarking performance against your selected category.
Select icon (optional) Upload your icon to display in the selector drop-down. Time Zone Choose the time zone in which you want your data to be reported.
Tip: Choose the time zone of your company headquarters or UTC. Your marketing campaigns will be delivered according to this time zone, except when you specify delivery in a user's time zone.
Customer Value Select the value you want to use for tracking in your reports.
- Choose Tracked as Money to track $$$ related to revenue or purchases.
- Choose Raw Data if you want to map the value to another metric such as "movies watched" or "ads viewed."
Custom Dimension Labels Custom Dimensions are assigned a numeric value during the tagging process. Apply a label here to describe and display Custom Dimensions in the Dashboard. For example:
CUSTOM_DIMENSION_0:Subscriber type.Channels (for Android) Starting with Android Oreo (v8.0) you're required to specify a channel (shown as a category on the user's device) for all push messages sent. You’ll need to specify channel information within your app or platform. Be sure the information is kept up to date in Localytics. Push messages sent without a specified channel will not reach your users.
To avoid this, Localytics creates a default channel for push messages when none is specified. This default channel assumes basic default specifications, such as importance, name (shown as the channel ID), sound and vibration setting. It is un-editable within the Localytics dashboard. For more information, see "Create and Manage Notification Channels" on the Android Developers website.
-
Make sure to fill out all of the required fields (Name, Platform, Category, and Time Zone).
-
If you're using the Events API (to connect systems like your point-of-sale system), choose the API platform. For more information, see Events API in the Developer documentation.
- Fill in any additional custom dimensions.
- When you are done, select Save.
Managing push messaging certificates
- Select Settings. The Manage Applications page opens.
-
Select the gear icon in the upper-right corner of the section, and then select Add Certs or Change Certs.
Note: If Add Certs or Change Certs is not available on the menu, then push messaging certificates are not available for this app.
- Follow the instructions to add or edit your iOS Push Certificate and/or your Google Cloud Messaging API key to enable push messaging. Prevent push errors by correctly matching development and production certificates with the Push Mode drop-down.
Rapid push verification
Localytics' Rapid push verification helps you confirm that you have properly configured your app to receive Localytics push notifications and detects any issues with your integration, providing guidance on how you can fix the problem.
To perform a rapid push verification test:
- At the bottom of the left pane, select the ellipsis (...) next to your name to open your account menu.
- Select Settings. The Manage Applications page opens.
-
Locate the app you want to test, and then select Test Push Integration.

-
Follow the instructions on the Rapid Push Verification page.
For more step-by-step instructions to successfully test or troubleshoot your push integration, watch this video:
Organization
To view your active Localytics analytics and marketing subscriptions:
- At the bottom of the left pane, select the ellipsis (...) next to your name to open your account menu.
- Select Settings. The Manage Applications page opens.
-
In the menu bar, select Organization.
You see your subscription and billing information.
- To edit the organization name, select Edit and make your changes. When you are done, select Save.
Events and event attributes
To manage the Events and Event Attributes that are displayed within Localytics:
- At the bottom of the left pane, select the ellipsis (...) next to your name to open your account menu.
- Select Settings. The Manage Applications page opens.
-
In the menu bar, select Events.
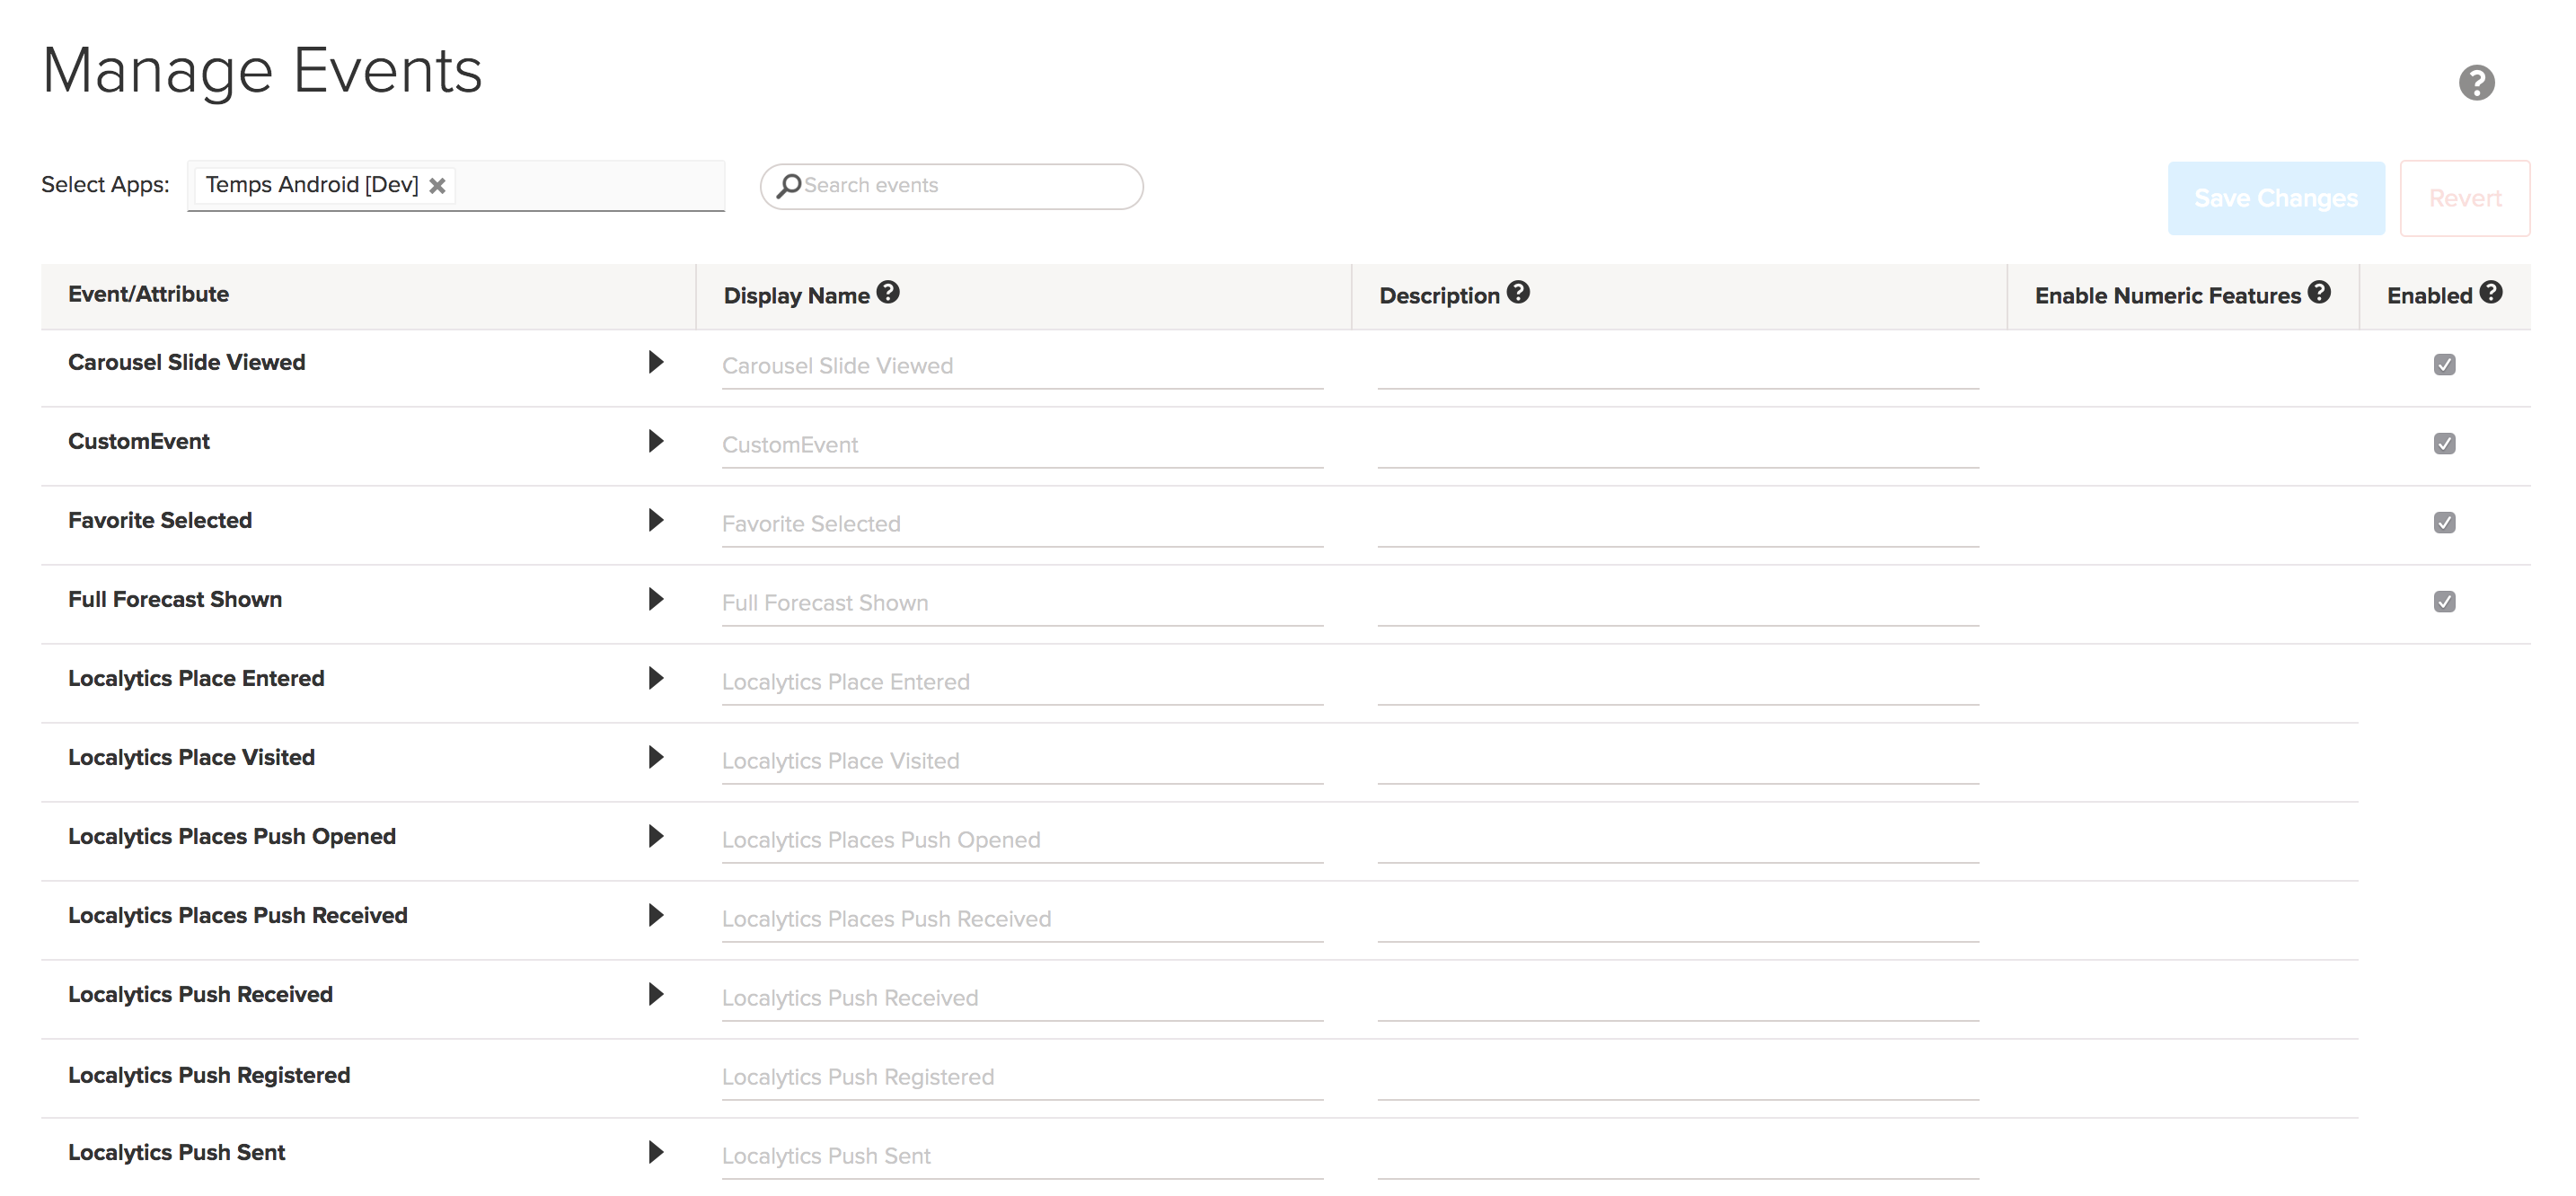
The Manage Events table lists the events and event attributes in the app.

You can rename events, disable events and event attributes, and set numerical attributes to be treated as numbers rather than text.
- When you rename events, you are simply assigning a different display name within the Localytics dashboard; your event will still be tagged and named the same way within your code base.
- When you disable events or event attributes, Localytics stops collecting this information moving forward. All historical data will be preserved and archived.
-
Localytics attempts to detect if the values that have been captured as an event attribute are numeric. When this is the case, we'll attempt to display these as numeric values (rather than text). This means, for example, that we will visualize results by bucketing numeric values.
If, however, Localytics has made a mistake, this can be easily adjusted by selecting or clearing the Enable Numeric Features check box, which is visible only for event attributes (not for events). To see all event attributes associated with an event, select the triangle next to the event name.
For more information, see Events and event attributes.
Scheduled reports
To see a summary of the Localytics reports scheduled to be emailed to you:
- At the bottom of the left pane, select the ellipsis (...) next to your name to open your account menu.
- Select Settings. The Manage Applications page opens.
-
In the menu bar, select Scheduled Reports.
The Manage Scheduled Reports table lists the scheduled reports in the app.
Custom reports
You can access custom reports only if they are available in your subscription:
- At the bottom of the left pane, select the ellipsis (...) next to your name to open your account menu.
- Select Settings. The Manage Applications page opens.
-
In the menu bar, select Custom Reports.
Data imports
To manage your data imports from Localytics:
- At the bottom of the left pane, select the ellipsis (...) next to your name to open your account menu.
- Select Settings. The Manage Applications page opens.
-
In the menu bar, select Data Imports.
The Imports page lists audience and profile data imports.
For more information, see Audience Imports in the Developer documentation.
Data exports
To manage your data exports on a regular cadence from Localytics:
- At the bottom of the left pane, select the ellipsis (...) next to your name to open your account menu.
- Select Settings. The Manage Applications page opens.
-
In the menu bar, select Data Exports.
The Export page lists audience and profile data exports.
- You can start or stop a scheduled data export:
- To start a scheduled export, locate the export in the list, and then select Enable Export.
To stop a scheduled export, locate the export in the list, and then select Disable Export.
For more information, see Audience Exports and Profile Exports in the Developer documentation.
API key
The Localytics API key grants to access to all of Localytics APIs. To access your Localytics API key:
- At the bottom of the left pane, select the ellipsis (...) next to your name to open your account menu.
- Select Settings. The Manage Applications page opens.
-
In the menu bar, select API Keys.
The API keys page lists the API keys used to access the Localytics APIs. You can use the regular API key for access to all APIs.
For more limited access to the Query API key, contact Support.