Setting up custom fields
The following standard profile fields are built into Mobile Commons:
- Age
- Date
- Gender
- Number
- Text
- Time of Day
- Yes/No
You can add any number of custom fields in order to build a more detailed data set that will enhance your company's ability to segment user groups, target prospective subscribers, and improve the reporting metrics.
Tip: Avoid using spaces in the custom field name, because spaces are not recognized in Liquid conversations and mail merges. So, if you add custom field with a space (for example, birth date), then you will need to replace the space with an underscore (for example, birth_date) in your Liquid conversations and mail merges. For more information, see Personalizing your message.
To set up custom fields:
For more information, see Working with custom fields.
Adding a new custom field
To add a new custom field:
-
Select
 Home in the left pane, and then select Custom Fields.
The Custom Fields table lists the custom fields in the profile form.
-
Select
 in the upper-right corner to open the "New Custom Field" window:
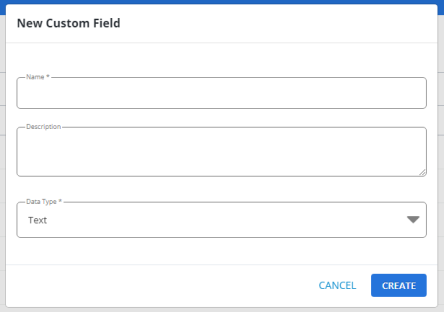
-
Enter a descriptive name and a brief description for the new field.
Note: Even though this name is available to internal users only, take the opportunity to assign a descriptive name that is meaningful to your organization.
-
Select the data type for content that will populate the new field:
-
Text
-
Date
-
Gender
-
Number
-
Age
-
Yes or No
-
Time of Day
-
Anniversary
-
Identity
-
-
When you are done, select the Create button.
Uploading custom fields
To upload a CSV file with custom fields:
-
Create a CSV file with the following column headings:
Heading Description name Name of the new custom field description (optional) Description of the custom field data_type One of the following data type values:
-
text
-
date
-
gender
-
number
-
age
-
yes or no
-
time of day
-
anniversary
-
identity
Tip: Be sure to save the file in CSV format; other file types will not be accepted.
-
-
Select
Home in the left pane, and then select Custom Fields. -
From the Actions drop-down list on the right, select Bulk Upload Fields.
-
Select Choose File, navigate to select the CSV file to upload, and then select Open.
-
To validate the custom fields to add, select Preview Columns.
The Custom Column: Preview tables list the valid fields that you can add to the profile form and any invalid custom fields that will not be added to the profile form.
Note: To fix invalid custom fields, select upload a corrected file to return to the Custom Column page. Update the CSV file, and then upload it again. Select Preview Columns to validate.
-
When all of the fields to add have been validated, select Create Columns in the upper-right corner.
Editing a custom field
-
Select
Home in the left pane, and then select Custom Fields. -
Locate the custom field in the Custom Fields table, select
 Menu at the end of the row, and then select Edit.
The Edit Custom Field form opens.
-
Make your changes to the form. For more information, see Adding a new custom field.
-
When you are done, select Update.
Deleting a custom field
Caution: Use caution when deleting a custom field. Deleting a custom field also clears the custom field values in the user profiles.
-
Select
Home in the left pane, and then select Custom Fields. -
Locate the custom field in the Custom Fields table, select
Menu at the end of the row, and then select Delete. -
Select OK to confirm.