Adding a new opt-in path message
Start with an opt-in path message in order to:
-
Obtain consent from the mobile user to receive messages from your company.
-
Qualify a mobile user on the basis of age, by setting minimum age requirements of 13, 18, or 21 years.
-
Qualify a user on the basis of location, by filtering mobile users based on home ZIP code.
Tip: For information on the requirements for contacting prospective users, see Obtaining written consent.
The purpose of the opt-in path message is to add new users to your company's messaging campaigns. After a user gives your company permission to send text messages (subscribes), you can send broadcast messages to promote your company or organization.
An opt-in path message is a two-way conversation with potential new users:
-
Call to action: Your company advertises an short code-keyword combination and prompts users to join your list.

The mobile user's initial message is the first opt-in in this two-part process.
-
Confirmation: When users respond to your call to action, the follow-up message asks them to confirm that they want to receive messages from your company, adding opt-out instructions and the standard note that they may incur data costs by exchanging text messages.

The mobile user's affirmative response is the second opt-in.
-
Confirmation response: You can prepare two automated responses to the second opt-in message, one welcoming users who responded with YES or other valid response and one acknowledging users who opted out with NO or other invalid response.

Tip: Be sure to identify your company or organization and include the opt-out disclosure (for example, “Reply STOP 2 quit, HELP 4 info”) regularly; for example, include the opt-out disclosure in every fourth message sent or once a month.
Note: If a mobile user opts out accidentally, they can opt back in by texting OOPS to the short code again. (This function is not available for campaigns using long codes.) The opt-out message is reset and the user rejoins the campaign as a new mobile user.
For opt-in path messages:
For more information, see Working with opt-in path messages.
Creating an opt-in path message
To create a new opt-in path message:
-
Select
 Text Messaging in the left pane, and then select Campaigns.
Tip: The default short code is listed in the title bar.

If you have questions about the short code to use, contact your customer success manager.
-
Locate an existing campaign in the Campaigns table, and then select the campaign name link.
The Campaign Details page opens.
-
To review existing opt-in path messages, select the Opt-in paths tab at the bottom of the page.

The Opt-in paths table displays the opt-in paths available for the selected campaign. You can identify phone opt-in paths in the Type column.
-
Select Actions at the top of the page, and then select New opt-in path.
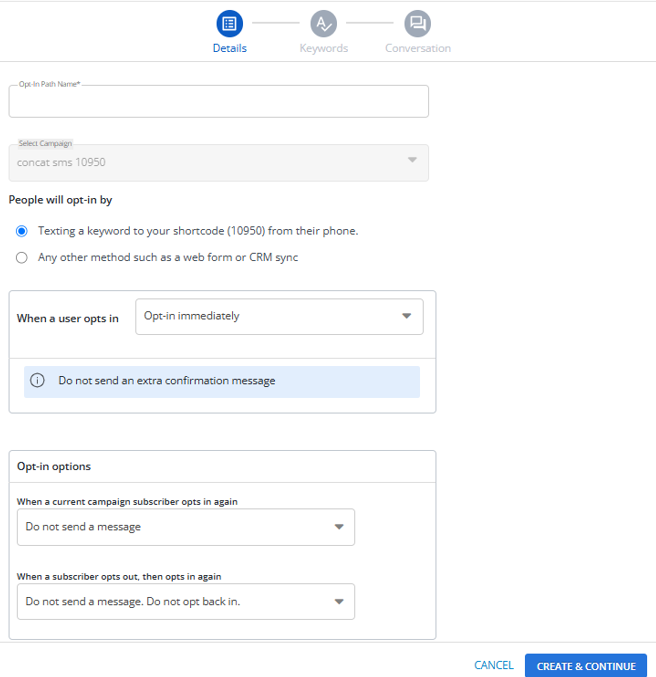
The New Opt-In Path form opens to Step 1, Details.
-
Enter a descriptive name for the opt-in path message.
Note: Even though this name is available to internal users only, take the opportunity to assign a descriptive name that is meaningful to your organization.
-
Under People will opt-in by, select Texting a keyword to your shortcode (shortcode) from their phone.
-
When you are done, select CREATE & CONTINUE.
The New Opt-In Path form opens to Step 2, Keywords.

-
Type a unique keyword or keyword phrase (between 2 and 20 characters) that users will text to opt in to the campaign.
Note: Keywords are not case sensitive.
 About keywords
Keep the following tips in mind when you add keywords to your opt-in message:
-
Avoid generic or common words, like MORE, IF, or THE, which could lead to unintended opt-ins.
-
Use keywords that are unique to your communication channels, so the success of your calls-to-action can be tracked and compared among channels.
-
To lessen the chance of typing errors, keep your keywords as short as possible.
-
Choose keywords that are easy to spell correctly (and less likely to be autocorrected).
-
Avoid acronyms or a mix of numbers and letters (TEXT2WIN, for example).
-
Add backup keywords, such as near spellings and misspellings for users who do not enter the keyword exactly. For example, if the keyword is BIGSALE, you may want to add SALEBIG and BIGSLAE.
As you type, the keyword is validated. In the text input field, type your desired keyword. As you type in the input field, the system should initiate a check to verify the availability of the keyword. If the keyword is available, a green labeled text “AVAILABLE” appears. If the keyword is taken, the red labeled “TAKEN” appears. If the system is still checking, it should show a blue labeled text “CHECKING” appears.
Note: You cannot add a keyword while it is in the “CHECKING” state.
-
-
Select the message type available for the keyword:
- SMS & MMS: Includes simple text messages (limited to 160 characters) and longer text messages (limited to 1600 characters) or attachments.
- SMS: Includes simple text messages only.
- MMS: Includes longer text messages or attachments.
-
Select ADD.
The keyword is added to the Keywords table. You can continue to add as many keywords as you need.
-
To delete a keyword, select
 Delete icon at the end of the row.
-
-
When you are done, select CONTINUE.
The New Opt-In Path form opens to Step 3, Conversation. The opt-in path status is
 .
.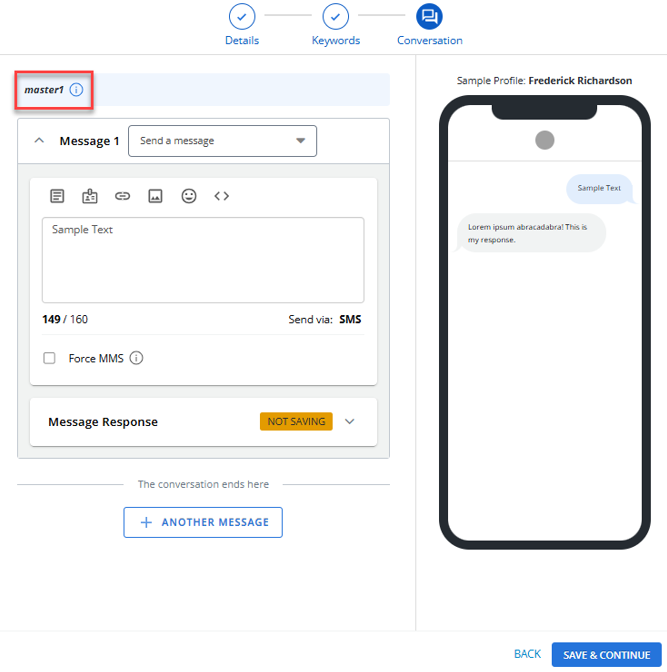
For more information on further steps, see Working with opt-in path messages.
The message is now active and available on the selected short code. Messages will be sent after users text the keyword to the short code.
Reviewing opt-in path settings
After you add an opt-in path, you can review the opt-in path settings.
-
Select
Text Messaging in the left pane, and then select Campaigns. -
Locate an existing campaign in the Campaigns table, and then select the campaign name link.
The Campaign Details page opens.
-
Locate the opt-in path in the Opt-In Paths table, and then select the opt-in path name link.
The Opt-in path page opens.
-
In the Opt-In Paths Actions panel on the right, select Edit Opt-in Path. The page opens to Details stepper where you can review the settings.
-
Opt-in immediately. Use this option when a user is added through a method, such as a CRM sync or web form opt-in, where an extra confirmation message is not needed.
-
Send a confirmation message.
-
Send an age confirmation > 13.
-
Send an age confirmation > 18.
-
Send an age confirmation > 21.
-
Send a zip code confirmation.
-
Do not send a message.
-
Resend the conversation.
-
Send the campaign's Already Subscribed message. For more information, see Editing a campaign.
-
Do not send a message. Do not opt back in again.
-
Resend the conversation.
-
Send a confirmation message.
-
When you are done, select SAVE & CONTINUE.
| Setting | Options |
|---|---|
| When a user opts in |
The opt-in options determine standard opt-in results, plus age gate (13, 18, and 21) and zip code options. |
| When a current campaign subscriber opts in again |
|
| When a subscriber opts out, then opts in again |
|
Cloning an opt-in path message
You can also create an opt-in path message by making a copy of an existing opt-in path message.
To clone an opt-in path message:
-
Select
Text Messaging in the left pane, and then select Opt-In Paths. -
Locate the opt-in path message to copy in the Opt-In Paths table, and then select the opt-in path name link.
The Conversation page opens.
-
In the Opt-In Path Actions panel on the right, select Clone.
Mobile Commons creates a copy of the opt-in path conversation.
The message is now active and available on the selected short code.
Editing an opt-in path message
To make changes to an opt-in path message:
-
Select
Text Messaging in the left pane, and then select Campaigns. -
Locate the campaign to edit in the Campaigns table, and then select the campaign name link.
The Campaign Details page opens.
-
Locate the opt-in path in the Opt-In Paths table, and then select the opt-in path name link.
The Conversation page opens.
-
In the Opt-In Paths Actions panel on the right, select Edit Opt-In Path.
-
Make your changes to the Details, Keywords, and Conversation steps.
-
When you are done, select SAVE.
Note: You cannot modify the campaign name.
Deactivating an opt-in path message
To deactivate an opt-in path message:
-
Select
Text Messaging in the left pane, and then select Campaigns. -
Locate an existing campaign in the Campaigns table, and then select the campaign name link.
The Campaign Details page opens.
-
Locate the opt-in path in the Opt-In Paths table, and then select the opt-in path name link.
The Conversation page opens.
-
In the Opt-In Paths Actions panel on the right, select Deactivate Phone Opt-in Path.
If you later decide to re-use the opt-in path message, you can reactivate it. For more information, see Reactivating an opt-in path message.