Working with opt-in path messages
To work with opt-in path messages:
-
Select
 Text Messaging in the left pane, and then select Opt-in Paths.
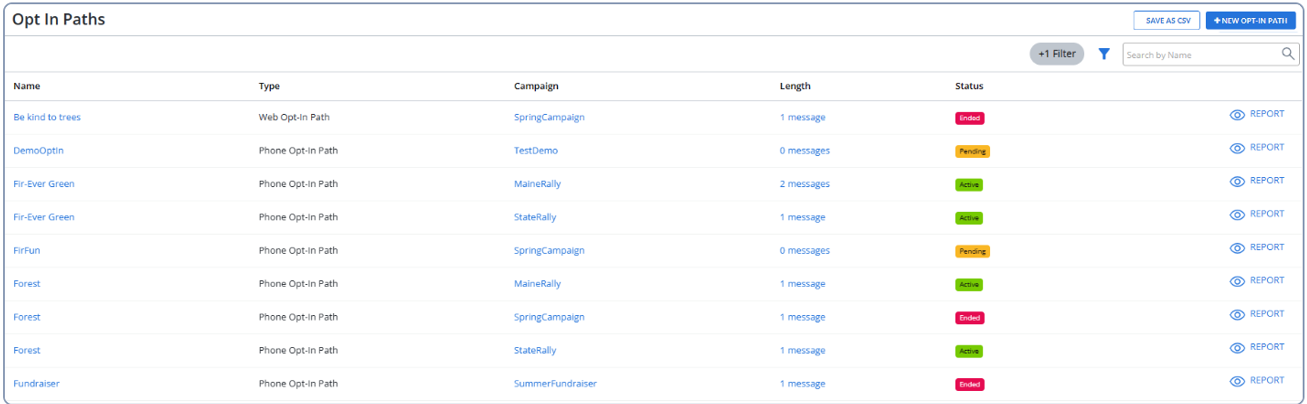
The Opt-in Paths table lists all of the opt-in path messages added for every campaign, sorted by name:
 About the Opt-in Paths table
The Opt-in Paths table contains the following information:
Column Description Name The name of the opt-in path message.
Type The type of opt-in path: Web Opt-In Path or Phone Opt-In Path. Campaign The name of the campaign. Length The number of messages in the opt-in conversation. Status The current status of the opt-in path message:
-
 Pending
 -
 Active
 -
 Ended
Ended
 Report opens the Opt-In Path report.
 If the table is longer than one page, use the page-navigation options on the lower-right to select the number of rows per page and to navigate to the
 next or
  previous page.To navigate directly to a specific page, select the page field, enter the page number, and then press ENTER.
 -
From the Opt-in Paths table:
For more information, see Adding an opt-in path message.
Creating a new opt-in path
To create a new opt-in path:
-
Select Text Messaging in the left pane, and then select Opt-in Paths.
-
Above the Opt-in Paths table, on the right click +NEW OPT-IN PATH button.
The “New Opt-In Path” page opens to the first step, Details. The full list of steps (1. Details, 2. Keywords 3. Conversation) appears at the top of the page.
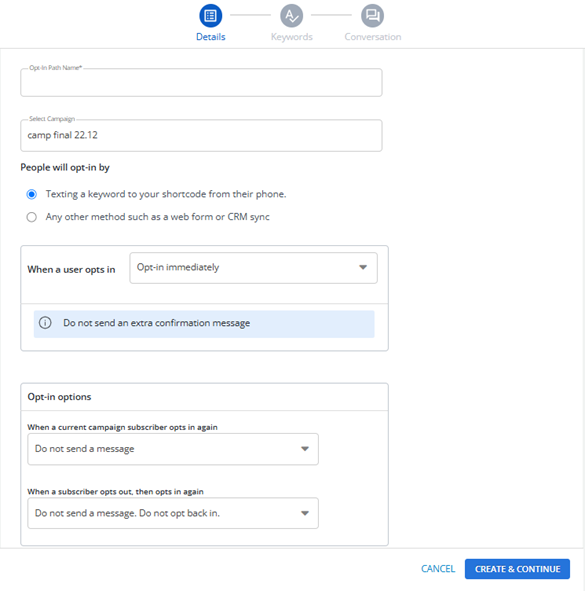
Details
-
Opt-in Path Name (mandatory): Enter a descriptive name for the opt-in path message.
-
Select Campaign (mandatory): Select an existing campaign from the dropdown list. You can also search the campaigns by entering campaign name in the search field. If there are no available campaigns, “No available campaigns” appears in the dropdown.
Note: The Select Campaign field is locked when you create an Opt-In Path through a particular campaign.
-
People will opt-in by: The following two radio button options are available for selecting the opt-in method:
-
Texting a keyword to your shortcode from their phone.
-
When selected, the system displays relevant settings for users opting in via shortcode.
Note: The shortcode will also be mentioned if the opt in path is created through a campaign, for example, Texting a keyword to your shortcode (30644) from their phone.
-
Any other method, such as a web form or CRM sync.
When selected, the system displays settings related to opt-in methods like web forms or CRM synchronization. These settings include configuration options for web form integrations, CRM sync, and other relevant details.
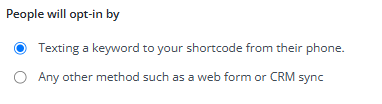
Note: Only one option can be selected at a time. Selecting one of the radio options is mandatory. If no option is chosen, an error message will prompt to make a selection.
-
When a user opts in: You can select an action to be taken when someone opts into the campaign from the available drop-down options:
-
Opt-In immediately
-
Send a confirmation message
-
Send an age confirmation > 13
-
Send an age confirmation > 18
-
Send an age confirmation > 21
-
Send a zip code confirmation
-
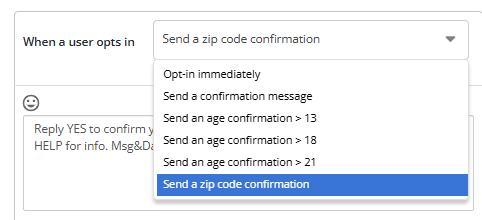
When a drop-down option is selected, a text box will appear, allowing you to enter a custom confirmation message.
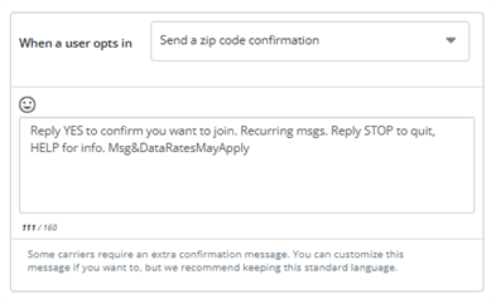
Note: The message cannot exceed 160 characters. A real-time character counter below the text box will show the remaining characters. If the character limit is exceeded, the system will prevent submission.
Opt-in Options:
-
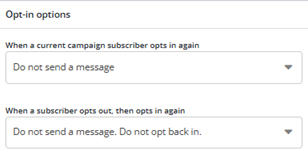
When a current campaign subscriber opts in again drop-down: Allows you to define what happens when a current subscriber opts into the campaign again. Options include:
-
Do not send a message
-
Resend the conversation
-
Send the campaign’s ‘Already Subscribed’ message
-
-
When a subscriber opts out, then opts in again’ drop-down: Allows you to define the action when a user opts out and then opts in again. Options include:
-
Do not send a message. Do not opt back in
-
Resend the conversation
-
Send a confirmation message (for example, ‘Reply YES to confirm if you want to join.’)
-
-
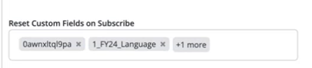
Reset custom fields on subscribe (available only for admin): Allows admins to select which fields to clear when a subscriber re-subscribes to an existing campaign. An admin can select specific custom fields to reset from the multi-select drop-down. When “Reset Custom Fields on Subscribe” is enabled, the selected custom fields resets to empty or default values whenever a subscriber re-subscribes.
-
Limited Response Settings: The “Active” toggle switch allows you to enable or disable the “Limited Response Settings”. When the toggle is turned on, dropdowns and message container appear for setting interaction limits and customizing the limited response message. You can select the interactions per day/hour/week/all_time from the dropdown.
When the toggle is turned on, a message container appear where you can input a custom message.
Note: You can modify this message up to 160 characters, a character count is displayed below the text box.
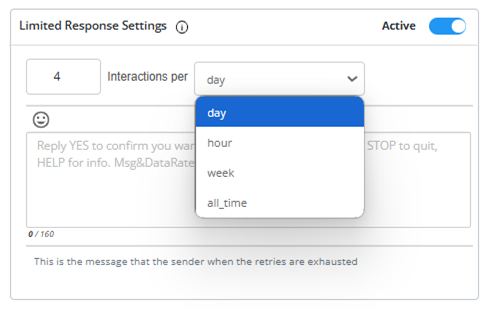
An error message appears if any of the required fields are not filled.

Keywords
Select the type of keyword from the following dropdown options:
-
SMS
-
MMS
-
SMS & MMS
Note: The “Keywords” stepper is not applicable when the user has selected the “People will opt-in by” option as “Any other method, such as a web form or CRM sync”. Also, minimum 2 characters are needed for creating a keyword, less than 2 characters shows a message while typing the keyword in the keyword field that it is too short.
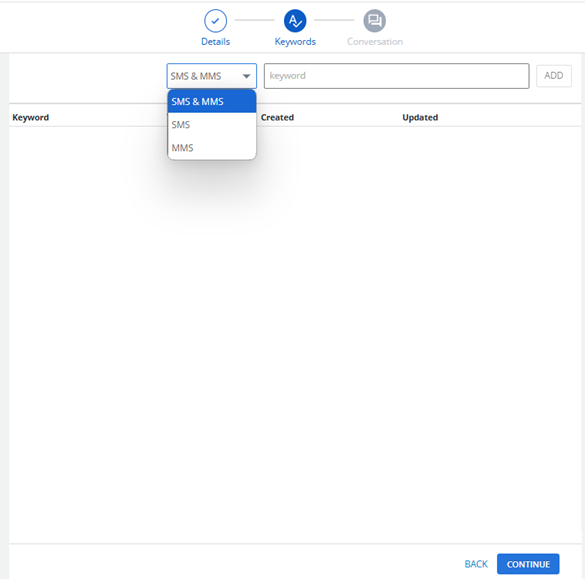
In the text input field, type your desired keyword. As you type in the input field, the system should initiate a check to verify the availability of the keyword. If the keyword is available, a green labelled text “AVAILABLE” appears. If the keyword is taken, the red labelled “TAKEN” appears. If the system is still checking, it should show a blue labelled text “CHECKING” appears.
Note: You cannot add a keyword while it is in the “CHECKING” state.

Click ADD to add the keyword. Once a valid keyword is added, it appears in the keyword list (along with its type, creation date, update date, and delete option). The keywords table includes the following:
-
Keyword: Displays the keyword name entered by the user.
-
Type: Indicates the keyword type, which can be either SMS, MMS, or SMS & MMS.
-
Created: Displays the date and time the keyword was first created.
-
Updated: Displays the date and time the keyword was last modified or updated.
-
Delete Icon: A delete icon at the end of each keyword row, enabling users to delete individual keywords.
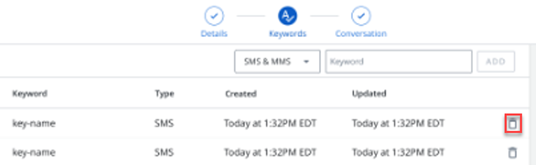
Each keyword entry has a delete icon, when the delete icon is clicked, a confirmation modal appears to confirm if you want to delete the keyword. Select “YES, DELETE IT” to delete the keyword from the keyword list, or “CANCEL” to remain in the keyword list.
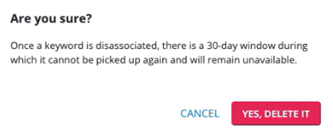
Note: The ADD button is disabled in “checking” and “taken” states. Once a keyword is disassociated, there is a 30-day window during which it cannot be picked up again and will remain unavailable.
When you are done, select CONTINUE. The New Opt-In Path form opens to Step 3, Conversation.
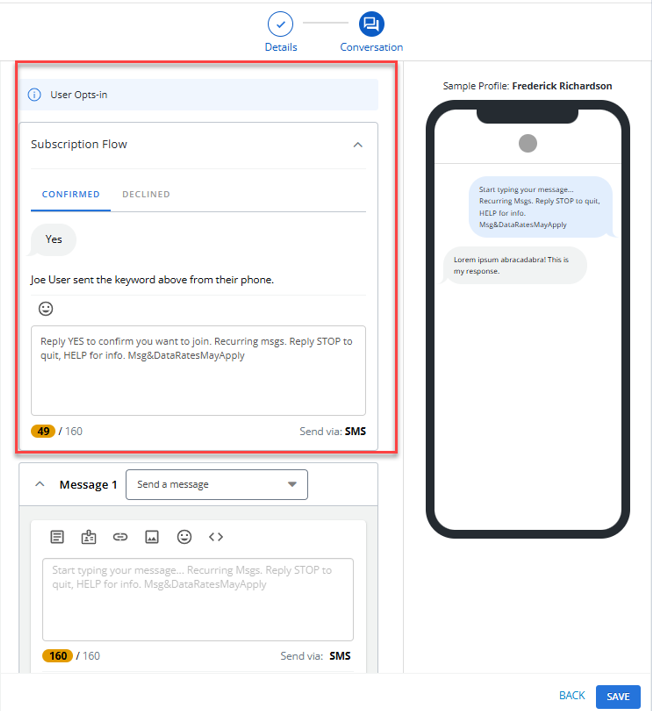
Conversation
-
For Opt-In Path Flow Creation through Keywords
When the user has selected the “People will opt-in by” option as “Texting a keyword to your shortcode from their phone”, the following conversation page appears. You must complete all the mandatory fields to proceed further. The keyword appears above the message container.
Note: Send as RCS message is not supported currently.
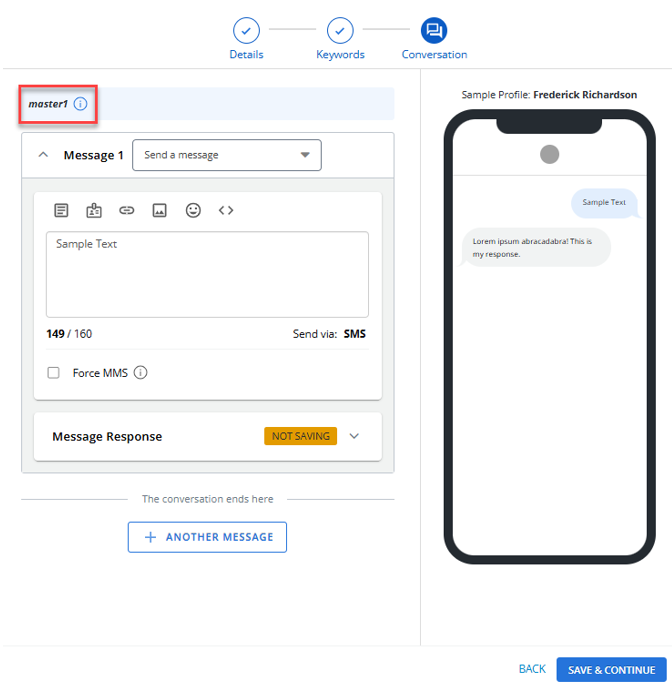
When you are done, click SAVE & CONTINUE to proceed further to view page.
-
For Opt-In Path Flow Creation through Web Form or CRM Sync
When the user has selected the “People will opt-in by” option as “Any other method, such as a web form or CRM sync”, the conversation stepper will only have two steps: Details and Conversation. During the Conversation step of the Opt-in Path creation process, you can design the interaction flow that recipients will experience when they begin the subscription process. The following tabs are available that includes setting up responses based on how the recipient interacts, such as:
-
CONFIRMED: When a recipient confirms their subscription, you can customize the confirmation message that will be sent. This message can be edited within the designated message containers and will also be displayed in the mobile preview for real-time visualization.
-
DECLINED: If a recipient declines the subscription, you can personalize the decline message that is sent. Like the confirmation message, these messages will be reflected in the real-time mobile preview, allowing you to review the recipient's experience before finalizing.
An info message will be displayed at the top of the message container based on the selected tab:
-
When ‘CONFIRMED’ is selected: User Opts-In.
-
When ‘DECLINED’ is selected: User Opts-Out.
When you are done, click SAVE to proceed further to view page.
Viewing Your Opt-in Path Summary (for opt-in path created through keyword)
After completing the Conversation step in the Opt-in Path creation process through keyword, you will be redirected to the view page. This page provides details such as campaign, type, opt-in keywords, total opt-ins, currently subscribed, currently subscribed to this campaign, key and others. In the Tags field, you can add or remove tags for the opt-in path.
The preview of the conversation is also available, allowing you to review all aspects of your opt-in setup before proceeding.
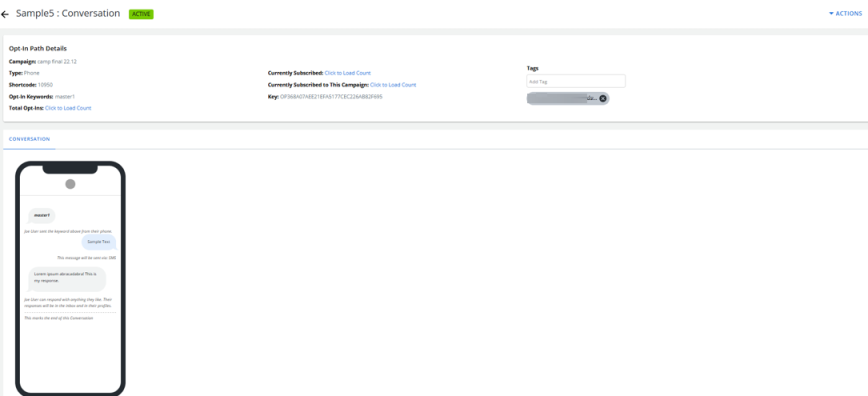
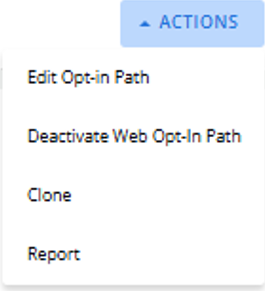
From this page, go to Actions menu on the top right, where you can also take additional actions, such as editing, cloning, deactivating, or generating opt in path reports.
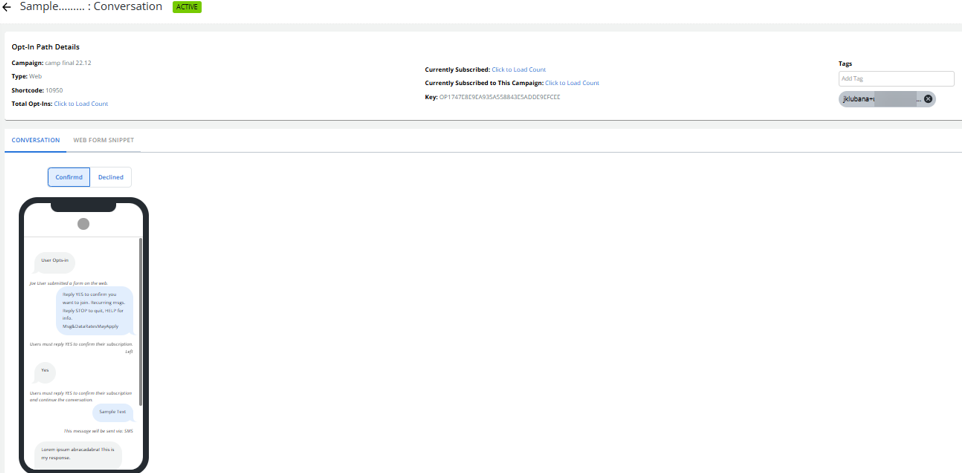
Viewing Your Opt-in Path Summary (for opt-in path created through Web Form or CRM Sync)
After completing the Conversation step in the Opt-in Path creation process through Web Form or CRM Sync, you will be redirected to the view page. This page provides details such as campaign, type, opt-in keywords, total opt-ins, currently subscribed, currently subscribed to this campaign, key, and others. In the Tags field, you can add or remove tags for the opt-in path.
The preview of the conversation is also available, allowing you to review all aspects of your opt-in setup before proceeding.
-
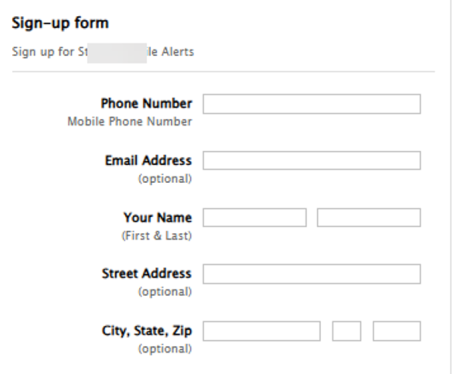
Accessing the Web Form Snippet Tab: This tab will help you in embedding the code on a particular website. After completing the Conversation step for a Web Form or CRM Sync opt-in path, you will be redirected to the View page, where the Web Form Snippet tab is available.
When you open the Web Form Snippet tab, the following options are available: Copy to Clipboard and Preview Web Form.
You can paste the HTML code into a web page to embed an opt-in form for a campaign. You can use the form as it is, or you can customize it to match your site's design.
-
Web Form HTML Snippet Display: The HTML snippet is displayed in a code block format with syntax highlighting for easy readability.
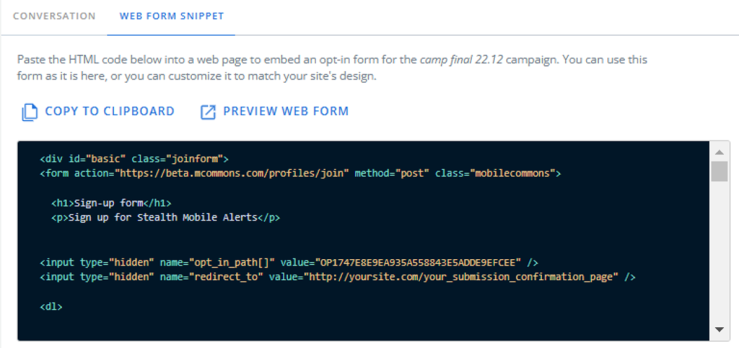
-
Copy to Clipboard: A COPY TO CLIPBOARD button is available above the HTML code snippet. Clicking the button copies the HTML snippet to the clipboard.
-
Preview Web Form: A PREVIEW WEB FORM button is located next to the COPY TO CLIPBOARD button. Clicking this button opens a preview window in a new tab, showing how the opt-in form will appear and function on a web page.
Searching the opt-in paths table
To search by opt-in path name:
-
Select
Text Messaging in the left pane, and then select Opt-In Paths. -
Above the Opt-in Paths table, on the right, enter a search term in the Search box, and then select
 Search.
The Opt-in Paths table displays opt-in path names that match the search terms.
Filtering opt-in data
To filter the data in the Opt-In Paths table:
-
Select
Text Messaging in the left pane, and then select Opt-In Paths. -
Above the Opt-in paths table, select
 Filter.
 -
Select a filter from the Status list in the right pane:
Filter Description Type -
All: Displays all of your opt-in path messages. (if no type is selected, “All” Opt-In Path is displayed by default)
-
Phone Opt-In Path: Filters phone opt-in path type messages.
-
Web Opt-In Path: Filters web opt-in path type messages.
Campaign Drop-down displaying all available campaign names. Upon selecting a campaign, the list shows only opt-in paths associated with that particular campaign.
Note: If no campaign is selected, "All" Opt-In Paths are displayed by default.
Status -
Active: Opt-in paths that are currently active.
-
Pending: Opt-in paths that have been started but not completed.
-
Ended: Opt-in paths that have been deactivated.
You can select one or more statuses.
Date Range Select a date range from the available drop-down options to filter and display opt-in paths based on a selected time period. -
-
When you are done, select APPLY.
The Opt-in Paths table displays only those records that match the selected filter(s). The filter indicator above the table
 displays the number of filters that have been applied. Hover your cursor over the filter indicator to display a list of applied filters.
Exporting opt-in data
You can export opt-in path records in the Opt-in Paths table to a CSV (comma-separated values) file.
-
Select
Text Messaging in the left pane, and then select Opt-In Paths. -
Above the Opt-in paths table, select
Filter and then select a filter from the Status list. For more information, see Filtering opt-in path data. -
(Optional) in the Search bar above the table, enter a search term to narrow the data in the Opt-in Paths table. For more information, see Searching the Opt-in Paths table.
-
Above the Opt-In Paths table, on the right, select Save as CSV.
-
To download the CSV file, select
 Home in the left pane, and then select Reports.
 -
Locate the CSV file in the Exports table, select the link in the Name column, and then open the downloaded file.
Editing opt-in path settings created through keywords
You can review and edit the opt-in path settings for an individual opt-in path message.
-
Select
Text Messaging in the left pane, and then select Opt-In Paths. -
Locate the opt-in path in the Opt-In Paths table, and then select the opt-in path name link.
The Conversation page opens.
-
In the Opt-In Paths Actions panel on the right, select Edit Opt-in Path.
-
To change the opt-in path name, edit the Opt-In Path Name field.
-
To customize the opt-in path options:
Setting Options When a user opts in The opt-in options determine standard opt-in results, plus age gate (13, 18, and 21) and zip code options.
-
Opt-in immediately. Do not send an extra confirmation message.
-
Send a confirmation message.
-
Send an age confirmation > 13.
-
Send an age confirmation > 18.
-
Send an age confirmation > 21.
-
Send a zip code confirmation.
When a current campaign subscriber opts in again -
Do not send a message.
-
Resend the conversation.
-
Send the campaign's Already Subscribed message. For more information, see Editing a campaign.
When a subscriber opts out, then opts in again -
Do not send a message. Do not opt back in again.
-
Resend the conversation.
-
Send a confirmation message.
-
-
Make any required changes to limited response settings.
-
When you are done, select SAVE & CONTINUE to proceed to the next steps – Keywords and Conversation.
-
Make required changes to keywords and conversation pages. Select SAVE.
Editing opt-in path created through Web Opt-In
To edit the details of an Opt-In Path created through a web form:
-
Select
 Text Messaging in the left pane, and then select Opt-In Paths.
 -
Locate the opt-in path in the Opt-In Paths table, and then select the opt-in path name link. The Conversation page opens.
-
In the Opt-In Paths Actions panel on the right, select Edit Opt-in Path. The Details page opens.
-
Make your changes on the Details page. Select SAVE & CONTINUE.
Note: The select campaign field cannot be edited.
-
Make your changes on the Conversation page. Select SAVE.
Reviewing an opt-in path message
To review an opt-in path message:
-
Select
Text Messaging in the left pane, and then select Opt-In Paths. -
Locate the opt-in path in the Opt-In Paths table, and then select the opt-in path name link.
The Opt-In Paths message page displays the message(s) in the opt-in conversation.
Reactivating an opt-in path message
You can reactivate an opt-in path message that has been deactivated.
To reactivate an opt-in path message:
-
Select
Text Messaging in the left pane, and then select Opt-In Paths. -
In the Status column, look for deactivated messages marked
 .
. -
Above the Opt-in paths table, select
Filter and then select Ended from the Status list. The Opt-In Paths table displays all of the deactivated opt-in paths.
-
Locate the ended opt-in path message in the Opt-In Paths table, and then select the opt-in path name link.
The Conversation page opens.
-
In the Opt-In Paths Actions panel on the right, select Activate Opt-in Path.
-
Select OK to confirm.
The message is now active and available on the selected short code.
Opening the Opt-In Path report
Each opt-in path message sent produces a subscription report.
To open the Opt-In Path report:
-
Select
Text Messaging in the left pane, and then select Opt-In Paths. -
Locate the message in the Opt-In Paths table, and then do one of the following:
-
Select
Report at the end of the row. -
Select the opt-in path name link to open the opt-in path conversation page, and then select Report in the Opt-In Path Actions panel on the right.
The Opt-in Path report opens.

For more information, see Working with the Opt-In Path report.
-