Setting up scheduled messaging
-
An absolute message schedule sends out messages at an exact date and time that you specify (for example, 8/10/23 at 3 pm EDT or a custom time field).
-
A relative message schedule sends the message out at a date and time relative to a date stored on the subscriber’s profile in a standard or custom date field (for example, opt-in date).
Tip: Plan to send messages at a neutral time of day, so it will arrive during regular business hours, regardless of the user's time zone.
The content of the messages is entered when the schedule is set up.
When you are ready, you will activate the schedule.
Note: You can create only one message schedule per active campaign.
For an active campaign:
For more information, see Editing a message schedule and Working with scheduled messages.
Adding an absolute message schedule
First, you'll set up a date and make time zone selections, then when you upload the messages, you'll set up the time for sending messages. For more information, see Adding messages to an absolute schedule.
To set up an absolute message schedule:
-
Select
 Text Messaging in the left pane, and then select Campaigns.
 -
Click +New Campaign.
The Create New Campaign modal opens.
-
Enter the details to create a new campaign. Click CREATE.
The Campaign Details page opens.
-
Select Actions at the top of the Campaign Details page, and then select New Messaging Schedule.

The New Schedule modal opens.
-
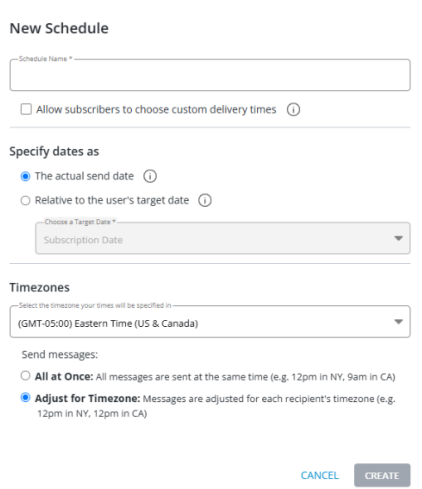
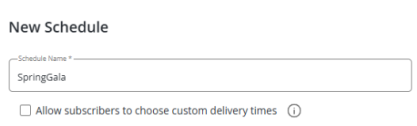
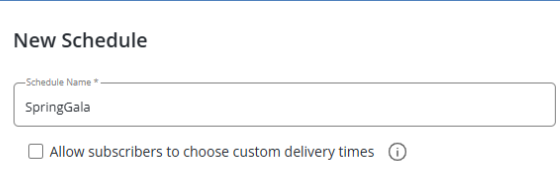
In the Schedule Name field, enter a descriptive name for the schedule.
(Optional) If you plan to use custom fields in the schedule, select the Allow subscribers to choose custom delivery times
checkbox.
-
In the Specify dates as section, select The actual send date.

-
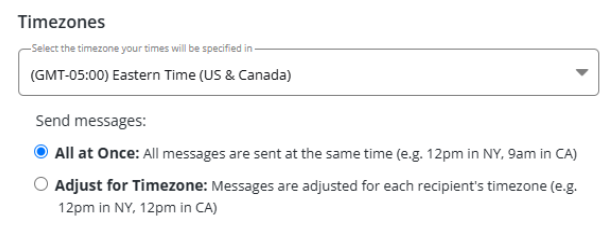
In the Timezones section, select the time zone to use from the drop-down list.
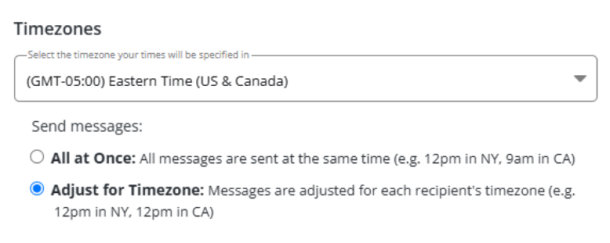
Select the method for applying the time zone to send times:
-
To send all messages simultaneously according to the time zone selection, select the All at once checkbox.
Note: If you do not select a time zone, then the default setting is your account's current time zone in Mobile Commons.
-
To stagger messages according to the recipient's local time zone, select the Adjust for Timezone checkbox.
The recipient's time zone is based on the address and zip code in their profile, if available. If this information is not available, then the recipient's time zone is based on the area code of their mobile phone number.
-
-
When you are done, select CREATE.
Adding messages to an absolute schedule
Next, you'll upload messages with fields that determine the time when the messages will be sent. You can upload messages to a schedule in bulk using a CSV file or by adding rows of messages:
Tip: If you only have a few rows of messages, add them manually. If you have a lot of messages, upload them in a CSV file.
When you are done, you will activate the schedule.
Uploading messages in a CSV file
You can upload schedule settings and messages in a CSV file.
To upload messgaes in a CSV file:
-
Select
Text Messaging in the left pane, and then select Campaigns. -
Locate the campaign in the Campaigns table, and then select the campaign name link.
The Campaign Details page opens.
-
Select Actions at the top of the Campaign Details page, and then select Edit Schedule.
The Schedule Details page opens.
-
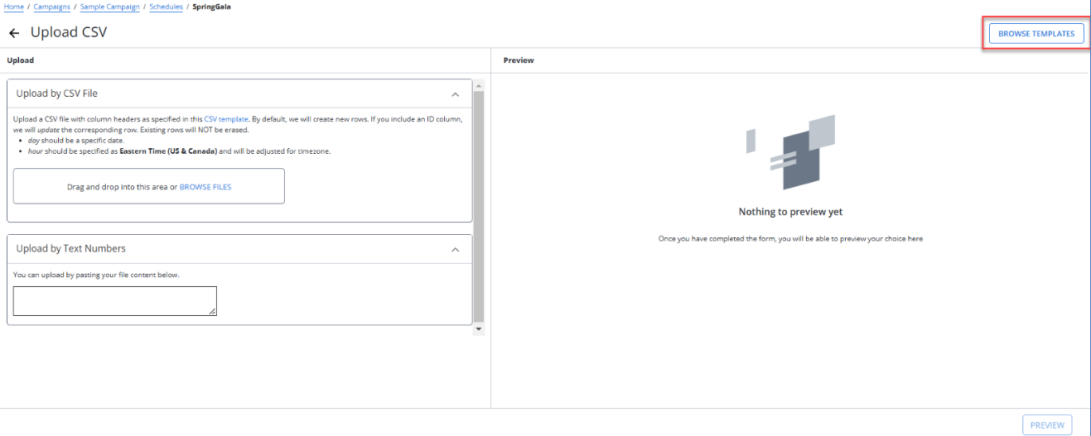
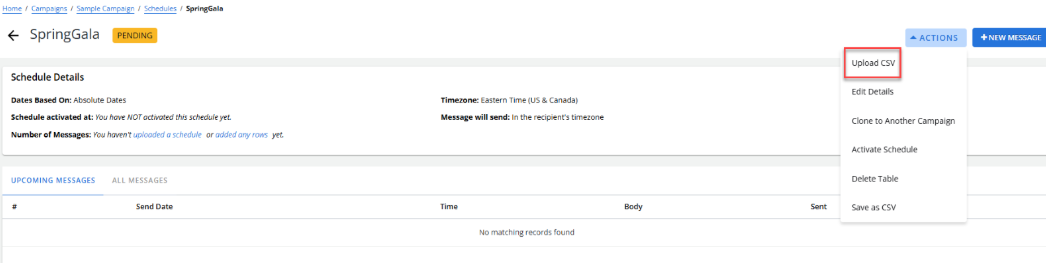
Select Actions at the top of the Schedule Details page, and then select Upload CSV.
 Caution: Use caution if the Messages table already contains data from a previous CSV upload. The existing data will be overwritten. If you want to retain messages from a previous upload, be sure to include them in the new upload file.
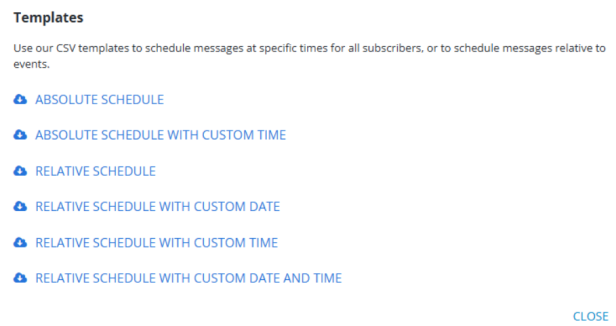
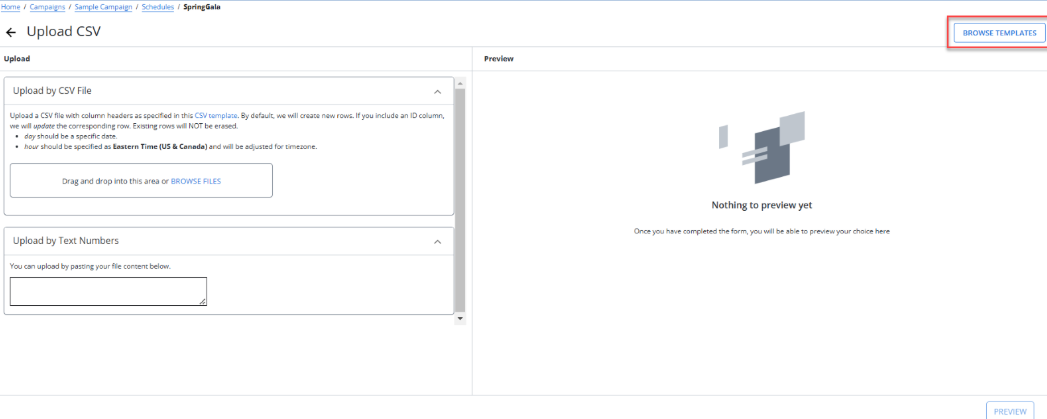
The “Upload CSV” page opens. To access and download CSV templates for scheduling messages, click the Browse Templates button at the extreme top-right corner of the Upload CSV page.
The sample CSV template file contains the following columns:
Column Description day The date when the message will be sent. Use YYYY-MM-DD format. hour The hour when the message will be sent. Use 24-hour format, for example, enter 9 to send the message at 9 am; enter 15 to send the message at 3 pm. minute The minute when the message will be sent. body The content of the message. The CSV Template with Custom Time file contains an additional column labeled custom_time_field, where you can add the profile field containing a send time value.
Note: Custom time field names cannot contain uppercase or blank spaces. Review your field names to ensure that field names are all lowercase. Replace blank spaces with an _ (underscore) . For example, if a field name is Birth Date, then the custom time field in the CSV upload file should be birth_date (no uppercase, no blank space).
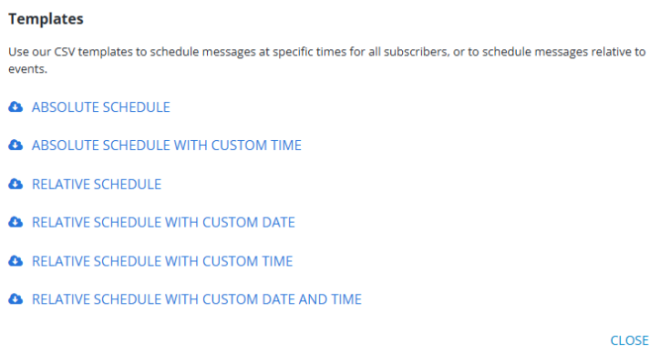
The "Templates" modal opens where you can browse through the list of available CSV templates. Select the template that best fits your scheduling needs—whether for absolute or relative schedules, with or without custom dates and times—and download it for use. Use the CSV templates to schedule messages at specific times for all subscribers, or to schedule messages relative to events. Click CLOSE to close the “Templates” modal.
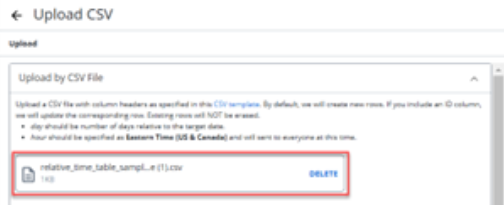
When the CSV file is ready, browse the file to upload.
Tip: Be sure to save the file in CSV format; other file types will not be accepted.
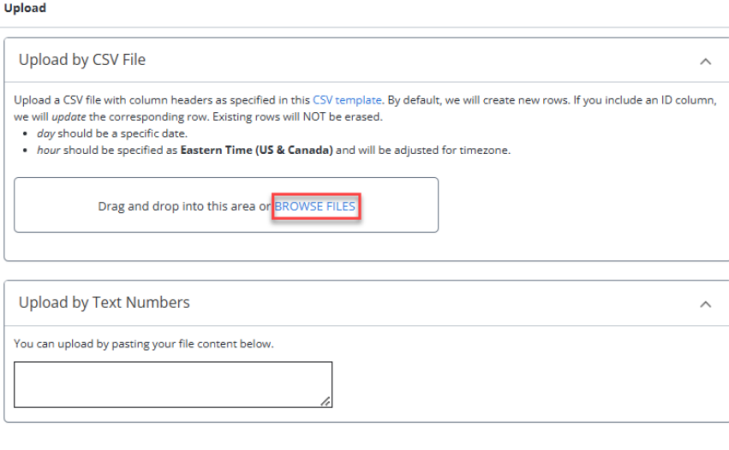
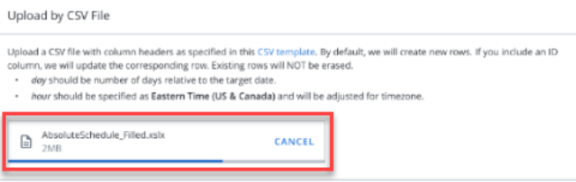
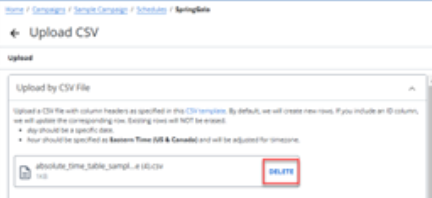
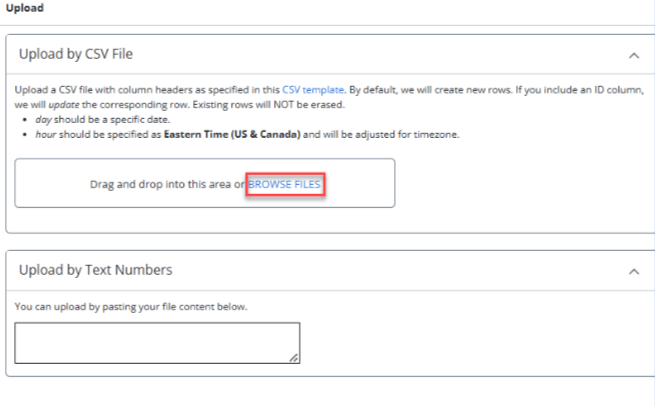
To upload a CSV file, either drag and drop the file into the designated upload area or select BROWSE FILES to select the file from your device. Once the upload starts, dynamic progress indicator appears showing the real-time status of your upload. If needed, click CANCEL to cancel the upload process or click DELETE to delete the uploaded file.
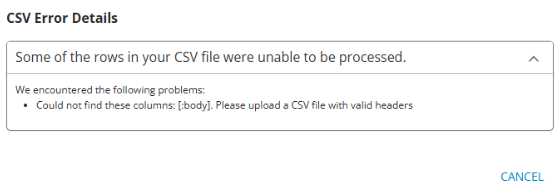
If any errors occur during the CSV upload process, a message appears to review the errors.

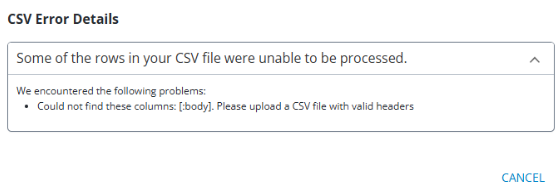
Note: Without adding a CSV file or phone numbers, a header displaying the message "Nothing to preview yet" appears in the Preview section. If an invalid row is detected under the Upload section, an error message stating: "Your file could not be processed because we did not find any rows. Is this a valid CSV? Please upload a corrected file" appears.

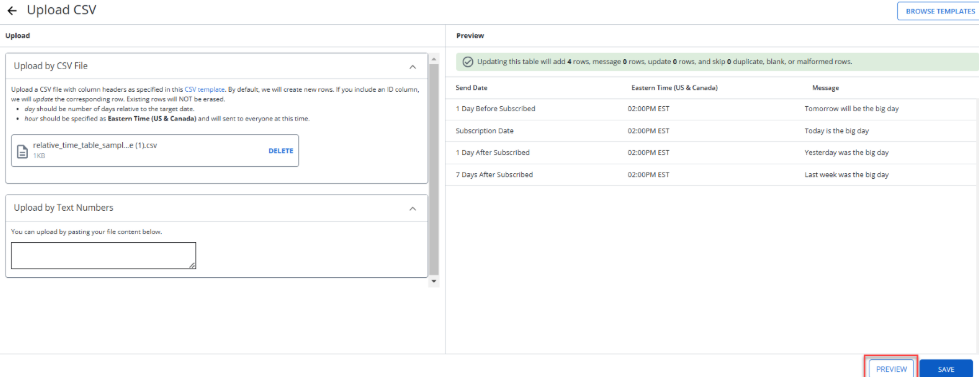
Clicking the PREVIEW button shows details such as the total number of added rows, rows to be messaged, rows to be updated, and duplicates. Additionally, the Preview section shows the send date, recipient’s local time, and the message.
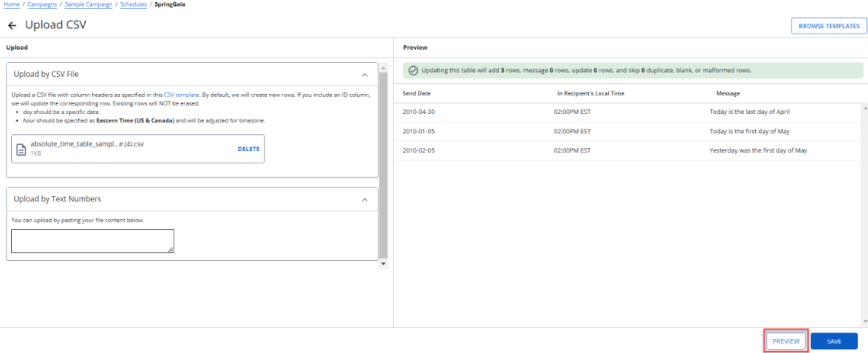
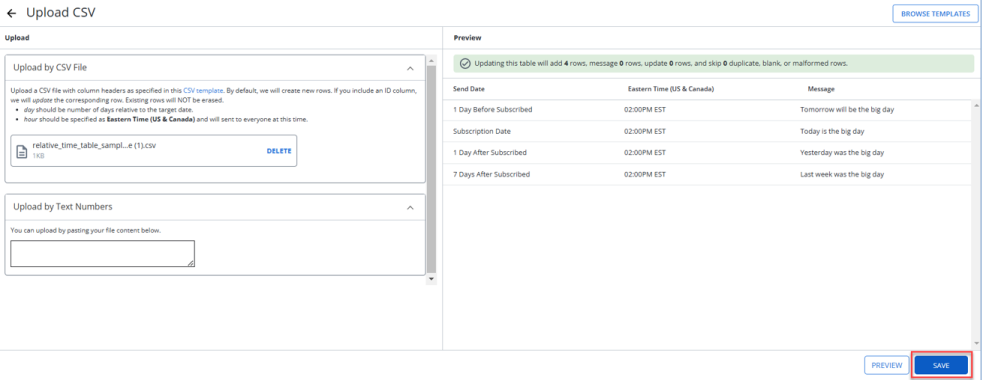
When all of the entries have been validated, select SAVE.
Note: The SAVE button will be activated (turn blue) once you successfully upload a file or paste content.

When you click SAVE, your CSV file will be uploaded, and a flash message will confirm the action.

Tip: If the upload is not ready, in the Number of Messages field, select Refresh for updates.

When the upload is complete, you are ready to activate the schedule. For more information, see Activating a message schedule.
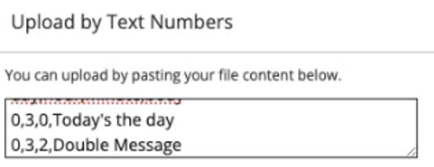
You can also manually paste the content of a CSV file in the test area of the Upload by Text Numbers section.

Adding new rows of messages
You can add details for a new row under a specific schedule using a streamlined, step-by-step process. This will allow you to efficiently customize the row content, review it, and save it to the schedule.
To add rows of messages:
-
Select
Text Messaging in the left pane, and then select Campaigns. -
Locate the campaign in the Campaigns table, and then select the campaign name link.
The Campaign Details page opens.
-
Select Actions at the top of the page, and then select Edit Schedule.
The Schedule Details page opens.
-
Click +New Message on the top-right of the Schedule Details page.
The New Message page opens with Details, Conversation, and Review stepper.
-
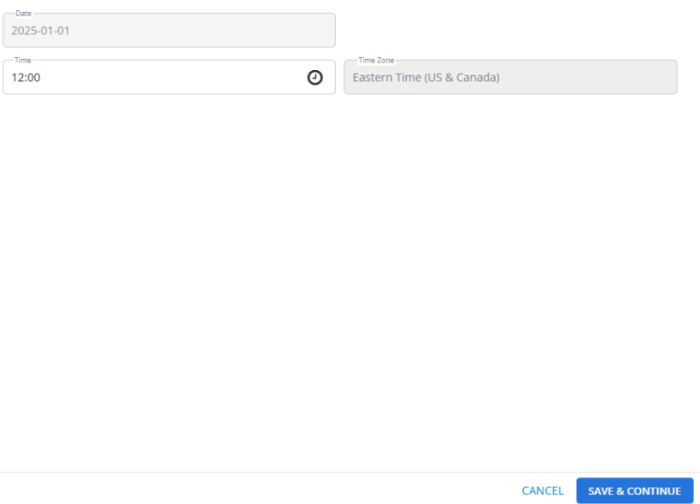
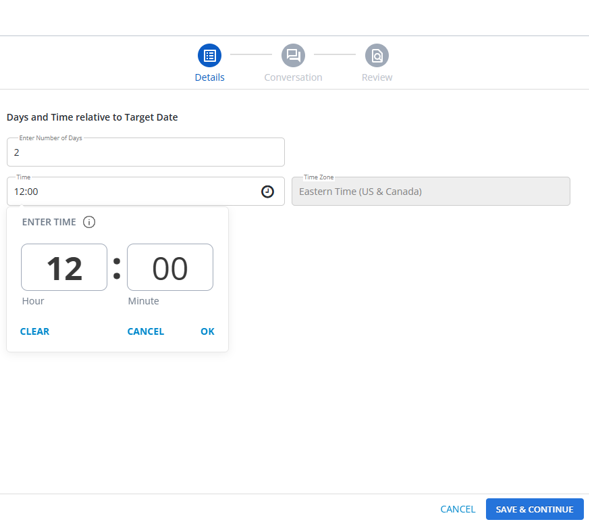
Enter the required information on the Details page. Select SAVE & CONTINUE.
-
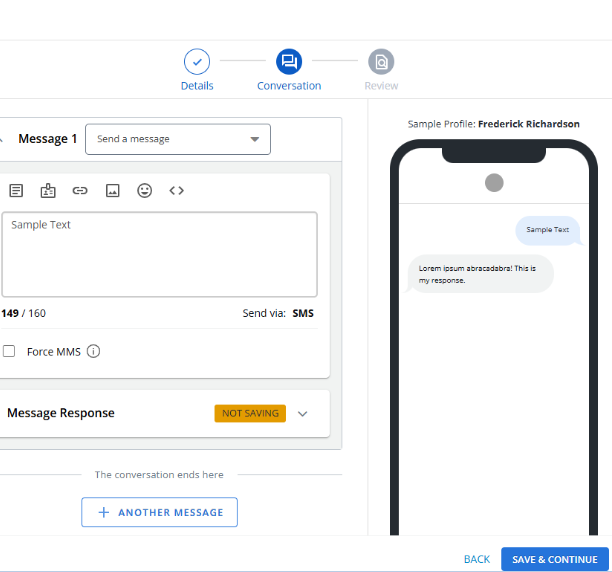
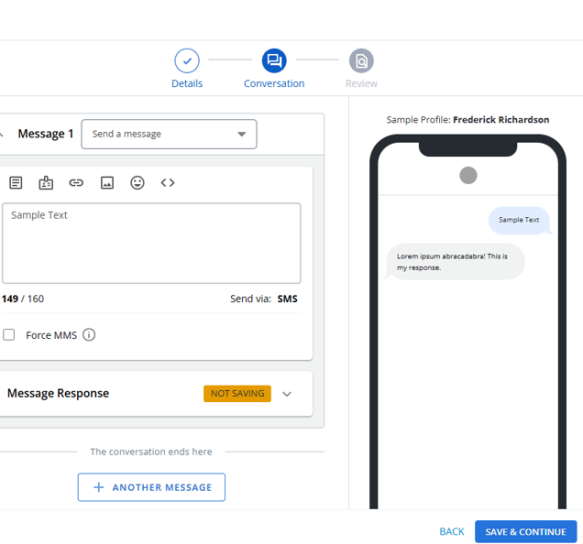
The Conversation page opens. Enter your message content in the message text box. The character count below the text box updates as you type. It includes features to insert links, dynamic tags, emojis, and attachments into messages, along with a preview option to visualize the content. You can view and manage message responses and add multiple messages if needed. When you are done, select SAVE & CONTINUE.
-
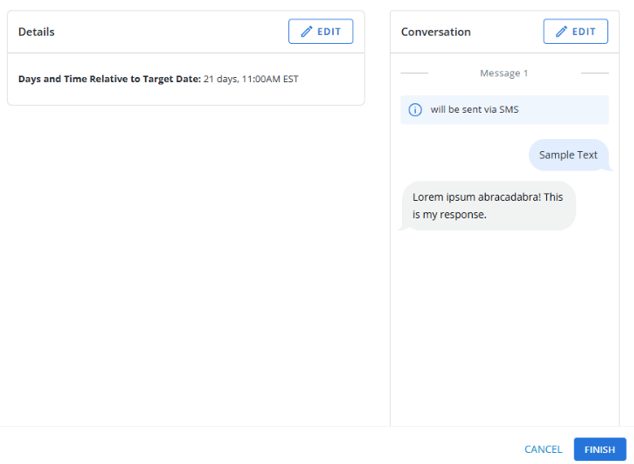
The Review page opens, displaying all the details. If you need to make any further changes to the details or conversation, click the EDIT button next to the respective sections. You can then modify the information as needed before proceeding.
-
Click FINISH to save the message details to the schedule or click CANCEL to cancel the row creation process.
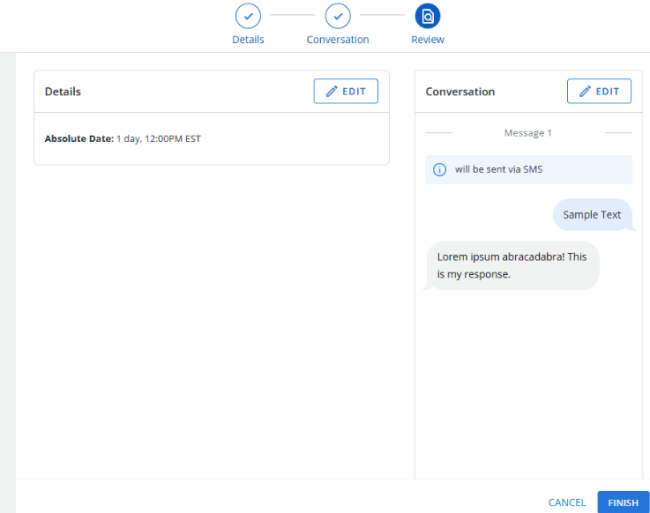
The row is added to the Messages table. For more information, see Working with scheduled messages.
When all of the rows have been added to the Messages table, you are ready to activate the schedule. For more information, see Activating a message schedule.
Adding a relative messages schedule
First, you'll set up a relative date to send your messages. You'll set up the time for sending messages when you upload the messages. For more information, see Adding messages to an relative schedule.
To set up a relative message schedule:
-
Select
Text Messaging in the left pane, and then select Campaigns. -
Click +New Campaign.
The Create New Campaign modal opens.
-
Enter the details to create a new campaign. Click CREATE.
The Campaign Details page opens.
-
Select Actions at the top of the Campaign Details page, and then select New Messaging Schedule.
The New Schedule modal opens.
-
In the Schedule Name field, enter a descriptive name for the schedule.
-
In the Specify dates as section, select Relative to the user's target date.
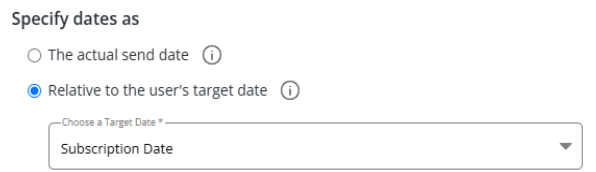
Select the target date from the drop-down list:
-
Subscription Date: the date the user began their subscription by opting in to the campaign.
-
If a user opts in and then opts in again, their subscription date will be the initial opt-in. They will only receive the message rows once based on that initial opt-in date.
-
If the user opts in, then opts out, then opts in again, their subscription date will be updated to the second opt-in. If the message rows are based on the subscription date, then the user will receive them again, even if they have already received them based on their first opt-in date.
-
-
Profile Creation Date: the date the mobile phone number was first seen in Mobile Commons.
Note: The key identifier in a user profile is the mobile phone number.
-
Custom column: the date indicated by a custom field that is a date type. Select an available date field from the drop-down list
Tip: Also select the Use Subscription Date if this custom field is blank checkbox.
-
-
In the Timezones section, select the time zone to use from the drop-down list.
Select the method for applying the time zone to send times:
-
To send all messages simultaneously according to the time zone selection, select the All at once checkbox.
Note: If you do not select a time zone, then the default setting is your account's current time zone in Mobile Commons.
-
To stagger messages according to the recipient's local time zone, select the Adjust for Timezone checkbox.
The recipient's time zone is based on the address and zip code in their profile, if available. If this information is not available, then the recipient's time zone is based on the area code of their mobile phone number.
-
-
When you are done, select CREATE.
Note: Even though this name is available to internal users only, take the opportunity to assign a descriptive name that is meaningful to your organization.
(Optional) If you plan to use custom fields in the schedule, select the Allow subscribers to choose custom delivery times checkbox.
Adding messages to a relative schedule
Next, you'll upload messages with fields that determine the time when the messages will be sent. You can upload messages to a schedule in bulk using a CSV file or by adding rows of messages:
Tip: If you only have a few rows of messages, add them manually. If you have a lot of messages, upload them in a CSV file.
When you are done, you will activate the schedule.
Uploading messages in a CSV file
You can upload messages in a CSV file.
To upload a CSV file:
-
Select
Text Messaging in the left pane, and then select Campaigns. -
Locate the campaign in the Campaigns table, and then select the campaign name link.
The Campaign Details page opens.
-
Select Actions at the top of the Campaign Details page, and then select Edit Schedule.
The Schedule Details page opens.
-
Select Actions at the top of the Schedule Details page, and then select Upload CSV.
Caution: Use caution if the Messages table already contains data from a previous CSV upload. The existing data will be overwritten. If you want to retain messages from a previous upload, be sure to include them in the new upload file.
The “Upload CSV” page opens. The sample CSV template file contains the following columns:
| Column | Description |
|---|---|
| day |
The number of days relative to the target send date:
|
| hour |
The hour when the message will be sent. Use 24-hour time format, for example, enter 9 to send the message at 9 am; enter 15 to send the message at 3 pm. |
| minute | The minute when the message will be sent. |
| body | The content of the message. |
The CSV template with custom time file contains an additional column labeled custom_time_field, where you can add the profile field containing a send time value.
Note: Custom time field names cannot contain uppercase or blank spaces. Review your field names to ensure that field names are all lowercase. Replace blank spaces with an _ (underscore) . For example, if a field name is Birth Date, then the custom time field in the CSV upload file should be birth_date (no uppercase, no blank space).
To access and download CSV templates for scheduling messages, click the BROWSE TEMPLATES button at the extreme top-right corner of the Upload CSV page.
The "Templates" modal opens where you can browse through the list of available CSV templates. Select the template that best fits your scheduling needs—whether for absolute or relative schedules, with or without custom dates and times—and download it for use. Use the CSV templates to schedule messages at specific times for all subscribers, or to schedule messages relative to events. Click CLOSE to close the “Templates” modal.
Tip: Be sure to save the file in CSV format; other file types will not be accepted.
When the CSV file is ready, browse the file to upload.
To upload a CSV file, either drag and drop the file into the designated upload area or select BROWSE FILES to select the file from your device. Once the upload starts, dynamic progress indicator appears showing the real-time status of your upload. If needed, click CANCEL to cancel the upload process or click DELETE to delete the uploaded file.
If any errors occur during the CSV upload process, a message appears to review the errors.


Clicking the PREVIEW button shows details such as the total number of added rows, rows to be messaged, rows to be updated, and duplicates. Additionally, the Preview section shows the send date, recipient’s local time, and the message.
When all of the entries have been validated, select SAVE.
When you click SAVE, your CSV file will be uploaded, and a flash message will confirm the action.


For more information, see Working with scheduled messages.
When the upload is complete, you are ready to activate the schedule. For more information, see Activating a message schedule.
You can also manually paste the content of a CSV file in the test area of the Upload by Text Numbers section.
Adding rows of messages
You can add details for a new row under a specific schedule using a streamlined, step-by-step process. This will allow you to efficiently customize the row content, review it, and save it to the schedule.
To add rows of messages:
-
Select
Text Messaging in the left pane, and then select Campaigns. -
Locate the campaign in the Campaigns table, and then select the campaign name link.
The Campaign Details page opens.
-
Select Actions at the top of the page, and then select Edit Schedule.
The Schedule Details page opens.
-
Click +New Message on the top-right of the Schedule Details page.
The New Message page opens with Details, Conversation, and Review stepper.
-
Enter the required information in the Details page. Select SAVE & CONTINUE.
-
The Conversation page opens. Enter your message content in the message text box. The character count below the text box updates as you type. It includes features to insert links, dynamic tags, emojis, and attachments into messages, along with a preview option to visualize the content. You can view and manage message responses and add multiple messages if needed. When you are done, select SAVE & CONTINUE.
7. The Review page opens, displaying all the details. If you need to make any further changes to the details or conversation, click the EDIT button next to the respective sections. You can then modify the information as needed before proceeding.
8. Click FINISH to save the message details to the schedule. Click CANCEL to cancel the row creation process.
The row is added to the Messages table. For more information, see Working with scheduled messages.
When all of the rows have been added to the Messages table, you are ready to activate the schedule. For more information, see Activating a message schedule.
Activating a message schedule
After you have set up a relative or absolute schedule and added messages in rows or from an uploaded CSV file, you can activate the schedule.
Note: If you want to make changes to the schedule, be sure to do so before you activate it. For more information, see Editing a message schedule.
To activate a schedule:
-
Select
Text Messaging in the left pane, and then select Campaigns. -
Locate the campaign in the Campaigns table, and then select the campaign name link.
The Campaign Details page opens.
-
Select Actions at the top of the page, and then select Edit Schedule.
The Schedule Details page opens.
-
Review the message schedule settings. When you are satisfied, you can activate it.
-
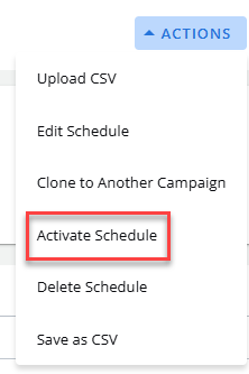
In the Actions panel on the right, select Activate Schedule.
Cloning a message schedule
To clone a schedule to another campaign:
-
Select
Text Messaging in the left pane, and then select Campaigns.
-
Locate the campaign to copy in the Campaigns table, and then select the campaign name link.
The Campaign Details page opens.
-
Select Actions at the top of the Campaign Details page, and then select Edit Schedule.
The Schedule Details page opens.
-
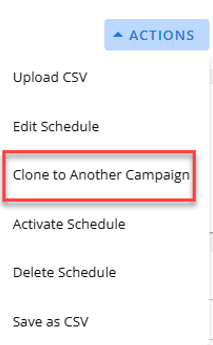
Select Actions at the top of the Schedule Details page, and then select Clone to Another Campaign.
This open the Clone To Another Campaign modal with a searchable dropdown, allowing you to quickly find and select the desired campaign for cloning. As you type in the dropdown, the list of campaigns will dynamically filter to match your search input. The search is case-insensitive and supports partial matches, making it easier to find the desired campaign.
Note: The "Clone to Another Campaign" option excludes any ended campaigns from the campaign selection dropdown.
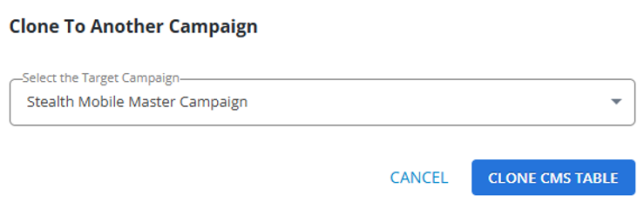
Scroll through the filtered list and select the appropriate campaign.
Select CLONE CMS TABLE to clone the schedule to the chosen campaign. A flash message will confirm the action.

Select CANCEL to close the Clone To Another Campaign modal.
Note: Initially, the CLONE CMS TABLE button will appear gray, indicating it is inactive. Once a campaign is selected from the dropdown, the button will turn blue, indicating that it is active and ready to be clicked.