Enable projects
This is the first topic of the Use Projects guide.
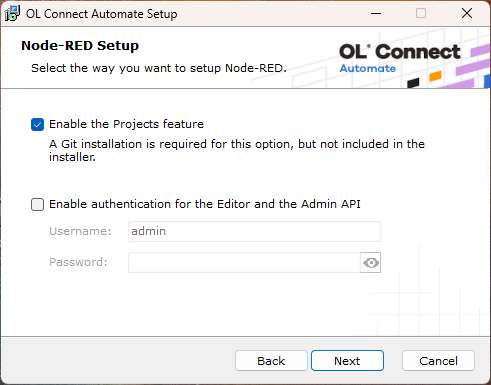
To use Projects, Git must be installed on your machine, and the Projects feature must be enabled. Projects can be enabled during OL Connect Automate installation, or after.
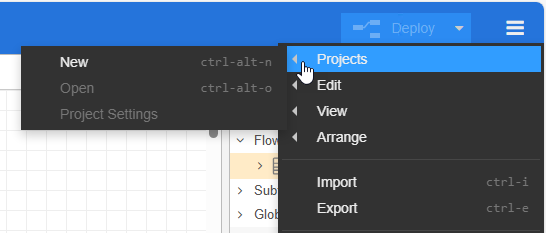
Once Projects is enabled and ready to use, the feature can be selected in the upper left menu.
Install Git
Projects uses the open source tool Git for version control. It tracks changes of your project files and lets you push them to remote repositories. When you commit a set of changes, Git records who made the changes with a username and email address.
You may already have Git configured on your machine, in which case OL Automate will reuse those settings. Otherwise, visit the following site to download the installer package: https://git-scm.com/install/windows
Git can be installed before or after Automate. If neither is installed, install Git first, then enable Projects when installing Automate. If Git is installed after Automate, restart the Automate service to enable Projects.
Enable Projects during Automate installation
The OL Connect Automate installer allows you to enable the Projects feature during installation. When this option is selected, the installer automatically applies the necessary settings and stores these in the olca.settings.json file.
By default, Node-RED stores configuration in the settings.js file. In OL Connect Automate, these settings are externalized to olca.settings.json. This prevents overwrites during updates or reinstalls, and ensures that your custom configurations, such as Project and Git settings, remain intact across software upgrades. For a default Automate installation, these files are found in the following location:
C:\ProgramData\Objectif Lune\OL Connect Automate
Enable Projects after Automate installation
To enable the Projects feature after installation, you can reinstall OL Connect Automate or manually update the appropriate settings file. If you update the settings file, restart the Automate service to enable Projects.
The olca.settings.json file
This is the JSON file holding the configuration of the installation and is created by the OL Connect Automate installer. The structure follows the structure of the settings.js file but in JSON format. Below is a configuration where the Projects feature is enabled.
{
    "credentialSecret": "olca-9H9LNhc-7H",
    "userDir": "C:\\ProgramData\\Objectif Lune\\OL Connect Automate",
    "uiPort":
        "type": "env",
        "value": "PORT",
        "defaultValue": "1880",
        "override": true
    },
    "editorTheme": {
        "page": {
            "title": "OLCA",
            "favicon": "C:\\ProgramData\\Objectif Lune\\OL Connect Automate\\assets\\favicon.ico",
            "css": "C:\\ProgramData\\Objectif Lune\\OL Connect Automate\\assets\\olca-style.css"
        },
        "header": {
            "title": " ",
            "image": "C:\\ProgramData\\Objectif Lune\\OL Connect Automate\\assets\\olca-logo.svg"
        },
        "projects": {
            "enabled": {
                "type": "value",
                "value": true,
                "override": true
            }
        }
    },
    "logging" : {
        "console": {
            "level": "warn"
        }
     }
}
The settings.js file
For installations that didn’t use the OL Connect Automate installer, the Projects feature can be enabled in the settings.js file. The option is found in the editorTheme section. This information is useful when working with a custom installation or Docker Container setup.
module.exports = {
  editorTheme: {
    projects: {
      enabled: true
    }
  }
}
Once projects are enabled, you can Create a Project.