Add template to serve a PDF preview
This topic continues the tutorial on how to Serve a PDF preview, with detailed steps to add the template and update the flow. The flow should already be created, as detailed in Build flow to serve a PDF preview
Deploy the OL Connect template
In the this section, you’ll learn how to use the data received through the HTTP request to generate a personalized PDF using an OL Connect template.
To do this, we'll send the Certificate of Completion.OL-template to the OL Connect Server and connect it to the Node-RED flow. This template defines the layout and the data model (e.g., name, course) that will be personalized based on the query parameters.
Let’s walk through the steps to make the template available for PDF generation.
-
Open OL Connect Designer from your Start Menu or desktop shortcut.
-
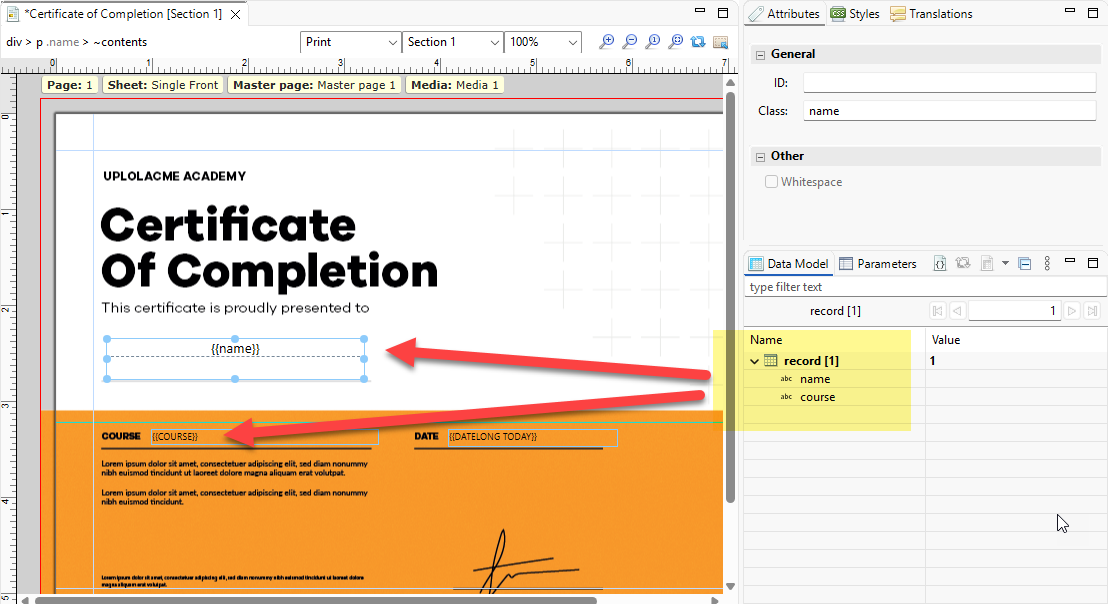
Open the Certificate of Completion.OL-template (previously downloaded from Certificate of Completion.OL-template)
The template includes a Print section configured to produce a course certificate. It expects two data fields, which are shown in the Data Model pane:
-
name
-
course
Note how these match the query parameters you passed earlier in the tutorial.
To make the template available for use in OL Connect Automate, you must upload it to the OL Connect Server.
Send the template from OL Connect Designer
-
In OL Connect Designer, go to File > Send to Server.
-
The Send to Server dialog appears, with the current template selected.
-
Confirm that
Certificate of Completion.OL-templateis selected. -
Click Send.
-
If prompted, enter your OL Connect Server credentials to complete the connection.
Once uploaded, the template is available to OL Connect Automate and can be referenced by flow nodes such as preview-pdf and paginated-content.
Add the preview pdf node
With the HTTP endpoint set up and the template deployed to the OL Connect Server, you’re ready to generate a personalized PDF. For this, we'll use the preview pdf node, which merges the Print context of an OL Connect template with a single data record and returns the resulting PDF.
Insert the preview pdf node into the flow
-
In the Node-RED editor, click the wire between the http in and http response nodes. The wire will highlight in orange.
-
You may need to move the http response node to the right to create space first.
-
-
Right-click the wire and select Insert > Node.
-
In the node search, type
preview pdfand select the respective node. -
The node inserts between the existing nodes and automatically connects to them.
Configure the preview pdf node
-
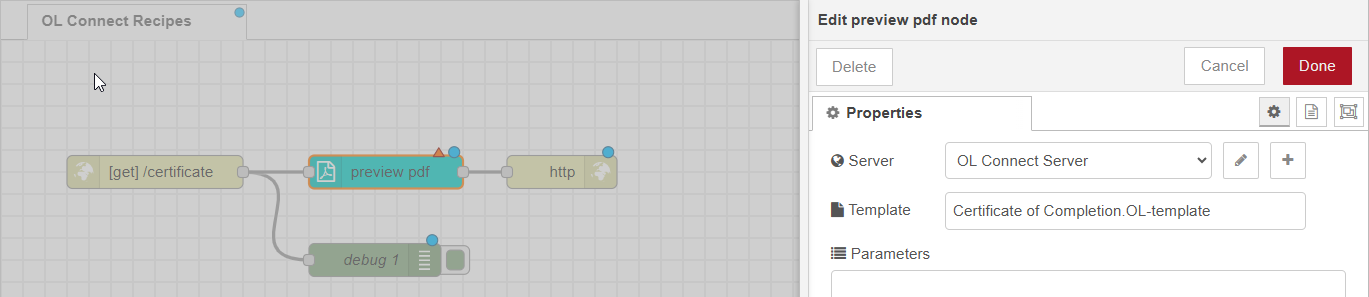
Double-click the newly added preview pdf node to open its Properties panel.
-
Under Server, select an existing OL Connect Server configuration from the drop-down.
-
If none are configured, click plus (+) to create one.
-
-
Once a server is selected, the Template field becomes active.
-
Choose the uploaded template:
Certificate of Completion.OL-template. -
Click Done.
Deploy the flow
-
Click Deploy to apply your changes and update the running flow.
-
The flow is now ready to generate PDF output based on incoming data.
View embedded documentation
Before continuing, it’s useful to explore the built-in help for the preview pdf node:
-
Select the preview pdf node in the editor.
-
In the right-hand panel, click the Help tab.
This reveals documentation specific to the node. Under the Inputs section, note that:
-
The node accepts
msg.payloadas input. -
msg.payloadcan contain either:-
A Data Record ID generated by a Data Mapper configuration, or
-
A JavaScript object with key-value pairs matching the template’s Data Model.
-
In this tutorial, you're using the second method: a JavaScript object passed as msg.payload, which includes the participant’s name and course title.
{
    "name": "Peter Parker",
    "course": "OL Connect Automate"
}
This data is merged with the OL Connect template to produce a personalized PDF.
See it in action
Now that everything is in place, let’s run the flow and view the personalized PDF output in the browser.
-
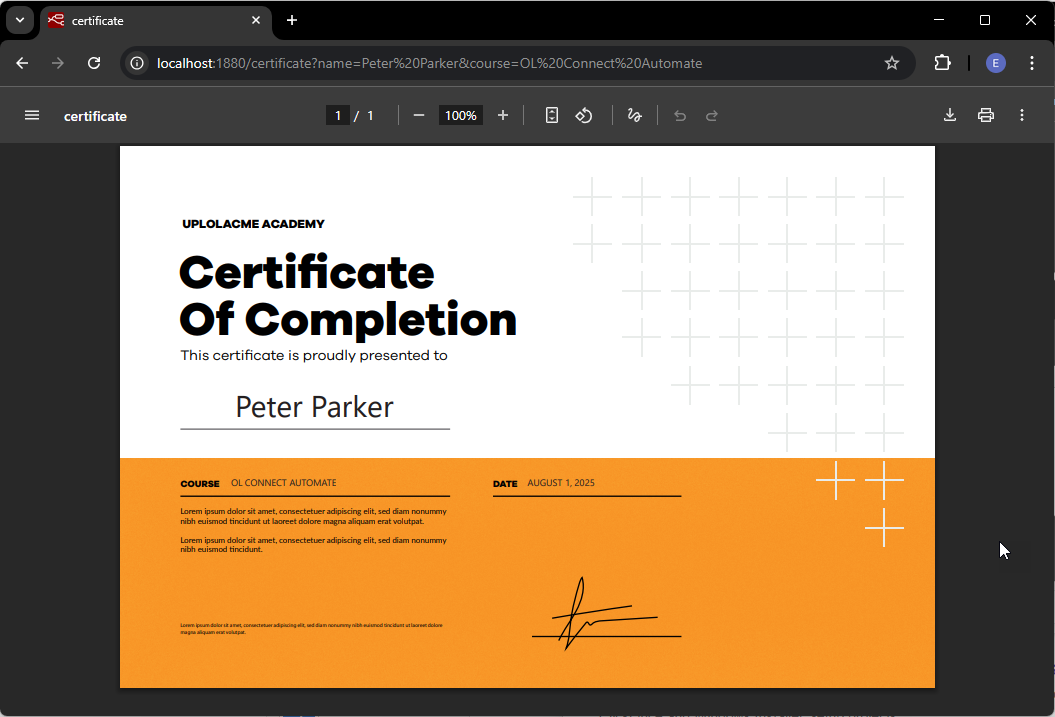
Go back to the browser tab with your demo URL:
http://localhost:1880/certificate?name=Peter Parker&course=OL Connect Automate -
Press Enter or refresh the page.
This sends the query parameters to your HTTP endpoint. The flow passes the data to the preview pdf node, which merges it with the Print section of the OL Connect template. The resulting PDF is then returned by the http response node and displayed directly in the browser.
To personalize the document for another participant, simply update the name value in the URL. For example:
http://localhost:1880/certificate?name=Antonio Viñés&course=OL Connect - Advanced
Each request produces a new, dynamically generated PDF based on the input parameters.