Build a flow to personalize a print job
This topic continues the tutorial on how to Personalize a print job, with detailed steps to create the flow.
Trigger the flow
Folder Capture, also knows as folder watching, monitoring, or creating a hot folder, allows you to watch a folder for incoming files and trigger automation workflows
When a new file appears in the target folder, the folder capture node sends information about the file to the flow using a message object, referred to as the msg object. This is a standard JavaScript object used to carry data from one node to the next during flow execution.
Rather than passing the file content, the node provides the full file path in msg.filename, along with structured metadata in msg.file. This metadata includes the file name, extension, and folder path. For convenience, the full file path is also available in msg.payload, one of the standard properties commonly used in Node-RED to carry primary data.
Create the flow
To begin watching a folder for incoming files, add the folder capture node to your flow.
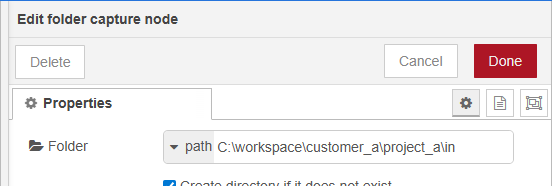
Double-click the node to open its Properties panel and configure the watched folder.
-
By default, the folder field accepts a static path.
-
You can enter a full directory path using Windows notation, for example:
C:\workspace\customer_a\project_a\in -
Alternatively, use Linux-style notation, such as:
/workspace/customer_a/project_a/in
For this tutorial, enter a full directory path using Windows notation, for example: C:\workspace\gettingstarted\invoices\in
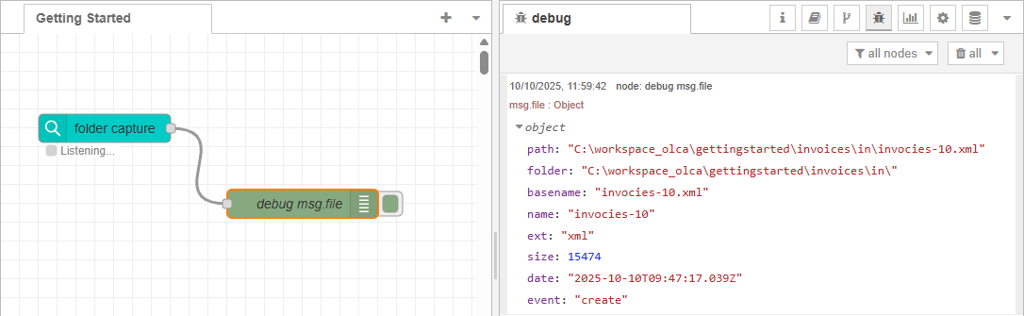
Debug the file
To review the information of the file captured by the folder capture node, connect a debug node to its output. Within the debug node’s settings, choose one of the following output options:
-
msg.filename or msg.payload to display the full file path of the file.
-
msg.file to show the file’s metadata (name, extension, folder, etc.).
-
Complete msg object to reveal all available properties in the message
The selected output appear in the debug panel, allowing you to verify the captured data.
You can use a change node to apply text conditions based on file metadata.
Process the data file
Now that you’ve set up the trigger for the flow, the next step is to process the data file using a data mapping configuration.
-
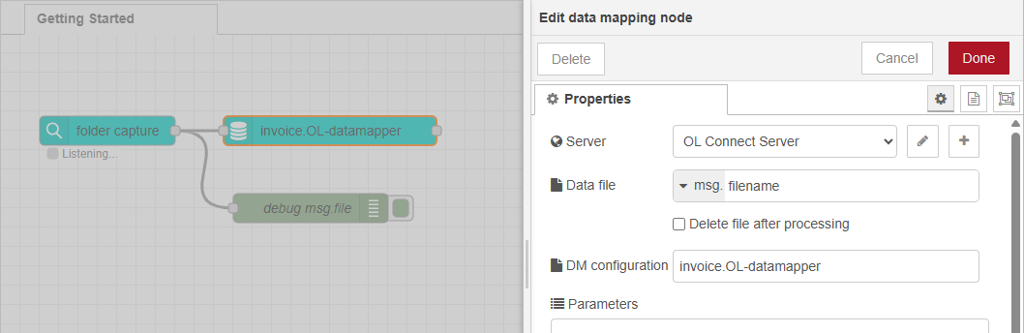
Add a data mapping node to the flow and link this to the folder capture node added earlier.
-
Double-click the data mapping node to open the Properties panel.
-
In the Server drop-down, select the appropriate OL Connect Server configuration.
-
Set the Data file name to
msg.filename. As you have learned, the full path to the data file is stored in this property by the folder capture node. -
In the DM configuration field, choose
invoice.OL-Datamapper.
-
Click Done to save your changes.
-
Click Deploy to apply your changes to the server, then test it by copying a sample data file into the configured hot folder.
Processing Review
The data mapping node uploads the captured file to the OL Connect Server and processes it using the data mapping configuration defined in the DM Configuration property. The node does not return the actual data; instead, once the mapping process is complete, the ID of the resulting data set is stored in msg.dataSetId.
This dataSetId can then be used by other nodes, for example, the paginated content node to merge the data with an OL Connect template, or the get data node to retrieve the extracted data into msg.payload.
Create paginated content
-
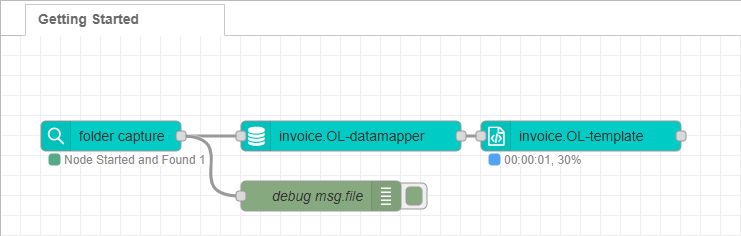
To generate paginated content, add a paginated content node to your flow after the data mapping node.
-
Add the paginated content node to the flow and connect it after the data mapping node.
-
Double-click the node to open its Properties panel.
-
In the Server drop-down, select the appropriate OL Connect Server configuration.
-
In the Template drop-down, choose the
invoice.OL-templatethat was previously deployed from OL Connect Designer. -
Click Done to save your changes.
-
Click Deploy to apply your changes to the server.
Paginated content review
The paginated content node automatically reads msg.dataSetId as its input, merges the corresponding data stored in the OL Connect database with the selected template, and stores the merged result in OL Connect’s File Store. It then returns msg.contentSetId to the flow.
This contentSetId can be used by either the paginated job or paginated output nodes. In this example, we’ll connect it directly to the paginated output node, which generates the final output using the format defined in an Output Preset.
Now continue to Prepare output for a personalized print job.