Personalize a print job
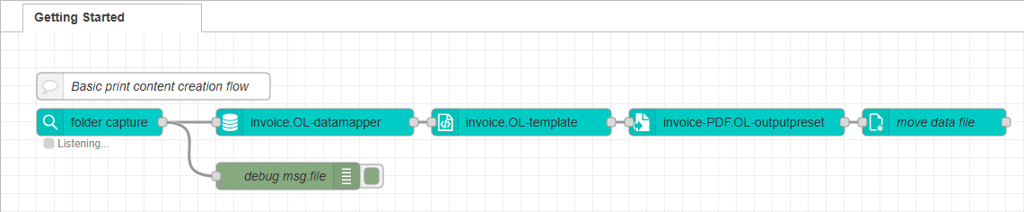
This exercise furthers your knowledge of OL Connect Automate by showing how to automatically generate invoice documents. The process begins when an XML data file is dropped into a hot folder. This action triggers the flow, where the data is extracted and mapped using a predefined data mapping configuration.
Next, the data is merged with an OL Connect template that defines the layout and design of the invoices. The workflow then outputs a single PDF file containing the documents for each invoice included in the XML data. This tutorial helps you understand how information flows and is exchanged between the different nodes in a process.
Tip: For more information about flows triggered by an incoming file, and use case examples, see Trigger flow with a folder capture node.
Prerequisites
Before you begin, make sure the following are in place:
-
OL Connect Automateis installed.
This includes the Node-RED environment with the OL Connect Automate nodes. -
OL Connectsoftware is installed
The OL Connect Server and OL Connect Designer must be available on your system. -
Download the OL Connect resources and sample data:
-
invoice.OL-template: This print template includes a print section, a master page, and media with a virtual stationery background. The layout displays address details, invoice information, and a detail table for the line items.
-
invoice.OL-datamapper: The data mapping configuration This reads the information from the XML file, maps it to the data model, and stores it in the OL Connect database.
-
invoice-PDF.OL-outputpreset: The preset is configured to generate the final PDF output.
-
invoices-10.xml: An XML data file containing the data to be merged with the template. It includes information for multiple invoices and simulates the output from an accounting system
-
-
Create the following working directory on your machine:
C:\workspace\gettingstarted\invoices
Before starting, ensure you’re familiar with the essential concepts of OL Connect Automate and Node-RED, including editor features and flow design. See Documentation, Training, and Support for links to getting started topics and information about using samples and tutorials. Nodes shown in flow example images may display their entered names, set in the node Properties panel, instead of their default names.
Deploy the OL Connect resources
Before the required files can be used in the flow, they must be deployed to the OL Connect Server. This tutorial uses OL Connect Designer for the deployment. In a production environment, this is typically managed automatically by a Startup flow.
-
Open OL Connect Designer, if necessary.
-
Select File > Send to Connect Server... The Send to Server dialog appears.
-
Click Browse at the right of the configurations area, and select the OL Connect resources:
-
invoice.OL-datamapper
-
invoice.OL-template
-
invoice-PDF.OL-outputpreset
-
-
Click Send to deploy the resource to the selected Connect Server.
Continue to Build a flow to personalize a print job and Prepare output for a personalized print job.