Import
The import tab allows you to manually import recipient data into the PostUp database, e.g. import an unsubscribe list, and view import history.
Imports are often performed when importing legacy data into your site’s database prior to launching your first email campaign.
Before you can import data, you will need to create an import file in a standard text format, e.g. txt, .csv, .tsv files.
Tip: you can also create an import template in the settings menu to streamline the import process if you are expecting to perform multiple imports.
Creating an import file
PostUp can import files in a standard text format using any of the following delimiters:
-
Comma separated.
-
Semicolon separated.
-
Tab delimited.
-
Pipe delimited.
When exporting your data from another source, ensure it is formatted with one of these delimiters.
To format your data:
-
Enter column headers that correspond to the fields in your PostUp database, e.g.
Email Address First Name Last Name Note: PostUp will attempt to map your column headers to the database fields when you upload the file. If your file does not have headers, or the headers are not an exact match with the database, you will have the option to manually map them during the import process.
-
Enter each recipient's data on a new line/row, e.g.:
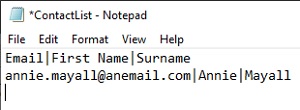
Email Address First Name Last Name annie.mayall@anemail.com Annie Mayall 
As a minimum, you need to include the chosen contact method, i.e. an email address for an email list, etc.
-
If you create a .txt file using a program such as Notepad, include the preferred delimiter, e.g. Email Address|First Name|Last Name.
-
If you create a .csv file using a program such as Microsoft Excel, comma separation is added by the program.
Note: format all dates as YYYY-MM-DD. Review all of your date fields prior to importing as this may affect future segmentation efforts.
-
-
Save the file for uploading on the import tab.