Report Wizard Details & Schedule Tab
The Details & Schedule tab allow you to name and save your report, as well as create a schedule that outlines when the report is to be automatically generated and emailed to users, groups, or outside contacts.
This tab is made up of the following components:
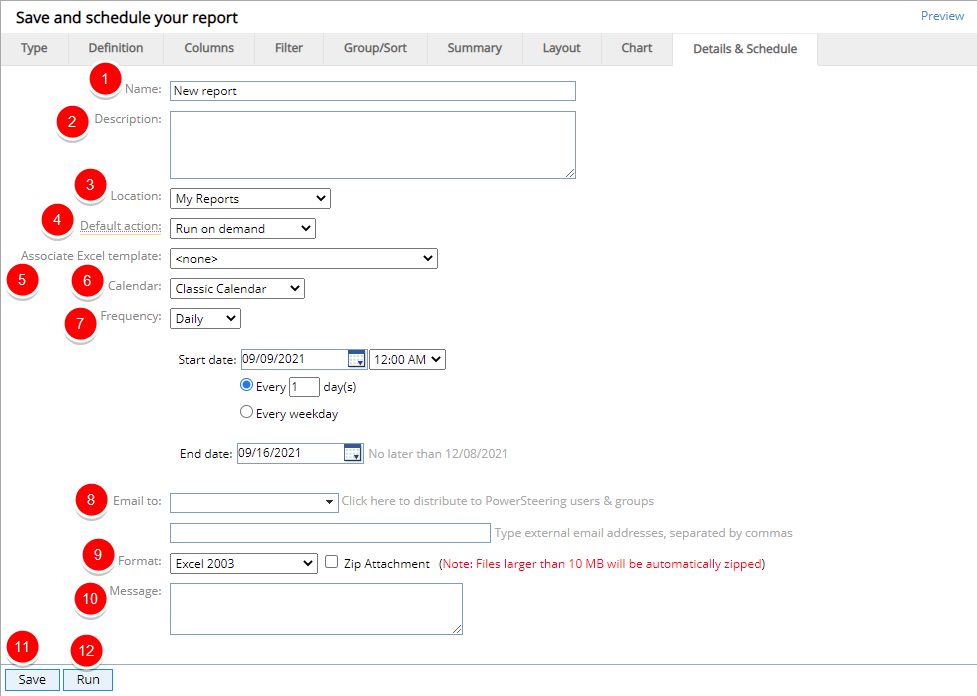
1. Name: Choose a name for your report.
Note: When the "Append timestamp" checkbox is selected, the date and time of running will be appended to the report file name whenever a user runs a report.
The numbers represent the date and time the report was run. The first eight digits represent a date that is formatted yyyy/mm/dd, so this report was run on March 19th, 2025. The final six digits represent the time it was run in hours, minutes and seconds, so this report was run at 8:51:51 AM.
2. Description: Write a quick summary and/or some important details about your report.
3. Location: Choose a location where your report will be saved.
Note: You can find your saved reports under "Reports" from the "Review" menu of the Icon bar:
Click to play.
4. Default Action: Choose how the report will be run whenever it is opened:
-
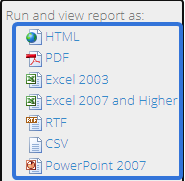
Run on demand: When users run the report manually, the report will collect and display the most recent PowerSteering data. The user will be able to select any of the available output formats.
-
Retrieve from last run: When users run the report manually, they will have the option to either run the report with the most recent PowerSteering data (same as "Run on demand" above) or export a copy of the report with data from the last scheduled run (indicated in parentheses).
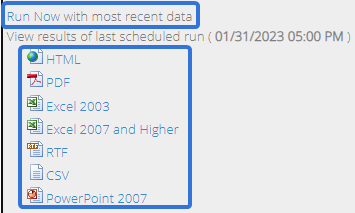
Tip: Whenever possible, users should export the results of the most recent scheduled run in the case of large reports. Running large reports more often than required can result in longer wait times and application overheat.
5. Associate Excel template: Choose a pre-created Excel template to associate with the report. See Create an Associated Excel Template for more information.
6. Calendar: Choose to apply either a "Classic Calendar" or an Alternative Calendar to your report.
7. Frequency: Decide how often you would like your report to automatically run and be sent out to recipients.
-
Never: The report will never automatically run and be sent out.
-
Daily: The report will automatically run and be sent out either on a custom daily basis or every weekday.
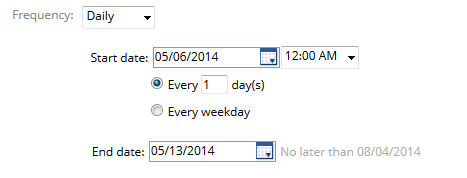
Note: PowerSteering will let you set an end date but there is a limit on how long a report can run automatically. This is to ensure that reports being sent automatically are reviewed and refreshed periodically. Reports set to the sending frequency of "Daily" are allowed to be scheduled for up to 3 months. The "No later than" date can be found next to the "End date" calendar field.
Note: When the end date of a subscribed report arrives, the report's creator will receive an email that allows them to extend the report.
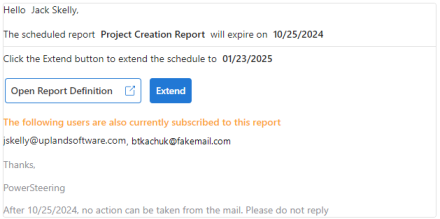
Selecting the Extend button for a report with a "Daily" frequency will automatically extend it by 3 months.
Please note that the email will only match the above formatting if your organization is a Microsoft 365 tenant. Users that are not tenants will see this email in plain text instead. If your organization is a tenant but you are not seeing this formatting, contact your PowerSteering representative. -
Weekly: The report will automatically be run and sent out on a custom weekly basis.
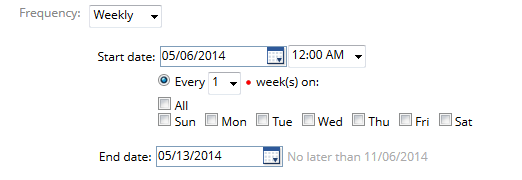
Note: PowerSteering will let you set an end date but there is a limit on how long a report can run automatically. This is to ensure that reports being sent automatically are reviewed and refreshed periodically. Reports set to the sending frequency of "Weekly" are allowed to be scheduled for up to 6 months.
Note: When the end date of a subscribed report arrives, the report's creator will receive an email that allows them to extend the report.

Selecting the Extend button for a report with a "Weekly" frequency will automatically extend it by 6 months.
Please note that the email will only match the above formatting if your organization is a Microsoft 365 tenant. Users that are not tenants will see this email in plain text instead. If your organization is a tenant but you are not seeing this formatting, contact your PowerSteering representative. -
Monthly: The report will automatically be run and sent out on a custom monthly basis.
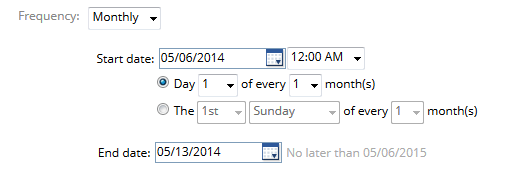
Note: PowerSteering will let you set an end date but there is a limit on how long a report can run automatically. This is to ensure that reports being sent automatically are reviewed and refreshed periodically. Reports set to the sending frequency of "Monthly" are allowed to be scheduled for up to 12 months.
Note: When the end date of a subscribed report arrives, the report's creator will receive an email that allows them to extend the report.

Selecting the Extend button for a report with a "Monthly" frequency will automatically extend it by 12 months (one full year).
Please note that the email will only match the above formatting if your organization is a Microsoft 365 tenant. Users that are not tenants will see this email in plain text instead. If your organization is a tenant but you are not seeing this formatting, contact your PowerSteering representative.
8. Email to: Use the drop-down menu to determine which PowerSteering users and/or groups will receive the report when it automatically runs and gets delivered. Additionally, you can use the text box below the drop-down menu to add email addresses of non-PowerSteering users who will also receive the reports.
Note: By default, emailed reports will not be sent to no-access PowerSteering users. If you would like to change this, contact your PowerSteering representative.
9. Format: Decide which format the attached report should be sent as. Also, you can select the "Zip Attachment" checkbox to send the report as a zipped file.
Note: Files larger than 10 MB will automatically be zipped by default. If you wish to change this default amount, please contact your PowerSteering representative. Also, the "Zip Attachment" checkbox can be removed entirely by contacting your PowerSteering representative.
Note: When using a paginated format (PDF, RTF, and PowerPoint 2007), the maximum number of pages is 200.
10. Message: Write a custom message that will accompany the report upon delivery.
11. Save: Click the Save button to save the report. The reports will be saved where specified in 3. Location.
12. Run: Click the Run button to run the report.
Caution: Clicking Run will not save the report; it will only provide you with an example of how the report will look whenever it is run. Be sure to click Save before leaving the page or your work will be lost.