Configure the Manage Time Page
Timesheet approvers have the ability to customize the Manage Time page to their liking. The toolbar at the top of the Manage Time table offers multiple configuration options:

Select any of the configuration options to learn more about them:
Note: Configuration changes to the Manage Time page will be saved for the user who made them. In other words, no other users will see your configuration settings when they open the Manage Time page.
Timesheet Status Filter
The "Timesheet Status" drop-down menu allows users to determine which Timesheets should be displayed for the period. Only Timesheets with a status that matches the checked boxes will be displayed in the table:
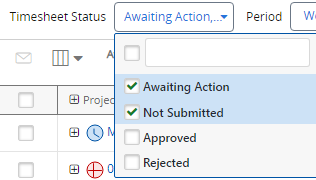
In this example, only Timesheets with a status of "Awaiting Action" or "Not Submitted" will be displayed for the time period. Timesheets with a status of "Approved" or "Rejected" will be filtered out.
Note: Selecting the top checkbox or none of the checkboxes will result in Timesheets of all statuses being displayed.
The "Total Hours" column will display an icon that represents the Timesheet's status:

The icons are as follows:
Awaiting Approval
Not Submitted
Approved
Rejected
Tip: A Timesheet will have a "Not Submitted" status when it is saved by a user but not yet submitted. Once the user submits it, the Timesheet will move to "Awaiting Action".
Tip: When "Awaiting Approval" is the only option selected, the Approve and Reject buttons will appear while the user is approving or rejecting time:
If other statuses are selected, the buttons will disappear and the user will have to approve or reject Timesheets using the "Actions" drop-down menus: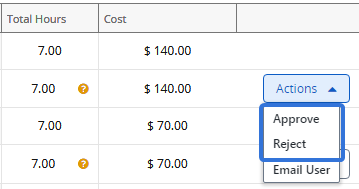
Users who are visiting the Manage Time page with the intent of approving or rejecting Timesheets should only select the "Awaiting Action" status to make the process easier.
Regardless of the filter from the "Timesheet Status" menu, a tally of each Timesheets by status will be displayed directly below the menu:

Even Timesheets that have been filtered out will be counted. This way, users always have an idea of the total number of Timesheets for the period.
Period
The "Period" options can be used to determine the time period covered by the Manage Time page.
The "Period" drop-down menu offers two time periods:

-
Weekly: The table will display Timesheets on a per-week basis. This means that the table will only display Timesheets for the selected week.
-
Monthly: The table will display Timesheet on a per-month bases. This means that the table will display a list of Timesheets for the entire month (five weeks).
Note: This provides the same function as the "Monthly Report" that users might remember from the legacy Manage Time page.
Once a period is selected, the date fields can be used to select a date range:

The first day of a date range will always be the first Sunday of the week. The last day of a date range will always be the last Saturday of the week. When a date is selected from either of these fields, the other date will be automatically calculated based on the selected period ("Weekly" or "Monthly").
Example: Imagine the selected period is "Weekly" and the user has selected Tuesday, February 6th as the starting date: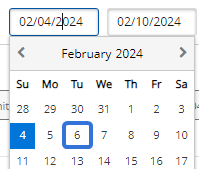
The starting date will automatically become Sunday, February 4th because the first day of a date range must always be a Sunday. Also, the end date will automatically be calculated as Saturday, February 10th because the end of a date range must always be a Saturday. Therefore, the range will be Sunday, February 4th to Saturday, February 10th.
The calculation will be similar if the selected period is "Monthly", but the end date will be automatically become the Saturday at the end of the five-week period. Therefore, the first day of the date range will still be Sunday, February 4th, but the end date will automatically become Saturday, March 9th.
The same process applies in reverse if the end date is selected instead of the start date. The end date will automatically become the Saturday of the selected week and the start date will automatically become the Sunday at the start of the period (either the beginning of the selected week or five weeks prior).
Display
The "Display" drop-down menu allows users to group Timesheets by users or by work items:

-
By User: The Timesheets will be grouped by the user who submitted or saved them:
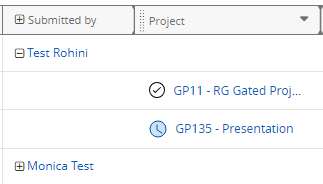
The "Submitted By" column (containing PowerSteering users) will be placed at the left-hand side of the table.
Note: When this option is selected, the row containing the user's name will display the user's total time for the period:

The rows containing work item names will only display the user's time toward the work item itself:
-
By Project (default): The Timesheets will be grouped by the work items they were submitted or saved against:
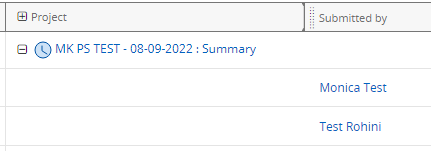
The "Project" column (containing PowerSteering work items) will be placed at the left-hand side of the table.
Note: When this option is selected, the row containing the work item's name will display the total time against the work item for the period:

The rows containing user names will only display the individual user's time toward the work item:
Currency
The "Currency" drop-down menu can be used to determine which currency the costs on the page will be displayed as.
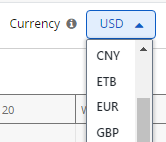
Note: The currencies in the drop-down menu are based on the Exchange Rates entered in PowerSteering.
When a currency is selected, all of the costs displayed on the Manage Time page will be converted to it.
Selected Columns
The "Selected Columns" drop-down menu allows users to customize the Manage Time table by determining which columns will be displayed:
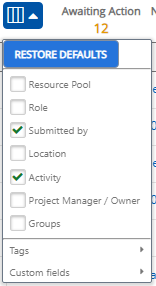
The selected columns will be displayed on the table along with each Timesheet.
Note: Scrolling the cursor over the "Tags" or "Custom Fields" options will open up an additional menu with column options for Tags / Custom Fields that have been associated with users.
Columns displayed on the table can be reordered by dragging and dropping the column headers by their dots:
Click thumbnail to play.
