Format a Scorecard Metric Import File
Please note an issue occurs intermittently when a Metric Import file with multiple errors is imported into PowerSteering. It occurs when users attempt to navigate pages or expand the results per page while reviewing the errors:
After selecting these buttons, users may receive a "Bad Request" error:
Temporary Workaround: When this issue occurs, users will need to clear their browser cache. Google Chrome users can do this by selecting the Chrome menu (top right-hand corner) → More Tools → Clear browsing data (or by selecting Ctrl+Shift+Del). Microsoft Edge users can do this by selecting the Edge menu (top right-hand corner) → Settings → Privacy, search, and services. Alternatively, users can use their browser's DevTools and clear any cookies with JSESSIONID prefix: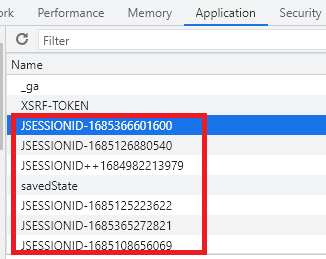
This action will clear the PowerSteering session, so another login will be required.
A Metric import file is easy to create, but very specific in how it must be formatted. The easiest way to prepare an import file is to create it in Microsoft Excel and save it as a "Text (Tab delimited) (*.txt)" file format.
Once your file is ready, see Import Metric Data for more information on completing the import process.
Note: Download an example metric import file here. Excel files must be saved in text (tab delimited) (*.txt) format before being imported into PowerSteering.
To create a Scorecard Metric import file:
-
Open up a blank worksheet in Microsoft Excel.
-
Decide whether to use "Header Option 1" or "Header Option 2" for your import file:
-
Header Option 1: This option will identify PowerSteering Projects based on their PowerSteering ID or Project Sequence (either one can be provided during the import process).
The PowerSteering ID is a 26-digit ID number of the Project. If you navigate to a Project's Summary page, you can see it in the browser URL directly after the "U":

The Project Sequence is a mixture of numbers and letters that can be seen directly on the Summary page:

Note: If the Project Sequence does not appear on the Summary page, contact a PowerSteering Team Member to enable it for you. Keep in mind that the Project Sequence is not necessary if the PowerSteering ID is provided.
An example of a file formatted for "Header Option 1" will look like this:

-
Header Option 2: This option will identify PowerSteering Projects by their "Project's ID", which can be seen directly on the Summary page:

Note: If the Project ID does not appear on the Summary page, contact a PowerSteering Team Member to enable it for you.
In addition to the "Project's ID", a "Header 2" import file will also require a "Type Name" column. This column contains the different types of Work that can have a Project ID.
Note: Each type must be entered exactly as the word appears below, including capital letters.
There are four different types that can be entered under "Type Name":
-
Work - Any basic, non-gated Work Item.
-
Tollgate - Any Gated Project.
-
Organization - Any Organization.
-
Deliverable - Any Deliverable.
An example of a file formatted for "Header Option 2" will look like this:

-
-
-
Enter the column headers into the first row of your spreadsheet.
Note: The column headers must be typed out exactly as they appear in the examples below, including capital letters and punctuation. The only exception is Custom Fields / Tags.
-
Header Option 1 Column Headers:
-
Project Name
-
Project's PowerSteering ID
-
Project's Sequence
-
Metric Template
-
View
-
Beneficiary
-
Item Name
-
Item Sequence Number
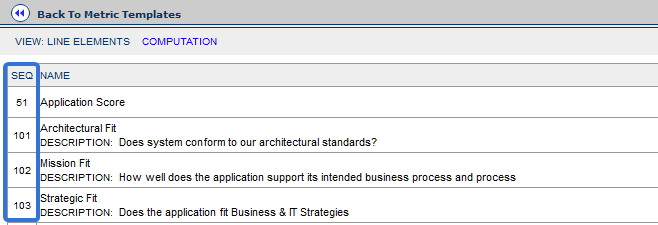
Note: This optional field is only required if two line items on the same Metric have the same name. When this is the case, the Sequence Number will differentiate them. PowerSteering Administrators can view line item Sequence Numbers while editing the Metric Template line items:
-
Amount
-
Note: Separate Custom Field and Tag column headers need to be entered for each Custom Field or Tag on the included Metrics. Each one must be formatted as follows, where <name> equals the name of the Custom Field or Tag exactly as it appears on the Metric: "CustomField:<name>" or "Tag:<name>".
Be sure that the entire Custom Field or Tag name is included after the colon and there is no space between the colon and the start of the custom field/tag name. You do not need to use the chevrons unless they are part of the name.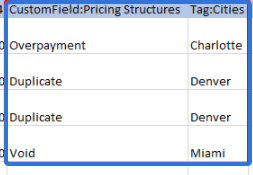
Caution: Be aware that any Custom Field or Tag columns that have values in the Metric will be erased if they are not included in the import file.
For example, imagine you are trying to add a value to only one Custom Field in your Metric:
If you do not include the other Custom Field or Tag columns in your import file, they will be cleared and your data will be lost:

To avoid this, ensure that your import file has columns for all of the Custom Fields and Tags of the Metric.Example:

-
-
Header Option 2 Column Headers:
-
Project Name
-
Project's ID
-
Type Name
-
Metric Template
-
View
-
Beneficiary
-
Item Name
-
Item Sequence Number
Note: This optional field is only required if two line items on the same Metric have the same name. When this is the case, the Sequence Number will differentiate them. PowerSteering Administrators can view line item Sequence Numbers while editing the Metric Template line items:

-
Amount
-
Custom Field / Tag
Note: Separate Custom Field and Tag column headers need to be entered for each Custom Field or Tag on the included Metrics. Each one must be formatted as follows, where <name> equals the name of the Custom Field or Tag exactly as it appears on the Metric: "CustomField:<name>" or "Tag:<name>".
Be sure that the entire Custom Field or Tag name is included after the colon and there is no space between the colon and the start of the custom field/tag name. You do not need to use the chevrons unless they are part of the name.
Caution: Be aware that any Custom Field or Tag columns that have values in the Metric will be erased if they are not included in the import file.
For example, imagine you are trying to add a value to only one Custom Field in your Metric:
If you do not include the other Custom Field or Tag columns in your import file, they will be cleared and your data will be lost:

To avoid this, ensure that your import file has columns for all of the Custom Fields and Tags of the Metric.Please note an issue with Custom Fields on an import file. If a file with a populated Custom Field is imported into PowerSteering when the "Remove empty tag and custom field values:" box is unchecked, the empty Custom Field cells in the import file will still override any populated cells in the Metric and make them empty as well. Please not that Tags are not affected by this bug, only Custom Fields.
Expected Behavior: If this checkbox is not selected, empty Custom Fields in the import file should be ignored; the Custom Fields in the Metric should not be affected by them.
Temporary Workaround: This issue is currently being repaired. In the meantime, users are encouraged to include each Custom Field from the Metric in their import file. Each Custom Field in the import file should be populated with the same values from the Metric in order to prevent them from being cleared out.Example:

-
-
-
Enter Scorecard Metric data into your spreadsheet:

-
Project Name: The name of the Project the Metric is attached to.
-
Project's PowerSteering ID (Header 1 only): The 26-digit ID number of the Project that the Metric is attached to (see above for an example).
-
Project's Sequence (Header 1 only): The Sequence Number of the Project that the Metric is attached to (see above for an example).
-
Project's ID (Header 2 only): The special ID number given to the Project that the Metric is attached to (see above for an example).
-
Type Name (Header 2 only): The Work Item type (see above for more information).
-
Metric Template: The name of the Metric's Template.
-
View: The name of the Metric view.
-
Beneficiary: The name of the Metric Beneficiary.
Note: These are only relevant for Manual Beneficiaries (Beneficiary lines that you can add values to), not Percent Allocation Beneficiaries (Beneficiaries that are populated based on a percentage of the line item).
-
Item Name: The name of the Metric Line Item.
-
Item Sequence Number: The Item Sequence Number of the Metric line item.
-
Amount: The desired value of the Metric Line Item.
Note: Only numeric values can be entered under "Amount". This means that if the Scorecard Metric contains non-numeric value options (labels), they cannot be directly entered into the import file.
For example, this Scorecard Metric has been configured to allow users to select a non-numeric value from a drop-down menu: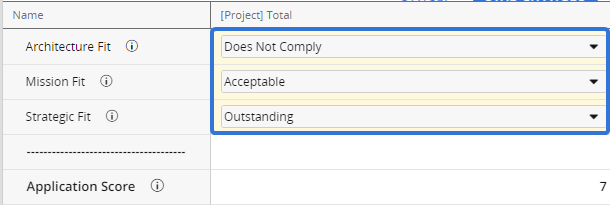
When this is the case, users cannot simply enter "Complies" under the "Amount" column in their import files to change one of the line item values. This will cause an error in the import process. Instead, users will have to enter whichever "Discrete Value" has been attached to the label on the Metric Template: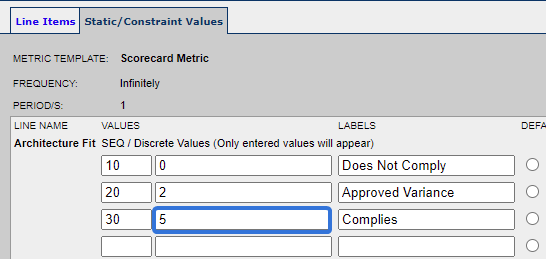
In this example, users should enter "5" under the "Amount" column in order to change the value of "Architecture Fit":
After importing the file, the "Architecture Fit" line item will be changed to the corresponding "Complies" label: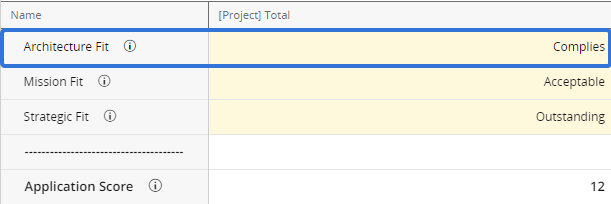
Ask your PowerSteering Administrator to provide you with the discrete values for each Scorecard Metric label. -
Custom Field / Tag: The desired value for the Custom Field or Tag on the Metric line item.
Please note an issue with Custom Fields on an import file. If a file with a populated Custom Field is imported into PowerSteering when the "Remove empty tag and custom field values:" box is unchecked, the empty Custom Field cells in the import file will still override any populated cells in the Metric and make them empty as well. Please not that Tags are not affected by this bug, only Custom Fields.
Expected Behavior: If this checkbox is not selected, empty Custom Fields in the import file should be ignored; the Custom Fields in the Metric should not be affected by them.
Temporary Workaround: This issue is currently being repaired. In the meantime, users are encouraged to include each Custom Field from the Metric in their import file. Each Custom Field in the import file should be populated with the same values from the Metric in order to prevent them from being cleared out.
-
-
Select File in Microsoft Excel.
-
Select Save As.
-
Decide on a name for your import file.
-
Select "Text (Tab delimited) (*.txt)" as the file format:

-
Select the Save button.
After selecting Save, your import file will be ready to upload into PowerSteering.