Invite / Create a New User
New users can be added to PowerSteering at any time. Invited users will receive an email that contains a link allowing them to set up a new PowerSteering profile.
Before You Start: Only PowerSteering administrators or users with the "Invite User" Context permission can invite new users to PowerSteering.
To invite a new PowerSteering user:
-
Select Add → User from the Navigation Menu:

Click thumbnail to play.
-
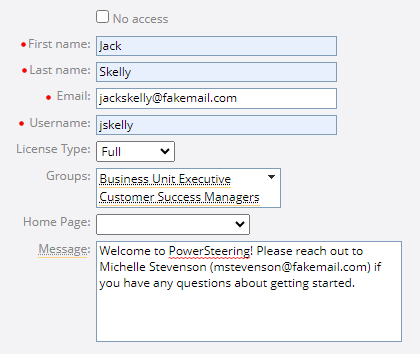
Enter some general information for the new user:
-
No-Access: Select the checkbox if this user will be a no-access user. No-access users can be accounted for on work items in PowerSteering, but they will not be able to login to the application.
-
First name (required): Enter the user's first name.
-
Last name (required): Enter the user's last name.
-
Email (required if "No access" is not selected): Enter the user's email address. This is where the email invitation will be sent.
-
Username (required if "No access" is not selected): Enter a username for the new user. This is what they will use to sign into PowerSteering.
Tip: Typically, the user's email address is used as a username.
-
License Type: Select one of the license types for the user. The available license types are "Full", "Team", "Limited", and "View Only".
Note: The selected value will be descriptive only; it will not have any affect on how the user will be able to interact with PowerSteering. The selection should reflect the type of permissions given to the user.
-
Groups: Select any Groups that the user should belong to upon entering PowerSteering.
-
Home Page: Select which Home Page Configuration the user will receive upon entering PowerSteering.
-
Message: Enter a message that the new user will receive with the PowerSteering invitation.
-
-
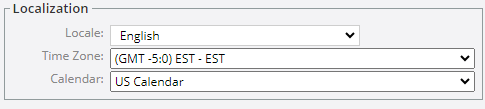
Enter the localization information for the new user:
-
Locale: Indicate which language the user will be presented with in PowerSteering.
-
Time Zone: Select the new user's time zone.
-
Calendar: Select which Resource Calendar the new user will follow.
-
-
Enter the applicable custom user information:
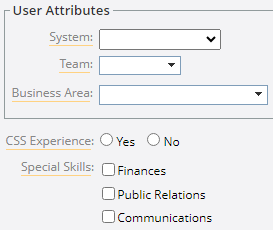
Note: This section consists of custom user information fields. Administrators can customized these by creating Tags and Custom Fields, applying them to Users, and then adding them to the "User" Object in Field Management:
-
Select any Roles and Resource Pools that the user should belong to upon entering PowerSteering:

Note: This section will only appear if Resource Management has been enabled for your site. Speak to your PowerSteering representative for more information.
-
Role: Select any Role from the drop-down menu.
-
Max Capacity %: Enter a percentage number into the field. This will indicate how much of the user's total available time can be consumed with tasks in that Role, which is useful if the user will have multiple Roles.
Example: Imagine Jack has two roles in the company: Analyst and Developer. To ensure that he does not get overworked in one position, he has a "Max Capacity %" of 50 for each role (pictured above). This means that 50% of his total working time can be allocated towards Analyst work and the other 50% can be allocated towards Developer work.
Now imagine that a Project Manager is currently looking for a Developer to assign to a Task in Project Central. This task will require a Developer to work on it for 8 hours a day across a 10-day period (80 hours total). She uses the "Best Matches" method to look for Developers, and she scrolls past Jack on the list. However, she sees that Jack only has 4 available hours each day (40 hours total) to work on this Task: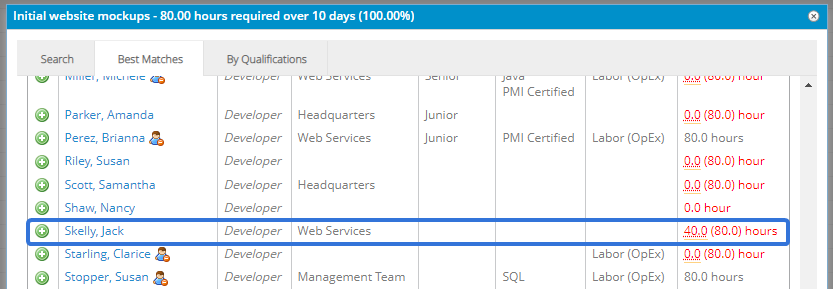
This is because Jack's "Max Capacity %" as a Developer has been set to 50% of his time. -
Pool: Select any Resource Pools that the user should belong to under that Role.
-
Default: Select the checkbox next to the Role that will serve as the user's default Role.
Note: When the "Search" method is used to assign a user to work in Project Central, the user's default Role will always display in the results grid. This will occur even when the Role of the work has been set to another one of the user's Roles.
-
Add Role: Select this to add another Role to the list.
Note: Any of the Roles can be removed from the list by selecting the Remove icon
 .
.
-
-
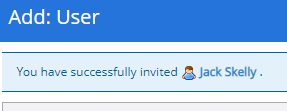
Select the Invite button:

After selecting Invite, the user will receive the email invitation to join PowerSteering. A banner will appear indicating that the invitation was successfully sent:
Note: Even if the banner appears, there may be an issue with the invitation delivery. You will receive an email notification if the invitation does not reach a valid email address.