Before creating, generating, or posting invoices, it is crucial to configure the global invoice settings. These settings ensure consistency and compliance with your organization's billing practices and financial controls.
To configure these settings, navigate to the Financial Settings setup page within the application and locate the Invoice tab. Here, you can access the Invoice General and Batch Templates settings, which allow you to set up the general invoice templates and batch templates. These templates define the layout and structure of all invoices generated by the system.
Additionally, you can establish rules that govern invoice creation and posting to ensure adherence to your organization’s financial policies. For example, you can set rules to prevent users from posting invoices for accounting periods that are not yet closed, ensure that all time entries included in the invoice have been approved, and verify that all days within the invoice interval are locked to prevent further modifications.
By properly configuring these global settings, you ensure that your invoicing process is smooth, consistent, and compliant with your financial controls, preventing errors and ensuring that all invoices are accurately generated and posted according to your organization’s standards.
- From the Icon Bar click Setup
 .
. - From the Navigation Menu click Financial to expand the corresponding menu.
- From the menu click System.
- Upon the Financial Settings page displaying navigate to the Invoice tab.
- Upon the General sub-tab displaying enter or select the required information within each of these sections:
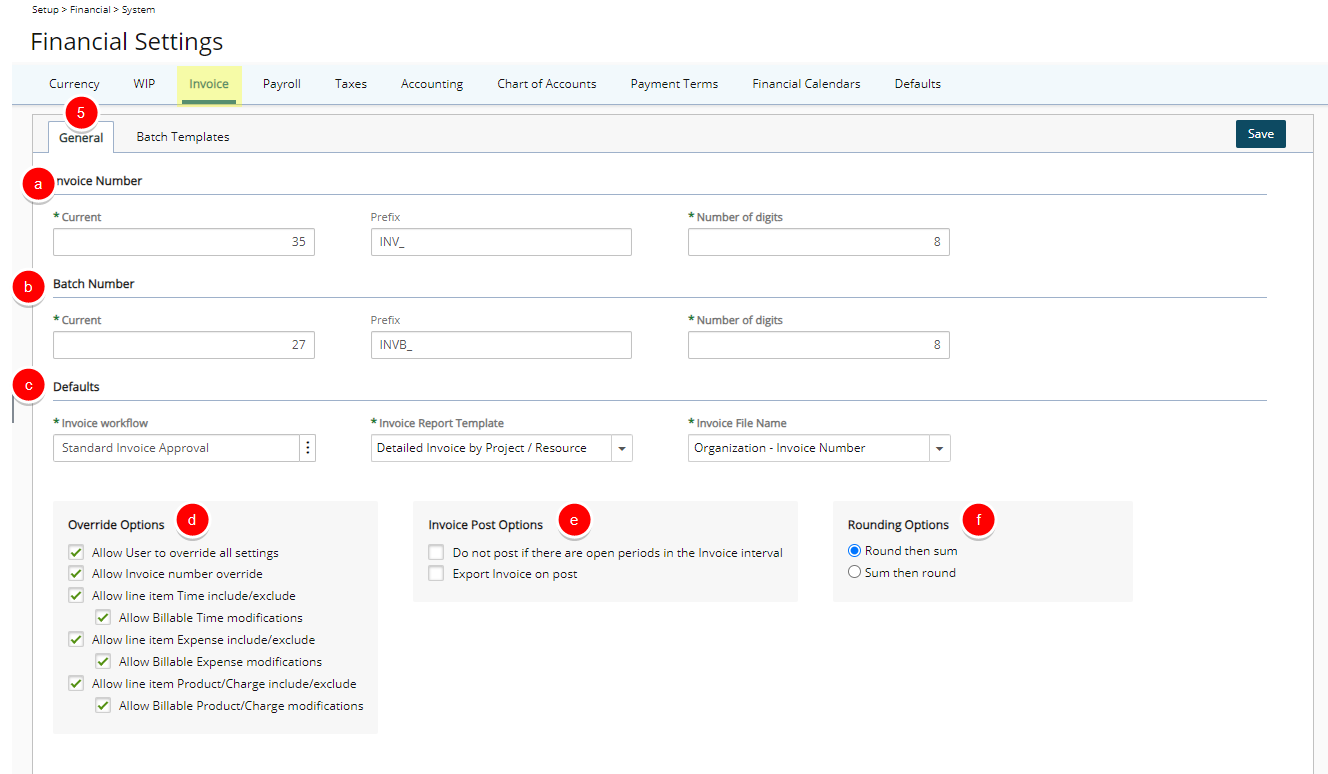
 Invoice Number
- Current: Invoice number generated the next time an invoice is created for a client.
- Prefix: Prefix that precedes the Current Invoice number.
- Number of digits: Total number of digits for the Current Invoice number.
- Batch Number
- Current batch number: Invoice batch number generated the next time a multi-client invoice is created.
- Batch number prefix: Prefix that precedes the Current batch number.
- Batch - number of digits: Total number of digits for the Current batch number.
Note: The Invoice module generates a multi-client invoice that includes multiple clients and projects. Each multi-client invoice is referenced by a batch number; for more information on multi-client invoices, see Generating Multi-Client Invoices.
- Defaults
- Invoice Workflow*: workflow used to track the invoices of an organization; to change the invoice workflow, click the browse button (...) to open the Invoice Workflow List page and then select another invoice workflow for generating the invoices.
Note: Before selecting a Default Invoice Workflow, the Invoice workflows must be created; for more information, see Invoice Setup: Creating an Invoice Workflow.
- Invoice Report Template*: invoice report template used at the global level, options include Detailed Invoice by Project/Resource, Detailed Invoice by Project/Task, Detailed Invoice by Resource and Detailed Invoice by Project/Task with Notes.
Note: When creating new clients, the selected template is set as the default template for the client. If a different invoice report template is selected for the client, then the default template is overridden. The default invoice template can also be changed when generating an invoice. Invoice reports are previewed from the Invoice Edit page.
- Invoice File Name*: Allows you to define the naming convention for PDF invoice files generated within the system when emailing an invoice, as well as for invoices in Excel, PDF, or Word format when previewing or downloading Invoice Reports. The available options are:
- Organization - Client ID - Invoice Number: Combines the organization name, client ID, and invoice number for a structured and informative file name. Example:
OrganizationName-12345-INV001.pdf - Organization - Client Name - Invoice Number: Includes the organization name, client name, and invoice number, providing clear identification of both the client and invoice.Example:
OrganizationName-ClientName-INV001.pdf - Client Name - Invoice Number: Uses the client name followed by the invoice number, focusing on the client’s identity.Example:
ClientName-INV001.pdf - Client Id - Invoice Number: Combines the client ID and invoice number for a concise and easily sortable file name.Example:
12345-INV001.pdf - Organization - Invoice Number (Default selection): The default format that includes the organization name and invoice number..Example:
OrganizationName-INV001.pdf - Invoice numberUses only the invoice number for a straightforward file name. Example:
INV001.pdf - Invoice Number - Client Name: Combines the invoice number and client name, making it easy to identify the invoice and its recipient.Example:
INV001-ClientName.pdf - Invoice Number - Client Id: Uses the invoice number followed by the client ID for clear reference and sorting.Example:
INV001-12345.pdf - Invoice Number - Organization: Combines the invoice number with the organization name, providing a clear reference to both the invoice and issuing entity.Example:
INV001-OrganizationName.pdf
Caution: During the invoice creation process, if the file name exceeds 255 characters, the system will truncate it to 255 characters when sending the attachment.
- Organization - Client ID - Invoice Number: Combines the organization name, client ID, and invoice number for a structured and informative file name.
- Invoice Workflow*: workflow used to track the invoices of an organization; to change the invoice workflow, click the browse button (...) to open the Invoice Workflow List page and then select another invoice workflow for generating the invoices.
- Override Options
From the Override Options section, define the rules for overriding or modifying the time, expense and charge entries in the invoices.
- Select the Allow User to override all settings box to allow users to modify the information in the invoice they are posting.
- Allow Invoice number override:
- Select this option to allow users to modify the Number field when creating an Invoice. Note that the Read Only State attribute must be unchecked.
- An auto-genrated Invoice Number where the Generate Invoice Number State Attribute is checked, will also be editable if the Invoice is in a modify-able State. Note that in this case, when the Allow Invoice number override is unchecked, the Invoice Number will remain non-modifiable regardless of the Read-only State Attribute.
- Select the Allow line item Time include/exclude box to allow users to include or exclude selected Time entry line items from an invoice (Financial > Invoice Manager > Invoice Edit > Time tab).
Note: When you deselect a parent selection box, the corresponding child option will also be deselected. If you want to select a child selection box, you must first select the parent box.
- Then choose the Allow Billable Time modifications box to allow users to modify the Amount of Time Entry line item (Financial > Invoice Manager > Invoice Edit > Invoice Time Entry Edit).
- Select the Allow line item Expense include/exclude box to allow users to include or exclude Expense Entry line item(s) from an invoice (Financial > Invoice Edit > Expenses tab).
Note: When you deselect a parent selection box, the corresponding child option will also be deselected. If you want to select a child selection box, you must first select the parent box.
- Then choose the Allow Billable Expense modifications box to allow users to include or Exclude Entry line item(s) from the Invoice Expense Report Edit page (Financial > Invoice Edit > Invoice Expense Report Edit).
- Select the Allow line item Product/Charge include/exclude box to allow users to include or exclude selected product or charge entry line items from an invoice.
Note: When you deselect a parent selection box, the corresponding child option will also be deselected. If you want to select a child selection box, you must first select the parent box.
- Then choose the Allow Billable Product/Charge modifications check box to allow users to modify the amount of a product or charge entry line item.
- Invoice Post Options
Under the Invoice Post Options section, define the rules for posting the invoices:
- Selecting Do not post if there are open Timesheet periods in the Invoice interval will prevent the invoices with open Timesheet periods from being posted.
The system will check for any open Timesheet periods within the Invoice interval during the posting process. If any Timesheet periods remain unclosed, a warning message will appear stating: The invoice cannot be posted. Some or all of the time entries to be invoiced are part of open periods. You cannot post the invoice until all of the periods in the invoice interval have been marked as closed. Selecting Do not post if there are open Expense periods in the Invoice interval will prevent the invoices with open Expense periods from being posted.
The system will check for any open Expense Reports within the Invoice interval during the posting process. If any Expense Reports remain unclosed, a warning message will appear stating: The invoice cannot be posted until all the Expense Reports in the Invoice interval are marked as closed.- To automatically export invoices to the accounting system, choose the Export Invoice on post option. This will export invoices automatically on post only when they reach an Invoice Workflow State that is flagged with:
- Allow Invoice to be posted
- Allow Invoice to be exported
Note: When both Do not post if there are open Timesheet periods in the Invoice interval and Do not post if there are open Expense periods in the Invoice interval options are enabled:
- If there are open Timesheet Period(s) and open Expense Report Periods:
- The Timesheet validation takes precedence. A warning message will appear stating: The invoice cannot be posted. Some or all of the time entries to be invoiced are part of open periods. You cannot post the invoice until all of the periods in the invoice interval have been marked as closed.
- Upon closing the Timesheets and reposting the Invoice, if any Expense Reports remain unclosed, a warning message will appear stating: The invoice cannot be posted until all the Expense Reports in the Invoice interval are marked as closed.
If there are closed Timesheet Periods and open Expense periods: You will receive the following warning message: The invoice cannot be posted until all the Expense Reports in the Invoice interval are marked as closed.
- Selecting Do not post if there are open Timesheet periods in the Invoice interval will prevent the invoices with open Timesheet periods from being posted.
- Rounding Options
Under the Rounding Options section, define the rules for rounding sums:
- Round then sum
- Sum then round
- Navigate to the Batch Templates sub-tab to Create, Delete or Set a Batch Template to be used as the Default one. For more information visit:
- When finished; Click Save to apply your changes.