Administrators can enhance User Defined Field (UDF) Descriptions using the Rich Text Editor. This feature allows formatted text and hyperlinks to be added directly within the Description field, making it easier to link users to relevant policies, procedures, or supporting documentation.
Hyperlinks included in the description appear as clickable links in the tooltip beside the associated UDF, giving users quick access to additional information without leaving the page. Please refer to the Expected Behavior and Limitations section below for details on supported formatting and object-specific behavior.
Example: Audrey the administrator creates a User Defined Field (UDF) called Task Reference. In the Description field, She use esthe Rich Text Editor to enter the following text:
“Enter the Task ID associated with this Project. For task setup guidelines, see the Task Management Guide”
She associates this UDF to Projects. By doing so an info icon appears next to the Task Reference field throughout the Project edit pages.
For end users, hovering over the info icon displays a tooltip containing the formatted description. The text appears with its formatting (for example, bold or italic), and the Task Management Guide link appears as a clickable hyperlink that opens the referenced page in a new browser tab.
This article covers the following sections:
- How to Format the Description – Step-by-step instructions for using the Rich Text Editor, including bold, italic, and hyperlinks, with notes on unsupported formatting.
- Expected Behavior and Limitations – Details on what works as designed, including icon display rules, supported formatting, and known restrictions such as Groups tooltips and unsupported images/tables.
- Associate to Project – Guidance on associating a UDF to Projects and verifying the Description field and info icon display.
- View As End User – Explanation of how UDF descriptions appear to end users, including tooltip behavior and examples of supported formatting.
How to Format the Description
- From the Icon Bar click Setup
 .
. - From the Navigation Menu click Organization.
- From the menu click System.
- From the Organization System page, click the User Defined Fields link.
- On the User Defined Fields page click New.
- Enter the Name*.
- Enter the Display name*.
- Click the Type list and select the UDF type you wish to create.
Note: You can enter or select additional information or properties on this page if you deem it necessary. In our example we will create a Browse for Task UDF.
Tip: For more information on the Available Fields and Data Types when creating a UDF click here.
- Click the Data type list and select Browse for Item.
- Click the Browse type list and make a selection.
Note: Depending on your selection in Step 9 the available options in Step 10 will differ. For further details refer to Available UDF Types.
- Add or select other information you deem necessary, such as entering an Id.
- Enter any additional information in the Description field. Use this field to provide context or guidance for the User Defined Field (UDF). The Rich Text Editor supports text formatting such as bold and italic, as well as hyperlinks.
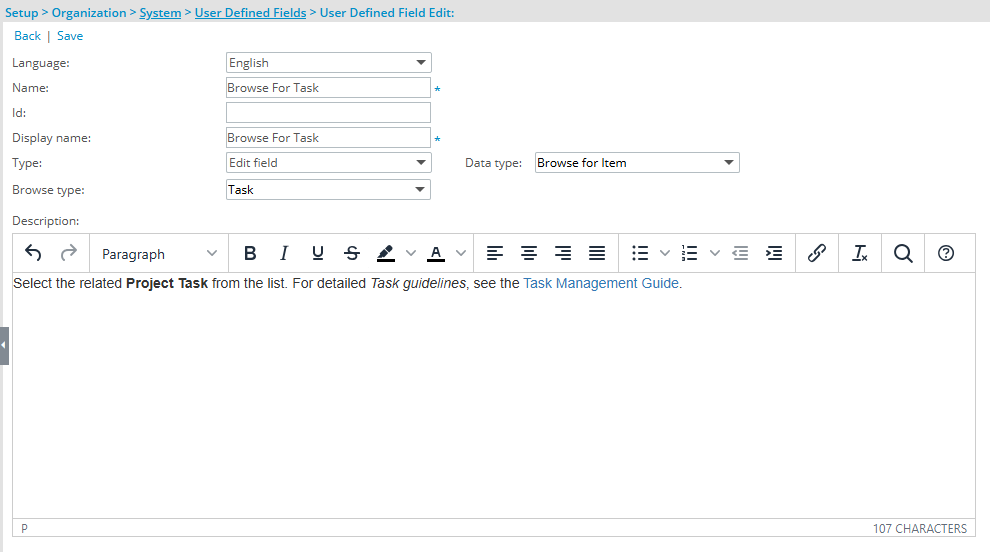
Note: Review the Expected Behavior and Limitations section below to understand how this feature works and any known restrictions.
- Click Save to apply your changes.
- Click Back to return to the previous page.
Expected Behavior and Limitations
The following outlines current limitations and expected behavior for the Description field and info icon in User Defined Fields (UDFs).
Expected Behavior
The following outlines the standard behavior for the User Defined Fields Description and info icon:
- The info icon does not appear for User Defined Fields (UDFs) associated with Timesheet Templates.
- Images and tables are not supported in the Description field.
- The info icon appears only when the Description field contains text. If the Description is blank, the icon will not be displayed.
- Any leading or trailing spaces in the Description text are automatically removed when displayed in the tooltip.
Limitation
- When a User Defined Field is associated with the Groups object, the tooltip for the info icon displays plain text only. Any formatting applied to the Description field (such as bold, italics, or hyperlinks) will be displayed as HTML code rather than formatted text.
Note: It is therefore recommended to avoid using rich text formatting for UDFs associated with Groups.
Associate to Project
- From the Icon Bar click Setup .
- From the Navigation Menu select User Defined Fields to access the Associate User Defined Fields page.
Tip: The Menu will automatically hide (collapse or minimize), allowing for more space on the Associate User Defined Fields page. While the menu is minimized, click the blue Collapse/Expand arrow to turn it back on.
- Click the Associate to box to access the list and select Projects from the list of available options.
- Select the Tab where the UDF resides.
- From the Available Fields section select the Browse For Task UDF created earlier.
- Drop it in the Layout section.
Tip: To add more UDF layout areas, simply drag a Field into the gray doted rectangle. You will notice a new line with dotted rectangles will appear above the gray dotted rectangle. You can add more UDFs in the available slots.
- When associating a User Defined Field for the first time to an item, the User Defined Field properties dialog box displays automatically allowing you to configure the UDF.
- Make any necessary changes.
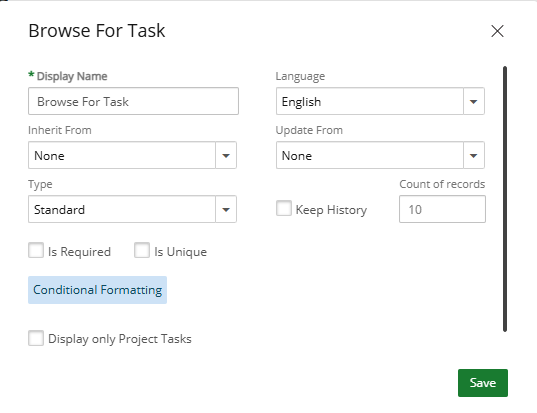
- Click Save.
View As End User
- From the Icon Bar click Project List
 .
. - From the Project List page, select the Project you wish to edit by following one of these steps:
- Click the Project context menu button
 to expand it. From the available options click Edit.
OR - Click the name of the Project you wish to access.
Tip: Use the search capability for an efficient way of finding the specific project. For further details refer to Searching for a Project within the Project List page.
- Click the Project context menu button
- Upon the Project Edit page displaying, navigate to where the Browse For Task UDF is displayed.
- When a Description is entered, an info icon appears next to the associated UDF throughout the application. Hovering over the icon displays the description as a tooltip, including any hyperlinks, helping users better understand the purpose or usage of the field.
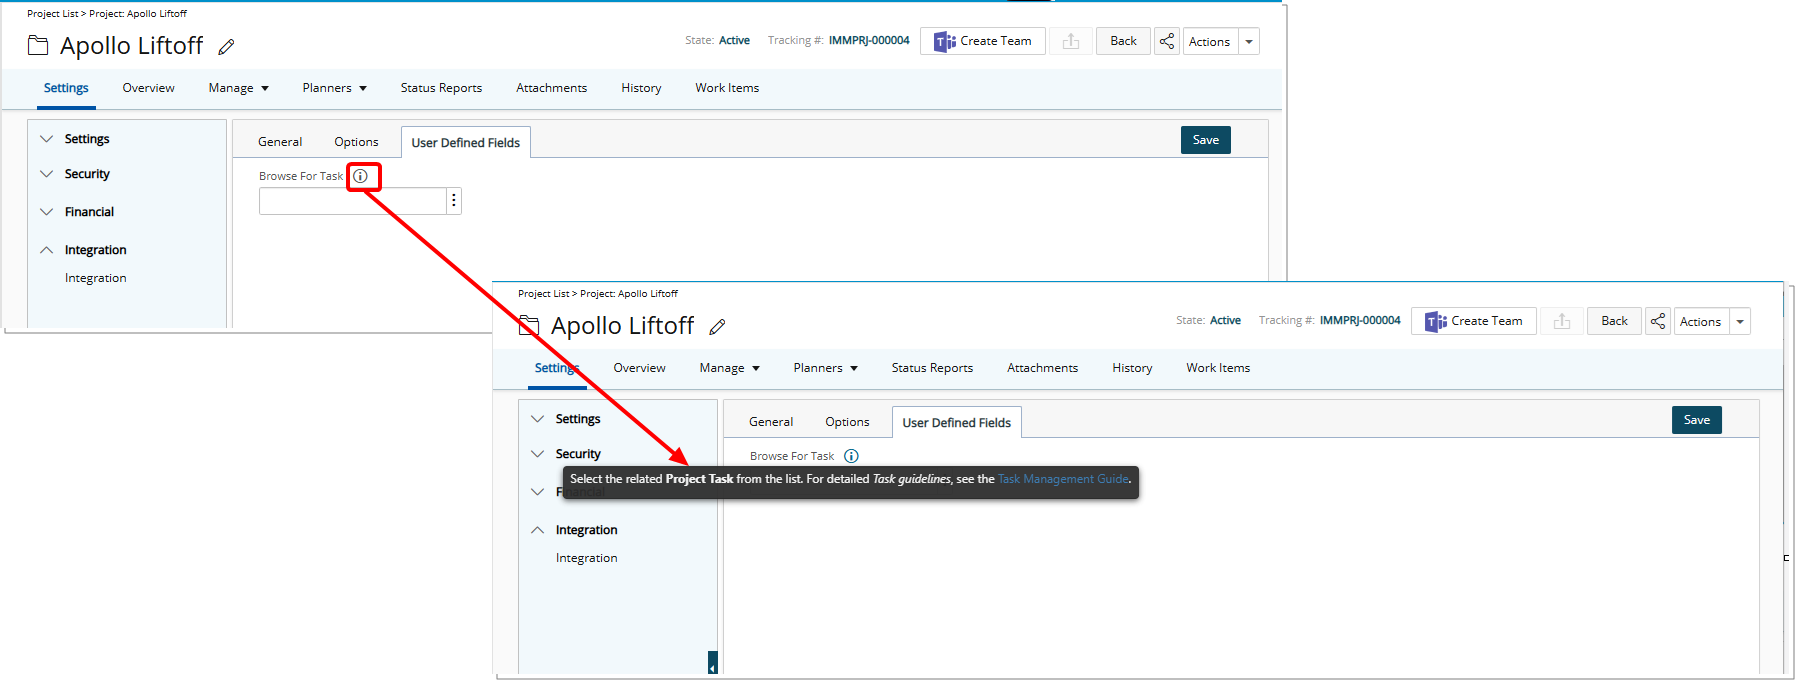
Note: Review the Expected Behavior and Limitations section above to understand how this feature works and any known restrictions.