This article details how to:
- Access and view the Time Entry Notes panel
- Enter Time Entry Notes
- Modify existing Time Entry Notes
- Delete existing Time Entry Notes
Note: To allow Users access to the new and improved My Timesheet in your Sandbox/Implementation/production environments, you must add them to the New Timesheet list. For further details refer to Adding users to the New Timesheet list. If you prefer, you can choose to enforce the use of New Timesheet for all Users at the global level.
Accessing and viewing the Time Entry Notes panel
- From the Icon Bar click Entries
 .
. - From the Navigation Menu click My Timesheet.
Tip: You can access your timesheet through different avenues, which are further detailed in Accessing My Timesheet.
- Navigate to the required Period:
- Click the Calendar button and select the appropriate period.
- Click the Next/Previous buttons to navigate to next/previous Period.
- Click Today to navigate to current Period.

- Hover your mouse over a Time Entry cell to trigger the context menu.
- Click Notes
 to access the Notes tab of Time Entry Details panel.
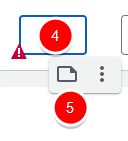
Note: If a Time Entry Note already exists, you will see a solid cyan note icon
 located on the top right corner of the Time Entry cell. Clicking this icon will open the Time Entry Notes panel.
 - Upon the panel displaying, any Exceptions are listed above the Note box and any existing notes are listed below the Add Note section.
Entering Time Entry Notes
When creating a note for the first time, the Add Note section expands automatically for easier access.
- Select a Note Type. The out-of-the-box Note Types are:
- Alert: Select this type to flag the note for the specific time entry as an alert and critical for reviewer/approver to read.
- Hourly: Select this type to indicate the note regarding a specific Hourly Time Entry.
- Invoice: Select this type to flag the note and the specific time entry as an invoicing matter, to be invoiced or pertaining to a specific invoice. Invoice notes are also included in an application report called "Detailed Invoice Report by Project/Task with Notes".
- Notice: Select this type to flag it as a general note regarding the specific time entry.
- R&D: Select this type to flag the note and the specific time entry as associated to Research & Development (if this is applicable within the organization).
- Rejection: Select this type, if the logged user is the timesheet approver, to flag the specific timesheet entry as rejected and the note provides further details.
- Specifications: Select this type to flag the note and the specific time entry as pertaining to working on specifications for a project or software functionality, in the case of a software organization
- Status: Select this type to indicate the note as providing a status of a task/project being done during the specified time entry.
Note: The Note Type(s) available to you may differ from that being listed above, as this can be configured based on the organization's preference.
- Type your note in the Note box.
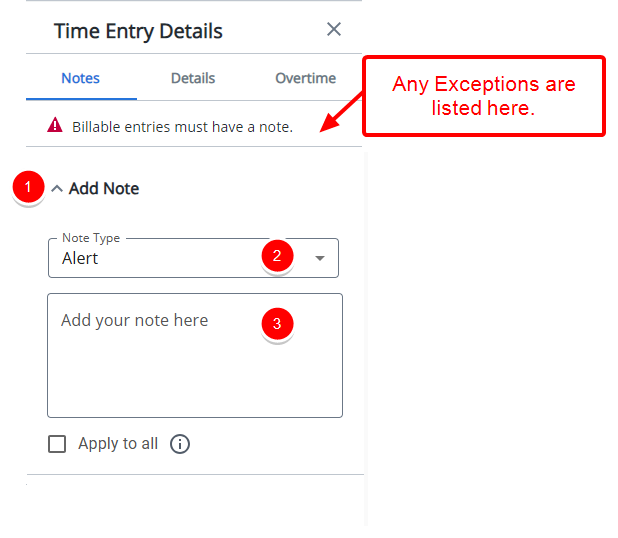
- Select the Apply to all option to apply the Note to all Time Entries against the Assignment within the current Period.
Tip: If you want to apply the same Note to all Entries in the row, make sure to select the Apply to All checkbox before clicking outside the Note box. If you don’t select this option, the Note will be saved for the current Entry only when focus is lost (for example, by clicking anywhere outside the Note box).
- Notes are automatically saved when the note text area loses focus. A counter appears to the right of the Notes tab title, displayed inside a round shape with a blue background, indicating the number of notes entered..
-
Existing notes are listed at the bottom of the panel, with each note visually separated by a dividing line.
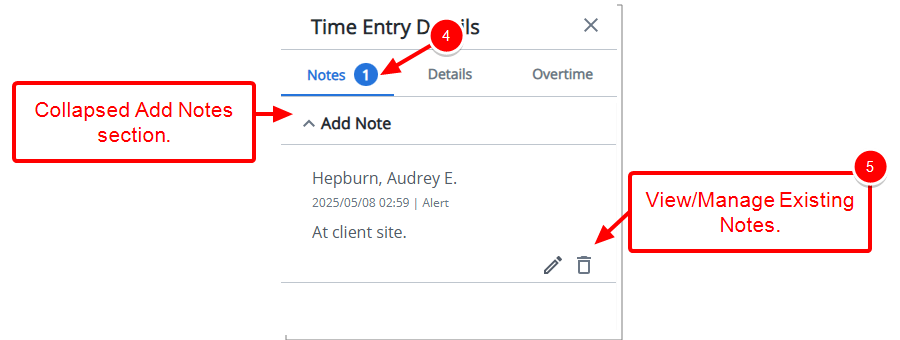
Tip: To add a new note, you can expand the Add Note section.
Modifying existing Time Entry Notes
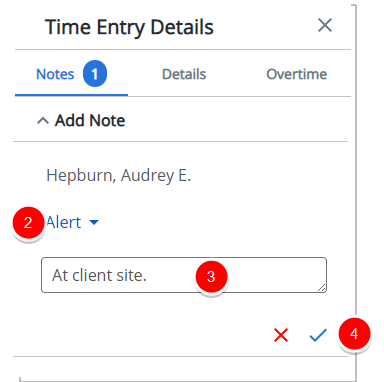
- Identify the Note you wish to modify and select the Edit
 button.
 - If required, make a modification to the Note Type.
- Text transforms into an editable text area with Cancel
 and Save
  buttons. Edit your Note as needed.
Note: The height of the text area dynamically adjusts based on the Note size, expanding up to a maximum of four lines as needed.
- Select Save to apply changes or Cancel to discard them.
Deleting existing Time Entry Notes
- Identify the Note you wish to delete.
- Select the Delete
 button.