My Timesheet has a responsive user interface so as to prevent vertical scroll-bars for a minimum 1280 screen width and 100% resolution. All key information is visible without the need to scroll vertically.
Furthermore, the New Timesheet Default view Display adds extra padding between visual elements of the page to allow for a better user experience. However, if you prefer a more compact experience, you can modify your view from the Display Settings, accessed through the Timesheet context menu.
The available Vertical Density view options to are:
- Default
- Comfortable
- Compact
Furthermore, In addition to the Vertical Density, Users of a Monthly Template can also choose a preferred Horizontal Density. The available options for the Horizontal Density are:
- Comfortable
- Compact
Overall Usability in Monthly View
The Monthly view in the New Timesheet provides a seamless experience for entering and navigating time. With features like stable visibility of the selected day in the Compact Horizontal Density layout, automatic display of hidden Time Entry cells, and a Period View that starts from the first day if today’s date is outside the current period, the layout ensures easy access and focus. When today’s date falls within the period, it loads in view immediately, allowing quick and efficient time entry without manual adjustments.
When using the Compact Horizontal Density layout, the Timesheet view now remains stable and does not shift past the selected day when opening the right panel such as the Notes panel. This keeps the day you are working on in view, making it easier to enter or edit Notes without losing track of your selected date.
When attempting to enter Time for a day that is currently hidden from view, the timesheet will now automatically bring that cell into viewpoint. This improvement ensures that you can seamlessly enter Time for any day, even if it was initially off-screen.
If today’s date is not part of the current Timesheet Period, the timesheet will now automatically start from the first day of the Period. This allows you to easily access and review the entire Period without needing to scroll or search for the beginning of the timeframe.
If today’s date falls within the current Timesheet Period, then today’s date is immediately visible in the viewpoint upon initial load. This makes it more convenient for you to enter Time for the current day without needing to navigate manually.
Note: To allow Users access to the new and improved My Timesheet in your Sandbox/Implementation/production environments, you must add them to the New Timesheet list. For further details refer to Adding users to the New Timesheet list. If you prefer, you can choose to enforce the use of New Timesheet for all Users at the global level.
- From the Icon Bar click Entries
 .
. - From the Navigation Menu click My Timesheet.
Tip: You can access your timesheet through different avenues, which are further detailed in Accessing My Timesheet.
- Click the Timesheet context menu button (
 ).
). - From the available options click Display Settings.
Note: When accessing My Timesheet through tablet devices, the Density is by default set to Compact, and the Density options are hidden, preventing accidental changes. This ensures a consistent experience across tablet devices, enhances usability, and makes it more efficient to enter time and manage your timesheets
- Choose your preferred Vertical Density view from
- Default
- Comfortable
- Compact
- From the Assignment Mode choose Inline or Modal Window. Your Assignment Mode is saved and maintained upon revisiting the page (by the same User) across all browsers.
- When Inline is chosen, upon clicking the +Assignment button you can pick your assignment directly from your Timesheet. Clicking Save
 will add the assignment to your Timesheet.
Note: The width of the selection boxes is dynamically set to fit on one line based on your screen resolution.
- When Modal Window is chosen, upon clicking the +Assignment button, a modal window will be displayed allowing you to pick your Assignment.
- When Inline is chosen, upon clicking the +Assignment button you can pick your assignment directly from your Timesheet. Clicking Save
Examples of the Timesheet view Density
Vertical Density
The Default Vertical Density view adds extra padding between visual elements of the page.
Note: Your system administrator might choose to Hide field name. When selected, the field labels will be hidden from the Assignment rows.

This Density setting reduces the white space.
Note: Your system administrator might choose to Hide field name. When selected, the field labels will be hidden from the Assignment rows.

This Density setting will reduce the white space considerably and provide an overall condensed view of Timesheets.
When using this Density setting:
- The Assignment and Complete buttons as well as the Period picker is moved to the right of the history button.
- The Summary section is in a drawer which by default is closed. You can click the Expand
 button to view it.
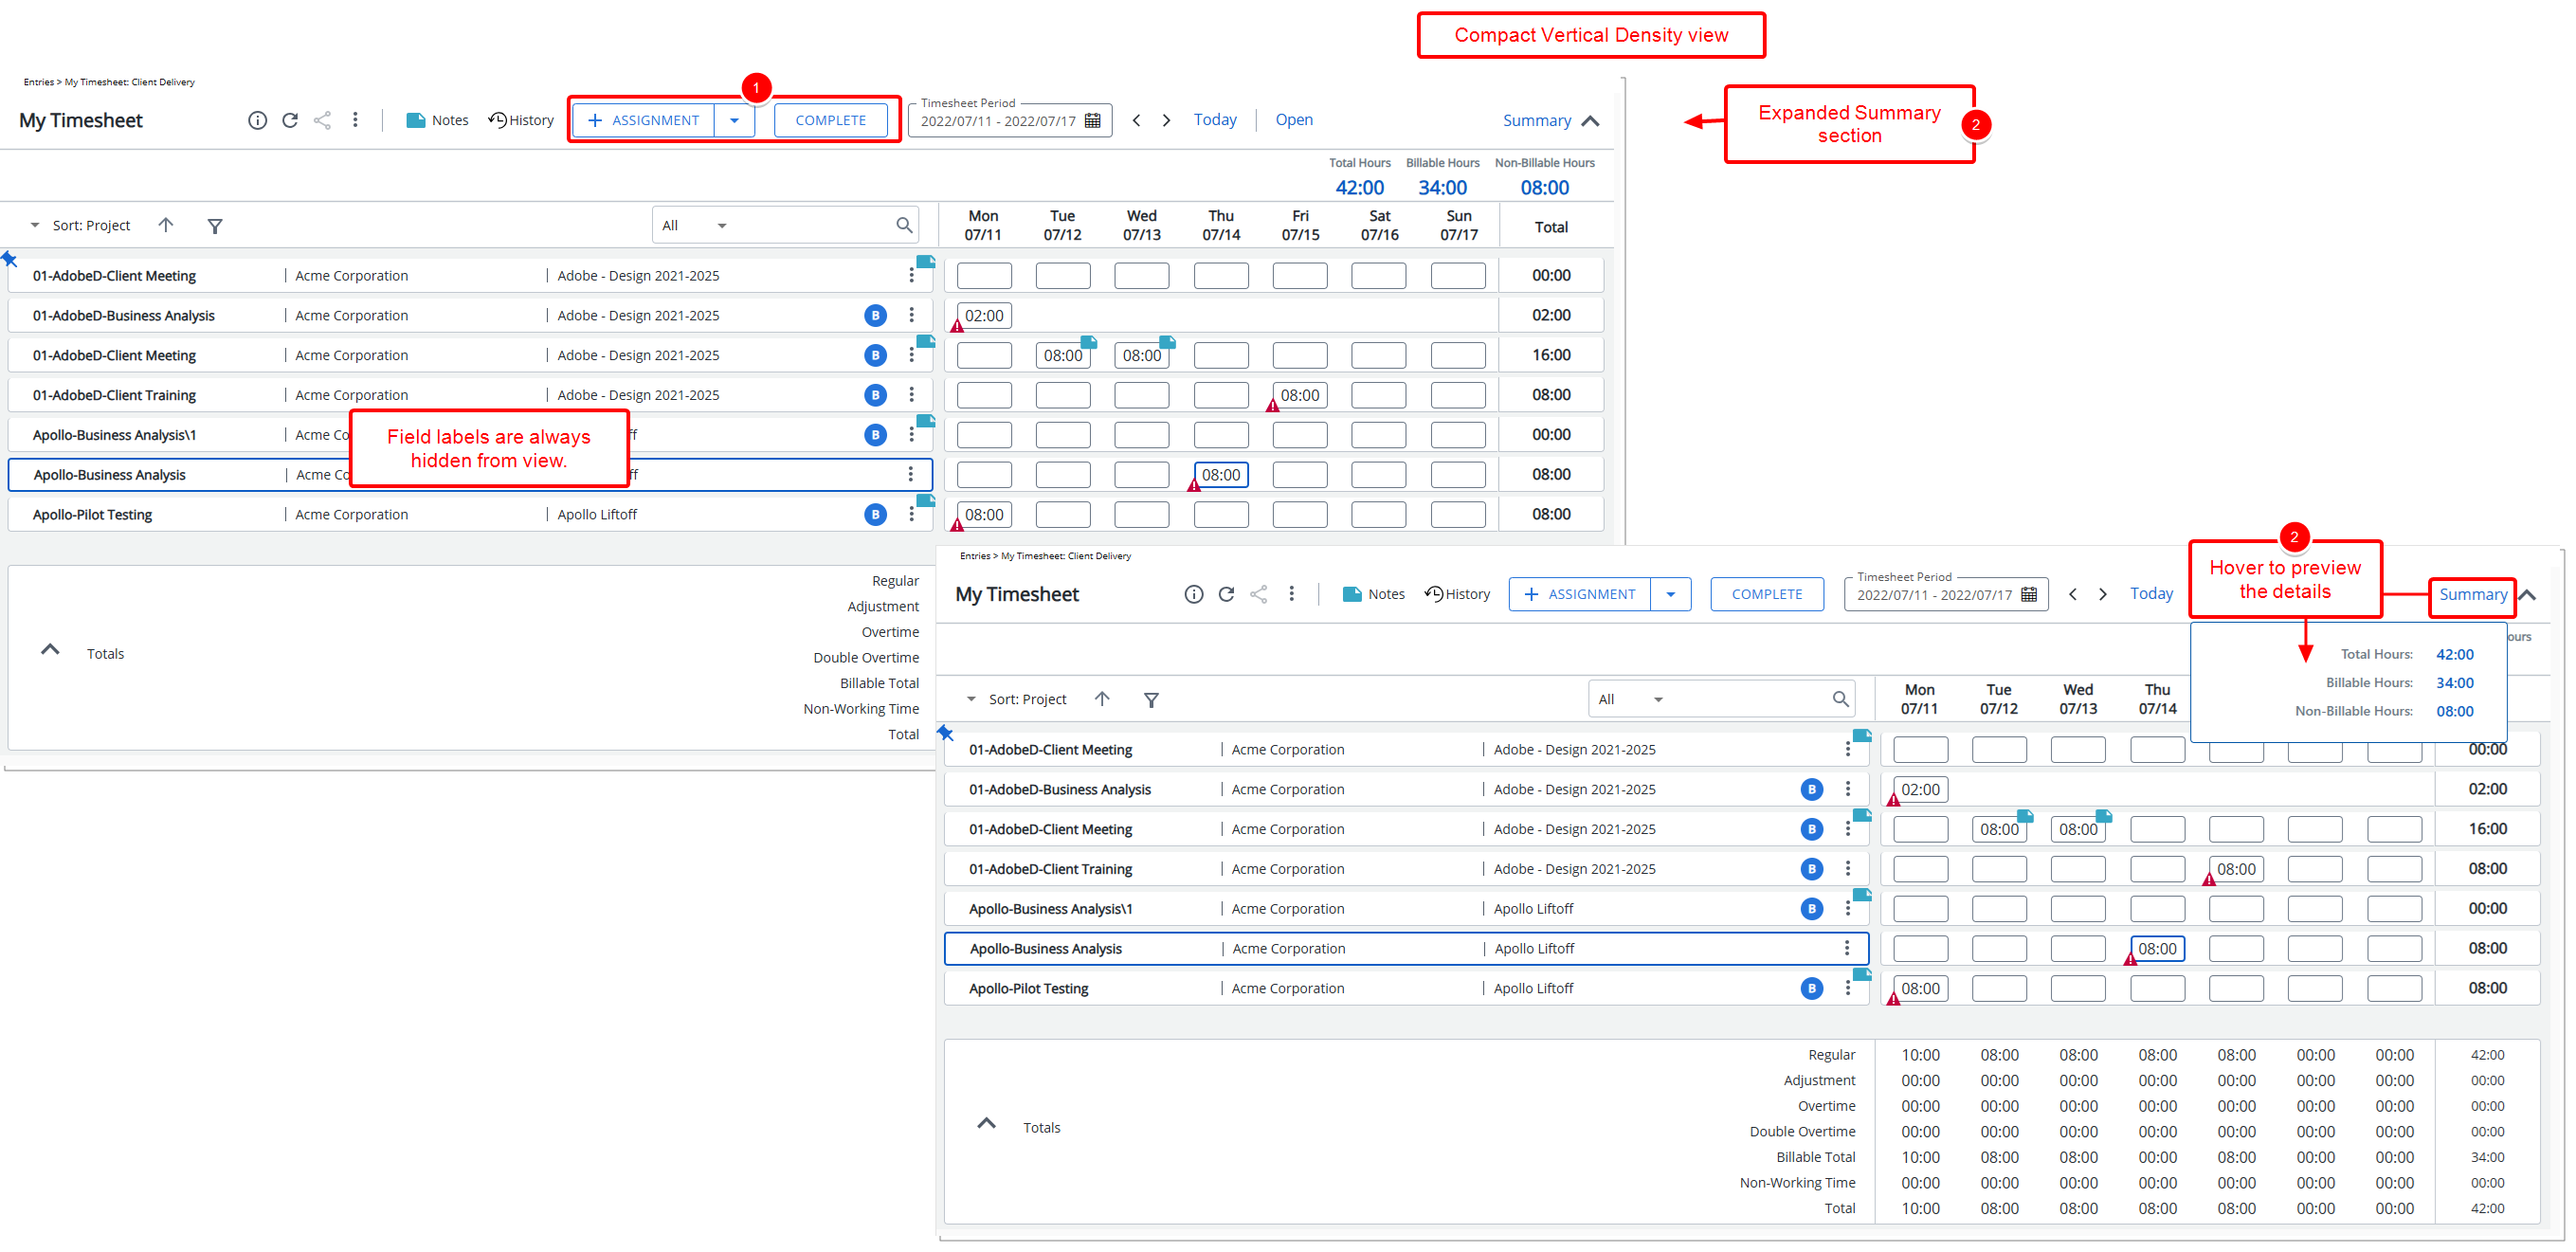
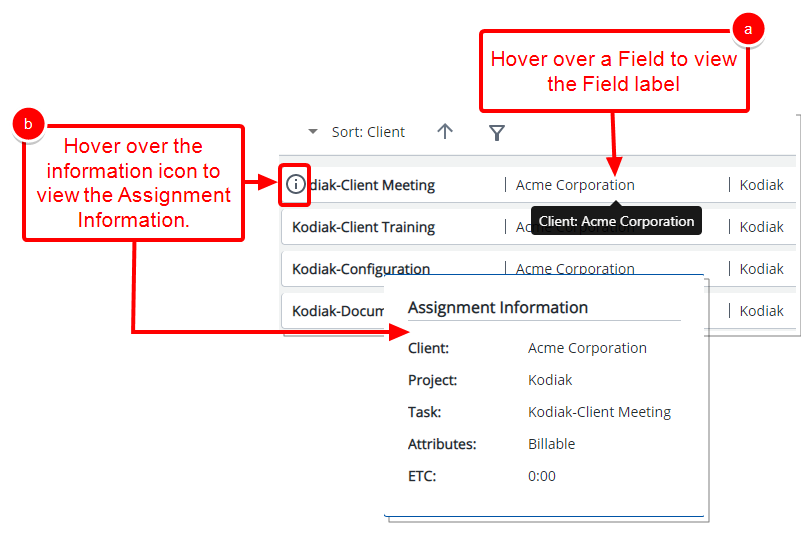
- The Field labels are always hidden. You can:
- Hover your mouse over a Field to view the tooltip displaying the Field label.
- An information icon is displayed upon hovering over an Assignment. Move your mouse over this icon to view the Assignment Information.
Horizontal Density
The Horizontal Density is available only for non-weekly Timesheet Templates.
This Density setting reduces some of the white space. You can choose Compact Horizontal Density to further reduce the white space.
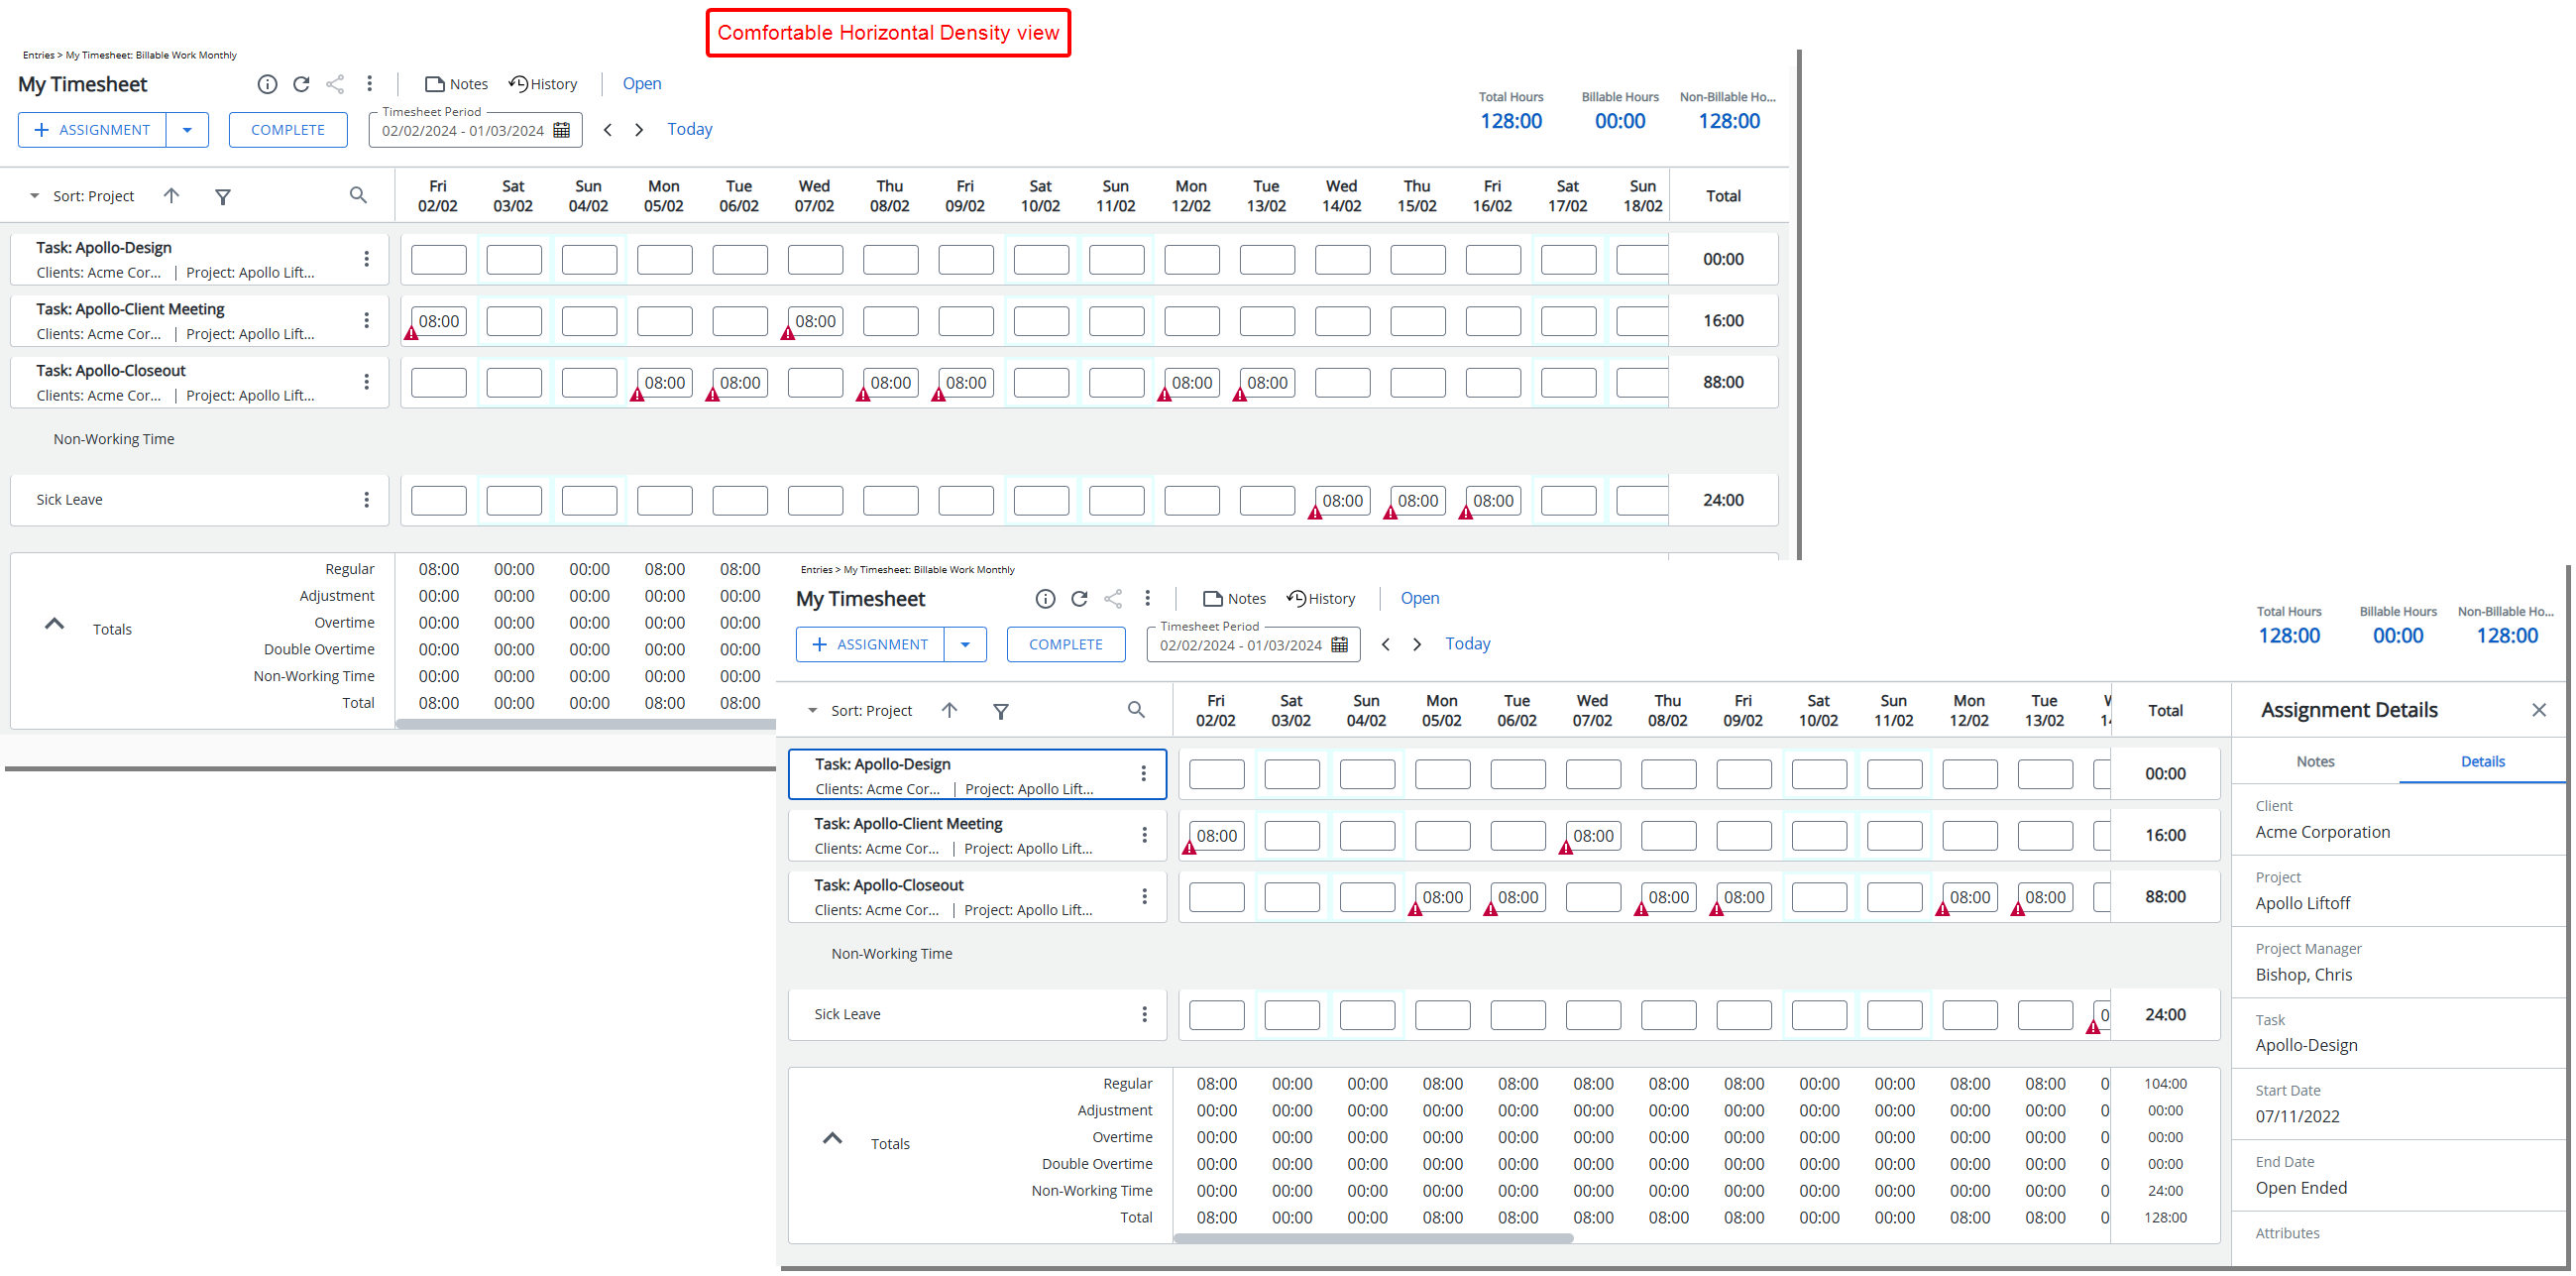
By default, the Compact setting is selected for a Monthly Timesheet Template. This Density setting reduces the white space considerably and provides an overall condensed view for non-weekly Timesheet Templates. Allowing you to view the entire month on your screen, eliminating the need for tedious scrolling or zooming.
Note that the font size within the right panel has been specifically adjusted to better align with the Compact Horizontal Density view view, resulting in a more cohesive and visually consistent look and feel across the entire page.

Note: The Timesheet view does not shift past the selected day when opening the right panel such as the Notes panel. This keeps the day you are working on in view, making it easier to enter or edit Notes without losing track of your selected date.