The Timesheet Notes dialog box can be accessed from the new My Timesheet by clicking the Notes button.
From the Timesheet Notes dialog box, you can navigate through the following tabs to view the corresponding Notes: Timesheet, Tasks, Assignments, Time Entries and All. A counter displayed against the tabs indicates the number of available Notes.
This article details:
- How to access the Timesheet Notes dialog box
- How to create a Timesheet Note
- Available options from each tab allowing you to mane Notes
Note: To allow Users access to the new and improved My Timesheet in your Sandbox/Implementation/production environments, you must add them to the New Timesheet list. For further details refer to Adding users to the New Timesheet list. If you prefer, you can choose to enforce the use of New Timesheet for all Users at the global level.
Accessing Timesheet Notes
- From the Icon Bar click Entries
 .
. - From the Navigation Menu click My Timesheet.
Tip: You can access your timesheet through different avenues, which are further detailed in Accessing My Timesheet.
- Navigate to the Period you wish to copy from by following one of these steps:
- Click the Calendar button and select the appropriate period.
- Click the Next/Previous buttons to navigate to next/previous Period.
- Click Today to navigate to current Period.

- Click the
 /
/ button to access the Notes dialog box where you can manage Timesheet & Time Entry notes. Other available Note types can only be viewed.
Note: A solid blue note icon (
) is displayed instead of a grey () one to visually indicate the presence of Note(s).
Creating a Timesheet Note
- From the Notes dialog box navigate to the Timesheet tab.
- Click + ADD.
- A new inline editing line item will be available to you where you can:
- Enter the Note in the Note box.
- Select the Note Type.

- Click Save
 .
. - Upon saving your note will be displayed within the Timesheet tab. Refer to Timesheet tab section below for further details.

Note: Long notes are wrapped within the Note column. By default, the first 3 lines of text are displayed. When a Note is saved, you can click the Show More/Show Less links to view more/less lines.
Available options from the Notes dialog box
From the Timesheet Notes dialog box, you can navigate through the following tabs to view the corresponding Notes: Timesheet, Tasks, Assignments, Time Entries and All. A counter displayed against the tabs indicates the number of available Notes.
The lists can be exported to Excel through the Export button located within each corresponding tab.
Timesheet and Time Entry Notes can be managed from their respective tabs however, other available Note types can only be viewed.
Note:
- Long notes are wrapped within the Note column. By default, only the first three lines of text are displayed. Select Show More to expand the note and view additional lines, or Show Less to collapse it.
- Hovering over the Note reveals the full content in a tooltip.
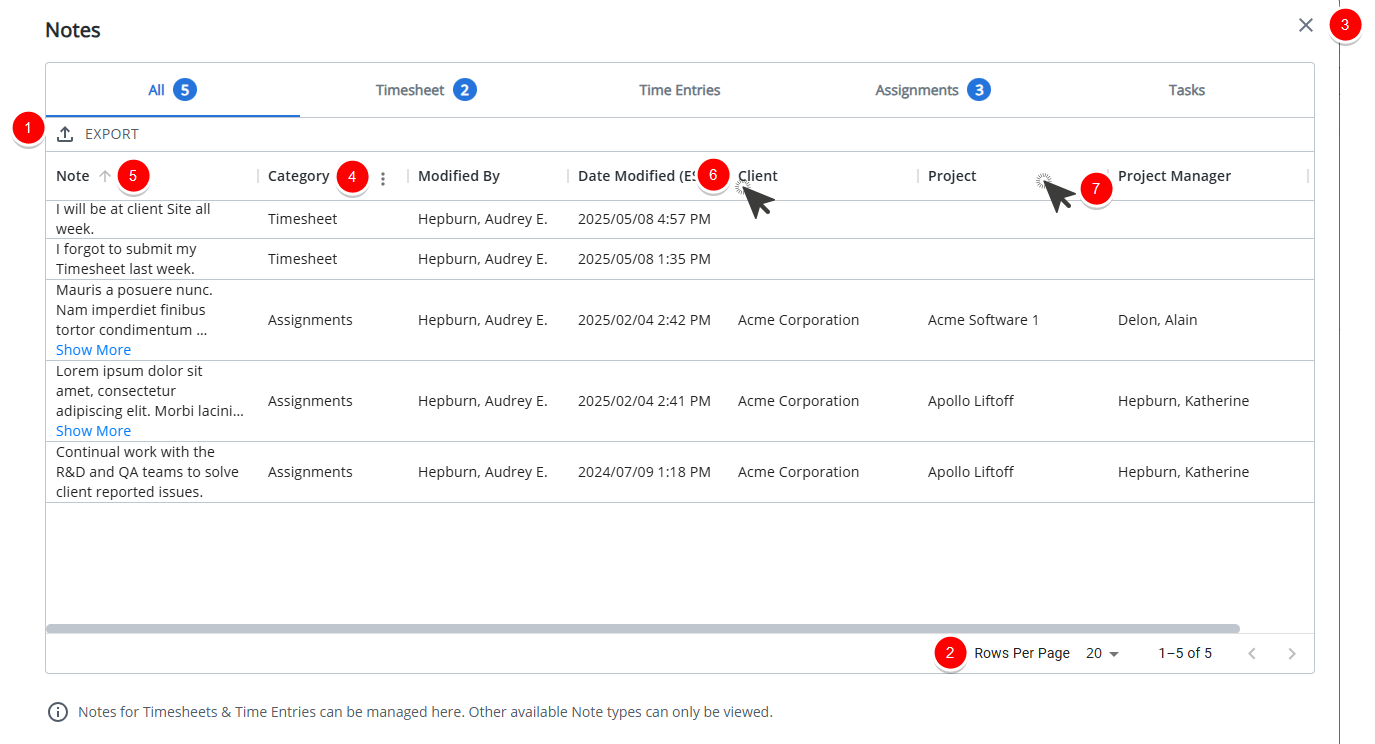
From the All tab you can:
- Export the list to Excel
- From the pagination, you can select the number of Notes to display per page (5, 10 or 20) and click the Previous and Next buttons to navigate though the available pages.
- Click Close
 to close the dialog box and return to My Timesheet.
 - From the column menu you can:
- Choose to apply a Filter based on Note, Day, Start Time, End Time, Hours, Category, Modified By, Date Modified, Task, Client, Project, Project Manager and Note type.
- Add or remove columns from the table. By default the following columns are displayed: Note, Category, Modified By, Date Modified, Client, Project and Project Manager
You can choose to add the following columns to the table: Day, Start Time, End Time, Hours and Task.Note: Long notes are wrapped within the Note column. By default, the first 3 lines of text are displayed. You can click the Show More/Show less links to view more/less lines.
- Select to display the information in ascending or descending order.
- To adjust a column width, simply move a column boundary to the desired width.
- To rearrange column positions, simply drag and drop a column in it's new position.
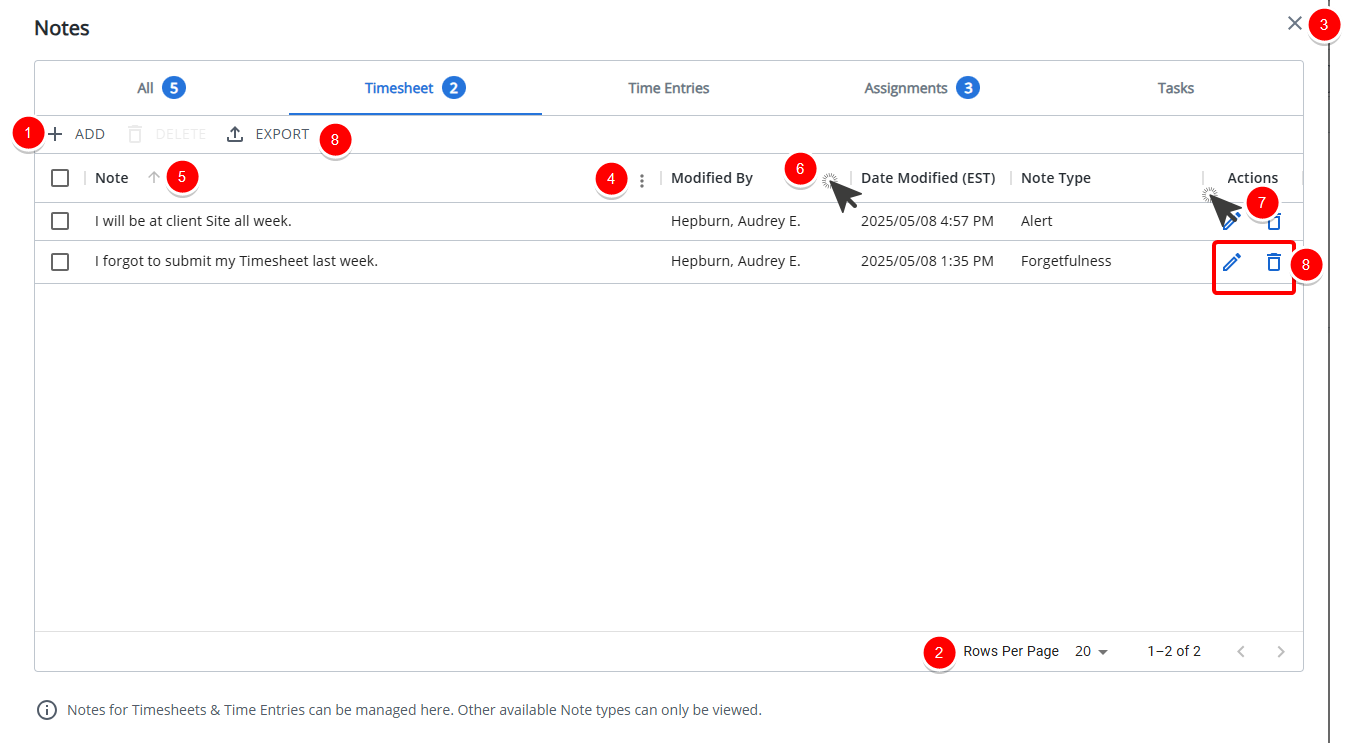
- Click +ADD to add a new Note
- From the pagination, you can select the number of Notes to display per page (5, 10 or 20) and click the Previous and Next buttons to navigate though the available pages.
- Click Close to close the dialog box and return to My Timesheet.
- From the column menu you can:
- Choose to apply a Filter based on Note, Day, Start Time, End Time, Hours, Category, Modified By, Date Modified, Task, Client, Project, Project Manager and Note type.
- Add or remove columns from the table. By default the following columns are displayed: Note, Modified By, Date Modified, Note Type and Actions.
You can choose to add the following columns to the table: Day, Start Time, End Time, End Time, Hours, Category, Task, Client, Project and Project Manager.Note: Long notes are wrapped within the Note column. By default, the first 3 lines of text are displayed. When a Note is saved, you can click the Show More/Show less links to view more/less lines.
- Select to display the information in ascending or descending order.
- To adjust a column width, simply move a column boundary to the desired width.
- To rearrange column positions, simply drag and drop a column in it's new position.
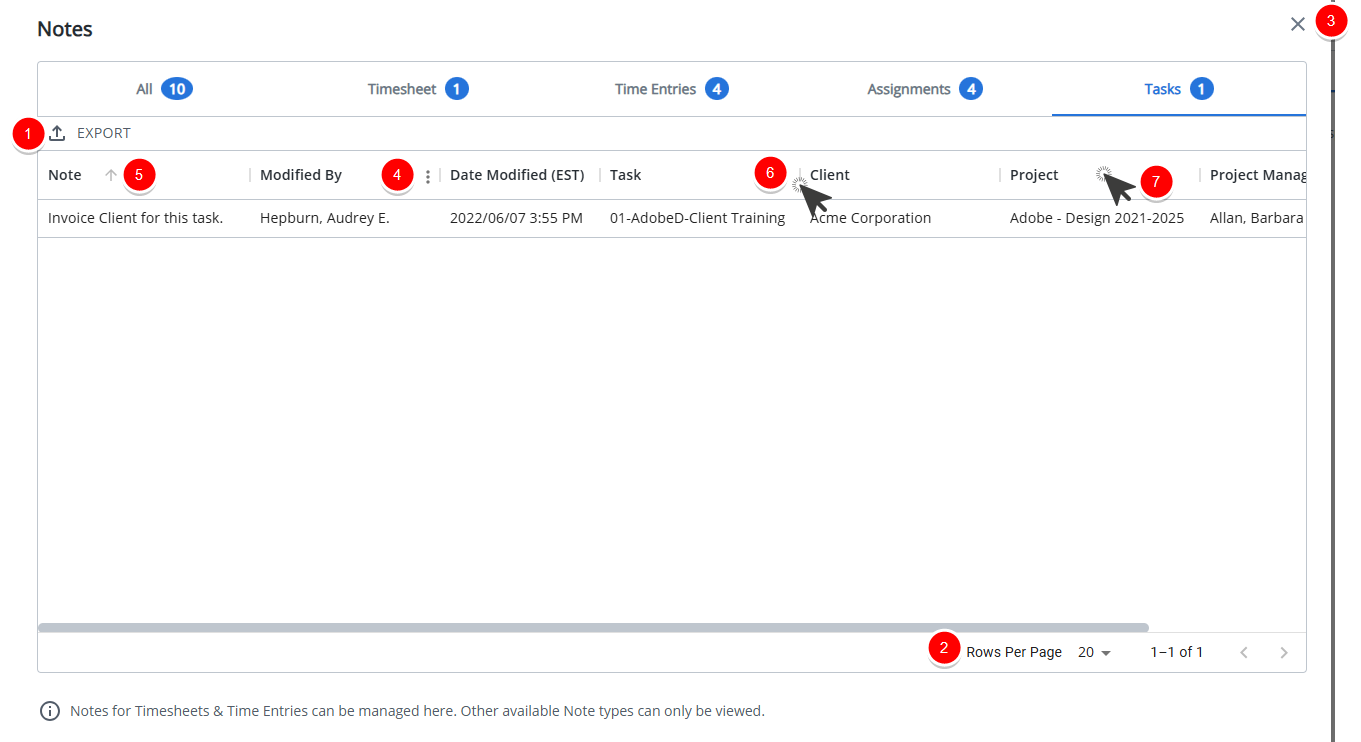
- Export the list to Excel
- From the Actions column you can:
- Click Edit to enable inline editing and modify the Note.
- Click Delete to remove the Time Entry Note.
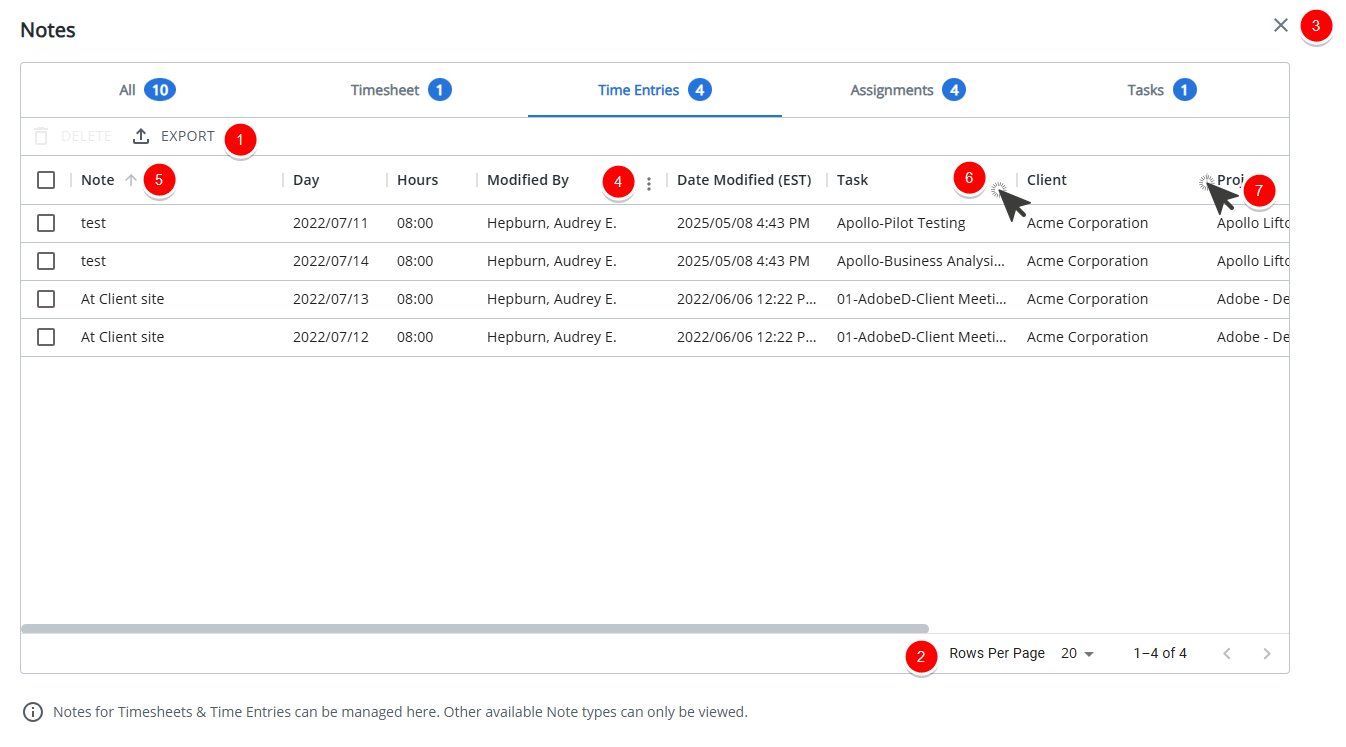
- Export the list to Excel
- From the pagination, you can select the number of Notes to display per page (5, 10 or 20) and click the Previous and Next buttons to navigate though the available pages.
- Click Close to close the dialog box and return to My Timesheet.
- From the column menu you can:
- Choose to apply a Filter based on Note, Day, Start Time, End Time, Hours, Category, Modified By, Date Modified, Task, Client, Project, Project Manager and Note type.
- Add or remove columns from the table. By default the following columns are displayed: Note, Day, Hours, Modified By, Date Modified, Task, Client, Project, Project Manager, Note Type and Actions.
You can choose to add the following columns to the table: Start Time, End Time and Category.Note: Long notes are wrapped within the Note column. By default, the first 3 lines of text are displayed. You can click the Show More/Show less links to view more/less lines.
- Select to display the information in ascending or descending order.
- To adjust a column width, simply move a column boundary to the desired width.
- To rearrange column positions, simply drag and drop a column in it's new position.
- From the Actions column you can:
- Click Edit to enable inline editing and modify the Note.
- Click Delete to remove the Time Entry Note.
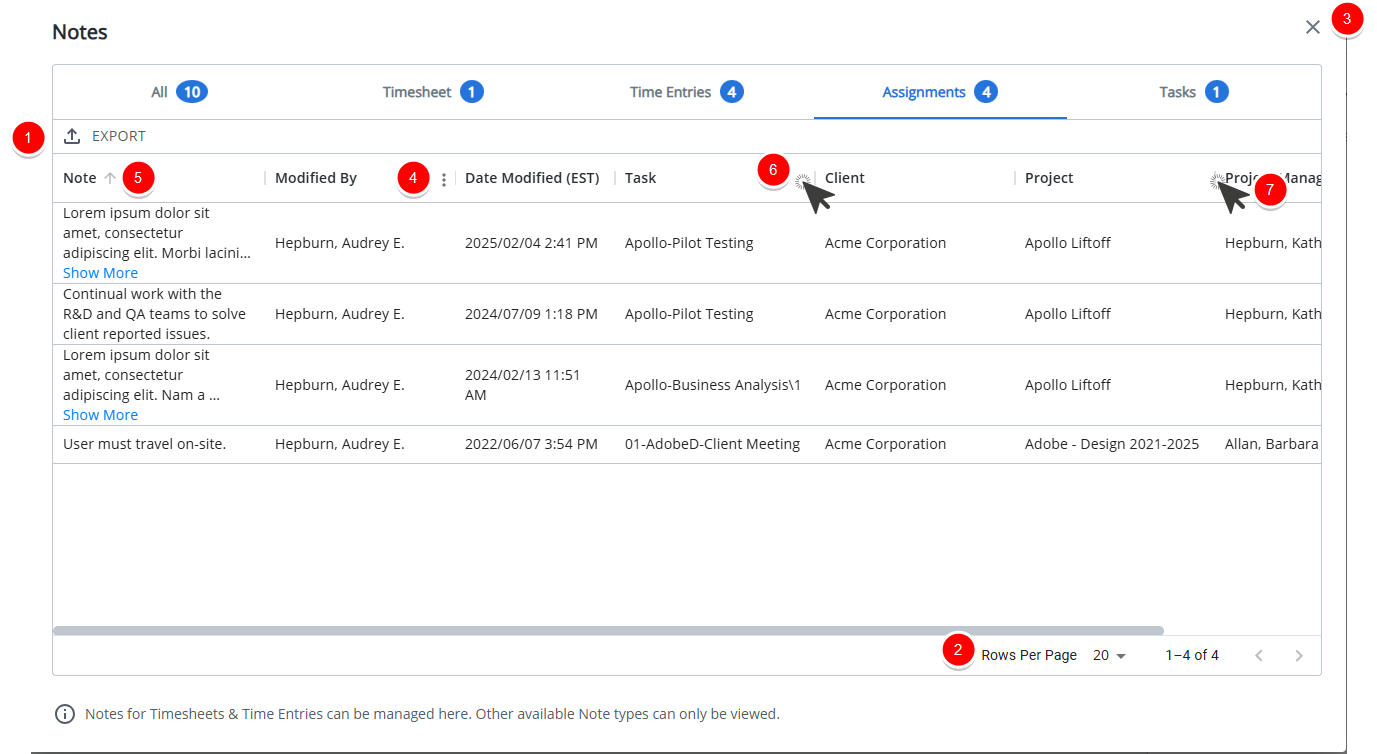
- Export the list to Excel
- From the pagination, you can select the number of Notes to display per page (5, 10 or 20) and click the Previous and Next buttons to navigate though the available pages.
- Click Close to close the dialog box and return to My Timesheet.
- From the column menu you can:
- Choose to apply a Filter based on Note, Day, Start Time, End Time, Hours, Category ,Modified By, Date Modified, Task, Client, Project, Project Manager and Note type.
- Add or remove columns from the table. By default the following columns are displayed: Note, Modified By, Date Modified, Task, Client, Project, Project Manager and Note Type.
You can choose to add the following columns to the table: Day, Start Time, End Time, Hours and Category.Note: Long notes are wrapped within the Note column. By default, the first 3 lines of text are displayed. You can click the Show More/Show less links to view more/less lines.
- Select to display the information in ascending or descending order.
- To adjust a column width, simply move a column boundary to the desired width.
- To rearrange column positions, simply drag and drop a column in it's new position.