Using Microsoft templates with your Upland Qvidian content
Templates, also known as style templates, are Microsoft Word and PowerPoint template files (.dot, .dotx, .pot, or .potx) containing a collection of text, layout, or theme styles. In Word, the template includes styles that control the format on the text areas of the document, such as headings, body text, bullet points, captions, and section numbering. Word style templates do not include headers and footers. In PowerPoint, the template controls the layout of the slides and the theme, which may include coordinating colors, fonts, effects, graphics and tables. When a user builds a document or slide presentation in Upland Qvidian, the content the user selects is assembled and formatted to the formatting instructions contained in the style template that the user selects.
Primary reasons for using templates include:
- Ensuring consistent formatting across all of the content in your library to maintain branding standards.
- Preventing your formatting from being removed or modified by the Word default template (Normal.dot).
- The option to quickly change the look of your content as needed. For example, different divisions of an organization, documents intended for different vertical markets, or changes resulting from rebranding.
Each style of text or slide layout has a specific style name that is stored with the content in your Upland Qvidian library. Word and PowerPoint templates are uploaded to Upland Qvidian to create documents using the template’s formatting. Templates are managed under Architecture > Templates.
Note: This topic contains instructions on creating and working with Microsoft Word and PowerPoint styles and templates that are based on information on the Microsoft support website. For more information, visit the Microsoft support website at: https://support.microsoft.com.
Note: For more information on downloading Microsoft Word and PowerPoint templates directly from the Library, see Download Microsoft Word and PowerPoint templates.
Word templates
All Word documents are based on a template that is a collection of styles. The default Word template is Normal.dot. A style is a collection of formatting properties. Common formatting properties include font color, size, indentation, and spacing. All text has an assigned style. Common styles include headings, subheadings, paragraph texts and lists. By default, most text is in Normal style. Applying a style to a word or paragraph of text applies all of your desired formatting with one click. You can create new custom styles with any style name you choose. If you use the same style names across all of your templates, you can quickly change the look of your document just by associating it with a new template. As long as the style names match, Word will recognize it and apply the formatting of that style to the piece of content when you associate the template with the file. To view all styles, click the Styles Dialog Box Launcher at the corner of the Styles group on the Home tab.
Note: When an RFP Project is created with a Project Style Template that uses a default style and an answer is added to a Word RFP using MS Word or MS Online, the default style will be applied to the answer. If an answer is added to a Word RFP using inline edit, the HTML will mimic the formatting of the default style.

Example of a style gallery in the Styles group on the Home tab in Word. Note the with the Style Dialog Launcher on the bottom right.
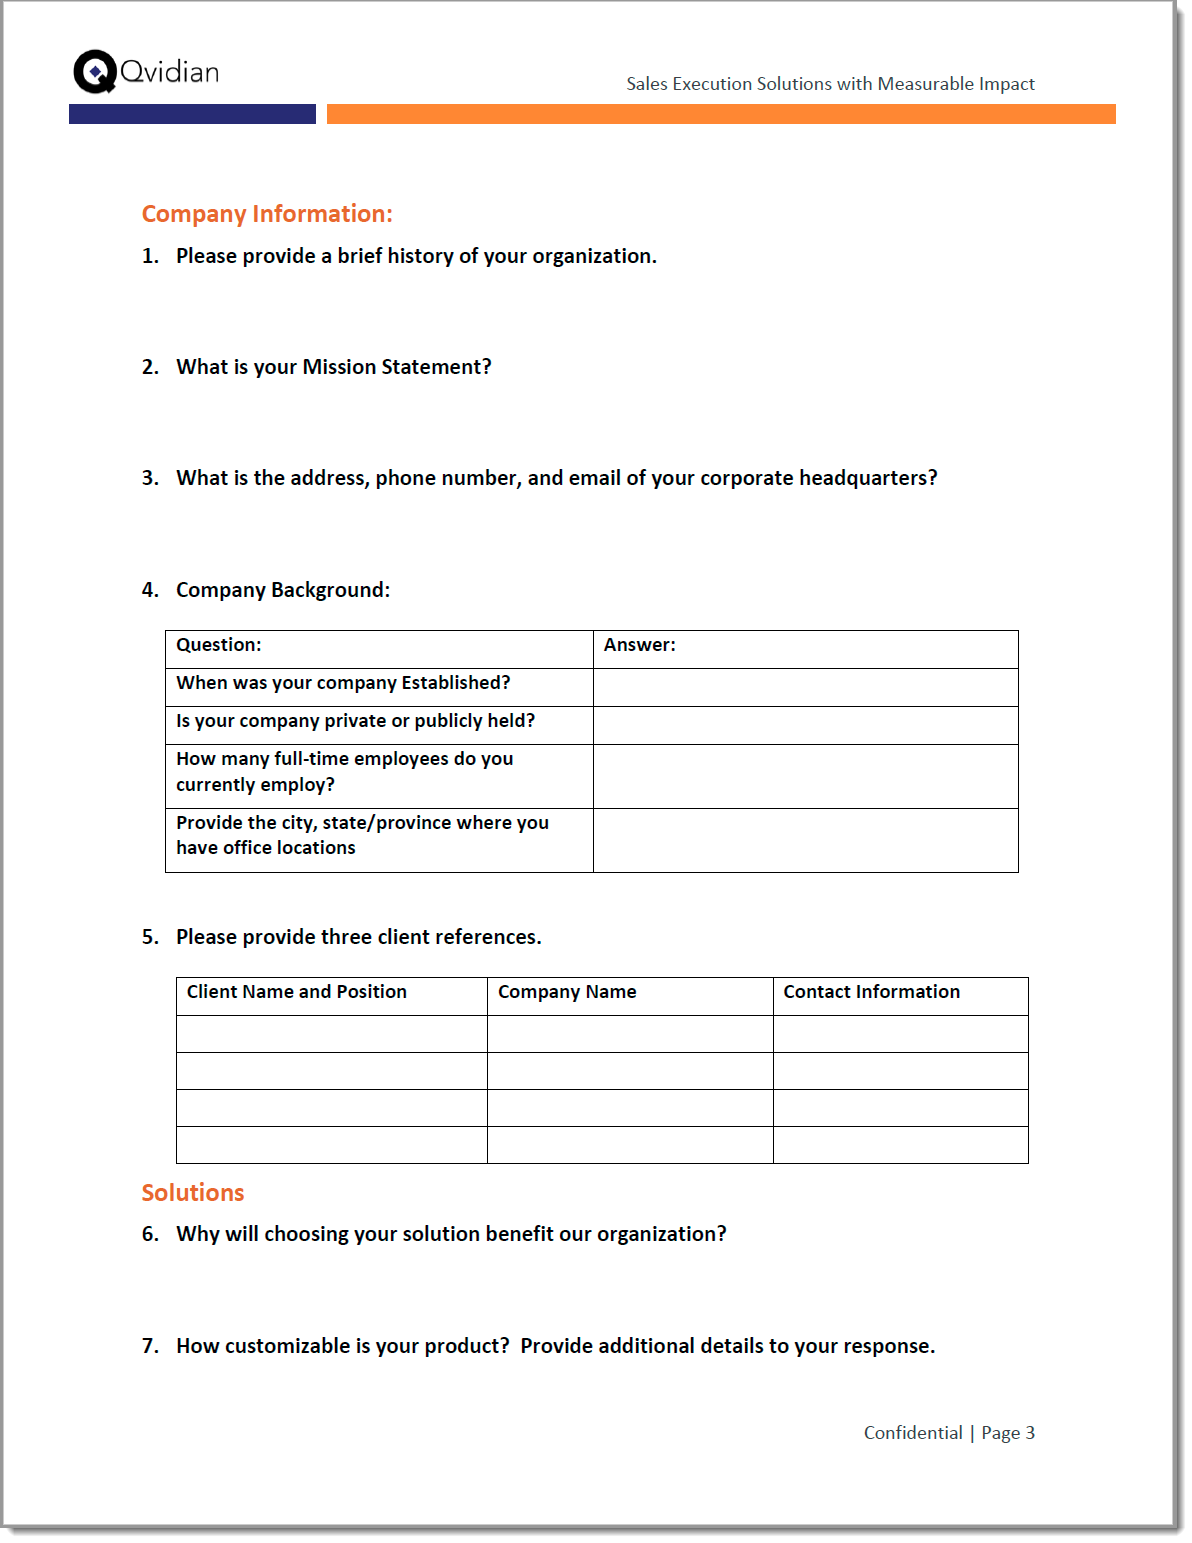

Examples of an RFP page with different templates applied.
Note: If you use custom fonts, you can add them to your Word template as you would a standard font. When you preview your content from within Upland Qvidian the custom fonts may not display, because the custom fonts do not exist on the Upland Qvidian servers. Once you have downloaded the Word or PDF on your computer, you will need to save your built document as a PDF file. This PDF file will show your custom fonts.
Word template best practices
- Do not base your styles on any of the default styles in Normal.dot, because Microsoft styles can be different on different computers. You should base custom styles on No Style. The best approach is to create base styles, such as Heading Style, and Text Style, that are based on No Style, then base the rest of your styles on those parent styles as appropriate. For example, create sub-headings based on Heading Style and body text, bullets, and table text on Text Style.
- You can use the same style names in different templates. As long as the style names match, Word recognizes the style name and applies the formatting of that style to the piece of content. Therefore, you can use any number of different templates with the same content to produce documents with different formatting.
- Use the Paragraph > Spacing settings on your styles to ensure correct and consistent spacing between paragraphs of text and bullet points, and between headings and main body text. Try not to use carriage returns, created by pressing the Enter key, to add blank lines and spacing.
- We recommend that you do not enable the Automatically update document styles option, which automatically updates the styles in the document to those in the template that is attached to it. To verify the check box is clear, click the Word Add-in button on the Developer tab, in the Add-ins group. The Templates and Add-ins dialog box will display. If you do not have the Developer tab, you can add it by going to File > Options > Customize Ribbon.
If you create a custom character style, and choose only the formatting attribute you want, the character style will remain, but be aware Microsoft Word character and linked styles are often applied inconsistently by people formatting content and can sometimes result in inconsistent or unexpected formatting in content built in a Qvidian project. If there are multiple individuals working in a template, we recommend only using paragraph styles to avoid this potential confusion. If you have used linked or character styles in the past and would like to remove them from your content, you can follow this process:
- Update your existing Style Template.
- Check out your template from the Templates page.
- Create a new paragraph style to take the place of the old linked style. Ensure that the new style has a different name.
- Delete the old character and/or linked styles.
- Upload your revised template to the Templates page.
- Apply the new template to content.
- From the Library, select the content record(s) you wish to update.
- Right-click the desired content record(s) and select Apply Template. You can update multiple records at once time.
- Apply the new style to existing content.
- Edit your content and apply the new non-linked style as needed.
- Once the new style is applied, delete the old linked/character style so that it no longer exists in the content and isn't used by mistake in the future.
- Repeat for all content (not just content that is using linked/character styles) because the linked/character style existed in the template that was applied to the content originally and must be deleted from the content files.
Tips and tricks
- You can print out a list of all the styles in your template along with their properties by going to File > Print, and, under Settings, selecting Styles from the first drop-down menu.
- To generate random text for testing the appearance of a style, type =rand(3) and press Enter to give your paragraphs of random text, where the number in parenthesis is the number of paragraphs.
- You can replace styles using Find and Replace:
- From the Editing ribbon on the Home tab, click Replace.
- Click in the Find what box, clear the field, then in the Replace section, select Style from the Format drop-down menu. A pop-up window listing all styles displays.
- Select a style from the pop-up window, and then click OK.
- Repeat tasks 2 & 3 for the Replace with box.
- Click Replace to replace one instance or Replace All to replace all instances.
- You can see which text is using a specific style, by right-clicking the style in the Styles gallery and then selecting Select N Instances, where N is the number of times the style has been used on a chunk of text. All text using this style is highlighted.
- You can use Draft view to see which styles are applied to all text. To switch to draft view, on the View tab, click Draft.
- There are many more creative ways you can use styles than we have mentioned here, including to set page breaks and build your table of contents. We recommend going to the Microsoft support website at: https://support.microsoft.com to learn more.
- You can set the proofing language to a template's default language on build. When users build a project, the proofing language can be automatically set to
the same language as the default proofing language of its template. Especially when working in
an environment that contains templates based in multiple languages, or multiple versions of the
same language (e.g., UK, US, and Canadian English), this setting helps users review
spelling errors more easily in the language they expect. To enable:
- Enable the "SetProofingLanguage" Global settings. This setting is disabled by default.
- Define your proofing language in Microsoft Word.
- Go to Review > Language > Set Proofing Language and select the desired proofing language.
- Click "Set as default" to set the desired proofing language as the default.
If you do not have a template, you can save a blank template and then edit it to create your own. Once you have updated the template and saved it on your computer, you can upload the template in Upland Qvidian in the template’s properties dialog box.
- Open a new blank Word document.
- Click File, Save As, and then This PC.
- Enter a name for your template and then save it as either a Word Template (.dotx) or Word Macro-Enabled Template (.dotm).
-
Click Save. By default, templates are stored in the Custom Office Templates folder in My Documents.
Note: If you cannot find your template in the Custom Office Templates folder, you can verify where it is stored by opening Word and then going to File > Options > Save > Save documents.
- Open a Word template. If you are editing a template that already exists in Upland Qvidian, go to Architecture > Templates, double-click the template name, and then click Edit to download an existing template.
- On the Home tab, in the Styles group, click the Styles dialog box launcher.
- Scroll to the style you wish to modify, select it and then select Modify from the drop-down menu. The Modify Style dialog box displays.
- Edit the available fields or click the Format button at the bottom of the dialog box to open additional dialog boxes for all of the formatting options available to you in Word, including:
- Font: Font name, size, color, justification, character formatting (dropped caps, sub/superscript), and character spacing (condensed/expanded).
- Paragraph: Paragraph spacing, alignment, indents, tab stops, the Outline Level for headings (so they appear in your Table of Contents) plus the “Keep with next” and “Page break before” settings so that headings appear with the text to which they belong.
- Border: Borders and shading for creating graphical headings, dynamic tables, or for simple call- out boxes.
- Frame: Call-out boxes for quotations, mini case -studies, and section summaries.
- Numbering: A dedicated style for numbered headings, lists or bullet points with your own choice of bullet characters.
- Click Save.
- Open a Word template. If you are editing a template that already exists in Upland Qvidian, go to Architecture > Templates, double-click the template name, and then click Edit to download an existing template.
- On the Home tab, in the Styles group, click the Styles Dialog Box Launcher.
- Click Create a Style. The Create New Style from Formatting dialog box displays.
- Enter a name for the style, and then use the drop-down menus to select the settings below or leave them as is to keep them the same as the style on which it was based.
- Style Type: Select paragraph or character to set how the style is applied to text, either to an entire paragraph or a selected word or highlighted text.
- Style Based on: Select the style on which you would like to base the new style. We recommend you base it on No Style.
- Styles for the following paragraph: Select the style you would like to apply to the paragraph following the one to which you have applied this style. This is commonly used in header styles to automatically apply a subheading style to the next line after a header.
Note: When naming styles, we recommend prepending the name with / or * to keep the style names consistent. This will keep your styles at the top of the list and help differentiate your custom style from the Microsoft default styles.
- Edit the Formatting fields or click the Format button at the bottom of the dialog box to open additional dialog boxes for all of the formatting options available to you in Word, including:
- Font: Font name, size, color, justification, character formatting, and character spacing.
- Paragraph: Paragraph spacing, alignment, indents, tab stops, the Outline Level for headings that determines how they appear in your Table of Contents, and the Keep with next and Page break before settings that keep headings with the text to which they belong.
- Border: Borders and shading for creating graphical headings, dynamic tables, or for simple call- out boxes.
- Frame: Call-out boxes for quotations, mini case -studies, and section summaries.
- Numbering: A dedicated style for numbered headings, lists or bullet points with your own choice of bullet characters.
- Click Save.
Deleting a style will permanently remove it from your template. By default, the Normal style will be applied to all styles previously associated with the deleted style. You can remove it from the style gallery without deleting the style. See the Microsoft support website: https://support.microsoft.com for more on customizing your style gallery.
- On the Home tab, in the Styles group, click the Styles Dialog Box Launcher in the lower right corner. The Styles panel displays.
- Hover over the style you want to delete, select the arrow to the right of the style, and then select Delete X from the drop-down menu, where X is the style name.
Follow the tasks below to apply the styles from your template to your content
- Select the text to which you want to apply a style by doing one of the following:
- Click anywhere in a word or paragraph to apply it to that word or paragraph. The style will be applied to the word or paragraph based on the style's Style type setting. If it is set to Character, it will be applied to a single word or selected text; if it is Paragraph, it will apply the style to the paragraph in which cursor is placed.
Select and highlight the text. If the style's Style type setting is set to Character, it will be applied to highlighted text; if it is set to Paragraph, it will be applied to all paragraphs of which the highlighted text is a part.
Note: You can verify the Style type setting by right-clicking the style in the gallery and then selecting Modify. The Style Type is in the Properties area of the Modify Styles dialog box. Paragraph styles will also have a paragraph marker icon next to the style name in the style gallery.
-
On the Home tab, in the Styles group, click the style to apply. If you don't see the style you want, click the More button to expand the gallery.
You can apply a new Word template in Word with or without the Qvidian add-inn toolbars.
- To update one or more Word files without add-ins, do the following:
- In the library, select one or more Word records, right-click, and then select Apply Template from the Actions menu.
- Select the radio button next to the template name and then click Update template.
- To update one or more Word files with a new template from the Qvidian Single or Multi-Edit toolbars, click Tools, select Select Style Template or Select Style Template for All, select the template from the pop-up window, and then click Save.
PowerPoint templates
PowerPoint templates control the layouts, theme, fonts, effects, background, chart, table, and SmartArt styles. A slide layout is the format of a slide, including the placeholders and their positions. Placeholders control the position of items, such as text, tables, charts, and images. We recommend that you use text placeholders for content that has something unique or one off, and avoid the use of text boxes. Text boxes will remain where you locate them when a new layout is applied, but placeholders will move the text according to the new layout.
Each template should have one Slide Master. If you have more than one Slide Master, Upland Qvidian will only recognize the first one. You can create as many uniquely named layouts to go with your Slide Master as you have unique layouts in your slide content. Common layouts include those for titles, title and content, and pictures with a caption. Layout names should be consistent amongst all templates, to ensure the correct layouts are applied to each slide when you apply a new template.
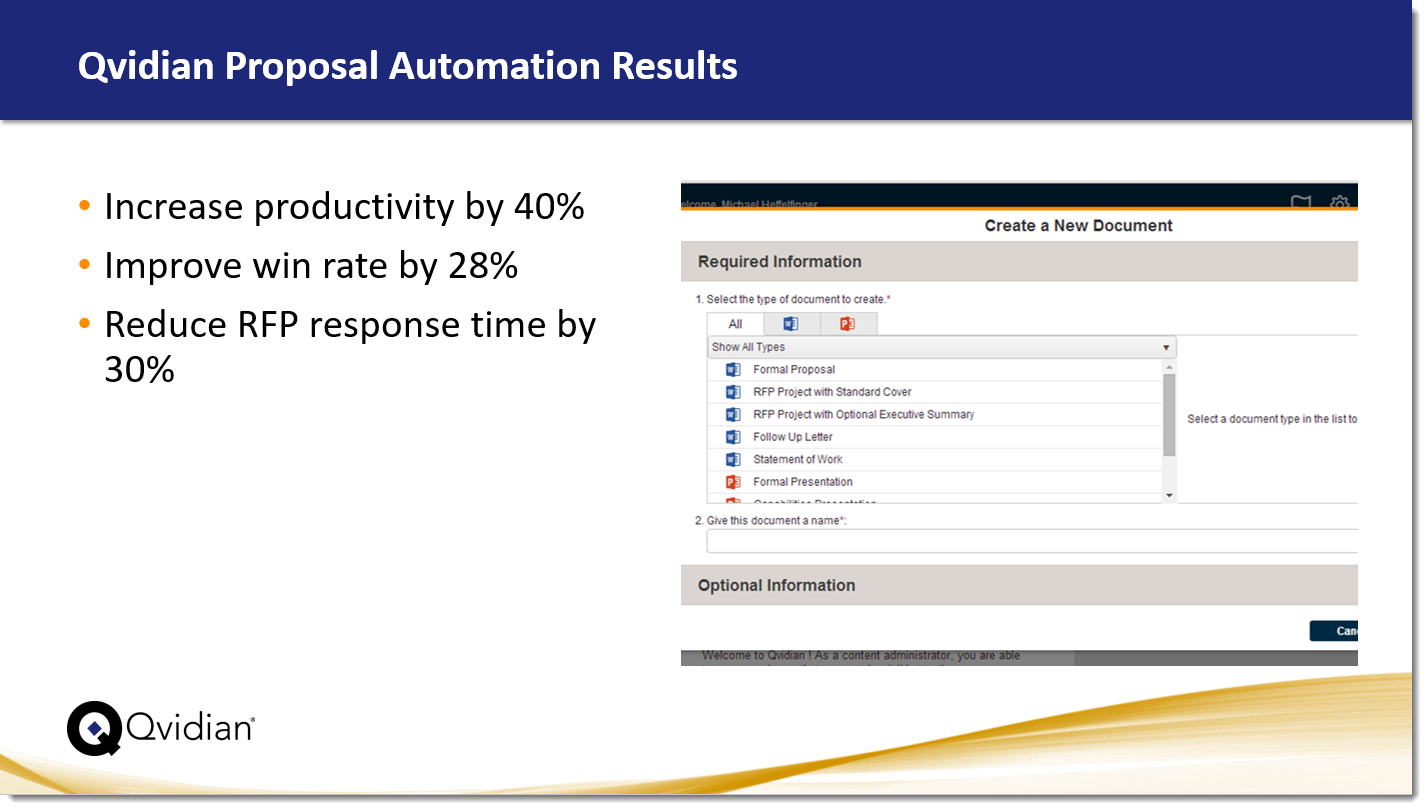
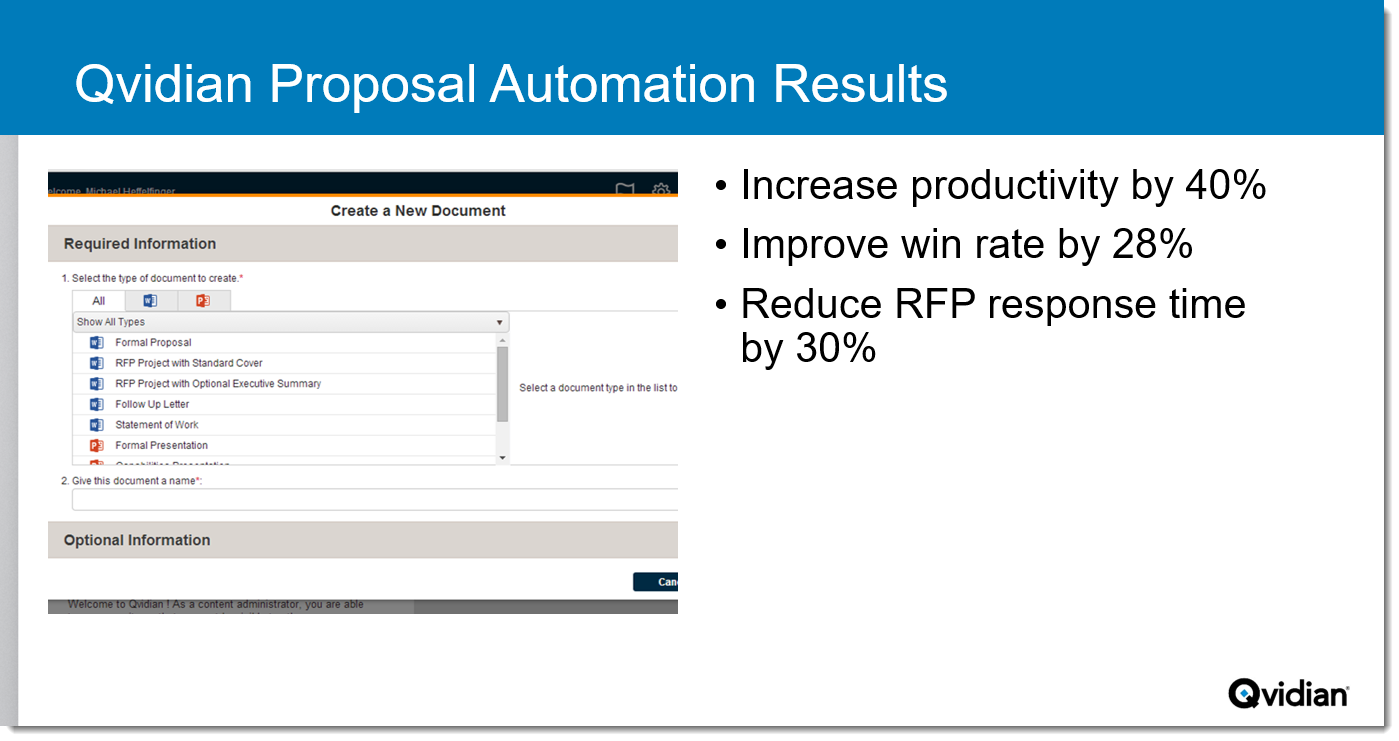
Examples of a slide with different templates applied. Click to enlarge.
Note: If you find the layout in your PowerPoint template is not being applied to your slides when you build your presentation, verify the EnforceSlideLayout global setting is turned on.
If you do not have a template, you can save a blank template and then edit it to create your own. Once you have updated the template and saved it on your computer, you can upload the template in Upland Qvidian in the template’s properties dialog box.
- Open a new blank PowerPoint presentation.
- Click File, Save As, and then This PC.
- Enter a name for your template and then save it as either a PowerPoint Template (.potx) or PowerPoint Macro-Enabled Template (.potm).
- Click Save. By default, the template is stored in the Custom Office Templates folder.
- Open a PowerPoint template. If you are editing a template that already exists in Upland Qvidian, go to Architecture > Templates, double-click the template name, and then click Edit to download the template.
- On the View tab, click Slide Master. The Slide Master slide displays at the top of the slide thumbnail list with its associated layouts beneath it.
- Edit the slide master or layouts, using the functions available on the Slide Master tab, including:
- Themes: Apply one of the Microsoft themes to add a predefined set of colors, fonts and effects.
- Fonts: Change the font type.
- Color: Add a predefined color scheme to your layouts or customize it to create your own.
- Effects: Add effects to SmartArt.
- Background: Add colors, patterns, or an image to the background.
- Insert placeholder: Add content and text boxes, images, SmartArt, tables and charts.
- Click Save.
You can apply a new PowerPoint template in Upland Qvidian.
- In the library, select one or more PowerPoint records, right-click, and then select Apply Template from the Actions menu.
- Select the radio button next to the template name and then click Update template.
Templates in Upland Qvidian
Each style of text has a specific style name that is stored with the text in your Upland Qvidian library. Style templates are uploaded to Upland Qvidian to create documents using a template’s formatting. Templates are managed under Architecture > Templates.For more information on managing your templates in Upland Qvidian, see Add, edit or delete a template.
You should apply styles or layouts included in your Upland Qvidian templates to all Word and PowerPoint content that you load into your Upland Qvidian Library. We recommend that you keep an up-to-date copy of your templates on your computer so that you can quickly create new documents for preparing content to upload to your Upland Qvidian library. Upland Qvidian does not add or update templates saved on your PC when a template is added or updated in Upland Qvidian. You must to download the new template.
Permissions
Once you have uploaded new templates to Upland Qvidian, you must make sure that the appropriate document types and users have the permission to use the new templates. This does not apply when modifying a template already uploaded to Upland Qvidian. To make a template available for use for a document or package, it must be enabled in the document type properties under Templates, by selecting the check boxes next to the template.
Users must also be granted permission to use the template when working with content. Administrators can grant a user or role the permission in the User Properties or Roles Properties dialog boxes, under Template permissions, by selecting the check box in the Enable column. This permission also controls which templates are available from the Qvidian toolbar in Word.