Project owners can build the package and download it.
Note: Data entry screen fields that have been designated by the document type architect as required, as indicated by a red asterisk, do not need to be complete to build a package.
Tip: To include a component in an Agenda Slide, select the checkbox beside the component name. It is recommended that you complete all other component areas of your project prior to completing the Agenda slide. Any project slide subsections will not appear in the Agenda slide until they have been completed.
Build the package
- Click the Build Package button in the project header. The "Build Package" page displays with the Customization tab open.
- Customization tab: Displays fields that correspond to merge codes included in the document content, some of which may be included on the data entry screen.
- Select one of the following options:
- Show All Custom Fields: Includes all unpopulated merge codes, those whose corresponding fields are left blank, in the package upon build. The unpopulated merge codes will display highlighted in yellow. We recommend that you use this option the first time you build the package, so that you can view all the merge codes in context in your package.
- Hide Empty Custom Fields: Removes all unpopulated merge codes from the package upon build.
Note: If you select Show All Custom Fields when building your package, the merge codes corresponding to the unpopulated fields on the Customization tab, will display in the built documents. The merge codes will be highlighted in yellow for easier identification.
Note: If you select Hide Empty Custom Fields during a build process, any merge code without an entry will be removed from the documents. You will not see any indication of where the merge code was in the package documents. You may want to use this option if you have built a package and entered data for the relevant merge codes yet have additional codes remaining that are no longer needed, such an additional address line.
- Enter values for the fields to replace corresponding merge codes in the file.
- Select one of the following options:
- Settings tab: Your settings will be saved for future builds.
- Select the Style Template with which you want the document content formatted. By default, the template that is currently applied displays.
- Choose the Build Format:
- Microsoft Word: The package will be built as a Word document (.docx). Any files with extensions other than .doc or .docx will build separately.
- Microsoft PowerPoint: The package will be built as a PowerPoint file (.pptx). The merge codes (excluding graphic merge codes and formatting codes) in the speaker notes will be replaced in the build file.
- Adobe PDF: The package will be built as a PDF (.pdf). Any files with extensions other than .pdf will build separately.
- Select the Perform in the background and email when my file is ready checkbox to receive an email with a link to the package when it is built.
- See Packages below for more information on the Packages tab.
- Click Build to build the package (up to 1GB in size). The package progress displays on the Packages tab.
Note: You may also build a package by clicking Finish & Build. When all actions are completed, the "Next" button changes to "Save and Build," promoting you to build the project. For more information on project navigation, see Projects .
Note: Any required fields that must be completed in order to build will be identified with an asterisk*.
Note: Depending on the how the “ProjectBuildButtonMode” Global settings is configured, your Project may or may not be built. This setting allows administrators to set the enforcement level of Architecture requirements by choosing whether to allow a Project to be built when there are incomplete subsections or workflows. When the setting value equals “0”, a Project build will occur even if incomplete subsections or workflows exist; a build is only prevented if the required merge codes are not complete. This is the default and how Project builds previously behaved. When the value equals “1”, a dialog appears informing the user that incomplete subsections or workflows exist in the Project, but still allows them to proceed with the build. If the value equals “2”, the user is prevented from performing a Project build if anything is incomplete. If the value equals "3", the Project build is prevented if any optional merge codes (including found merge codes on Build Package > Customization) are incomplete.
Caution: If the “PreventBuildWithDisabledDocType” Global settings is turned on, the build will be prevented if the previously created Project contains a Doc Type that is now disabled. The "Build" button will be grayed out and the following hover text will appear: “Build is not available when the Document Type is disabled.” This setting is disabled by default.
Packages
When a package is built, the build is recorded on the Packages tab in the Build Package page, along with the details on when the package was submitted, started and finished, the document type and the user who ran the build.
- Click the Expand and Collapse icons to show and/or hide information about the built package.
- To download a package document, click the Download
 icon.
icon. - To delete a package or any documents within the package, click the Delete
 icon
icon - To upload a package to Salesforce, click the Upload icon, and then click OK. The package and any accompanying files will be saved in the associated account under Notes & Attachments on the Accounts and Opportunity pages.
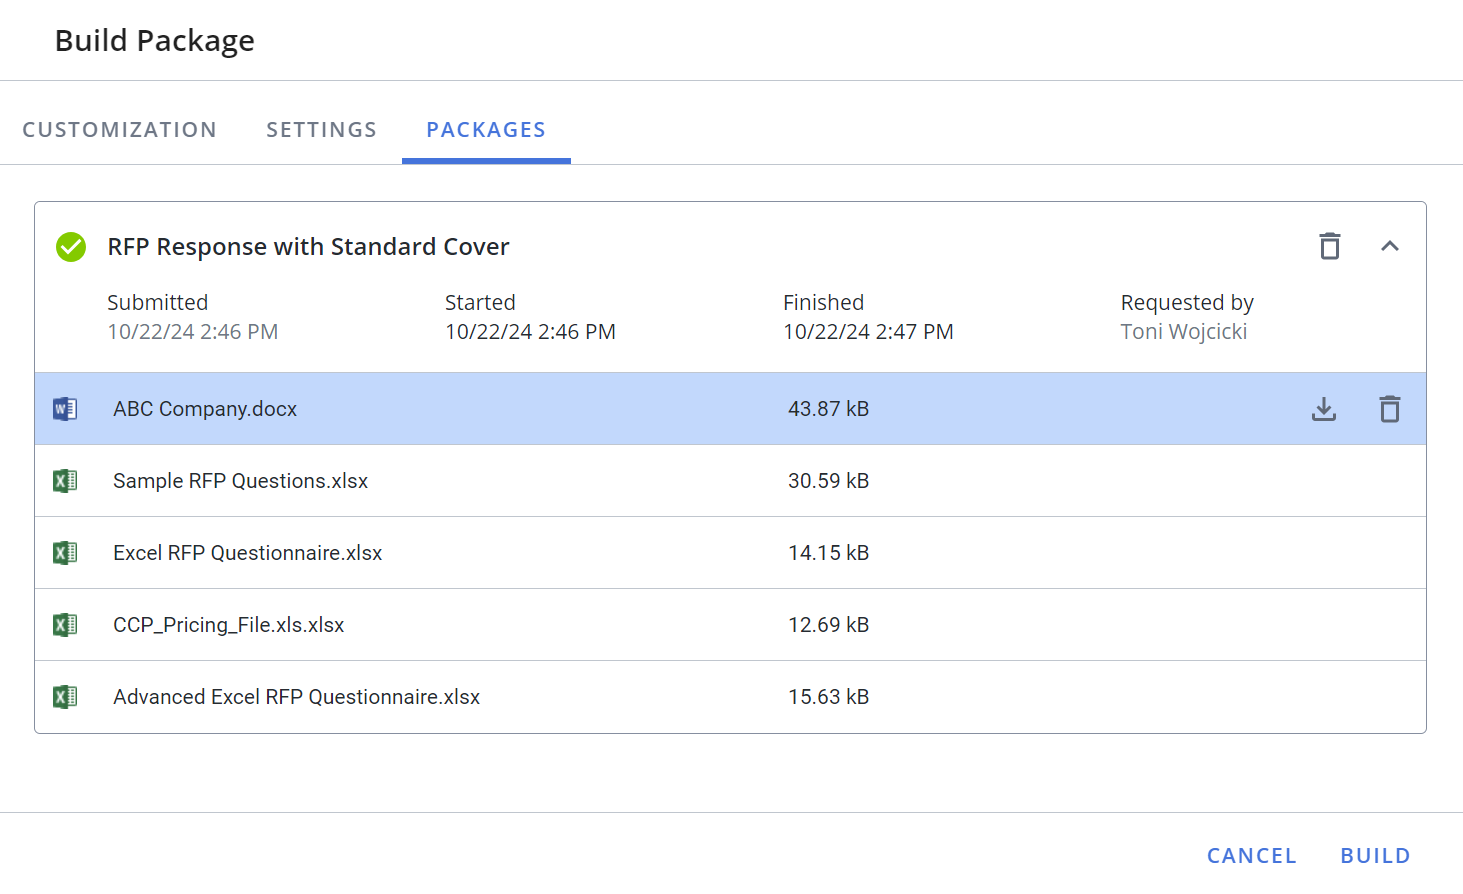
Example of the Packages tab of the Build Package dialog box.
Tip: Use the "PreserveCommentsOnBuildForPowerPoint" global setting to display PowerPoint comments on your presentation after you build. Use the "PreserveCommentsOnBuildForWord" global setting to preserve comments on build for Word files.