Project Instructions and Related Files
In addition to the sections included in your document type, the Instructions and Related Files section is included in your project. In the Instructions and Related Files section, you can upload files that will help the participants work through the project.
Example: You may want to include background information on the company for whom the package will be created. These files will not be included in the package.
Users can edit files in this section and assign workflows to control editing access and approvals. This allows teams to collaborate on the source materials and instructions provided to their project participants.
Note: AI Assist functionality can be used on reference materials. For more information, see File Analyzer and File Queries.
You can upload files of any file type, up to 300MB, by doing one of the following:
- Drag and drop a file from your computer or the library to the drop target on the workspace.
- Click the Browse Files button to add files from your computer.
- Right-click the file in the workspace or click the More
 menu.
menu. - Select one of the following, as applicable:
- Edit in Word
- Edit in Excel
- Edit in PowerPoint
- Edit as desired.
- Click the Save icon in the upper left corner of the Microsoft Office application to save the file back to the project, and then close the file.
If you have a Microsoft 365 online account and the "EnableOffice365" global setting is turned on, you can edit a Word or PowerPoint file in Office for the Web.
- Right-click the file in the workspace or click the More menu.
- Select Edit in Office for the Web.
- Edit as desired, and then close the browser tab when finished. Changes are automatically saved.
You can download a file in the project
- Right-click the file in the workspace or click the More menu.
- Select Download.
Note: If you are using Qvidian for Microsoft Office, your past versions will be available for download in the Versions tab (accessed by right-clicking your RFP file and selecting View Details).
If you have opened a file for editing, you can cancel the edit to allow others to work on the file.
- Right-click the file in the workspace or click the More menu.
- Select Cancel Checkout.
- Right-click the file in the workspace or click the More menu.
- Select Delete. You will be asked to confirm the deletion.
- Right-click the file in the workspace or click the More menu.
- Select View Full Preview.
- Assignments can be created anywhere in the project, file list file, or RFP. Do one of the following:
- Participants Tab
- Drag and drop participant(s) onto the desired location in the workspace. Dragging and dropping a participant into the file list title bar automatically makes that participant the file list section owner.
- Click the Add Participants
 icon in the project header.
- Sections Tab
- Click the Project Assignments
 icon to create assignments in a file list file.
 - Right-click the file and select Assignments from the More menu.
- Click the Project Assignments
- Participants Tab
- Select a new workflow or an existing one.
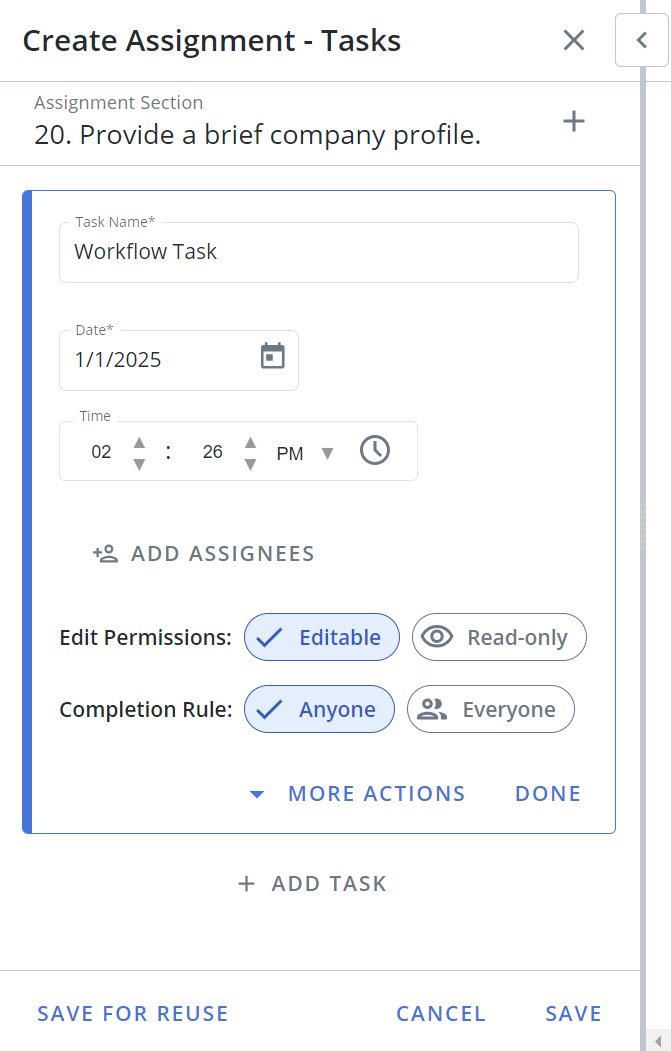
- (Optional) Enter a Task Name. By default, the system will name new workflow tasks “Workflow Task,” allowing users to leave the default workflow task name unchanged to create workflows faster when there’s no need to replace the default name with something more descriptive. Admins can change this default to the name they prefer via the “DefaultWorkflowTask” Global Setting.
-
 Set the due Date and Time ˅
- Click the calendar icon to open the calendar.
- Browse to the required month and year and click on a date to set the date. Use the left and right arrows on the top right to move to the previous or next month. Use the drop-down to select the year.
- Set the time using one of the methods below:
- Click the clock icon to open the clock.
- Click in the hours and minutes fields and enter a new time.
- Click the up or down arrows on the hours, minutes.
- Use the drop-down to select AM or PM.
Note: This will be the task's due date. The default date is the due date of the project.
- Click the Add Assignees button to add assignees to that task. The "Add Assignees" dialog appears.
- Narrow down the list by selecting: Users, Participants, or Teams from the dropdown menu. Once a user outside the project is assigned, they are automatically added as a project Participant.
- Enter two or more letters into the search bar to locate a specific user. Results begin populating below the search bar once text is entered.
- Click the X icon to exit out of the "Add Assignees" dialog and save any changes.
Note: Once selected, a blue checkmark appears to the left of the participants' initials. To remove an assignee, click the participant name again so that the blue checkmark is no longer visible.
- Select the desired Edit Permissions:
- Editable: These participants can answer and edit their slices or edit their file, and mark their workflow task as complete. By default, tasks are in "Editable" mode.
- Read-only: These participants only have permission to approve or reject answers by marking their workflow task complete or reopening a previous participant’s workflow task.
- Select the desired Completion Rule:
- Anyone: Requires all participants to complete their task before the workflow can move to the next task. By default, all tasks are set to "Anyone."
- Everyone: Only requires one participant to complete the assigned task.
- (Optional) Click the More Actions menu to complete or delete the task; or when there are multiple tasks, move the task up/down or to the top/bottom of the workflow.
- Click Done.
- (Optional) Click Add task to add more tasks to your workflow.
- (Optional) Drag and drop the tasks to rearrange the order of the workflow or select one of the following options from the More menu: Complete Task, Move Up, Move to Top, Move Down, Move to Bottom, Delete.
- (Optional) To save this assignment workflow for future use, click Save for Reuse. This eliminates the need for commonly used workflows to be recreated manually every time they're needed.
- Enter a Workflow Name.
- (Optional) Unselect the Save participants to workflow checkbox to save the tasks in your workflow without including its participants. By default, this checkbox is selected so Upland Qvidian will remember the participants associated with saved workflows.
- (Optional) Update your Share Settings. By default, a saved workflow is "Private" and therefore only visible to the project owner that created it. To make a saved workflow available to all permissioned users, select "Global."
- Click Save.
- Click Save.
Example: You may want to require only one of the participants to complete the task if you have assigned it to a team, but any member of the group can answer it. You may want to require all the participants to complete the task if the question contains multiple parts, or requires approval from all participants.
Note: For information on editing existing assignments, see Project assignments.