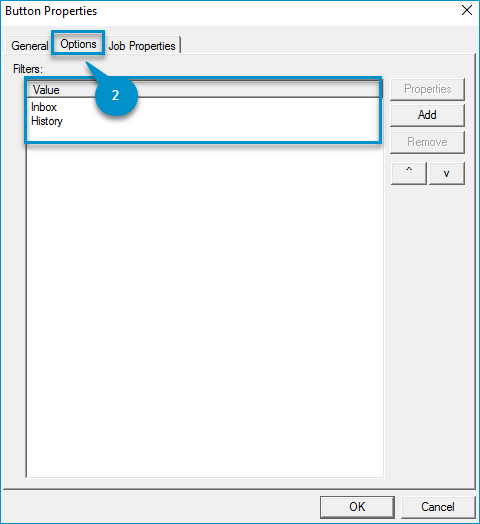
Administrators can set up MyMessages for Device and WebApps client users. This enables users to select their messages, attachments including faxes, and print from a device or web client. Authentication is required. Inbox and History filters are set up during configuration for users to access via the View MyMessages button. Custom filters can be added specific to your workflow requirements. In addition, users can run a report that shows the status of print jobs by job id.
Before you begin
Administrators must complete the following installations and tasks.
-
Server installation
-
Device client installation
-
WebApps installation (if WebApps is part of your company’s workflow configuration)
See the Administrator User Guide Library for more information.
For the Device Client
-
Add or use a current device group.
-
Add the MyMessages button to a new or current device group.
For WebApps Client
• No additional setup is required. Messages is a default tile that appears in the WebApps user interface (UI) after the WebApps installation is complete.
See WebApps > About Messages for more information.
MyMessages at a Glance

|

|
|
MyMessages Legend |
Description |
|---|---|
|
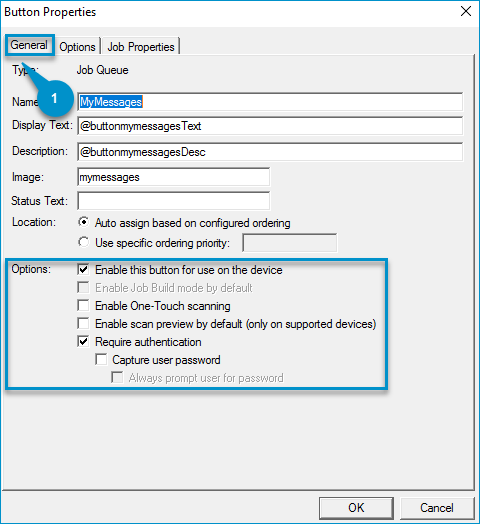
1. Button Properties General tab |
Use the General tab to specify or modify:
|
|
2. Button Properties Options tab |
Use the Options tab to specify or modify:
|
Note: Additional job properties for the MyMessages button can be applied, if necessary.
See About Job Properties for more information.
Accessing MyMessages
You can access the device group and MyMessages button by using Devices on the Server Administrator tree.
Device group > MyMessages button
To access Devices
-
Start the Server Administrator.
-
Expand the Server Administrator tree, if necessary.
-
Select and expand Devices, if necessary.
-
Right-click the device group with the MyMessages button in the details pane. The Properties shortcut menu appear.
-
Select Properties.
-
Use the Device Group Properties dialog box to modify the device group with MyMessages button properties.
See also