AddressBook integration allows taking advantage of the REST APIs for both Office 365 and on-premises mailboxes.
Use the following configurations to integrate the AddressBook and WebApps Client.
-
Application registration in Azure Application Portal
-
Grant Application Permission
-
Integrate AddressBook and WebApps Client
Application registration in Azure Application Portal
To register the application in the Azure application
portal
-
Sign into the Microsoft App Registration Portal.
-
Choose Add an app.
-
Specify Name and choose Create Application.
-
Note down the application ID(unique identifier for your app).
-
Generate a New Password and note down the password.
-
Select Add Platform and select Native Application.
-
Add two Redirect URLs to the native platform that ends in //permissions and //auth.
-
Under Microsoft Graph Permissions, add Application Permissions.
-
Select the Application Permissions below.
-
Contacts.Read
-
Group.Read.All
-
People.Read.All
-
User.Read.All
-
Click OK.
-
Click Save to save all the changes.
Note: There are many permissions that user/Admin can consent.
Grant Application Permission
The following steps must be carried out by the Server Administrator using an account with the administrative privileges.
To grant application permission
-
Launch Server Administrator.
-
Navigate to WebApps node under Configuration.
-
Double click on the profile to open the Profile Properties.
-
Navigate to Features tab.
-
Click on Add and choose OutlookAddressBook.
-
Enter the required information obtained from the application registration portal.
-
Client ID: ID generated on App Registration Portal
-
Client Secret: Password generated on App Registration Portal
-
Redirect URI: msal<YourClientID>://auth
-
Permissions URI: msal<YourClientID>://permissions
-
Click Grant Admin Consent.
-
When prompted, sign into Azure with an Administrative account.
-
When prompted, authorize the registered application.
-
Once permission is granted, the Status is updated.
-
Click OK, OutlookAddressBook feature will be added.
-
Click OK to close the Profile Properties.
Integrate AddressBook and WebApps Client
Once permission is granted in the WebApps client, the user will see auto-complete suggestions as they type in the Destinations field of the Create Distribution App and Email Destination field of the Create Distribution Recipient Properties dialog.
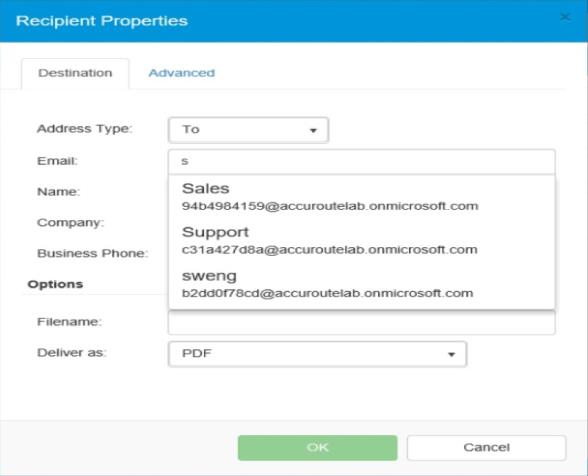
Note: The filtered list displayed is based on what was keyed in the text field and only works for email recipients.
See also