Administrators must complete the following tasks to set up Redaction. Some of these tasks may not be required for current server configurations. Use the tasks listed below as a checklist and review the steps carefully to ensure you have everything you need to set up redaction correctly.
Note: The steps described below are based on a simple workflow example that uses FileScan Connector folders. This example is for illustrative purposes only and may not reflect your company’s unique configurations. Any destination or connector can be used for redaction.
Task Checklist
Activating the Content Monitor Component license
Contact your Account Manager to get a Content Monitor Component license and activate the license.
See Activating a license for more information.
Ensure the following Content Monitor Components appear in the Components details pane.
-
Content Monitor Analyzer
-
Content Monitor Distributor
-
Content Monitor Review
Creating FileScan Connector > Folders
Enable and create the appropriate folders needed for the processing and delivery of redacted documents.
See About FileScan Connector and Managing FileScan Folders for more information.
Creating Content Monitor (CM) Profiles and Content Criteria
Create the CM Profiles with custom content criteria for WebApps Security Station and Content Review users. The server searches and routes documents that match specific content criteria in a CM Profile.
See About CM Profiles for more information.
Applying Redaction Settings
You can apply redaction settings in a variety of ways to meet the DLP requirements of your company.
-
At the CM Profile level only
-
At the CM Profile Content level only
-
A combination of both CM Profile and Content levels
The Profile and Content level redaction settings can be combined to assist Security Station and/or Content Review users during the redaction approval process. For example, Administrators can set manual redaction of any content at the Profile level with auto redaction at the content level. In this combined scenario example, users have the ability to manually draw redaction boxes over additional content that may require redaction and review/approve automatically redacted content.
To apply Redaction settings
Allow redaction of any content (Profile level)
-
Start and expand the Server Administrator, if necessary.
-
Go to Configuration and select CM Profiles. The CM Profiles appear in the CM Profiles details pane.
-
Select the appropriate CM Profile. The CM Profile Properties dialog box appears.
-
Select Prevention Review on the Action drop-down list.
-
Select the Allow redaction of any content check box.
-
Click OK.
Allow, Redact, and Suggest redaction (Content level)
These redaction settings work in conjunction with the Content Criteria properties specified in the CM Profiles.
-
Start and expand the Server Administrator, if necessary.
-
Go to Configuration and select CM Profiles. The CM Profiles appear in the CM Profiles details pane.
-
Select the appropriate CM Profile. The CM Profile Properties dialog box appears.
-
Select Prevention Review on the Action drop-down list.
-
Select the Content tab.
-
Select the appropriate content criteria in the list. The Content Criteria Properties dialog box appears.
-
Select the Enable redaction check box and any of the following redaction settings on the drop-down list.
-
Allow redaction – review pre-selected redacted content. User can choose to redact or remove the redaction. Click to redact is the default.
-
Redact – review auto-redacted (obscured) content areas. User cannot choose to remove redaction.
-
Suggest redaction – review pre-selected redacted content. User can choose to remove or redact content. Click to remove is the default.
-
Repeat steps 6 – 7 until you are done.
-
Click OK.
Creating Groups
Create WebApps Security Station and Content Review groups responsible for the redaction review workflow and provide group access to the appropriate Content Monitor (CM) profiles.
See About Groups and Creating a Group for more information.
Providing group access to CM Profiles
To provide group access to CM profiles
-
Start the Server Administrator.
-
Expand the Server Administrator tree, if necessary.
-
Select Configuration > Groups. The groups appear in the Groups details pane.
-
Select the appropriate group in the details pane. The Group dialog box appears.
-
Expand Clients, if necessary.
-
Select CM Access.
-
Select the Enable members of this group… check box, if necessary.
-
Choose the appropriate CM Profile ID for the group.
-
Click OK.
Creating RuleSets > User
Create the User RuleSets for your redaction workflow, include the Content Monitor components, and add the Content Monitor job properties to the rule.
See About RuleSets for more information.
Including the Content Monitor component
To include the Content Monitor components
-
Start the Server Administrator.
-
Expand the Server Administrator tree, if necessary.
-
Expand RuleSets, if necessary.
-
Right-click User. The Properties shortcut menu appears.
-
Select New > Route to Connector. The Criteria dialog box appears.
-
Specify the Destination type; for example, Email.
-
Specify the content criteria in the Matches box.
-
Click Next.
-
Specify the Connector type, Format, and other parameters.
-
Click Next.
-
Select the Include Content Monitor components check box.
-
Click Finish.
Adding the Content Monitor job properties
To add the Content Monitor job properties
-
Start the Server Administrator.
-
Expand the Server Administrator tree, if necessary.
-
Expand RuleSets, if necessary.
-
Select User. The User RuleSets appear in the details pane.
-
Select the appropriate User RuleSet. The Rule Properties dialog box appears.
-
Select the Actions tab.
-
Select Start Workflow on the Actions Workflow tree.
-
Click the Properties button.
-
Select the Job Properties tab.
-
Click Add. The Set Job Property dialog box appears.
-
Use the Ellipsis button (…) to search for the following System > Content Monitor job properties.
-
ContentMonitorRequested and set it to a value of 1.
-
ContentMonitorProfileIDs and set it to the appropriate CM Profile ID.
-
Click OK on the Set Job Property dialog box.
-
Click OK on the Action Properties dialog box.
-
Click OK on the Rules Properties dialog box.
Note: You can set these properties in a control file if that is how jobs are submitted at your company. The ContentMonitorProfilesIDs can be a delimited list (;) of CM Profile IDs.
Adding the WebApps Security Station
To add the WebApps Security Station
-
Start the Server Administrator.
-
Expand the Server Administrator tree, if necessary.
-
Expand Configuration, if necessary.
-
Select WebApps . WebApps details pane appears.
-
Select Default. The Default Profile Properties dialog box appears.
-
Select the Applications tab.
-
Click Add. The Applications shortcut menu appears.
-
Select Messages > Security Station.
-
Click OK.
Viewing and/or troubleshooting redaction
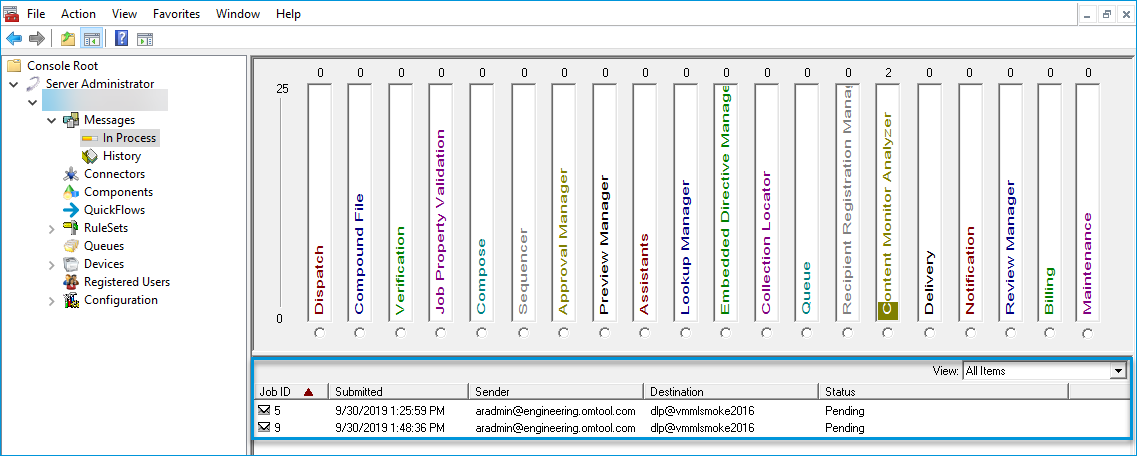
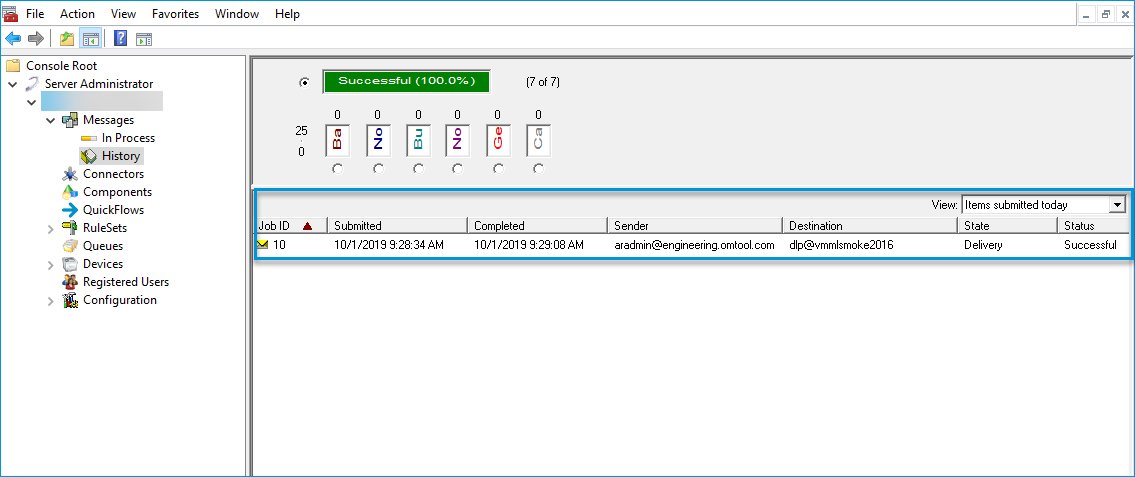
To view the status of a redaction message
Use the Messages > In Process and History folders by selecting Messages on the Server Administrator tree.
See the Messages > In Process folder example below.
See the Messages > In History folder example below.
See About Messages for more information.
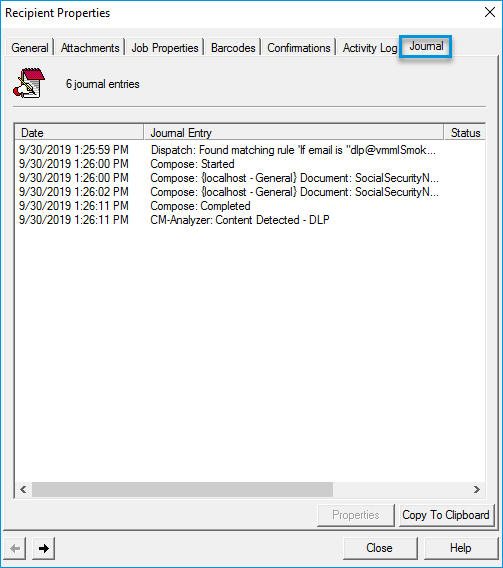
To troubleshoot a redaction issue
Use the Journal on a redaction-related Server Administrator resource by selecting the Journal tab that appears on the Properties dialog box; for example, the Messages > History > Recipient Properties dialog box.
The journal contains the history of a message. If any errors occur during the processing of the message, they are listed in the journal. For example, if you want to track the delivery status of a message, the message journal can tell you if the message failed delivery and was resent at a later time.
See the Messages > History > Recipient Properties > Journal example below.
See also