SSL Configuration Server Certificate Request
The following Server certificate request tasks are required to configure SSL between the AccuRoute Server and Ricoh (Android) device.
See About Ricoh Android Device SSL Configuration for more information.
Creating a Server certificate request
Using Internet Information Services (IIS) Manager, you must create a Server certificate request after creating the Self-Signed CA certificate and generating a Private key.
To create a Server certificate request
-
Open the Internet Information Services Manager (IIS) on the computer where the AccuRoute Server is located.
-
Select the Server connection on the Connections pane.
-
Select Create Certificate Request on the Actions pane. The Request Certificate wizard appears.
See IIS > Actions > Create Certificate Request pane below.

-
Type or copy/paste the following information from the Self-Signed CA certificate.
-
Common name
-
Organization
-
Organizational unit
-
City/locality
-
State/province
-
Country/region
-
Click Next. The Cryptographic Service Provider Properties wizard dialog box appears.
-
Select a Cryptographic service provider from the drop-down list.
-
Select a Bit length. (2048 is the default.)
-
Click Next. The File Name wizard dialog box appears.
-
Specify a certificate request file name in the box provided with a *.CSR extension and use the Browse ellipsis (…) button to select a location, if necessary.
Note: In this example, the *.CSR (certificate server request) file is saved to the OpenSSL-Win64\bin folder.
-
Click Finish.
Creating a Server certificate
Using a CA resource, you must create a Server certificate by using the Self-Signed CA certificate and Server certificate request created previously.
Note: Refer to the documentation provided by your CA resource. The next series of steps use OpenSSL as an example and may not apply to your specific SSL configuration.
To create a Server certificate
-
Run OpenSSL.
-
Type the following command at the prompt to create a Server certificate.
OpenSSL> x509 -req -in mydomain.com.csr -CA certificate.crt -CAkey PrivateKey.key -CAcreateserial -out *.server.crt -days 500 -sha256
-
Replace the information highlighted above with your certificate-related information.
-
Ensure the following information is specified in the command and press Enter.
-
mydomain.com.csr (certificate server request)
-
certificate.crt (self-signed CA certificate)
-
privateKey.key (self-signed CA certificate private key)
-
*.server.crt (new server certificate filename)
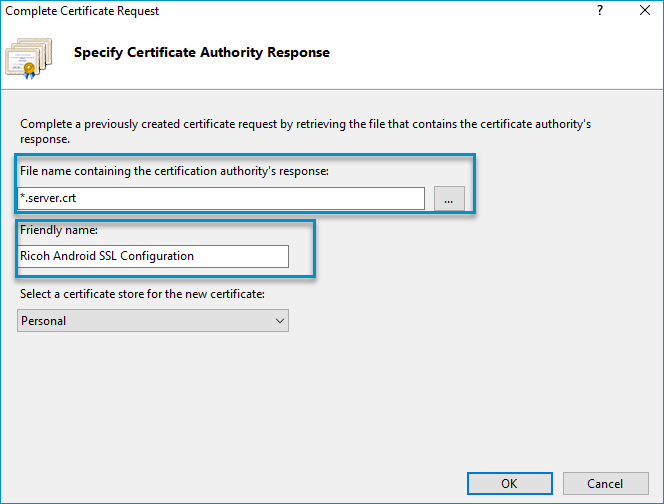
Completing the Server certificate request
Using Internet Information Services (IIS) Manager, you must complete the Server certificate request.
To complete the Server certificate request
-
Open the Internet Information Services Manager (IIS) on the computer where the AccuRoute Server is located.
-
Select the Server connection on the Connections pane.
-
Select Server Certificates in the IIS area.
-
Select Complete Certificate Request on the Actions pane. The Complete Certificate Request Certificate dialog box appears.
-
Use the Browse ellipsis (…) button next to the File name box and find the Server certificate. If necessary, you can change the file name search criteria from *.cer to *.*.
-
Select the Server certificate (*.crt) and click Open.
-
Type a friendly name in the box provided.
-
Click OK. The Server certificate completed request appears on the Server Certificates list.
See the Complete Certificate Request dialog box below.
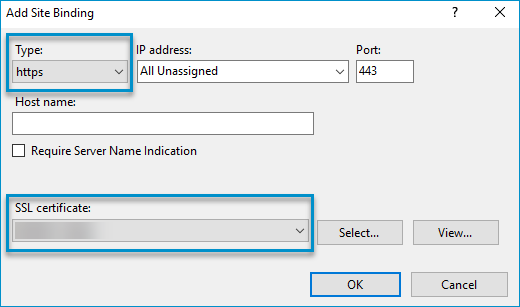
Binding the Server certificate
Using Internet Information Services (IIS) Manager, you must bind the Server certificate to the sites that require SSL.
To bind the Server certificate
-
Select Default Web Site on the Connections pane.
-
Select Bindings on the Actions pane. The Site Bindings dialog box appears.
-
Click Add. The Add Site Binding dialog box appears.
-
Select https from the Type drop-down list.
-
Select the Server certificate you created from the SSL certificate drop-down list box.
-
Click OK.
See the Add Site Binding dialog box below.
See also
About Ricoh Android Device SSL Configuration