Contact Profile
Whenever you click on a specific contact from the Data Viewer, you will be able to view their contact profile. This interface provides a host of functionality to help you manage your contacts on a granular level.
On this page:
- Searching for a Contact
- Profile Use
- Map
- Contact Data
- List Management
- List History
- Events
- Unsub Lists
- Transactions
- Automation
- FAQ
Searching for a Contact
To view a contact, first you must find them.
Contacts are stored on a Core Table and referenced in a List. By navigating to either of these you will then be able to go to the 'Browse' tab.
The browse tab will display the Data Viewer, where you can search manually for a contact or, if you know the contact's name/email, use the search box.
If you happen to know the email address, you can find the contact by using the search box. By searching a complete email address it will display any matching contact, where you can then click on them and view their contact profile.
Profile Use
It allows you to keep track of a contact, which lists and unsub lists they are currently subscribed to, and a log of when they have been added to and removed from lists. This data is available from when they're first added to the system. It also shows the event activity associated with each individual contact, including their preferred email clients, and a visual representation on a world map of where emails have been opened.
Once you click to view a contact, you can navigate to the different pages using the page tabs at the top of the section.
Contact Picture
The contact profile displays a picture for each contact. If the contact is signed up to Gravatar, their contact picture will be pulled in from the site using their email address. If no picture is available by this means, the profile will display a default picture for the user.
Overview
The overview provides basic information about the contact.
ID
The internal Adestra ID for this contact.
Created
This gives the timestamp for when the contact was first added to the system.
Note: Any contacts who were added previous to this feature will display 'Unknown' for this field.
Location
The most common location in which the contact opens emails.
Email Clients
This lists the most preferred desktop, webmail and mobile clients used by the contact.
Map
The 'Map' works in a very similar fashion to the Geo Tracking feature, allowing you to see where in the world this contact has opened emails. It works on a scale of purple, through blue, green, yellow, orange and red. The highest concentrations of opens are represented in red and the lowest in purple.
When viewing a single contact, the map allows you to filter by different email clients, so you can see how your contacts are viewing their emails. You can use the check boxes in the top right corner to view different combinations of email clients on the map.
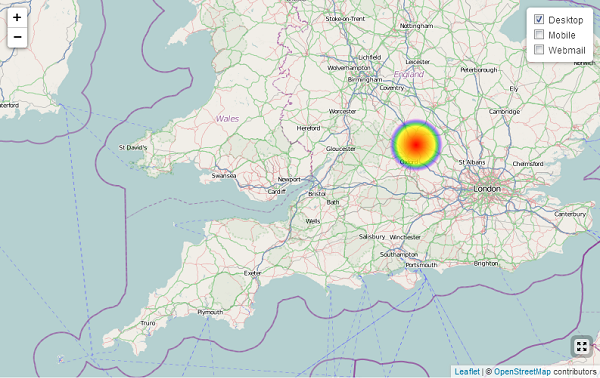
You can zoom in and out of the map using + and - buttons in the top left corner of the map, or using your mouse wheel. To move around the map, click and drag to reposition it.
You can also expand the map to the full size of your browser using the full screen button in bottom right corner of the map. Clicking the button again will return the map to its normal size.
Contact Data
The contact data page shows all core table fields for the contact and any addition fields in different data tables.
When browsing data via the 'Lists' interface, or when browsing a list associated with a campaign, this page will also display any additional list data tables.
It is possible to modify the contact details using the 'Edit' link, in the top right of each table.
You can alter fields in data tables by clicking the 'Display Data Table' button, which will bring up a list of available data tables for you to choose from.
Remember to click the 'Save' button to save any changes you make.
List Management
The 'List Management' page displays the lists that the contact is currently subscribed to, and you can add or remove the contact from existing lists.
You can select a list and use the 'Remove from List' button to remove the contact from that list. In a similar way, you can also add the contact to a list using the 'Add to List' button.
Please note that you can only add contacts to lists with a common core table. When you click the 'Add to List' button, the available lists will be displayed for you to choose from.
You can search for a particular list using the 'Search table' box in the top right of the table, which can be useful if the contact is subscribed to multiple lists.
Any changes made here will be reflected in the 'List History' page.
List History
The 'List History' page provides a log for the contact, showing when they have been added to or removed from lists.
The table gives a timestamp for the action, and the 'User' column refers to the Adestra user who performed the action. If the action was performed by the contact, this column will remain blank.
The 'Source' column shows which part of the system invoked the action that ended up adding or removing someone from that list. Possible sources include:
- Adestra: An action performed by an Adestra user
-
Dynamic List: Action from Dynamic List updates
-
Remote List: Action from automatic update of Remote List
-
Import: Added via the import manager or manual import
- API: A user accessing via the API
- Custom: A custom script
- Administrator Action: An Adestra employee
- Contact Interaction: Action performed by the contact
Events
Any activity associated with contact is displayed in the 'Events' page. This lists the events in date order with their launch ID, as well as links to the campaign, project and workspace for each event.
Navigate to Event
For click and Inbound message events, it is possible to click on the event and you will be directed to the URL that was clicked on by the user or the message that was received (e.g. Flame/Out of Office etc.)
Archived Events
If any of the contacts events are older than the data retention period set on your account then these will no longer be displayed in the Events tab.
Unsub Lists
The 'Unsub Lists' page displays the unsub lists that the contact is currently on.
It is possible to add or remove a contact from unsub lists from this page. To remove the contact from an unsub list, select the relevant list and click the 'Remove from Unsub List' button below the table. To add the contact to an unsub list, click the 'Add to Unsub List' button, which will display the available unsub lists for you to choose from.
You can search for a particular unsub list using the 'Search table' box in the top right of the table, which can be useful if the contact is on multiple unsub lists.
Transactions
The 'Transactions' tab displays any transactions the contact has made, when and the value of it in a table.
By clicking a Reference link you can view more detail about the transaction, including any transaction tags associated to purchases and product detail.
Automation
The 'Automation' tab displays the programs that the contact is in. You can add and remove the contact from programs via this tab.
FAQ
Can I add a picture to a contact's profile?
No, the contact picture is pulled in directly from Gravatar using the contact's email address. You can however add a photo for your own email address.
I can't click on a particular click event, why is this?
In some instances there was no link recorded for that event, or the link data may have been removed for example, the most likely case is that the HTML message has since been deleted.