Connecting your Shopify store to Adestra

On-demand: the Shopify integration is currently invitation only. If you are interested in connecting Shopify and Adestra, contact your customer success manager.

Connect your Shopify store to your Adestra account using Adestra's Shopify connector.

Once connected, you will be able to:

Note: Adestra's Shopify token requires Adestra API access. Contact your customer success manager to receive a token for the connector setup.

Installing the Adestra Shopify app

To install the Adestra app:

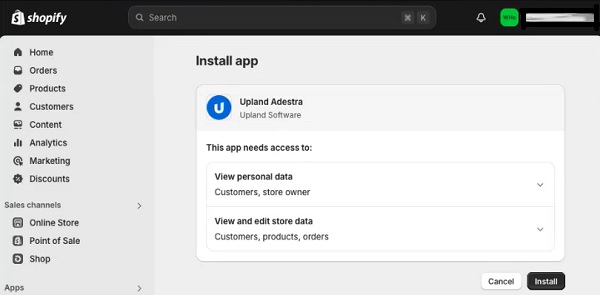
  1. Locate the Upland Adestra app in the Shopify app store and press the Install button.

  2. Review what kind of personal data will be accessed by the Adestra app.

    Screen capture illustrating the Shopify app installation page and the dropdown options for viewing the data collected by the app.

  3. If you agree, press the Install button.

Configuring the Adestra-Shopify connection

Tip: prepare a core table in your Adestra workspace that mirrors your Shopify store fields before configuring the app.

  1. On the Adestra app landing page, press the Get Started button.

  2. Enter the token provided by your customer success manager.

    Tip: keep the token safe as it will be needed for authentication should you wish to change any settings in the future.

  3. Press the Next button.

  4. Use the Browse buttons to select:

    • The Adestra workspace,

    • The Adestra core table, and

    • The Adestra unsub list that you want to connect to your Shopify store.

      Tip: when choosing an unsub list, anybody who unsubscribes via Shopify will be added to the selected unsub list in Adestra.

  5. Press the Next button.

  6. Map your standard Shopify fields by:

    • Pressing the + New Row button.

    • Selecting an Adestra field from the dropdown menu.

    • Selecting the matching field in Shopify from the dropdown menu.

    • Repeating for each row of fields to map.

      Screen capture showing an excample field mapping for the First_name field in Adestra and the First name field in Shopify.

      Note: the email field is mandatory and pre-mapped.

  7. Press the Next button.

  8. Optional - map your custom Shopify fields by:

    • Pressing the + New Row button.

    • Selecting the custom Shopify field from the dropdown menu.

    • Selecting a matching Adestra field from the dropdown menu.

    • Repeating for each row of fields to map.

  9. Press the Next button to complete the connection.

  10. Should you need to update any settings, press the Settings button in the left panel to return to the configuration options.