Configuring Salesforce User Settings
After installing the Upland apps and setting your app permissions, configure your end users permissions and custom profile permissions.
Note: only Salesforce admins should perform app settings.
After configuring your user settings, connect your Salesforce apps to your Adestra account.
Custom profile permission settings
Note: each user being linked with Adestra must be a custom marketing profile.
To allow this profile to connect with the Adestra app:
-
In the Salesforce Setup options, use the Quick Find search box to find and open the Profiles option.
-
Select the custom marketing profile you and your users will be using to connect to Adestra.
Note: if you have multiple custom marketing profiles you wish to link to Adestra, you will need to perform these steps on each profile.
-
In the profile detail section, press the Edit button.
-
Under Custom App Settings:
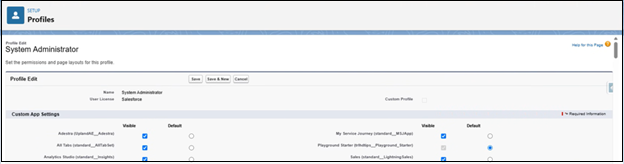
-
Ensure Adestra (UplandAE__Adestra) is set as Visible.
-
In the tab settings dropdowns, set:
Dashboards to "Default On".
-
In the custom tab settings dropdowns, set:
Adestra Settings to "Tab hidden".
Events to “Default On”.
Messages to “Default On”.
Send to “Default On”.
This is to enable marketing users to view event data synchronized from Adestra.
-
-
Under Administrative Permissions, enable the following checkboxes:

-
Customize Application.
-
View Dashboards in Public Folder.
-
Manage Reports in Public Folders.
-
-
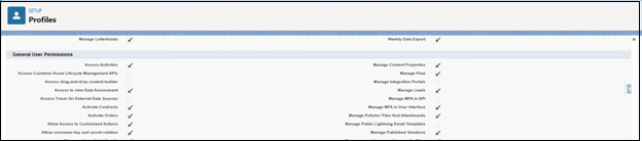
Under General User Permissions, enable the following checkboxes:
-
View Event Log Files.
-
View My Team’s Dashboards.
-
Run Flows.
-
-
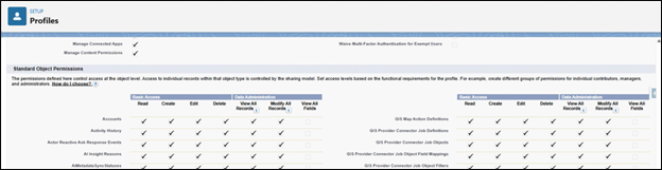
Under Standard Object Permissions, enable the following checkboxes:
-
"Read" for User External Credentials.
-
-
Under Custom Object Permissions, Enable the following checkboxes:

-
"Read" and "Create" for Connectors Config.
-
"Read" for Events.
-
"Read", "Create", and "Edit" for Messages.
-
"Read" for Send.
-
-
Press the Save button.
-
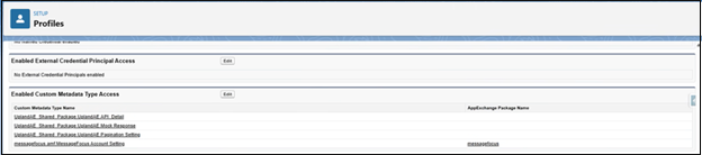
Select “Enabled Custom Metadata Type Access” and press the Edit button.
-
Select all UplandAE_* metadata types in the Available Custom Metadata Types column.
-
Press the Add arrow button to move the metadata types to the “Enabled Custom Metadata Types” column.
-
Press the Save button.
-
-
Select “Enabled Apex Class Access” and press the Edit button.
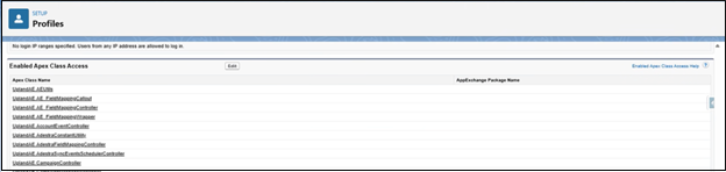
-
Select all classes in the Available Apex Classes column.
-
Press the Add arrow button to move the classes to the “Enabled Apex Classes” column.
-
Press the Save button.
-
-
Locate the Connectors Config option under Custom Field-Level Security and press the View button.

-
Press the Edit button.
-
Enable Read access for all fields.
-
Press the Save button.
-
-
Locate the Message option under Custom Field-Level Security and press the View button.
-
Press the Edit button.
-
Enable Read access and Edit access for all fields.
-
Press the Save button.
-
-
Locate the Event option under Custom Field-Level Security and press the View button.
-
Press the Edit button.
-
Enable Read access for all fields.
-
Press the Save button.
-
-
Locate the Send option under Custom Field-Level Security and press the View button.
-
Press the Edit button.
-
Enable Read access for all fields.
-
Press the Save button.
-
End users permission settings
Note: if you have more than one end user that will be using the Adestra app, you will need to apply these settings to each user.
-
In the Salesforce Setup options, use the Quick Find search box to find and open the Users menu.
-
Press the Edit button next to your Adestra user.
-
Ensure the correct profile is assigned, i.e. one of the custom marketing profiles configured for Adestra.
-
Enable the checkboxes for the following options/settings:
-
Active.
-
Marketing User.
-
-
Press the Save button.
After configuring your user settings, connect your Salesforce apps to your Adestra account.