How to Set Up and Configure the SharePoint Online Connector
All BA Insight connectors can be downloaded from Right Answers under Knowledge > BA Insight > Product Downloads > Connectors.
This connector is installed with the same generic steps as any BA Insight connector.
Satisfy the Prerequisites for your connector before installing.
Configuration specifics are detailed below.
Install the Connector
Both the SharePoint Online and SharePoint O365 (old version) connector can be installed on the same server at the same time.
For instructions on migrating your connector to the latest version without any interruption to your index, see How to Migrate to Latest SharePoint Online Connector.
Before extracting the MSI from the downloaded .zip file, select the downloaded .zip file, and check the "Unblock" box in file properties dialogue box.
- Follow the instructions in the opening screens of the wizard.
- Note where on the local machine the application is installed. Note the path.
- Click Next to proceed, until you reach the "Web Service Information" screen, shown below.
- DO NOT use the provided, default Domain Service Account "NetworkService."
- Enter a valid local user account with admin rights on the local machine in the format domain\username
- Enter the account Password.

- Click Next.
- When finished, the wizard closes and the connector is successfully installed.
- Configure the connector by adding it to your connector application: Connectivity Hub or Connector Framework, using the instructions provided in those help systems.
- Specific configuration information is provided in the following topics.
Connection Configuration Settings
Set the Connection
- After setting your generic information, click the Connect or Refresh Web Service link.
- Select the appropriate authentication mechanism:
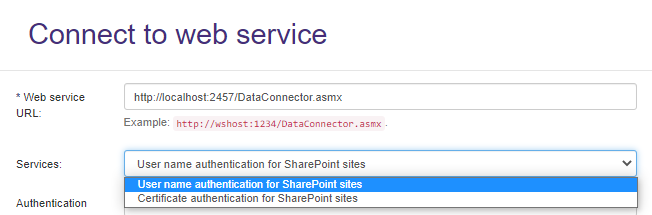
- The page refreshes and displays additional settings.
Username Authentication Settings
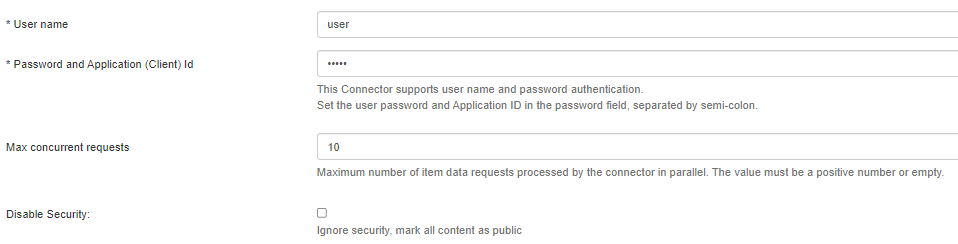
- In the User name field, enter the user with the appropriate permissions for crawling the configured site collection
- If AUTOFETCH is used (no mailbox filters are used or if a filter containing the wildmark (*) symbol is used):
- Tenant admin permissions are required
- If AUTOFETCH is not used (mailbox filters are added for each individual site collection):
- Edit permissions are required for each site collection
- Edit permissions are required for each site collection
- If AUTOFETCH is used (no mailbox filters are used or if a filter containing the wildmark (*) symbol is used):
- In the Password field, enter the user password first and the Application ID, separated by the semi-colon (;) sign.
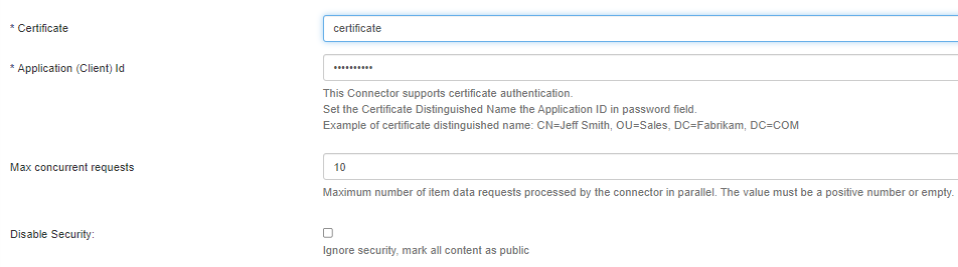
Certificate Authentication settings
-
In the Certificate field, enter your Certificate common name.
If you copy your certificate details, as shown in the Certificate console graphic below, your syntax will contain unnecessary spaces.
You must ensure you enter your certificate information in syntax without spaces or your certificate will not work.
CORRECT SYNTAXexample: "CN=Jeff Smith"
INCORRECT SYNTAXexample: "CN = Jeff Smith"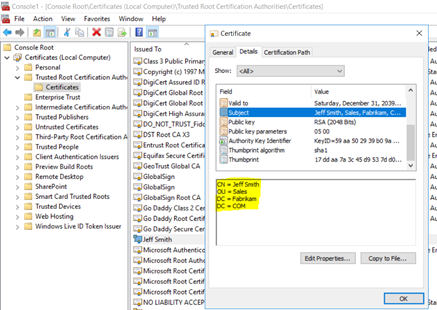
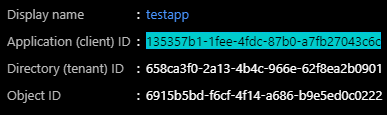
- In the Password field, enter the Application ID.
- This is a GUID such as "c87a7836-a1da-455c-9171-836bf793c195"
Common Configuration Settings
- Disabled Security:
- Check to disable security.
- This results in no content be security-trimmed.
- Azure Portal Configuration Settings. Refer to the graphic below for sample values.
- Enter the following values in the following order, as shown in the graphic below, one per line:
- Tenant name
- Audience URI
- Admin URL

- Enter the following values in the following order, as shown in the graphic below, one per line:
- Next, complete all remaining fields.
Carefully read the instructions under each field.
Configure the Mailbox/Datastore Settings
Terminology
For the SharePoint Online connector a data store lists site collections.
For more information about SharePoint sites and site collections, see Microsoft SharePoint documentation.
Configure your mailboxes, or datastores, for the SharePoint Online v2.0 Connector, using the following steps.
Use the Datastore Sync Settings tab to filter the datastores (site collections) that are returned after Datastore Load job completes.
If none of the filters have values, all site collections in your tenant are returned.
- Site Collection Title Filter:
- Use this field to filter site collections by title.
- You can specify both inclusion and exclusion rules.
- One set per line.
- Use *at beginning or end for wildcards.
- Use the pipe character to separate multiple entries
- Site Collection Url Filter:
- Use this field to filter site collections by URL.
- You can specify both inclusion and exclusion rules; one set per line.
- Use *at end for wildcards.
- Use the pipe character to separate multiple entries.
- Filter is case insensitive
- Use this field to filter site collections by URL.
- Web Template Id Filter:
- Use this field to filter sitecollections by.
- Template IDs must not include the number
- (Ex: SPS is accepted, SPS#1 is not accepted).
- You can specify both inclusion and exclusion rules; one set per line.
- Use *at end for wildcards.
- Use the pipe character to separate multiple entries.
- Filter is case insensitive
- Template IDs must not include the number
- Use this field to filter sitecollections by.
Content Configuration Settings
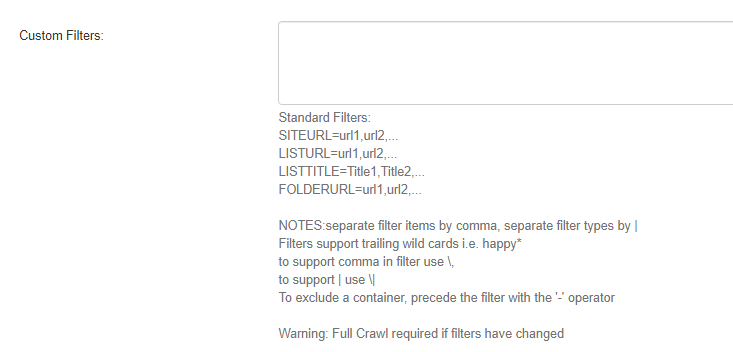
For a given content source, you can apply additional filters to decide which list or item to crawl.
Use the following syntax for the filters:
- LISTURL =url1,url2,...
- LISTTITLE=Title1,Title2,...
- FOLDERURL=url1,url2,...
- SITEURL=url1,url2,…
- Separate filter items using a comma (,) and separate filters with a character pipe (|) character.
- Filters support trailing wildcards.
- To use a literal comma (,) or a pipe character (|), precede the character with a backslash (\,), or (\|), respectively.
- If any changes are made to this field, a full crawl is required to properly refresh the index.
- LISTURL, LISTTITLE, FOLDERURL, SITEURL are regex capable
- To use regex apply the regex:expression.
- Example: LISTURL=regex:(\/Released)
- To use regex apply the regex:expression.
- By default, connector returns SharePoint sites as search result items.
- To exclude these entries from search results, disable Site content type using the content types filter.
-
To property map well known groups from SharePoint (like Everyone except external users, All Authenticated Users, and Authenticated Users), use the following Group load script:
Group Load ScriptCopydim sysId as string = HOST.GetSystemId()
If sysId = "true"HOST.SetAdId("NT AUTHORITY\Authenticated Users")
End If
If sysId = "windows"HOST.SetAdId("NT AUTHORITY\Authenticated Users")
End If
If sysId.startswith("spo-grid-all-users")
HOST.SetAdId("NT AUTHORITY\Everyone")
End If
Complete the information in the remaining tabs using the generic instructions here:
- Connector Framework
- Connectivity Hub
Extracting HTML Text and Metadata from Documents
You can extract HTML text and metadata from your source system (optional).
Extracted information includes:
- Available text and metadata which can be mapped to metadata properties.
- HTML metadata tags from HTML pages.
- Available HTML tags and links for use as metadata from HTML documents
Update the SharePoint Online Connection with the Certificate and Azure App Information
- Open your Connector Framework.
- Click the Connections link from the top navigation.
- Select your SharePoint Online v2.0 connection from the drop-down menu.
- Navigate to the Certificate portion of the page.

- Enter the credentials (Login and Password) of your SharePoint Online connection:
- Login
- Required
- Enter the Certificate Distinguished Name.
- Password
- Required
- Enter the Azure Application ID.
- Login
- Click Save.