How to Configure Your Azure Cognitive Search Target
The following topics describe how to create an Azure Cognitive Search Target in ConnectivityHub.
For more information about Targets, see What is a Target?
Prerequisites
Before you can add your target, you must install the BA Insight ConnectivityHub.
- Before you proceed to add and configure your Azure Cognitive Search Target:
- Create an index in your Azure Search Service instance
Index-to-Content Source
In ConnectivityHub, there is one index created per content source for both Elasticsearch and Azure Cognitive Search.
Schema Mapping
To plan your Azure Cognitive Search schema, consider the fields you wish to include in your search.
- To configure the fields you want to see in your index, navigate to the Metadata page for your Content Source. An example is shown below.
- Set the Active, Refinable, Searchable, and Exact match settings for your metadata.
- The fields are automatically created in your index, based on these settings.
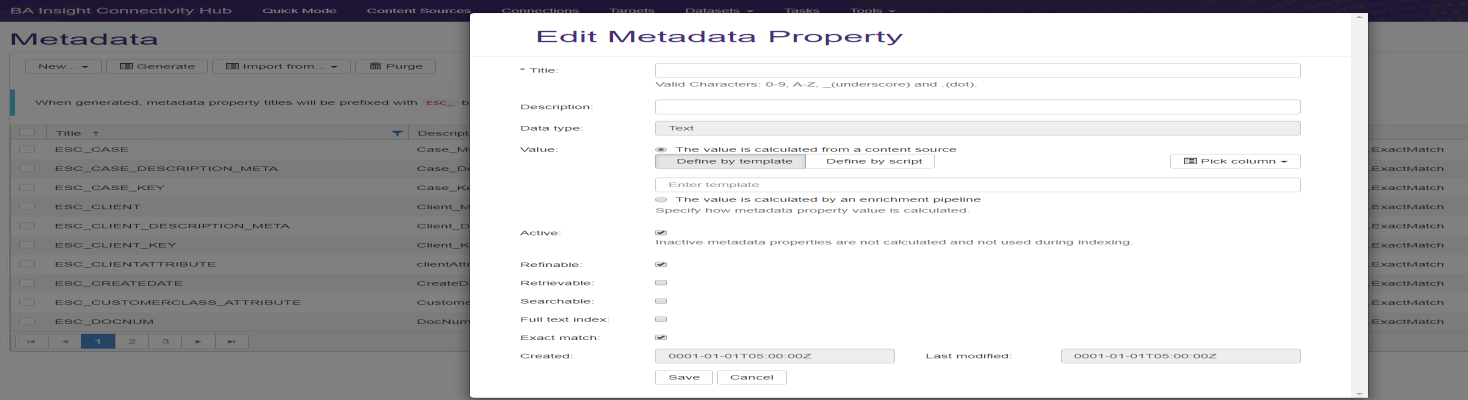
- Retrievable:
- Select this for any field you wish to return with the search results.
- Generally, these are fields that are used as part of your displayed result.
- Refinable:
- Select this for any field which might be explicitly searched or used by a refiner.
- For example, a title search: "title = 'Mary had a little lamb'"
- Searchable:
- Select this for any field which should be searched for the keywords used in your query.
Complex Fields
Table data types from Connectivity Hub will be treated as Collection of Complex fields in Azure Cognitive Search schema.
Azure target cannot create these complex fields, so they require manual input:
You need to add the table field and all its subfields in you Azure index and then repeat the full crawl.

Add the Azure Cognitive Search Integration Target
You can add as many Targets to ConnectivityHub as you like.
A target is associated with a specific Azure Cognitive Search index.
More than one target can point to the same index.
To add the Azure Cognitive Search Integration Target, follow these steps:
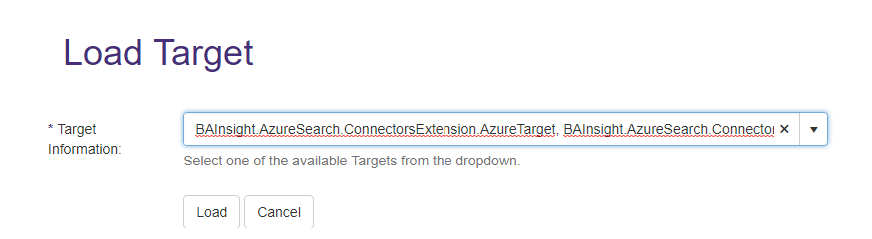
- Go to the Connectivity Hub Target page. Select New Target.
- The Load Target page appears. See below. Use the drop-down menu to select your Target.
- Select the Target Info tab.
- Title (required): Specify a name.

- Title (required): Specify a name.
-
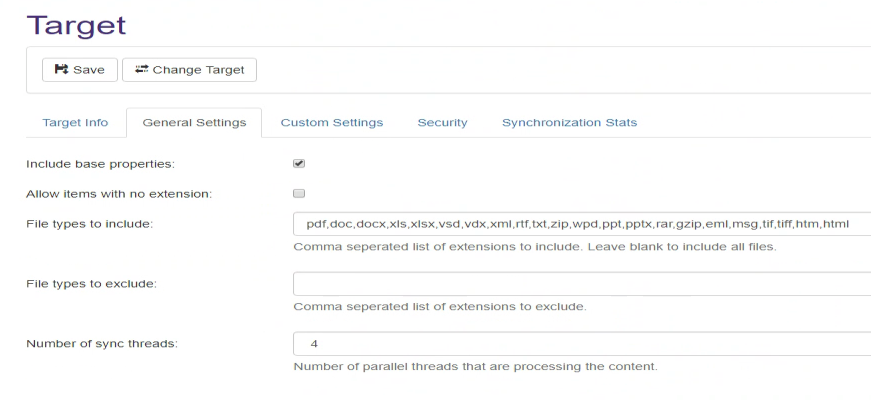
Select the General Settings tab.
-
The fields shown in the graphic below are completed, by default.
-
Note that the "Include base properties" box is checked.
-
This option sends the
esc_baseproperties to the index.
These properties are mandatory to ensure security trimming and integration with Smart Previews. It is recommended not to disable them.If you pause a job, change the number of threads, and then resume your job, the job leverages the additional threads.
-
- Select the Custom Settings tab. Enter your information as described (below the graphic):
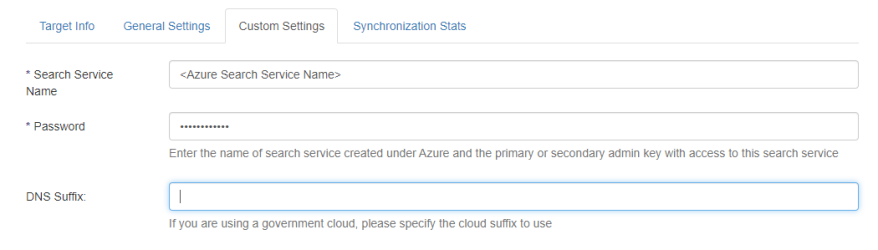
- Search Service Name (required):
- Enter the name of your Azure Cognitive Search service.
- Password (required):
- Enter the admin key (with full permissions) for your Azure Cognitive Search service as the password
DNS Suffix:
Custom DNS suffix to be used when connecting to Azure Cognitive Search Service.
This parameter is required when connecting to a custom cloud such as a Government cloud.
Do not specify this suffix for the public Azure cloud.
- Search Service Name (required):
- Click Save.
How Index the Content of Your Documents (Full-text) with Azure Cognitive Search
To index the content of your documents (such as PDFs or MS Office documents) with Azure Cognitive Search, you must connect your content source to the BA Insight Tika Text Extractor service.
- Follow the instructions on the page: Azure Cognitive Search: How to Extract Plain Text from Documents.
- After you add a Target, you must run a Full Target Update job.
- Finally, run an Incremental Target Update job to update your Target.