Install and Configure Smart Preview Hybrid Server
Perform the following steps with the App Service account, except where noted.
-
Install SSL Certificates for the Smart Preview Hybrid Service
-
Connect the Smart Previews Azure Web App and the Smart Previews Hybrid Service
Install SSL Certificates for the Smart Preview Hybrid Service
The Smart Previews Hybrid service is required to run on SSL.
-
You must have an SSL certificate available on the host before installing Smart Previews Hybrid.
Repeat these steps on each server you have designated for the Smart Preview Hybrid Service
- Add the SSL certificate for the URL you will use for the Smart Preview Hybrid Service.
- Certificates should be added under the local computer store, personal certificates
- For use in IIS to provide SSL encryption to web traffic.
- Add the certificate in the Windows Certificate Manager:
- Launch the Microsoft Management Console: Start>Run>MMC.
- In the Management Console, go to File>Add/Remove Snap-in.
- Select the "Certificates" add-in.
- Choose "Local Computer" when prompted for which computer to manage certificates for while adding the certificate snap-in.
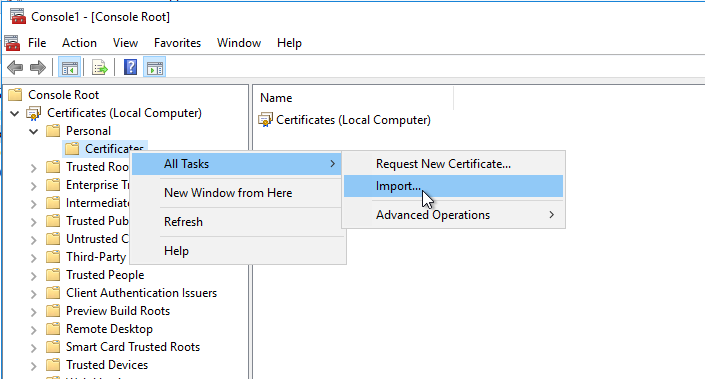
- When the certificate manager load, in the left navigation, expand "Certificates (Local Computer)">"Personal".
- Right-click the "Certificates" folder under "Personal, select "All Tasks" then "Import"

- Follow the wizard to import your certificate.
- Ensure the network is configured to allow HTTPS traffic to your Smart Preview Hybrid service URL to reach this server.
Install the Smart Preview Hybrid Server
Use the following instructions to install the Smart Preview Hybrid server.
- Run the file SmartPreviewsHybrid.msi as an Administrator.
- Open a command prompt as admin, CD to the installation folder.
- Execute the command: \>msiexec.exe /i SmartPreviewsHybrid.msi. The installer launches with Administrator privileges.
- Read and accept the EULA.
- Provide the path to the application directory.
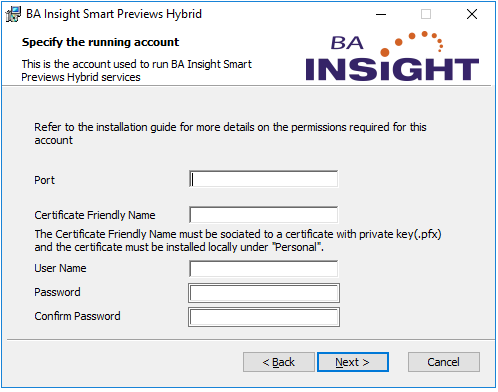
- Provide details for how the web application will be configured in IIS:
- Port:
- The port number the site listens on.
- This is the port that receives the HTTPS requests from the Smart Previews Hybrid service URL.
- Certificate Friendly Name
- The certificate used for your Smart Preview Hybrid Service URL
- The certificate added in step 1 above.
- User Name.
- This is your App Service Account, in the form domain\username
- Password: The App Service account password.

- Port:
-
Complete the wizard and wait for the installation to complete.
Service Account
Your Smart Previews Service account requires full control security permissions to the Smart Previews Hybrid installation folder.
Configure the Smart Preview Hybrid Service
- Open a web browser and navigate to the Smart Previews Hybrid site /pages/configure.aspx page.
https://[smartPreviewHybridServiceURL]:[port]/pages/configure.aspx- Provide the Tenant information
- Click "Generate" to generate a new signing certificate to be used by Smart previews Hybrid. (this is different from the SSL cert used for the HTTPS binding, as described in step 1 above.)
- Click "Download" to download the .cer file to be used in the Smart Previews Azure App configuration.
- Provide the Smart Previews On-Premise Deployment data.
- The Database Connection String identifies how to connect to the preview configuration database, created when installing the import server.
It is in the format:
Server=[Database Server Name];Database=[Name of Configuration Database];Trusted_Connection=True;- The Preview Generation service address points to a service that runs on the Import server.
It must be in the format:http://[Import Server Name]:1238/PreviewGeneratorService - Configure the Fetchers.
- For more information, see How to Configure Fetchers
- The Preview Generation service address points to a service that runs on the Import server.
- Navigate to the Installation directory and find the web.config file.
- Edit web.config:
- Find the cloud service address. "CloudServiceAddress" (approximately line 105):
<add key="CloudServiceAddress" value="https://previewapp.bainsight.com/Services/PreviewProxyService.svc" /> - Update the URL to the URL of your Azure Preview Service.
- Save the changes.
- Find the cloud service address. "CloudServiceAddress" (approximately line 105):
- Provide the Tenant information
- The Smart Preview Hybrid Service installation is now complete.
Connect the Smart Previews Azure Web App and the Smart Previews Hybrid Service
As described in previous sections, Smart Previews Web App is deployed in an Azure Web Service while Smart Preview Hybrid Service is deployed in an on-premise virtual machine.
At this point you have 2 options:
- Expose the Hybrid Service to internet - Not Recommended since opening ports to a virtual machine provides a network vulnerability.
- Use Azure Hybrid Connections to enable the Azure Web App to talk to an on-premise site - Recommended approach.
How to Configure an Azure Hybrid Connection between Smart Previews Azure Web App and the Hybrid Service
Follow these steps:
- Make sure you Smart Previews Web App is on a paid Azure subscription (not free, not shared) so that it has access to Azure Hybrid Connections feature.
Note: this step must be mentioned in step 7.... - Connect to the Smart Previews Web App Service in Azure.
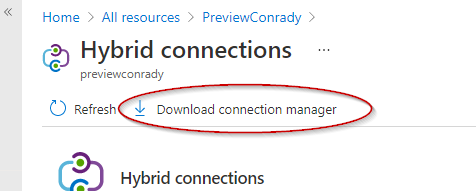
- Download the connection manager from the Azure Portal UI to your Hybrid Server.
- You can find the download link while viewing/configuring the Hybrid Connections in your App Service.

- You can find the download link while viewing/configuring the Hybrid Connections in your App Service.
- Install the Hybrid Connection Manager on your hybrid server.
- Go to Networking → Hybrid Connections → Configure your hybrid connection endpoints
- Click Add hybrid connection.

- Fill out the hybrid connection info:
- Name - Name as desired.
- Example: SmartPreviewsHybrid
- Endpoint Host - The host of the Hybrid Service Site.
- Example: hybridpreview.contoso.com
- Endpoint Port - The port of the Hybrid Service Site.
- Example: 6677
- Servicebus Namespace - The underlying Service bus namespace used by the hybrid connection.
- Create a new one and name as desired.
- Example: SmartPreviewsServicebus
- Important! - The Endpoint provided above must resolve correctly on the Hybrid Server and must load the Hybrid Site.
Using the above examples, accessing https://hybridpreview.contoso.com:6677/pages/configure.aspx from the Hybrid Server virtual machine browser must correctly load the Hybrid Service configuration page.
This address must not be exposed to internet, therefore not publicly available.
- Name - Name as desired.
- Click Ok to create the hybrid connection and wait for the creation process to complete.
- Open Hybrid Connection Manager UI program after it is installed.
- Click Add a new Hybrid Connection
- Connect to your Azure instance and select the subscription where the hybrid connection was created.
- Select the hybrid connection created in step 6 and click Save.
-
Make sure the connection status shows up as Connected in both Hybrid Connection Manager UI (on-premise machine) and Azure Hybrid Connections (Azure).
Connection shows "Not Connected"
When you first create the connection in the Hybrid Connection Manager, it will often show "not connected" until you re-start the Azure Hybrid Connection Manager service.
This is a Windows service, and can be re-started via the Windows Services Manager.
- Make sure to use the Hybrid Service address (Example: https://hybridpreview.contoso.com:6677) in the Smart Previews Web App configuration page for the On-premise Previews Service Address field (described here)
Configure Your Content Sources to Call Smart Previews CEWS
You must configure either your Connector Framework or AutoClassifier to call the Smart Preview CEWS service.
AutoClassifier
- If using AutoClassifier, use the steps here to call Smart Preview CEWS: How to Generate Document Previews
Smart Previews
- Otherwise, use the steps here to configure your Connector content sources to call Smart Preview CEWS: How to Connect Your Content Source to Smart Previews.