Connect SmartHub to your search engine
Use the following instructions to learn how you can connect SmartHub:
Amazon Kendra
Prerequisites
- An Amazon Kendra index populated with documents
- A set of IAM Access Keys (access key and secret) that can be used to access the AWS Kendra index
Limitations
- As Amazon Kendra doesn't support the XRANK operator, the following features are unsupported:
- Relevancy tuning
- Other boosting-based functionalities
- By default, Amazon Kendra can display up to 10 facet values per facet for a query.
- If you want to increase this limit, contact Amazon Kendra support. For more details, see https://docs.aws.amazon.com/kendra/latest/dg/API_Facet.html.
- If you have your limit increased, you must configure the MaxRefinersLimits setting in the AWS Kendra Translator Stage.
- Amazon Kendra doesn't provide an actual document ranking, instead it provides a relative ranking that indicates how confident Amazon Kendra is that the response matches the query. Therefore, the valid values for ScoreConfidence are: VERY_HIGH | HIGH | MEDIUM | LOW | NOT_AVAILABLE.
- SmartHub assigns the threshold values as follows:
- VERY_HIGH - 1.0
- HIGH - 0.7
- MEDIUM - 0.4
- LOW - 0.1
- NOT_AVAILABLE - 0
- SmartHub assigns the threshold values as follows:
- SmartHub supports the following Amazon Kendra result types:
- Document
- Answer
- Question_Answer
- SmartHub is limited to the quota limits as provided by Amazon Kendra. In particular, the following quota limits may cause issues with your search experience:
Maximum number of token words per query text before truncation: 30
Maximum number of characters per query text: 1000
Amazon can increase these quota limits at an extra cost for customersThe token and character query limitations can impact the security trimming functionality in the SmartHub Advanced Security Module. If the origin source system has multiple users and groups, the ASM restriction will exceed the Kendra quota limits, causing the query to fail.
For more information, see Query and search results quotas in the amazon documentation.
Create and Configure Your Kendra Search Engine
After you satisfy the prerequisites listed above, use the following steps to create and configure an Amazon Kendra search engine.
- Navigate to the SmartHub Administration page at http(s)://[web-app-url]/_admin.
- For example: http://smarthub.azurewebsites.net/_admin.
- For example: http://smarthub.azurewebsites.net/_admin.
- Go to the General Settings page.
- Click the ADD SEARCH ENGINE link to add your new Amazon Kendra search engine.
- In the modal window add the corresponding information in the appropriate fields:
- Type: Select Regular.
- Search Engine: Select Amazon Kendra from the drop-down list.
- Name: Enter a name for your search engine.
Rank offset formula coefficients(optional): Enter these values only if you selected the Rank Based mixing algorithm that is set in the Additional Settings page:
BOOST: Enter the boost factor.
OFFSET: Enter the rank offset.
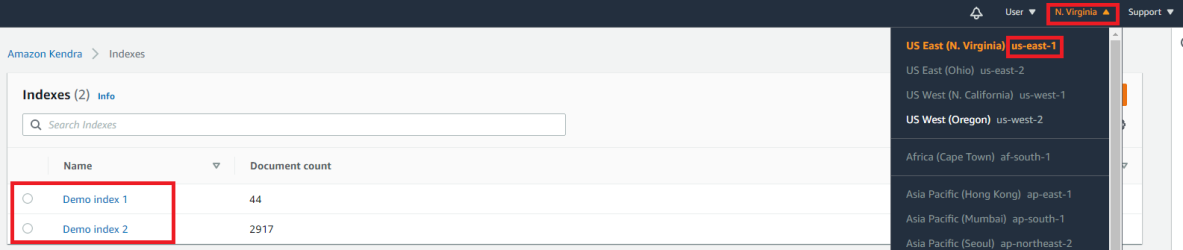
- Index name: The name of the AWS Kendra index to be used at search time. This name is located in the Kendra management page.

- Endpoint: the URL that is the entry point for the web service.
Access Key: The IAM Access Key to be used at search time for authorization.
This is located in the IAM management page.
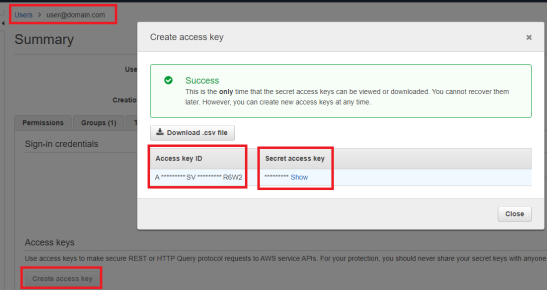
- Secret Key: The IAM Secret Key to be used at search time for authorization (see screenshot above).
- Region: The Region where the AWS Kendra instance is hosted. You can find this in the Kendra management page.
Navigate to the SmartHub Administration page at http(s)://[web-app-url]/_admin.
Go to the General Settings page.
Click on your Amazon Kendra search engine
Click on AwsKendraTranslatorStage from the Query/Results Tuning sections.
Add the following code snippet to the Parameters:
<configuration>
  <settings>
    <setting Name="MaxRefinersLimits" Value="PropertyName1,Limit1;PropertyName2,Limit2" />
  </settings>
</configuration>
The MaxRefinersLimits setting configures the maximum number of facet values per facet that can be requested.
It is necessary to configure only the facets that have different limits than the default one (10 values).
Provide a semicolon-delimited list of comma-separated value pairs with the following format <PropertyName1,Limit1;PropertyName2,Limit2>, where:
PropertyName is the AWS Kendra managed property name.
Limit is the maximum number of facet values per facet configured in AWS Kendra. If the limit set in MaxRefinersLimits exceeds the limit that was set in AWS Kendra, the request will fail.
For example:
<setting Name="MaxRefinersLimits" Value="_authors,100;escbase_fileextension,50" />
Configure the Amazon Kendra Translator Stage.
Create and Configure Your Kendra Search Engine
After you satisfy the prerequisites listed above, use the following steps to create and configure an Amazon Kendra search engine.
- Navigate to the SmartHub Administration page at http(s)://[web-app-url]/_admin.
- For example: http://smarthub.azurewebsites.net/_admin.
- For example: http://smarthub.azurewebsites.net/_admin.
- Go to the General Settings page.
- Click the ADD SEARCH ENGINE link to add your new Amazon Kendra search engine.
- In the modal window add the corresponding information in the appropriate fields:
- Type: Select Regular.
- Search Engine: Select Amazon Kendra from the drop-down list.
- Name: Enter a name for your search engine.
Rank offset formula coefficients(optional): Enter these values only if you selected the Rank Based mixing algorithm that is set in the Additional Settings page:
BOOST: Enter the boost factor.
OFFSET: Enter the rank offset.
- Index name: The name of the AWS Kendra index to be used at search time. This name is located in the Kendra management page.
- Endpoint: the URL that is the entry point for the web service.
Access Key: The IAM Access Key to be used at search time for authorization.
This is located in the IAM management page.
- Secret Key: The IAM Secret Key to be used at search time for authorization (see screenshot above).
- Region: The Region where the AWS Kendra instance is hosted. You can find this in the Kendra management page.
Configure the Amazon Kendra Translator Stage.
Azure AI Search
Azure AI Search
Limitations
-
Due to the changes made to support vector search, any Microsoft Azure search engines that are already configured will not work after upgrading SmartHub from 6.0.x to 6.1.0.0 or later, due to the changes needed to support Vector Search. To fix the Microsoft Azure search engines, follow the steps:
-
Create a backup of your FederatorConfiguration.xml file found at <SH_root>\Configuration. This step is only a safety measure in case something goes wrong in the steps below.
-
Navigate to the SmartHub Administration page found at <SH_address>/_admin.
-
Select the General Settings page.
-
Scroll down to the Import/Export Settings section.
-
Click EXPORT SETTINGS.
-
Click IMPORT and select the newly downloaded FederatorConfiguration.xml file. The FederatorConfiguration.xml file must be decrypted.
-
Verify that Microsoft Azure search engine settings are correct and that they contain a new Query Tuning stage named AzureTranslator.
-
Configure the Azure AI Search Engine
Use the follow instructions to configure an Azure Cognitive Search engine
- Open a web browser and navigate to your SmartHub Administration page at http(s)://<web-app-url>/_admin
-
Click General Settings.
-
Click Add New Search Engine.
-
Type: Select Regular
-
Name the search engine and select the Azure from the drop-down list.
-
Enter a name for your search engine.
-
Set the following configuration parameters:
Parameter Required/Optional Description Search Service Name
Required
Name of an existing search service in Azure to connect to. Search Service DNS Suffix Optional -
This is the DNS suffix of the search service. If left empty, the default value search.windows.net is used.
API key
Required
An API key which has at least read access to the search service. API Version The API version used to interrogate the index. For Vector Search functionality use the 2023-10-01-Preview version Index Name
This is the name of the index in search service to query. Fields with Manual Highlight Optional These are the names of the columns in the search index for which the highlight is done manually, without truncating the original value. The properties should be separated by comma. The Default value is escbase_title.
Fields To Highlight Optional These are the fields to be requested as highlighted on the search index. The default value is escbase_fulltextcontent,ESC_body,escbase_author. Suggester Name Optional This is the name of your suggester if you have configured a suggester for autocomplete and suggestions in a query for your Azure search index. -
-
Save the configuration.
Note: When upgrading SmartHub 6.0 to the latest version, the API Version setting for the Azure Search Engines that you have already configured must be set manually. In older SmartHub versions, 2020-06-30-Preview was the default API version that was used.
Pipeline Stages
The following stages are automatically added to both the User Experience tuning stages for the new Azure search engine:
-
Range Facets
-
This user experience tuning stage is used to configure range facets.
-
-
Property Mapper
- This user experience tuning stage translates managed properties names so that they map to an existing property on the Azure search engine.
- You can modify the Property Mapper stage configuration by assigning a search index field to the properties that are used by default by the SmartHub user interface.Important: In the Property Mapper, the property "Rank" must be mapped to the property "_score". For example,
Rank,_score; - For more information, see Map Metadata Property Values: Property Mapper.
-
Azure Translator
-
This user experience tuning stage translates the search query into an Azure search query.
-
For more information, see Translate queries into an Azure search query with the Azure Query Translator.
-
Configure Scoring Profile In Azure
Procedure:
- Go to your Azure Cognitive Search Service.
- Click Overview > Indexes.
- Select your index that will be used also in SmartHub.
- Select Scoring Profiles > Add scoring profile.
- Enter a scoring profile name and click Add scoring profile.

- Click Add functions > Add Scoring function.
- From the Function type dropdown, select Freshness.
- Choose Field name for boosting.
- Choose interpolation:
- Required for scoring functions.
- Defines the slope for which the score boosting increases from the start of the range to the end of the range.
- Choose a Boost value:
- Required for scoring functions.
- A positive number used as multiplier for raw score. It cannot be equal to 1.
- Choose Boosting duration (Sets an expiration period after which boosting stops for a particular document.)
- The Boosting duration must be formatted as an XSD "dayTimeDuration" value.
- Example: "P1D" (1 day), "PT15M" (15 minutes)
- Click Ok > Save.
Vector Search
You can learn more about vector search by referring to Enhancing search results with Vector Search. For more details about the search performed in Azure, see Deciding which type of search to use. By default, pure vector search is enabled if the Azure Translator Stage exists.
Enable Vector Queries
In order for SmartHub to perform vector queries, the VectorQueries property of the SearchQuery object must be populated. This can be achieved through a Query Tuning Stage. A sample script for generating vector queries using OpenAI can be found at Generate vector is a Query scripting pipeline.
Retrieve And Process Vector Field(s)
Although it is not recommended to return vector field(s) on the returned results, there may be cases when it is needed. To achieve this, do the following:
-
Navigate to your results page.
-
Edit this page using the UI Editor.
-
Select the Basic mode
-
Open the Customize ContentContainers section.
-
On the left side panel, select and edit your content container.
-
Add your vector field(s) to the FieldsToinclude list.
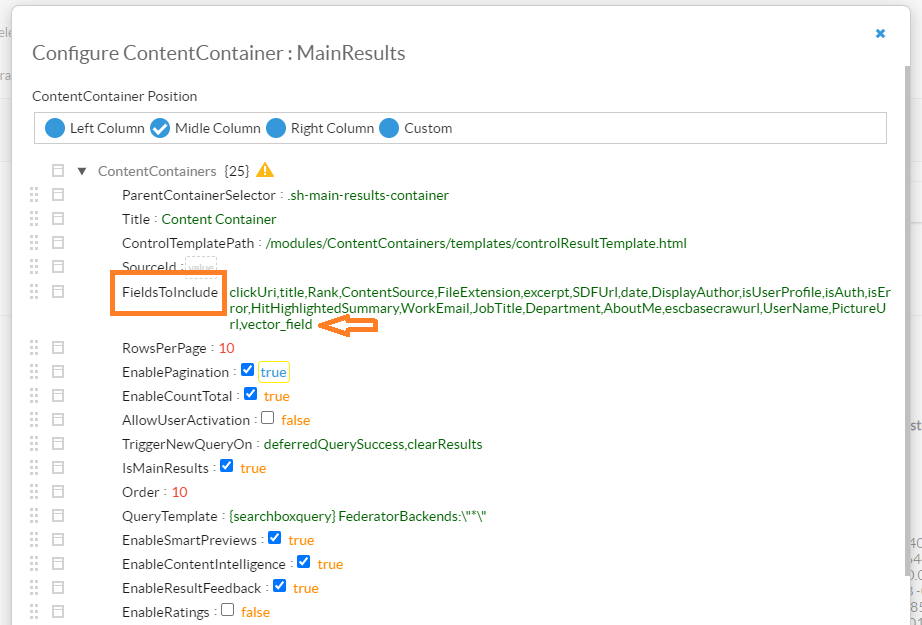
-
Save the changes.
-
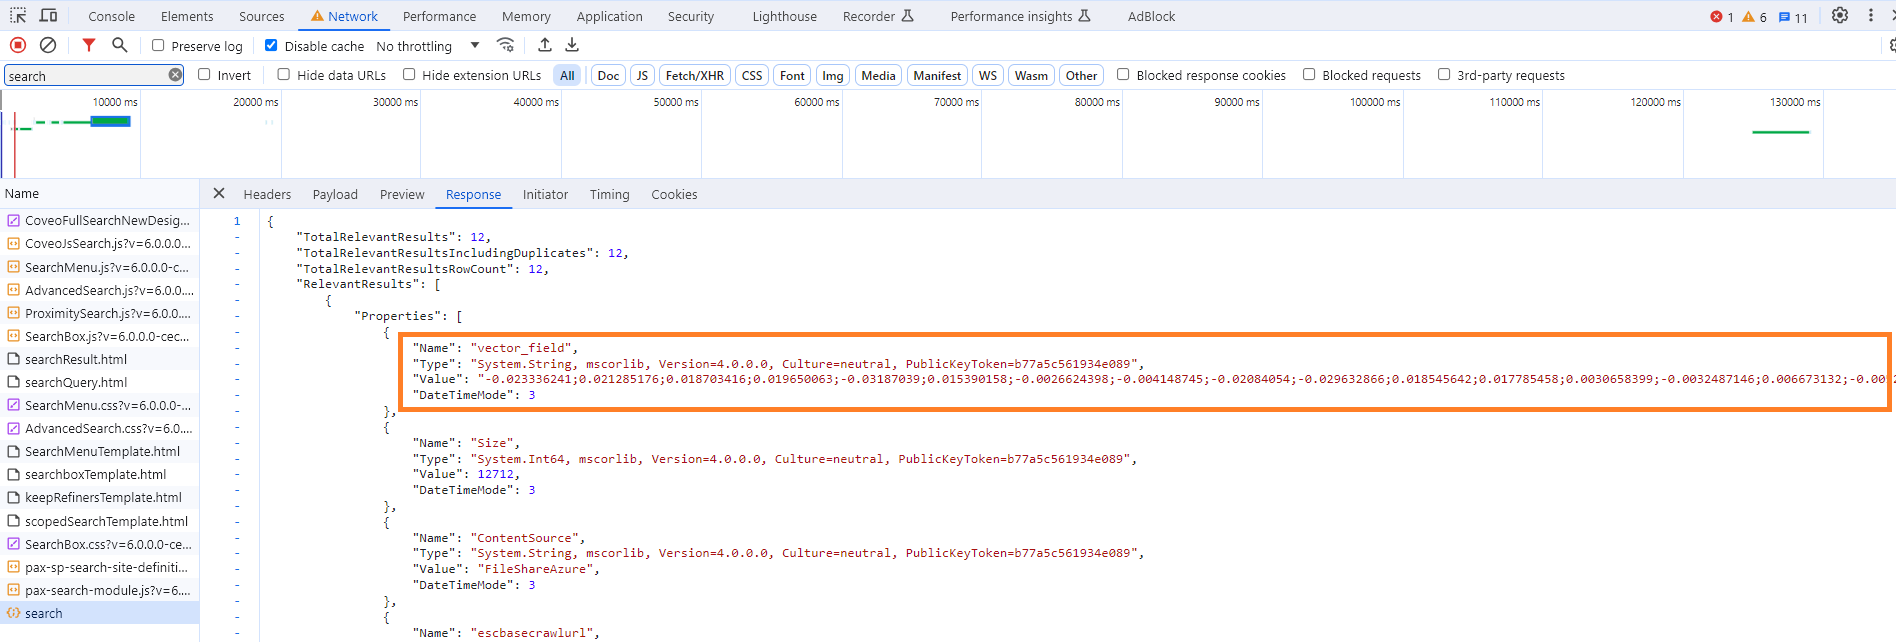
Validate that the vector fields are returned on the results:
-
Open the dev tools for your browser.
-
Navigate to the Network tab.
-
Look for the search request.
-
On the response, validate that the vector field was returned.
-
Deciding which type of search to use
There are multiple searches that can be executed against the Azure Search Index using Smart Hub Azure Search Engine:
| Search | Description |
|---|---|
| Full text query | This search type includes only keywords. |
| Hybrid Search | This search type includes both full text query and vector query components. When retrieving search results, both components are considered and the final rank is calculated based on these components. |
| Semantic Search | This search type includes full text query and semantic query components. |
| Hybrid Search with Semantic | This search type includes full text query, vector query and semantic components. |
In order to execute one of the above, you need to enable the components required in each of the cases to be included in the final search request.
-
Full text component:
-
This is always enabled by default
-
Running searches without this component is not supported
-
-
Vector query component:
-
This is enabled when the VectorQueries member of the Query object has at least one VectorQuery set; For more information on how to set VectorQuery, see How to Use Vector Search.
-
-
Semantic Component
-
This is enabled by setting “Enable Semantic Search” to true in the Azure Query Translator stage
-
Troubleshooting
Check the server logs for any configuration errors. By default, logs appear in the directory <SmartHub_Install_Directory>\Logging.
- When using a field that does not exist in the Azure index as a Filter or as a Sort option, the field will be ignored by the query.
- Searching for a field that does not exist or applying a filter that has no corresponding field in the Azure index will return 0 results.
Elasticsearch
Note: Search engines in SmartHub are often referred to as "backends." Consider the terms interchangeable.
Use the following procedure to configure the Elasticsearch search engine.
-
Connect SmartHub to an Elastic Cloud or Self-hosted Elasticsearch On-Premise Instance
-
Translate queries into an Elastic search query with the Elastic Translator
Prerequisites
- Elasticsearch v7.x or later must be installed.
- If Elasticsearch is not installed, download Elasticsearch and install it.
Limitations
Note the following limitations when using an Elasticsearch search engine in your SmartHub environment:
-
Elasticsearch does not guarantee consistent ordering for documents with identical sort values (including nulls or empty values), unless a secondary sorting criterion is specified. This means that when multiple documents share the same sort value, and you do not define a secondary sort criterion, the order of their appearance in the search results may vary between query executions, leading to inconsistencies in pagination. For more details, see Paginate search results in the Elasticsearch documentation.
-
To ensure a consistent sort order, Upland BA Insight recommends that you include another field, such as a unique identifier, as a tie-breaker. In SmartHub, this can be achieved by adding a new Query Scripting Processor tuning stage with the following code:
Query.SortList.Add(
    SortType.SortByProperty,
    "escbase_title.keyword", // this is an example of a property that can be used
    typeof(System.String),
    SortDirection.Ascending
); -
Once configured, this stage must be placed before the Elastic Translator Stage in the User experience tuning section.
-
Connect SmartHub to an Elastic Cloud or Self-hosted Elasticsearch On-Premise Instance
Make sure that you have the following information and access for the search engine(s) that you are configuring:
- Elastic Cloud URL
- Access to Elasticsearch On-Premise
Add an Elasticsearch Search Engine
Procedure:
- Navigate to the SmartHub Administration page at http(s)://<web-app-url>/_admin
- For example: http://smarthub.azurewebsites.net/_admin.
- For example: http://smarthub.azurewebsites.net/_admin.
- From the General Settings page click ADD NEW SEARCH ENGINE to add your new Elasticsearch search engine.
- Type: Select Regular
- Search Engine: Select Elastic or AWS Opensearch (for AWS-hosted Search service) from the drop-down list.
- Enter the search engine Name and corresponding information in the appropriate fields, as shown in the following image:
-
(Optional): Enter these values only if you selected the Rank Based mixing algorithm that is set in the Properties for the SSA page:
-
BOOST: Enter the boost factor.
-
OFFSET: Enter the rank offset.
-
-
From the Authentication Mode field, select the authentication mode for your environment's Elasticsearch type from the drop-down menu. For more information, see Configure your Elasticsearch authentication mode. The possible authentication modes are include the following:
-
If you selected Elastic as your search engine:
-
None
-
Basic
-
Token Based
-
API Key
-
-
If you selected AWS OpenSearch as your search engine:
-
AWS Access Key & Secret Key
-
AWS Profiles
-
AWS IAM Roles With Assume Role
-
AWS IAM Roles Anywhere
-
-
-
Depending on your selection in step 7, do one of the following:
-
For Elastic search engines:
-
If you selected Basic, enter the account name and password for your Elastic service in the respective fields.
-
If you selected Token Based, enter the Azure scope for your Elastic instance in the Azure Scope field.
-
If you selected ApiKey, enter the API key for your elastic instance in the Api Key field. Your API key must be in the following format: id:api_key.
For more information on configuring these authentication types, see Configure your Elasticsearch authentication type.
-
-
For AWS OpenSearch search engines:
-
if you selected AWS Access Key & Secret Key:
-
In the AWS Access Key field, enter the access key for your AWS-hosted Elastic instance.
-
In the AWS Secret Key field, enter the secret key for your AWS-hosted Elastic instance.
-
-
If you selected AWS Profiles:
-
In the AWS Profile Name field, enter the AWS profile name. For example, basic_profile.
-
In the AWS Credentials File Location field, enter the location of AWS Credential file. For example, C:\\Users\sdkuser\customCredentialsFile.ini.This file stores the AWS credential profiles used to access AWS Elasticsearch content and must be saved with a .ini extension. for example, credentials.ini.
-
-
If you selected AWS IAM Roles With Assume Role:
Use this option only when running on an EC2 instance. When no role is provided, the system uses the default credentials without assuming any role. If a role is specified, it first obtains the default credentials and then assumes the given role.-
In the Role ARN fied, enter the Amazon Resource Name (ARN) of the role to assume.
-
In the Session Duration Seconds field, enter the duration, in seconds, for the role session. Valid values range from 900 seconds (15 minutes) up to the maximum session duration configured for the role (between 1 and 12 hours). If the specified value exceeds the configured or administrator-defined maximum (whichever is lower), the operation fails. The default value is 3600 seconds (1 hour). For more information, see AssumeRole in the AWS documentation.
-
-
If you selected AWS IAM Roles Anywhere:
Use this option when the application runs outside of AWS. For instructions on configuring IAM Roles Anywhere in AWS, see Configure IAM Roles Anywhere in AWS. When using AWS IAM Roles Anywhere, you need to configure AWSCertificatesFolder and AWSSigningHelperToolPath settings in the web.config file:AWSCertificatesFolder: Enter the path to the folder that contains the IAM Roles Anywhere certificates and their private keys. By default, this is set to ~/Certificates/AWS IAM Roles Anywhere/.
AWSSigningHelperToolPath: Enter the path to the IAM Roles Anywhere credential helper tool. By default, this is set to ~/Tools/AWSSigningHelper/.
-
In the Cetificate Name field, enter the name of your AWS certificate. For example, smarthub-iam.cert.pem. This certificate must be stored in the location specified in the AWSCertificatesFolder setting.
-
In the Certificate Private Key Name field, enter the name of the certificate’s private key that signed the request. For example, smarthub-iam.key.pem. The certificate key must be stored at the location specified by the AWSCertificatesFolder setting.
-
In the Trust Anchor ARN field, enter the Amazon Resource Name (ARN) of the trust anchor used to authenticate. For example, arn:aws:rolesanywhere:us-east-1:886706448578:trust-anchor/ 84f004f7-aad3-4d50-b84b-9d382da99202.
-
In the Profile ARN field, enter the Amazon Resource Name (ARN) of the profile that provides a mapping for the specified role. For example, arn:aws:rolesanywhere:us-east-1:886706448578:profile/ 847a417f-9e60-46b2-b570-44fa94be0571.
-
In the Role ARN field, enter the Amazon Resource Name (ARN) of the role to assume. For example, arn:aws:iam::886706448578:role/SHRole.
-
In the Session Duration Seconds enter the duration, in seconds, for the role session. Valid values range from 900 seconds (15 minutes) up to the maximum session duration configured for the role (between 1 and 12 hours).
-
-
-
If you are using AWS Opensearch, in the Region field, select the region for your environment's AWS OpenSearch instance.
-
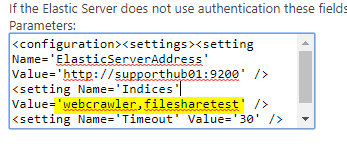
Modify the search engine configuration by entering your configuration settings into the Parameters field.
See the following example code:Search engine configuration example
<configuration>
    <settings>
        <setting Name='ElasticServerAddress' Value='http://localhost:9200' />
        <setting Name='Indices' Value='index1, index2' />
        <setting Name='Timeout' Value='30' />
        <setting Name='SourceMappings' Value='00000000-0000-0000-0000-000000000000#index1,index2;' />
    </settings>
</configuration>-
Use the following table to specify this code:
Parameter Description Default Value ElasticServerAddress
-
Required
-
URL of your Elastic Cloud service instance.
-
Obtain this URL from your Elastic Could provider.
http://localhost:9200 Indices
-
Required
-
Specify one or more comma (,) separated indices to be used for search.
index1,index2 Timeout
-
Optional
-
Specify the configurable timeout of the search
-
Note: If the search takes longer than 30 seconds, the search is canceled
30 SuggestionFields These are the fields that you can configure if you are using the search engine spelling suggestion feature to suggest spelling alternatives for misspelled personal names, company names, and specific terms that are relevant to the user, based on your indexed data. escbase_title,escbase_fulltextcontent SourceMappings
-
Optional
-
A mapping between
SearchQuery.SourceIdand Elasticsearch indices -
A Search Query with a matching Source ID is executed against the specified indices.
-
This option is used for performance tweaks when you have multiple search engines.
00000000-0000-0000-0000-000000000000#index1,index2 -
Translate queries into an Elastic search query with the Elastic Translator
After creating the search engine, two Elastic translator stages are automatically added to the Tuning categories:
-
Query Tuning stage
-
Result Tuning stage
These are search engine-specific Tuning stages and do not apply to any other search engines you have configured.
Perform the following steps for both the Query Tuning and Results Tuning Elastic Translator stages:
- Click the stage name.
-
Modify the Stage Configuration by entering your configuration settings into the Parameters field.
See the following example code.Stage Configuration Example
<configuration>
    <settings>
        <setting Name='Indices' Value='index1,index2' />
        <setting Name='RefinablePropertiesSuffix' Value='' />
        <setting Name='Timeout' Value='30' />
        <setting Name='EnableFuzziness' Value='true' />
        <setting Name='UsePureVectorSearchAsDefault' Value='true' />
        <setting Name='MaxSearchCandidates' Value='1000' />
        <setting Name='ResultsToConsider' Value='10' />
        <setting Name='TextQueryType' Value='best_fields' />
        <setting Name='DateProperties' Value='ElasticLastUpdate' />
        <setting Name='NumericProperties' Value='FileSize' />
        <setting Name='SourceMappings' Value='00000000-0000-0000-0000-000000000000#index1,index2;' />
        <setting Name='FieldBoost' Value='' />
        <setting Name='ShowAccurateResultCount' Value='false' />
        <setting Name='BodyField' Value='FileContent' />
        <setting Name='AdditionalUrlQueryParameters' Value=' search_type,dfs_query_then_fetch' />
    </settings>
</configuration> -
Use the following table to specify this code:
| Parameter | Optional/Required | Description | Default Value |
|---|---|---|---|
|
Indices |
Required |
Specify one or more comma (,) separated indices to be used for search. |
index1,index2 |
|
RefinablePropertiesSuffix |
Optional |
Suffix to append to the Elasticsearch field name when building an aggregation on top of it. |
|
|
Timeout |
Specify the configurable timeout of the search. Note: If the search takes longer than 30 seconds, the search is cancelled.
|
30 | |
|
EnableFuzziness |
The fuzzy query uses similarity based on Levenshtein edit distance. | false | |
| EnablePureVectorSearch | When this setting is set to true, the user search query will be a pure vector. When this setting is set to false, hybrid search is used. By default, this setting is set to true. This setting is only valid if you have configured an Azure OpenAI or OpenAI vector embedding generator tuning stage. | true | |
| MaxSearchCandidates | This setting specifies the maximum number of matches that are returned from the vector search query. | 1000 | |
| ResultsToConsider | This setting specifies the number of search results that will be returned that are most similar to the search query. | 10 | |
|
TextQueryType |
The multi_match query builds on the match query to enable multi-field queries
|
best_fields | |
|
DateProperties |
Specify the date properties that are to be used as refiners | ElasticLastUpdate | |
|
NumericProperties |
Specify the numeric properties that are to be used as refiners | FileSize | |
|
SourceMappings |
|
00000000-0000-0000-0000-000000000000#index1,index2 | |
| FieldBoost |
Note that the field names should be taken from elastic, not from the property mapper.
|
|
|
| ShowAccurateResultCount |
Specify if the elastic max count of 10000 results or the accurate count is used.
|
false | |
| BodyField |
Specify the field care corresponds to the body field.
Note: If the setting is missing the default value is used.
|
FileContent | |
| AdditionalUrlQueryParameters |
Specify the extra URL parameters that you want to send on the Elasticsearch search request.
In order to send multiple parameters, they need to be separated using ";"
|
Configure your Elasticsearch authentication mode
Your Elasticsearch search engine can be configured with the following types of authentication:
-
For Elastic
-
None
-
Basic
-
Token Based
-
API Key
-
-
For AWS Opensearch
-
AWS Access Key & Secret Key
-
AWS Profiles
-
AWS IAM Roles With Assume Role
-
AWS IAM Roles Anywhere
-
Refer to the following sections for in-depth information to configure your desired authentication type:
Configure Elasticsearch with basic authentication
Prerequisites
- You must have an account that has access to your Elastic service
Configure the search engine
When Connecting SmartHub to your Elasticsearch search engine, after selecting Basic from the Authentication Mode drop-down, do the following:
-
In the Account field, enter the account name for your Elastic service.
-
In the Password field, enter the password for your Elastic service account.
Configure Elasticsearch with token-based authentication
About token-based authentication
We exchange the user token that is currently valid for SmartHub with a token that is valid for the Azure app assigned to Elasticsearch.
Note! Token Based Authentication works only with Azure Active Directory authentication configured in SmartHub.
For more details about how to configure Azure Active Directory in SmartHub, go here.
Prerequisites
- SmartHub must be configured with Azure Active Directory
- An app must be registered in Azure for Elastic Authentication
Grant the app permissions
You must grant the SmartHub app registration permissions in order to consume the Elastic app.
For more details about this procedure, go here.
- Log in to your Azure portal as an administrator:http://portal.azure.com.
- Click Azure Active Directory → App registrations → App applications.
- Search for application used for SmartHub Authentication.
- Click the "API permissions" entry from the left side navigation menu.
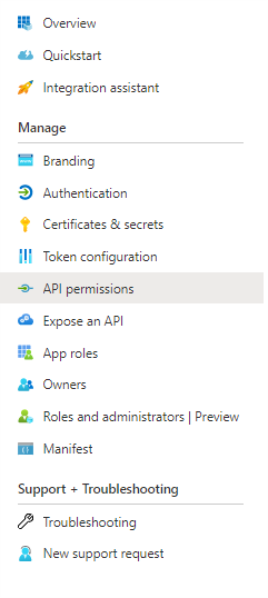
- Click Add a permission:
- Click "APIs my organization uses" and search for "Elastic App."
- Click "Add permissions."
- Now your app should be under "Configured permissions" from SmartHub Authentication app.

- Click Grant admin consent (the button near to the App a permission)
Elastic Backend Configuration
- Choose TokenBased from Authentication Mode drop-down menu.
- In the Azure Scope field, add the Azure Scope for your Elastic Authentication app
- To obtain Azure Scope from an Azure app, perform the following steps:
- Log in to your Azure portal as an administrator:http://portal.azure.com
- Select Azure Active Directory → App registrations → App applications
- Search for the application used for the Elastic Authentication app
- Select Expose an API → Add a scope
- Add a scope name → Choose who can consent → Add a consent display name → Set state on Enabled
- Click "Add scope."
- To obtain Azure Scope from an Azure app, perform the following steps:
Configure your Elasticsearch search engine to use API key for authentication
You can configure your Elasticsearch search engine to use an API key for authentication. To do so, you must complete the following:
Enable security in Elasticsearch
-
Open your elasticsearch.yml file in a text editor.
-
Set the xpack.security.enabled and xpack.security.authc.api_key.enabled parameters to true.
xpack.security.enabled: true
xpack.security.authc.api_key.enabled: true -
For single-node developer set-ups, add the following line to the file.
discovery.type: single-node -
Restart your Elastic server.
Set passwords for built-in users
After enabling security, you will be locked out from Elastic until you set passwords. For more information, see elasticsearch-setup-passwords in the Elastic documentation.
-
In the Elastic CLI, run the following one-time setup command:
./bin/elasticsearch-setup-passwords interactive -
When prompted, set the password for the elastic superuser and other users. Ensure that you note the password for later use in authentication.
If you have not explicitly also set the elastic username, the default username is elastic.
Generate an API Key
After setting your passwords, you can use the Elastic user credentials that you set previously to create an API key.
-
Using an API platform, such as Postman, make a post request to the following:
http://<elastic webserver address>/_security/api_key -
If you are using Postman, you can click the Authorization tab > Basic Auth > and add the username and password that you configured in Set passwords for built-in users. For more information, see API authentication and authorization in Postman in the Postman documentation.
-
Provide the request body for your request. The following example provides a super admin API key. You can adjust this request body to fit your needs. For more information, see Create an API key in the Elastic documentation.
{
    "name": "admin-api-key",
    "expiration": "365d",
    "role_descriptors": {
        "admin_role": {
            "cluster": ["all"],
            "index": [
            {
                "names": ["*"],  // Wildcard for all indices
                "privileges": ["all"]
            }
        ]
        }
    }
} -
Verify that you are receiving your API key in the response. For example, the sample code above produces the following response:
{
    "id": "-YgrFZYB6OjK-FcX6Tan",
    "name": "admin-api-key",
    "expiration": 1775647921575,
    "api_key": "rqtDE3W6RwqPFYybuSUb-w",
    "encoded": "LVlnckZaWUI2T2pLLUZjWDZUYW46cnF0REUzVzZSd3FQRll5YnVTVWItdw=="
}
Configure the API Key in SmartHub
After creating your API key, you can configure SmartHub to use it for your Elasticsearch Search Engine and storage settings configurations:
-
In your Elasticsearch Search Engine configuration, select ApiKey from the Authentication Mode drop-down list.
-
In the API Key field, enter your API key in the following format: id:api_key. For example, using the sample response above, the value of this field is -YgrFZYB6OjK-FcX6Tan:rqtDE3W6RwqPFYybuSUb-w.
-
In your storage settings configuration, select ApiKey from the Elastic Authentication drop-down list.
-
In the API Key field, enter your API key in the following format: id:api_key. For example, using the sample response above, the value of this field is -YgrFZYB6OjK-FcX6Tan:rqtDE3W6RwqPFYybuSUb-w.
Configure Elasticsearch with IAM Roles Anywhere in AWS
AWS IAM Roles Anywhere provides a way to obtain temporary AWS credentials for workloads running outside of AWS using X.509 certificates. This allows external applications, servers, or containers to securely access AWS services such as Amazon OpenSearch Service without storing long-term AWS credentials.
To use IAM Roles Anywhere, a trust relationship must be established between AWS and a certificate authority, and the workload must authenticate using an X.509 certificate and private key.
Your cloud administrator should provide the certificate and private key required for IAM Roles Anywhere authentication. The following steps describe how to create a self-signed certificate and configure IAM Roles Anywhere in AWS.
Create an X.509 certificate
These steps require OpenSSL. Install OpenSSL before proceeding.
-
Create a folder where the certificates will be generated.
-
In the folder created in Step 1, create a file named ca.cnf and add the following configuration. Update the values in the [ dn ] section with your organization details.
[ req ]
default_bits = 4096
prompt = no
default_md = sha256
distinguished_name = dn
x509_extensions = v3_ca

[ dn ]
C = <2-letter country code, e.g., US>
ST = <State or Province Name>
L = <City or Locality Name>
O = <Organization Name>
OU = <Organizational Unit or Department>
CN = <Common Name for this CA, e.g., RolesAnywhereCA>
emailAddress = <Optional email address>

[ v3_ca ]
basicConstraints = critical,CA:TRUE
keyUsage = critical, digitalSignature, cRLSign, keyCertSign
subjectKeyIdentifier = hash
authorityKeyIdentifier = keyid:always,issuer

[ v3_leaf ]
basicConstraints = critical,CA:FALSE
keyUsage = critical, digitalSignature
subjectKeyIdentifier = hash -
Open a command prompt.
-
Navigate to the certificate folder:
cd <folder_path> -
Create the certificate authority private key:
openssl genrsa -out <ca_name>.key.pem 4096 -
Create the self-signed CA certificate:
openssl req -x509 -new -key <ca_name>.key.pem -sha256 -days 3650 -out <ca_name>.cert.pem -config ca.cnf -extensions v3_ca -
Create the workload private key:
openssl genrsa -out <workload_name>.key.pem 2048 -
Create the certificate signing request. Afterwards, you will be prompted to enter certificate details.
openssl req -new -key <workload_name>.key.pem -out <workload_name>.csr.pem -
Sign the workload certificate with the certificate authority:
openssl x509 -req -in <workload_name>.csr.pem -CA <ca_name>.cert.pem -CAkey <ca_name>.key.pem -CAcreateserial -out <workload_name>.cert.pem -days 365 -sha256 -extfile ca.cnf -extensions v3_leaf
Configure IAM Roles Anywhere in AWS
Create a Trust Anchor
-
Sign in to the AWS Management Console.
-
Open IAM Roles Anywhere.
-
In Trust anchors, click Create trust anchor.
-
Enter a name for the trust anchor.
-
For Certificate authority (CA) source, choose one of the following:
-
AWS Private CA: Select an existing AWS Private CA resource.
-
External certificate bundle: Paste the CA certificate body (the contents of <ca_name>.cert.pem that you created in Create an X.509 certificate).
-
-
Click Create trust anchor.
Create an IAM Role for Roles Anywhere
-
https://console.aws.amazon.com/iam/
-
Open the IAM console.
-
Select Roles > Create role.
-
For Trusted entity type, select Custom trust policy.
-
Update the trust policy to include rolesanywhere.amazonaws.com. For example:
{
    "Version":"2012-10-17",
    "Statement": [
        {
            "Effect": "Allow",
            "Principal": {
                "Service": [
                    "rolesanywhere.amazonaws.com"
                ]
            },
            "Action": [
                "sts:AssumeRole",
                "sts:TagSession",
                "sts:SetSourceIdentity"
            ],
            "Condition": {
                "ArnEquals": {
                    "aws:SourceArn": [
                        "arn:aws:rolesanywhere:us-east-1:123456789012:trust-anchor/TA_ID"
                    ]
                },
                "StringEquals": {
                    "aws:PrincipalTag/x509Issuer/CN": "YourCN"
                }
            }
        }
    ]
} -
Attach the required permissions policies, for example:
-
AmazonOpenSearchServiceFullAccess
-
AmazonOpenSearchServiceReadOnlyAccess
-
-
Enter a role name and description.
-
Click Create role.
Create an IAM Roles Anywhere Profile
-
Open IAM Roles Anywhere in the AWS Management Console.
-
In Profiles, click Create profile.
-
Enter a profile name.
-
Select the IAM role created in Step 2.
-
Click Create profile.
Configure OpenSearch role mapping
After IAM Roles Anywhere is configured and the IAM role is associated with your workload certificate, you must map the IAM role in OpenSearch to grant permissions.
Add an Additional Index to Your Existing search engine
To add additional Elastic indices to your default search engine, use the following instructions:
- Add the additional index names to the Elastic backend configuration "
indices" value.- Refer to the topic How to Configure Your Elasticsearch Backend.
- Refer to the topic How to Configure Your Elasticsearch Backend.
- Modify each of your existing Elastic translator stages. This Pipeline stage exists as both a Query and Results stage.
- Add your additional index names to the "
indices" value. - Also add your additional index names to the "
SourceMappings" value in the Result source you want them to appear in.
- Add your additional index names to the "
Logs
-
By default, logs appear in the directory: <SmartHub_Install_Directory>\Logging.
NEAR:The Elasticsearch search engine supports the operator
NEAR.
Supported syntax:
- (A OR B) NEAR(5) C => "A C"~5 OR "B C"~5
- (A OR B) NEAR(5) (C OR D) => "A C"~5 OR "B C"~5 OR "A D"~5 OR "B D"~5
- (A OR "B C") NEAR(5) D => "A D"~5 OR ("B C D"~5 AND "B C")
- (A AND B AND C) NEAR(5) (D AND E) =>"A B C D E"~5Grant the app permissionsLog in to your Azure portal as an administrator:http://portal.azure.com.
SharePoint On-premise
SharePoint On-premise
- Establish Trust Relationship Between SmartHub and SharePoint
- Enable Apps Management and Register the App in SharePoint
- Grant Permissions to the App
- Synchronize User Profiles in SharePoint
- Configure the SharePoint 2016/19/SPSE Search Engine
Establish Trust Relationship Between SmartHub and SharePoint
-
Create a public and private certificate. See Create and Configure Certificate.
-
This certificate is required to create trust between SmartHub and SharePoint 2016/19/SPSE.
-
This single certificate you export as both private and public.
-
Both private and public certificates are required.
-
- Create the trust between SmartHub and SharePoint 2016/19/SPSE: Configure SharePoint to use certificates and configure trust for your add-in.
- Record the
$specificIssuerIdthat you use in this step. - This information is required in the following section: Configure the SharePoint 2016/19/SPSE Search Engine.
- Record the
Enable Apps Management and Register the App in SharePoint
- Enable Apps Management in SharePoint 2016/19/SPSE: Configure the Subscription Settings and App Management service applications.
- This step is required to manage permissions for this High Trust App.
- This step is required to manage permissions for this High Trust App.
- Register the App in the SharePoint site that will be used by SmartHub to query for results: Register SharePoint Add-ins.
- Generate a new Client ID and Secret using the UI.
- App Domain: Enter the URL where SmartHub is hosted (without HTTP/HTTPS, such as contoso.azurewebsites.net).
Redirect URI: Enter the full SmartHub URL, such as https://contoso.azurewebsites.net.
Record the
ClientIDthat was generated. This information is required in the Configure the SharePoint 2016/19/SPSE Search Engine section.
Grant Permissions to the App
Give permissions for the App that was created.
- Navigate to SharePoint site that will be used by SmartHub and go to _layouts/15/appinv.aspx.
- Use the
Add-in IDbox and enter the ClientID generated in step 2a. above and click Look-up. -
Paste the following permissions XML in the Permissions Request XML box:
App Permissions
<AppPermissionRequests AllowAppOnlyPolicy="false">
    <AppPermissionRequest Scope="http://sharepoint/search"
        Right="QueryAsUserIgnoreAppPrincipal" />
    <AppPermissionRequest Scope="http://sharepoint/social/tenant"
        Right="FullControl" />
</AppPermissionRequests>
The XML contains all of the permissions provided to the application that uses this Trust:
- Impersonate user during searches
- Request user profile properties
Synchronize User Profiles in SharePoint
-
Do a full User Profile Synchronization in SharePoint.
-
Go to SharePoint Central Administration > User Profile Administration.
-
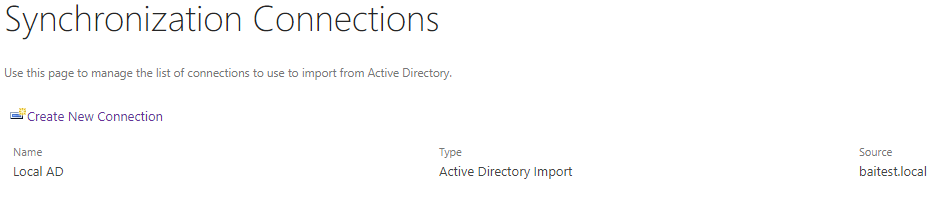
Configure a Synchronization connection. Make sure the container used contains all of the users that you want to access SmartHub.
-
Start a Full Profile Synchronization.
-
After profile synchronization is complete, on the top right a "Number of User Profiles" value appears that is similar to the total number of users who have access to SmartHub.
See the following graphic.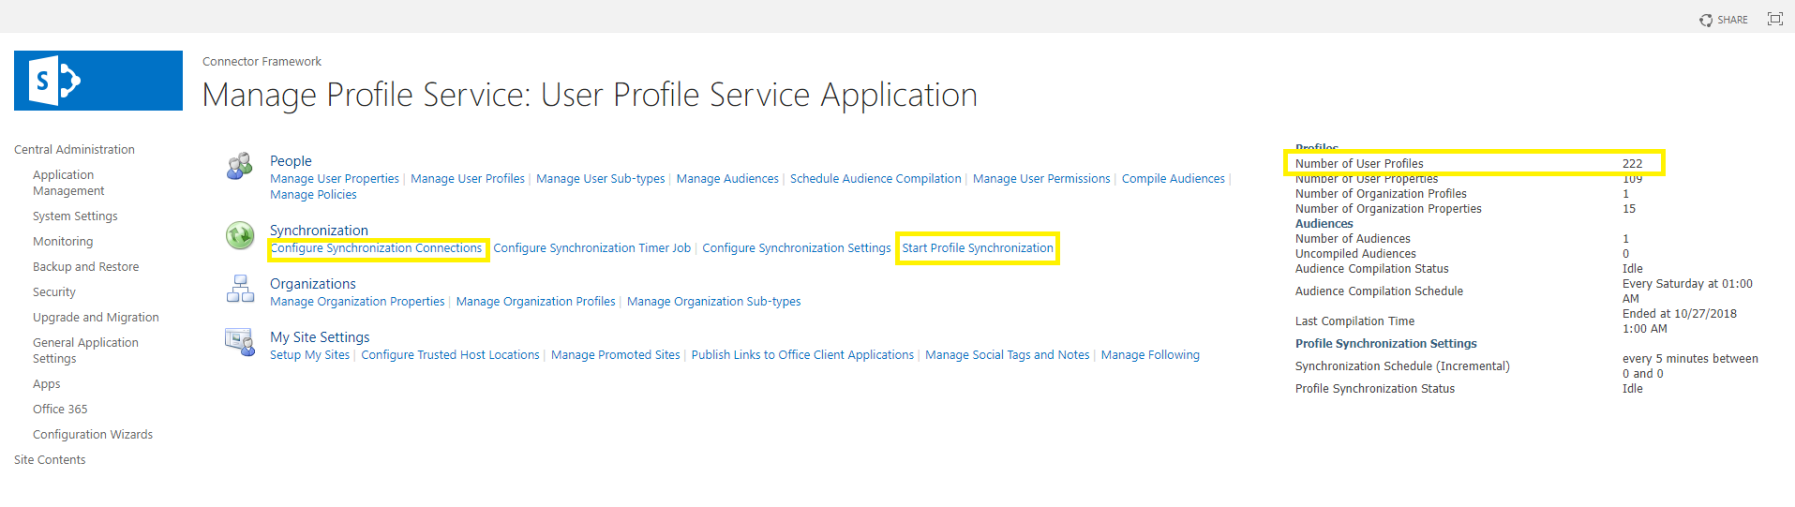
-
Configure the SharePoint 2016/19/SPSE Search Engine
The Main search engine determines which options are available for the search center and other search UI controls. The main search engine is also used to list the available search locations, as well as rank profiles, search scopes, and so on. To configure this search engine, do the following:
- Navigate to the SmartHub Administration page at http(s)://[web-app-url]/_admin.
- For example:http://smarthub.azurewebsites.net/_admin.
- For example:http://smarthub.azurewebsites.net/_admin.
- Select General Settings> Add New Search Engine to see the Search Engine pop-up window:
- Name (required):
- Enter a unique name for your search engine.
- This name cannot be duplicated and can contain only letters, digits, or any of the following characters:
' ', '-', '_', '.', '(', ')', '[', ']'
- Type:
- Click the down arrow and select Sharepoint OnPremise.
- Click the down arrow and select Sharepoint OnPremise.
- Rank offset formula coefficients (optional):
- These values are used only if you selected the Rank Based mixing algorithm that is set in the Properties for SmartHub SSA page.
- For more information, see Specify the Mixing Algorithm.
- BOOST: Enter the boost factor.
- OFFSET: Enter the rank offset.
- These values are used only if you selected the Rank Based mixing algorithm that is set in the Properties for SmartHub SSA page.
- These are the credentials used to access the site collection:
- Audience URL
- Username: Enter the user name for this site.
- Password: Enter the password for this user.
- Impersonate Logged in User:
- Checked: This enables SmartHub to assume the identity of the user when retrieving data.
- Unchecked: If you don’t use impersonation, all queries will run as the account configured here in the search engine configuration.
-
Url:
-
Specify the internal website URL of the SharePoint 2016/19/SPSE site to be used for querying.
-
Example: http://mysharepointserver/sites/search
Site Collection:This Site Collection option must not be enabled:
Limited access user permission lockdown mode
-
- Registered Issuer Name: Specify the "Registered Issuer Name" of the Security Token Issuer created for the High Trust App.
- App Client ID: Specify the "Client ID" of the High Trust App registered in SharePoint.
- Tenant Authentication Realm: Specify the "Authentication Realm" GUID of the 2016/19/SPSE SharePoint farm.
- Certificate path:
- Specify the relative path, which must start with
~/, to the location where the certificate (.pfx) was uploaded. - (This certificate must be in the same place as the rest of the SmartHub resources in the Azure Web App.
- Export your certificate:
- Go into Certification Manager and export your certificate, as a PFX file onto disk.
- Best practice is to export to the Certificates folder in the SmartHub directory:
- Go back to your SmartHub Administration page and add the name of the PFX that you saved to the “Certificate path”
- The path should be ~/Certificates/the name of the pfx file
Note: The path is not looking for the name and path in the Certification Manager. It is looking for the name path to the .PFX file on desk. - Specify the relative path, which must start with
- Certificate pass: This is the password for the .pfx file
- NameID Claim name: Enter the NameID claim that is used by your identity provider. If you are using Azure Active Directory for authentication, set this value to onprem_sid and add an optional claim with the same value in the Microsoft Entra Admin Center.
- NameID provider: Enter the identity provider.
- Click OK to add this search engine.
SharePoint Online
SharePoint On-premise
- How to Configure the SharePoint Online Search Engine
- How to Register an App in Azure and Configure It
- How to Show Personal OneDrive Documents
Use the following procedure to connect SmartHub to your SharePoint Online search engine.
REQUIRED
When using SharePoint Online as your search engine, only Azure Active Directory can be used to secure SmartHub and authenticate users.
How to Configure the SharePoint Online Search Engine
- Navigate to the SmartHub Administration page at:
http(s)://[web-app-url]/_admin - Click General Settings > ADD NEW SEARCH ENGINE. The Search Engine window displays.
- Name (required): Enter a unique name for your search engine. This name cannot be duplicated and can contain only letters, digits, or any of the following characters:
- ' ', '-', '_', '.', '(', ')', '[', ']'
- ' ', '-', '_', '.', '(', ')', '[', ']'
- Type: Select Regular.
- Search Engine: Select SharePoint Online.
- Rank offset formula coefficients (optional): These values are used only if you selected the Rank Based mixing algorithm that is set in the Properties for SmartHub SSA page. For more information, see Specify the Mixing Algorithm.
- BOOST: Enter the boost factor.
- OFFSET: Enter the rank offset.
- These are the tokens used to access the site collection:
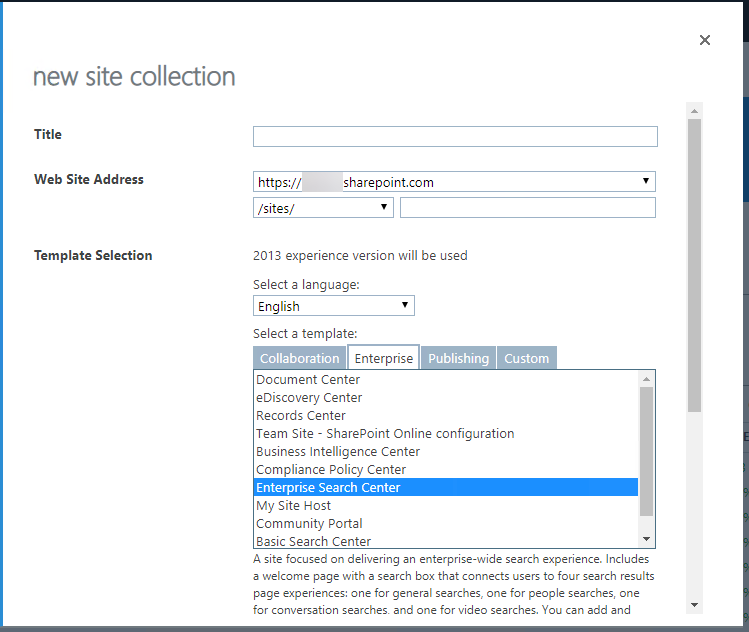
- Site url: Enter the URL for your SharePoint Online Search Center, which is a site collection created with a SharePoint "Enterprise Search Center" template. You may receive an error when performing a query if you do not use a Search Center URL in this field.
- Access Token: Enter the access token from SmartHub's OAuth page.
- Refresh Token: Enter the refresh token from SmartHub's OAuth page.
- Client Id: Enter the Application ID from Azure App Registrations.
- Client Secret: Enter the Key's value from Azure App Registrations.
- Company Signature (Optional): Enter the company signature. This is used to avoid getting throttled by SharePoint O365.
- Example:
- See here for more details on required format.
- Impersonate: Click to let SmartHub assume the identity of the specified account when retrieving data. If impersonation is checked you don't need to fill the rest of fields.
- Site url: Enter the URL for your SharePoint Online Search Center, which is a site collection created with a SharePoint "Enterprise Search Center" template. You may receive an error when performing a query if you do not use a Search Center URL in this field.
- After completing Site Url, Client Id and Client Secret, click Authorize. A new tab will open to log in.
- After logging in, you are redirected to SmartHub's OAuth page where you can find the access token and refresh token. See How to register an app in Azure and configure it.
- Click OK to add this search engine.
How to Register an App in Azure and Configure It
SmartHub with SharePoint Online requires Azure Active Directory authentication. You can register an app in Azure by following the instructions in the sub-topic "Azure Active Directory" in Set Access and User Authentication for SmartHub with SharePoint Online.
How to Show Personal OneDrive Documents
In order to request personal OneDrive documents the ContentSetting property must be configured.
- The OneDrive documents will not be visible but can be found in the query result ResultBlocks attribute.
- Enabling ContentSetting is done using a Query Scripting Processor stage, while manipulating the OneDrive documents is done using a Results Scripting Processor stage.
Examples
Example of how the Query Scripting Processor used to enable the ContentSetting can look like:
if(Query.QueryText.Contains("ContentSettingFlag"))
{
    Query.QueryText = Query.QueryText.Replace(" ContentSettingFlag","");
    Query.AdditionalPropertiesFromBag = new Dictionary<string,object>();
    Query.AdditionalPropertiesFromBag["ContentSetting"] = 3;
}
In the example only when the "ContentSettingFlag" keyword is passed to the query text, the ContentSetting property will be enabled. This is done so that the property is enabled only for a specific query. ContentSettingFlag is used only as an example and the query can be identified in other ways too. For example, SourceID.
The ContentSettingFlag was passed to the query text via a ContentBySearch:
<div class="CoveoContentBySearch cbs-tab-container" id="top-results" data-query-text='* FederatorBackends:"*" ContentSettingFlag' data-source-id="b29924a9-ec32-4c10-8892-a544b69ee121" data-results-per-page='3' data-hide-until-first-query="false">An example of how the Results Scripting Processor is used to manipulate the OneDrive personal documents can look like:
if(Results.ResultBlocks.Count > 0)
{
    Results.RelevantResults.Clear();
    foreach(var resultBlock in Results.ResultBlocks)
    {
        Results.RelevantResults.AddRange(resultBlock.BlockResults);
    }
}
In this example the original results will be replaced with the results from the ResultBlock that contains the OneDrive personal documents.
Note: The three results per page is a SharePoint limitation.
While showing more than three results at a time is not possible, the Pager component can be used to show multiple pages.
If the OneDrive documents are shown in a Content-By-Search component the Pager component must also be added to the Content-by-Search.
The Pager component markup: <div class="CoveoPager"></div>
Snowflake
Prerequisites
Note the following prerequisites before setting up your Snowflake search engine:
-
If you want to connect SmartHub to Snowflake using JWT (JSON Web Token) authentication, you must generate an RSA key pair.
-
Your Snowflake user account must have the SECURITYADMIN or ACCOUNTADMIN role granted.
-
-
The Snowflake database must meet the following requirements:
-
Main Table: Must have a Primary Key defined on the unique identifier column (for example, ENTITY_ID).
-
EAV (Entity-attribute-value) Table: Must have a Foreign Key referencing the Main Table Primary Key.
-
Limitations
Note the following limitations when using the Snowflake search engine:
-
Relevancy tuning using XRANK is not supported.
-
Mathematical operators in fielded queries must not contain spaces.
-
Supported: size>1200
-
Unsupported: size > 1200
-
-
Boolean operators must be uppercase.
-
Supported: john AND marketing
-
Unsupported: john and marketing
-
-
Date queries must use the format YYYY-MM-DD.
-
Supported: date>2005-01-01
-
Unsupported: date<today, date>2005
-
-
Facet filtering is currently not supported
Generate RSA Key Pair for Snowflake Authentication
To connect SmartHub to Snowflake using JWT (JSON Web Token) authentication, you must generate an RSA key pair consisting of a private key and a public key.
-
The private key must be placed in the following location: <SmartHub installation folder>/Certificates/Snowflake.
-
The public key must be assigned to your Snowflake user account in Snowsight.
It is recommended to run the following commands using Git Bash on Windows because Windows Command Prompt does not include OpenSSL by default.
Unencrypted Key Generation
Generate the private key:
openssl genrsa -out snowflake_key.pem 2048Generate the public key:
openssl rsa -in snowflake_key.pem -pubout -out snowflake_public.pemEncrypted Key Generation
Generate the private key:
openssl genrsa -aes256 -passout pass:<YourPassword> -out snowflake_key.pem 2048Generate the public key:
openssl rsa -in snowflake_key.pem -passin pass:<YourPassword> -pubout -out snowflake_public.pemAssign the Public Key to a Snowflake User
-
Open the generated public key file.
-
Copy the key string between:
-----BEGIN PUBLIC KEY-----
-----END PUBLIC KEY----- -
Log in to Snowsight as a user with the SECURITYADMIN or ACCOUNTADMIN roles.
-
Open a new SQL worksheet and execute the following:
ALTER USER "your_snowflake_username"
SET RSA_PUBLIC_KEY='your_public_key';
Create and Configure the Snowflake Search Engine
- Open a web browser and navigate to your SmartHub Administration portal at http(s)://<web-app-url>/_admin
-
Click General Settings.
-
Click Add New Search Engine.
-
In the modal window, complete the following fields:
-
In the Type field, Select Regular.
-
In the Search Engine field, select Snowflake from the drop-down list.
-
In the Name field, enter a name for your search engine.
-
In the Rank offset formula coefficients field, enter values for the Boost and Offset. Enter these values only if you selected the Rank Based mixing algorithm that is set in the General Settings.
-
-
Provide the following connection and schema information so SmartHub can connect to Snowflake and query the appropriate database tables:
Setting Description Account Enter the Snowflake account identifier used to connect to your Snowflake environment. This typically includes the account locator and region (for example, xy12345.us-east-1). For more information, see Account Identifiers in the Snowflake documentation. User Enter the Snowflake username that SmartHub will use to connect to Snowflake. This user must have the RSA public key assigned for JWT authentication and must have access to the database, schema, and tables being searched. Warehouse Enter the Snowflake virtual warehouse used to execute search queries. The warehouse provides the compute resources required to run SQL queries against Snowflake data. Database Enter the Snowflake database that contains the tables used for search. Schema Enter the Snowflake schema that contains the Main Table and optional EAV table used by SmartHub. Main Table Enter the primary table that contains the documents, records, or searchable content. Each row represents a searchable item. ACL Column Enter the column in the Main Table that contains Access Control List (ACL) values used for security trimming. This column typically contains arrays or lists of security identifiers. Searchable Main Columns Enter a comma- or semicolon-separated list of columns in the Main Table that should be searched during standard full-text searches. -
If you using an EAV table, configure the following mapping settings:
EAV Table Enter the name of the EAV table containing your extended metadata. EAV Table ID Column Enter the foreign key column that links the EAV table to your Main Table ID. EAV Key Column Enter the column containing the attribute/property names. EAV Value Column Enter the column containing the actual values for those attributes. Searchable Attributes Enter a comma-separated list of the specific EAV keys that should be included in search queries. -
In the Private Key field, enter the exact file name of your generate private key. This file must be located in <SmartHub installation folder>/Certificates/Snowflake.
-
In the Private Key Passphrase field, enter the passphrase used to encrypt your RSA private key. Leave this field blank if you generated an unencrypted key.
-
Click Ok.
Tuning stages
When a Snowflake search engine is created, SmartHub automatically adds the following Query and Results tuning stages:
-
Advanced Security Module: This stage performs security trimming by retrieving Access Control List (ACL) security IDs. You can optionally impersonate a user for testing by updating the following setting:
<impersonateUser>domain\username</impersonateUser> -
Property Mapper: This stage maps SmartHub managed properties to Snowflake database columns. You must update this stage to reflect your Snowflake Schema. For example, if your Snowflake table uses ENTITY_ID for the document title, DESCRIPTION for the summary, and SOURCE_SYSTEM for the file extension, you would update both the Query and Results mappers to look like this:
title,ENTITY_ID;
excerpt,DESCRIPTION;
FileExtension,SOURCE_SYSTEM;
If you modify mappings in the Query Tuning stage, , you must apply the same changes in the Results Tuning stage.
Querying the Snowflake Search Engine
There are two search scopes:
-
Searchable Fields (SF) – Columns configured as searchable
-
All Fields (AF) – All columns and EAV attributes (only searchable via property restrictions)
Standard Search (Searches Searchable Fields Only)
Standard text queries and boolean operators only look for matches inside your Searchable Fields. Supported query features:
-
AND
-
OR
-
NOT
-
Exact phrase search
-
Grouping with parentheses
-
Wildcard *
Property Restrictions (Searches All Fields)
Property restrictions dynamically query All Fields in the database.
-
Text/Partial Match: Uses Property:Value syntax. For Example: file_type:pdf.
Using ":" for numbers acts as a text search. size:1200 may return partial text matches like 12. -
Exact Match: Use "=" for exact matches. For example, size=1200 only returns documents where the size is exactly 1200.
-
Numeric/Date Comparison: Use standard operators (>, <, >=, <=). For example:
-
Numeric: budget>100 or size<=102.5.
-
Date: date>2025-03-03. This must strictly follow YYYY-MM-DD format.
-
Combined Queries
You can mix standard text searches (SF) with property restrictions (AF) using parentheses and boolean operators. For example, (john OR marketing) AND (size=1200 OR department:sales).
Solr
Note: Search engines in SmartHub are often referred to as "backends." You can consider the terms interchangeable.
How to Add and Configure a Solr Search Engine
You add a Solr search engine as an additional search engine to your SmartHub instance. This does not effect your Main search engine.
-
Go to General Settings, Search Engine section and click on ADD NEW SEARCH ENGINE.
-
Type: Select Regular.
-
Search Engine: Select Solr.
-
Modify the search engine configuration by entering your configuration settings into the Parameters field.
Parameters XML
<configuration>
    <settings>
        <setting Name='ServerAddress' Value='http://localhost:8983' />
        <setting Name='Collection' Value='index' />
        <setting Name='HighlightSummaryProperty' Value='title' />
        <setting Name='timeout' Value='30' />
    </settings>
</configuration>
Parameters
Use the following table to set your parameters shown in the XML code above:
|
Parameter |
Default Value |
Required? |
Description |
|---|---|---|---|
ServerAddress
|
http://localhost:8983 | Yes | The URL of your Solr service instance. |
|
|
documents | Yes | Index Collection. |
|
|
30 | No |
Note: If the search takes longer than 30 seconds, the search is canceled.
|
HighlightTagContent
|
c0 | HTML markup tag for highlighted content. | |
|
|
body | Highlight Summary property. | |
AnalyzedFieldSuffix
|
No | The suffix that is appended to the field name whenever search operations have to be done on the analyzed version of the field. |
Pipeline Stages
The following Tuning stages are added to your Solr search engine.
These tuning stages only apply to your Solr search engine.
-
After creating the Search Engine, multiple new Tuning stages are added:
-
Under "Query Tuning"
-
Property Mapper
-
Range Facets
-
-
Under "Results Tuning"
-
Property Mapper
-
-
Supplemental search engine
Bing News
About
Bing News search engine uses the News Search API to:
- Send search queries to Bing
- Receive a list of relevant news articles
How to Add the Bing News Search Engine to SmartHub
Use the following instructions to add the Bing News search engine to SmartHub:
- Navigate to the SmartHub Administration page: http(s)://[web-app-url]/_admin
- Click Add New Search Engine.
- The Search Engine dialogue box appears.
- Select Type: Experimental
- Enter a search engine name.
- In the Search Engine field, select Bing News Experimental.
- Enter your parameters as set and defined in the table below into the appropriate fields.
- Click OK.
Parameters
| Parameter | Required? | Description |
|---|---|---|
| Bing API Access Key | yes | This is the subscription key that you received when you signed up for this service in Cognitive Services. |
| Country code | optional |
A 2-character country code of the country where the results come from.
|
| News category | optional |
The category of articles to return.
|
| Freshness |
|
Filter news articles by the following time values:
|
Bing Search
About
The Bing Search search engine uses the Web Search API to:
- Send search queries to Bing
- Receive search results that include links to web pages, images, and more.
How to Add the Bing Search search engine to SmartHub
Use the following instructions to add the Bing Search Experimental search engine to SmartHub:
- Navigate to the SmartHub Administration page: http(s)://[web-app-url]/_admin
- Click Add New Search Engine.
- The Search Engine dialogue box appears.
- Select Type: Experimental
- Enter a Search Engine name.
- In the Search Engine field, select Bing Search Exerimental.
- Enter your Bing API Access Key (see below).
- Click OK.
Parameters
| Parameter | Required? | Description |
|---|---|---|
| Bing API Access Key | yes | This is the subscription key that you received when you signed up for this service in Cognitive Services. |
CourtListener
About CourtListener
CourtListener is a free legal research website containing millions of legal opinions from federal and state courts.
-
For more information see: https://www.courtlistener.com/
Limitations
The following features are unsupported by the CourtListener search engine:
-
File Type refiners
-
Multiple order properties
-
Fuzzy search and proximity
-
Related opinions
-
Field boosting
How to Set Up the CourtListener search engine
Use the following topics to set up and configure your CourtListener search engine.
Add a New search engine to SmartHub
-
Start by opening your SmartHub Administration site: https://<SmartHubSite>:<port>/_admin.
-
Click Add New Search Engine to add your new CourtListener search engine. The Search Engine page appears.
-
In the Search Engine field, select Court Listener Experimental.
-
Complete the following fields on the page:
-
Authentication Token:
-
The authentication token is available only when you are logged in to CourtListener.
-
The token can be obtained from https://www.courtlistener.com/api/rest-info/.
-
As CourtListener states, keep this token private, like a password.
-
-
Max number of results for shallow refiners:
-
The number of results the search engine uses to build the refiners. This value is set to 100 by default.
-
The lower the value, the faster queries are performed.
-
Note this can result in a less precise refiner.
-
-
The higher the value, the slower queries are performed.
-
Note this can result in a more accurate refiner.
-
-
The value should be smaller than 1000, otherwise you may experience throttling or the thread may be aborted.
-
-
Summary Max Length:
-
The maximum number of characters for excerpt. This value is set to 200 by default.
-
Verify the Required Pipeline Stages
After the search engine is configured, ensure the Property Mapper pipeline stage is configured for both the Query and Results tuning stages for your new CourtListener search engine. If these pipeline stages are missing, add them using the following steps:
-
Go to the General Settings page from the SmartHub Administration page: https://<SmartHubSite>:<port>/_admin
-
Select the CourtListener search engine you have just created.
-
Click Add a new Query Stage link.
-
In the newly opened window, select the Property Mapper stage from the Pipeline Stages drop-down.
-
Add a new name for this state.
-
In the Parameters text area, add the properties you want to map in the format described in the left panel.
-
Save and repeat these steps for the Result Pipeline stage.
The Results pipeline stage must contain a Refiner Mapper tuning stage. The Refinement Mapper stage is used to display appropriate names for Courts instead of their IDs. If this mapper is missing, contact BA Insight to provide the newest value for the refinement mapper.
Refiner Properties
The results can be refined by the following properties:
-
court_id – Facet Type: List facet
-
judge – Facet Type: List facet
-
dateFiled – Facet Type: Date picker facet
-
citeCount – Facet type: Slider facet
-
status_exact – facet type: List Facet
Default Refiners
-
No default refiners are mapped.
-
Remove Author, File Type, and Modified Date and add refiners from the above list
Sorting Properties
The Court Listener search engine supports sorting by only one property at one time. The properties that can be used for sorting are:
-
Rank (default)
-
Descendent only
-
Note: An ascending order automatically results in a descending order.
-
-
dateFiled
-
Ascendent
-
Descendent
-
-
citeCount
-
Ascendent
-
Descendent
-
Fielded Queries
In addition to being able to place fielded searches in the side bar, advanced users can also place fielded searches in their main query.
For example:
-
court_id:ca1 status:precedential
-
A search for court_id:ca1 status:precedential returns only:
-
precedential cases (status:precedential) in the First Circuit of Federal Appeals (court_id:ca1)
-
The Abbreviation field is used as the value for court_id field query.
-
-
-
caseName:”Axe Tool Co.”
-
A search for caseName:”Axe Tool Co.” returns only:
-
cases that contains Axe Tool Co. in case name
-
-
-
docketNumber:”1107”
-
A search for docketNumber:”1107” returns only:
-
cases that contains 1107 docket number.
-
-
More Information
-
For more information about advanced query techniques see: https://www.courtlistener.com/help/search-operators/#fielded-queries-fieldname-term
-
For all available jurisdictions see: https://www.courtlistener.com/api/jurisdictions/
Documentum
About
OpenText Documentum is an Enterprise Content Management system.
-
The Documentum search engine makes it possible to search in SmartHub for documents stored on the OpenText Documentum server.
Prerequisites
The Documentum search engine is based on the Documentum REST API, therefore all the following must be satisfied:
- Documentum can be reached over the network from the machine where SmartHub is deployed.
- Search service is installed and configured in Documentum.
- REST API for Documentum is enabled.
Authentication
-
Authentication of search engine is based on Azure applications.
-
Both Documentum and SmartHub must be configured to support this type of authentication.
-
When a user logs in to SmartHub, the authentication token of its application is automatically converted to a Documentum-related one and is used to authenticate in Documentum.
How to Install the Documentum Search Engine
- Start by opening your SmartHub Administration site: https://<SmartHubSite>:<port>/_admin.
- Click Add a New Search Engine. The search engine settings page appears.
- Select Type: Experimental.
- In the Search Engine field, select Documentum Experimental.
- Complete the following fields on the page:
- Base Url:
- Base URL of Documentum REST API.
- Example: http://mydocumentum.mydomain.com/dctm-rest
- Scope URL
- The scope URL configured in Azure application created for Documentum
- Repository:
- Name of Documentum repository to search
- Date Refiner Format:
- Select what refinement values to display for dates.
- Possible values: "year", "quarter" and "month"
- Base Url:
Configure Results Page
Refiners
Following properties can be used in refiners:
- ContentType
- All Documentum properties that support facets.
Configuring Refiners
- Following attributes must be set on each refiner in Results.html:
- data-preload-values=”true”
- data-use-and="true"
- Properties filetype and a_content_type should not be used for refiners.
- Use contentType property instead.
- File {SmartHubFolder}\modules\SmartHubResourceLoader\DefaultModuleSettings.js must be changed.
- Refiner mapping under query suggestions for filetype property must be either removed or changed to contentType.
- Date refiners must be configured as normal, text based refiners.
- Refinement values are displayed according to the "Date Refiner Format" setting (see above)
Egnyte
About Egnyte
Egnyte is a secure content platform.
- For more information about Egnyte, see: https://www.egnyte.com/solutions/secure-enterprise-content-platform
- For information about Egnyte apps and API, see Egnyte Help.
Prerequisites
-
You must create your own app registration in Egnyte. Whn you add you Egnyte search engine, you will have to specify those parameters.
Limitations
The following limitations of the Egnyte search engine are due to the current Egnyte API:
- Egnyte API returns a maximum of 20 results.
- BA Insight recommends you remove the "total results count" from the Results page.
- Egnyte API accepts queries that are up to 100 characters.
-
Sorting can only be done by one property at one time. Properties that can be used for sorting are:
- name
- score
- last_modified
- size
-
Highlighting doesn't work with custom fields. It is predefined by the Egnyte API.
-
Excluding refiners:
-
Custom fields cannot be used for exclusion
-
Built-in properties that can be used for exclusion include fileName, folderName, canonicalFileName, canonicalFolderName, content, comments, description, size, modifiedDate, fileExtension, userName, userFullName, type.
-
Create an app registration in Egnyte
-
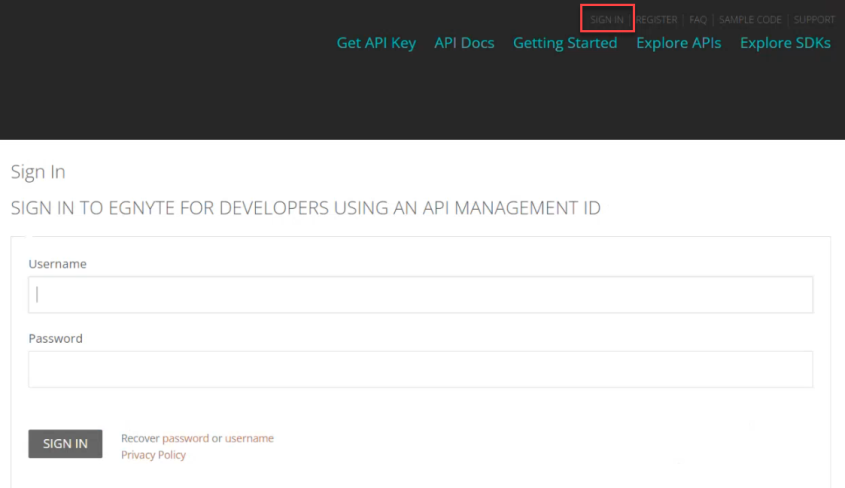
Go to developers.egnyte.com
-
Click SIGN IN.
-
You must Register if you do not already have an account.
-
Next, click Get API Key from the top of the page.
-
Click the APPLICATIONS tab.
-
Click CREATE A NEW APPLICATION.
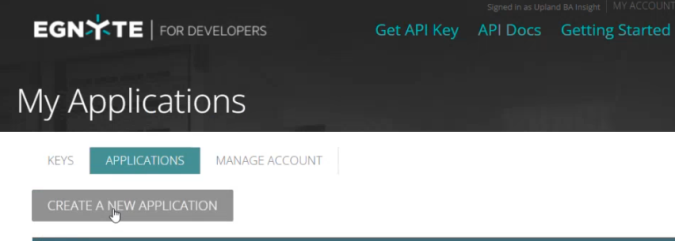
-
Complete the fields with the following information:
-
Name This is the name of your Egnyte application. Enter an appropriate name and note it for later use.
-
Type: Publicly Available Application.
-
Current User Base: New App (only for deployment, it is changed later)
-
Platform: Web App
-
Egnyte domain you will use for testing: This is the name of your (client) domain in Egnyte. For example, app4domain
-
App Icon URL: skip this field.
-
Please describe what your application will do: This is a description of what you app will accomplish. You may complete this field as you see fit.
-
Registered OAuth redirect URI:
-
Enter URL in the form: <URL of your domain>/oauth.
-
Example: https://app4YourDomain.egnyte.com/oauth
-
Note: Note: When you move to production we recommend you CHANGE this value to a more appropriate option for your environment, such as 100k-1m, etc..
This impacts volumes and scalability -
-
Click Register Application.
-
The App Registered page appears.
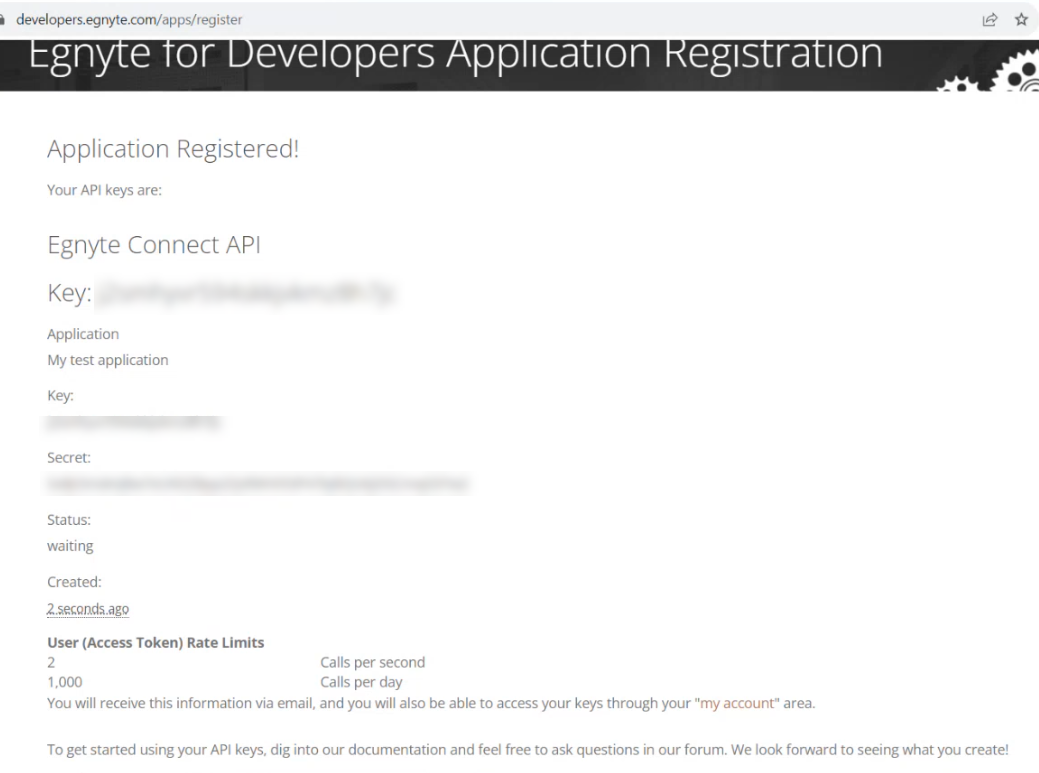
-
Your Key and Secret appear on this page. You should Record both of these values for the following use:
-
Key is your Client ID for SmartHub usage.
-
Secret is your Client Secret for SmartHub usage.
-
How to Set Up the Egnyte Search Engine
Use the following topics to set up and configure your Egnyte search engine.
Add a New Search Engine to SmartHub
- Start by opening your SmartHub Administration site: https://<SmartHubSite>:<port>/_admin.
- Click Add New Search Engine. The Search Engine page appears.
- Select Type: Regular.
- In the Search Engine field, select Egnyte.
- Complete the following fields on the page:
- Egnyte Impersonation Property:This is the name of a property to be added to the client context properties that hold the username of the user to be impersonated. This is done with a script in a Query Scripting Processor tuning stage, see section Tuning Stages below.Note: The script retrieves the Client Context object and uses the upn property to calculate the user name of the logged user (without the domain) and add it to the Client Context in the custom property mentioned above.Note: If your Client Context object (JTW Token) contains a property of the logged user, without the domain, only the username, and the same username can be found in the Egnyte App, you no longer need the Scripting Tuning stage. The specific Client Context object (JTW Token) property must be added here.
- Name: This is the name you give to your Egnyte search engine.
- Domain: This is the Egnyte domain you want to search. For example: myegnyteapp.egnyte.com
- Folder Path (optional): This is the Egnyte folder path that you want to search. For example, /Shared/Templates.
- Client Id: This is the Client ID provided when creating an Egnyte app. See Egnyte Prerequisites.
- Client Secret: This is the Client Secret provided when creating an Egnyte app. See Egnyte Prerequisites.
- Egnyte Impersonation Property:This is the name of a property to be added to the client context properties that hold the username of the user to be impersonated. This is done with a script in a Query Scripting Processor tuning stage, see section Tuning Stages below.
- Click the Get Authorization Code button. This opens and redirects you to a new web page.
- On the new page, enter your credentials.
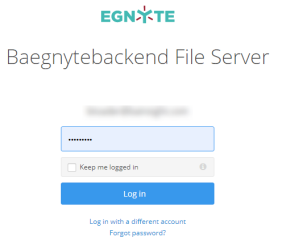
- After logging in, you are redirected to a page where you grant access to the Egnyte app.
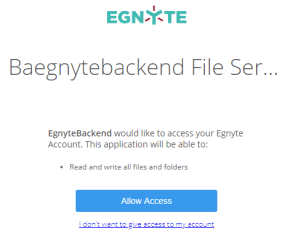
- On the new page, enter your credentials.
- Click Allow Access. You are redirected to a new page.
-
In the URL of the new page, select the
codeparameter value.The value is found in the URL between the words "code=" and "&state":

Note: This page may display "Not found". This is acceptable as long as the code parameter is shown in the URL.
- Copy the code.
- Go back to the Search Engine page and paste the code in the Authorization Code field.
- Press the Get Access Token button.
-
You are redirected to a new page where you can see the Access Token.
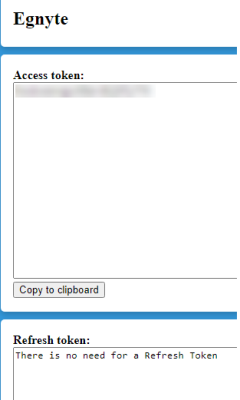
Note: As described in the Refresh Token section, a refresh token is not required.
- Copy the access token using the "Copy to clipboard" button.
- Go back to the Search Engine page and paste the access token in the Access Token field.
- Click the Save button.
- Close all web pages opened during the authentication process.
Verify the Required Tuning Stages
After the search engine is configured, ensure the Property Mapper tuning stage is configured for both the Query and Results tuning stages for your new Egnyte search engine. If these tuning stages are missing, add them using the following steps:
- Go to the General Settings page from the SmartHub Administration page: https://<SmartHub_web_app_url>/_admin.
- Select the Egnyte search engine you have just created.
- Click ADD QUERY TUNING.
- In the newly opened window, select the Property Mapper stage from the Pipeline Stages drop-down.
- Add a new name for this state.
- In the text area on the right, add the properties you want to map in the format described on the left panel.
- Save and repeat these steps for the Result Tuning stage.
Query Scripting Processor Tuning Stage
Next, a Query Scripting Processor stage should also be present as a Query tuning stage.
This stage adds a custom property to the Client Context object with the same name as the one you selected during Configuration step 5, for the field Egnyte Impersonation Property.
The script retrieves the Client Context object and uses the upn property to calculate the user name of the logged user (without the domain) and add it to the Client Context in the custom property mentioned above.
Note: The default script should resolve the Azure AD and Windows authentications. If a different type of authorization is used, then the script might have to be changed.
Configure Your SmartHub Results Page
- Your SmartHub Results page is controlled by the file Results.html (or a modified version of that file if you use a custom Results page). Open your Results HTML page to edit.
-
Reference the Egnyte search engine name within a
coveo-tab-section. See the example below:Example:

Refiner Properties
The results can be refined by the following properties:
- fileName
- size (only with a range operator)
- modifiedDate (only with a range operator)
- fileExtension
- userName
- userFullName
- Every custom metadata created in the source system.
To add custom metadata as a refiner, add the custom metadata to the PropertyMapper Tuning stage in your search engine using the specific format:
dataFieldValueFromFacet,namespace.propertyNameCustom metadata: "Company"
Namespace where custom metadata is defined: "SHProd"
Data-Field configured in HTML page for your facet: "company"
PropertyMapper stage configured for Egnyte search engine:
Default Refiners
Display Author → userFullName
Result Type → fileExtension
Modified Date → modifiedDate
Sorting Properties
As mentioned in the limitation section, the Egnyte search engine supports sorting by only one property at one time.
The properties that can be used for sorting are:
-
name
-
score
-
last_modified
-
size
iManage Cloud
Prerequisites
- Network service account
A service account can only be used with a single SmartHub instance at any one time.
You must contact Upland BA Insight Support before deciding to use the iManage Cloud search engine. Since the underlying iManage App Registration is owned by Upland BA Insight, we will need to add your SmartHub instance URL(s) to the Allowed Redirect URLs in the App Registration. You will need to provide the FederatedAuth.aspx page URL accessible from your SmartHub site. For example: https://[sh-web-app-url]/FederatedAuth.aspx
If you purchased Smart Previews, you will need to provide the OAuth.aspx page URL accessible from your Smart Previews site. For example: https://[smart-previews-web-app-url]/Pages/OAuth.aspx
Limitations
Note the following limitations before configuring your iManage Cloud search engine:
-
The iManage federated search API only returns a maximum of 500 potential search results rather than a specific count. If your count of potential search results exceeds 500, the UI on the SmartHub results page will only state Results 1-10 of 500.
-
Filtering is limited with the iManage search engine. You are able to filter integer-based values, such as a client number, but you cannot filter string-based values, such as client name.
-
iManage search results do not return a hit highlighted summary. Text that precedes and succeeds the queried term is not included in the search results text block.
-
Search queries that use trailing wildcards(*), for example, "litiga*", are not supported.
-
The iManage search results do not return a score or rank.
-
Relevancy tuning to dynamically weigh the importance of search results from specific search engines, is not supported by the iManage search engine.
-
The iManage API does not return the refiners count. Instead, SmartHub computes the count based on the retrieved results. If your query returns more than 500 results (the iManage API search limit), the refiner count will not be accurate.
Endpoints used
These are the iManage service endpoints that the search engine uses:
-
AUTHORIZE ENDPOINT = {iManageServerURL}/auth/oauth2/authorize
-
TOKEN EXCHANGE ENDPOINT = {iManageServerURL}/auth/oauth2/token
-
API INFO ENDPOINT = {iManageServerURL}/api
-
SEARCH ENDPOINT = {iManageServerURL}/api/v2/customers/{customerID}/documents/search
Required User Access and Authorization
-
This search engine implements Federated Impersonation which means every user must log in for themselves.
-
You must configure the Federated Impersonation module to handle automatic user login before proceeding.
- The authentication flow is as follows:
- The user is redirected to iManage where he provides credentials to log in.
- iManage redirects him back to SmartHub.
- The user is provided only with the items for which he has access to in iManage.
How to Configure an iManage Search Engine
- Navigate to the SmartHub Administration page at: http(s)://[web-app-url]/_admin
- For example: http://smarthub.azurewebsites.net/_admin
- For example: http://smarthub.azurewebsites.net/_admin
- Go to the General Settings page.
- Add New Search Engine: Click the "Add New Search Engine" link to add your new iManage search engine.
- Type: Select regular
- In the Search Engine field, select iManage Cloud.
- Next, enter the Name and corresponding information in the appropriate fields.
- If you desire, you can use your own iManage App registration, however, this is not recommended. Upland BA Insight recommends using the default app registration. For more information, see the note regarding redirect URLs above.
Use the following table:
| Property | Required? | Description | Default Value |
|---|---|---|---|
| Client Id | Yes |
|
|
| Client Secret | Yes |
|
|
| Always Exclude Emails | Yes |
|
Checked |
Available Filters
WorkspaceId, Author, Type, EditDateFrom, EditDateTo, CreateDateFrom, CreateDateTo,
Custom1 to Custom20, Custom29, Custom30
Note: Additional filters can be added if considered relevant (detailed list here)
iManage search engine does not support the "startswith" operator. In this case, the search within the refiners feature is limited to match exactly the value written inside search within the search box.
Example: doc → returns doc / docx → returns docx.
The same limitation applies in the case of property restriction queries.
Configuring Clicking Results Behavior
- Single-click
- Opens the document in a new tab in iManage preview
- Double-click
- Opens the document in the native app for that document type.
- For example: Word for documents, PowerPoint for Presentation, etc
- The following products must be installed in your environment for this behavior to work:
- iManageAgentServices
- iManageWorkDesktopforWindows
- Office Suite
Procedure:
Use the following steps to configure your iManage results clicking behavior:
- Go to iManage search engine settings.
- In the Document Profile Fields field, add the characters "iwl".
-
In your SmartHub settings file, and add FieldsToInclude from ContentContainers to the MainResults "iwl" property
-
Inside the
MainResultsoption fromContentContainers:
Replace the last return:
"return SH.RootLevelURL + "/modules/ContentContainers/templates/iManageResultItemTemplate.html";"With the following code:
"return SH.RootLevelURL + "/modules/ContentContainers/templates/iManageResultItemTemplate.html";"iManage Server
Prerequisites
- Network service account
Note: A service account can only be used only with a single SmartHub instance at any one time.
Limitations
Note the following limitations before configuring your iManage Cloud search engine:
-
The iManage federated search API only returns a maximum of 500 potential search results rather than a specific count. If your count of potential search results exceeds 500, the UI on the SmartHub results page will only state Results 1-10 of 500.
-
Filtering is limited with the iManage search engine. You are able to filter integer-based values, such as a client number, but you cannot filter string-based values, such as client name.
-
iManage search results do not return a hit highlighted summary. Text that precedes and succeeds the queried term is not included in the search results text block.
-
Search queries that use trailing wildcards(*), for example, "litiga*", are not supported.
-
The iManage search results do not return a score or rank.
-
Relevancy tuning to dynamically weigh the importance of search results from specific search engines, is not supported by the iManage search engine.
Endpoints used
These are the iManage service endpoints that the search engine uses:
-
AUTHORIZE ENDPOINT = {iManageServerURL}/auth/oauth2/authorize
-
TOKEN EXCHANGE ENDPOINT = {iManageServerURL}/auth/oauth2/token
-
API INFO ENDPOINT = {iManageServerURL}/api
-
SEARCH ENDPOINT = {iManageServerURL}/api/v2/customers/{customerID}/documents/search
Required User Access and Authorization
- This search engine implements Federated Impersonation which means every user must log in for themselves.
- You must configure the Federated Impersonation module to handle automatic user login before proceeding.
- The authentication flow is as follows:
- The user is redirected to iManage where he provides credentials to log in.
- iManage redirects him back to SmartHub.
- The user is provided only with the items for which he has access to in iManage.
How to Configure an iManage Search Engine
- Navigate to the SmartHub Administration page at: http(s)://<web-app-url>/_admin
- For example: http://smarthub.azurewebsites.net/_admin
- For example: http://smarthub.azurewebsites.net/_admin
- Go to the General Settings page
- Add New Search Engine: Click the "Add New Search Engine" link to add your new iManage search engine.
- Type: Select Regular.
- In the Search Engine field, select iManage Server.
- Next, enter the Name and corresponding information in the appropriate fields. See the table below.
Use the following table:
| Property | Required? | Description | Default Value |
|---|---|---|---|
| Server Url | Yes |
|
https://imanageserver1.domain.local |
| Client Id | Yes |
|
|
| Client Secret | Yes |
|
|
| Always Exclude Emails | Yes |
|
Checked |
Available Filters
WorkspaceId, Author, Type, EditDateFrom, EditDateTo, CreateDateFrom, CreateDateTo,
Custom1 to Custom20, Custom29, Custom30
Additional filters can be added if considered relevant.
Microsoft Academic Knowledge
About
Microsoft Academic Knowledge search engine uses the Academic Knowledge API to interpret the user queries for academic intent and retrieve rich information from the Microsoft Academic Graph (MAG). For more information about the Microsoft Academic Knowledge project, see here in the Microsoft documentation.
How to Attain a Subscription Key
You enter your Microsoft subscription key into the search engine. This key is used to run authorized calls against the API.
- If you don't have an account yet, click here to sign up.
- Once this step is completed, go here to subscribe.
- Once this process is completed, you are taken to your account page where you can copy the subscription key:
Add a Microsoft Academic Knowledge Search Engine to SmartHub
Use the following instructions to add the Microsoft Academic Knowledge search engine to SmartHub:
- Navigate to the SmartHub Administration page: http(s)://[web-app-url]/_admin
- Click Add New search engine.
- The search engine dialogue box appears.
- Select Type: Regular.
- Enter a search engine name.
- In the Search Engine field, select Academic Knowledge Experimental.
- Enter your parameters as set and defined in the table below into the appropriate fields.
- Click OK.
Parameters
| Parameter | Required? | Description |
|---|---|---|
| Academic API Access Key | yes | Type the subscription key obtained using the steps above. |
| Maximum number of results | optional | The API does not return the number of matches, so you must input a value to enable pagination on the search engine. |
| Override default request attributes | optional |
If you need any extra properties to be returned for each item, use this text box to supply the complete list of attributes. If you add extra mappings in the Property Mapper, the MS Academic properties need to be added in this list too. Default Attribute List:
Complete Attribute List: |
Microsoft Search Items
About
The Microsoft Search Items search engine uses the Graph API to query the following resource types (configurable at search engine level):
Limitations
The following are limitations for the Microsoft Search Items search engine. If a feature is not supported by the Microsoft Search Graph API, it will also be not supported by a Microsoft Search Graph search engine. For more information, refer to the Microsoft Graph API documentation.
-
The DatePicker refiner will not work for site entity types if the start date and end date are set to auto. For example,
<div class="CoveoFacetDatePicker" data-start="auto"data-end="auto" data-default-state="collapsed" data-title="Modified Date" data-field="@date" data-lookup-field="@date" data-available-sorts="occurrencesdescending,occurrencesascending,alphaascending,alphadescending" data-enable-settings="false"> </div>.-
If you want to use the DatePicker refiner, you must set it to specific date. For example,
<div class="CoveoFacetDatePicker" data-start="2000-01-01"data-end="2025-01-01" data-default-state="collapsed" data-title="Modified Date" data-field="@date" data-lookup-field="@date" data-available-sorts="occurrencesdescending,occurrencesascending,alphaascending,alphadescending"></div>
-
-
Result sorting is not supported for External Items.
- If you are upgrading from an older version of SmartHub, the Microsoft Search search engines must be removed and re-added. For more information on upgrading, see How to Upgrade SmartHub.
- Microsoft Search Graph API does not support excluding refiners.
Set Azure Active Directory Authentication
Set authentication to Azure Active Directory in SmartHub as described here: Azure Active Directory Authentication
Application Permissions
The Client ID specified in Azure Active Directory Authentication must belong to an application with the following permissions:
- Microsoft Graph
- Files.Read.All or Sites.Read.All
How to Add the Microsoft Search Items search engine to SmartHub
Use the following instructions to add the Microsoft Search Items search engine to SmartHub:
- Navigate to the SmartHub Administration page: http(s)://[web-app-url]/_admin
- Click Add New search engine.
- The search engine Settings dialogue box appears.
- search engine Name: Enter a search engine name.
- search engine type: Select the search engine type "".
driveItem
list
listItem
site
externalItem
- Connector Connection Id (only for externalItem): Enter the connection ID associated with your content.
To get the Connection ID for your connector, do the following:
Navigate to the Office Admin page.
Click Settings > Microsoft Search.
Click Connectors
A list of your current connectors appears with their connection IDs.
The connection ID value is the parameter that the search engine expects to receive.
- Graph Url:
- Example: https://graph.microsoft.com/
- Example: https://graph.microsoft.com/
- Authentication
- If you set Impersonate to true, security trims the results using the current user running the search
- If you set Impersonate to false, complete the following fields and click Authorize:
- Client Id: Enter the Application ID from Azure App Registrations.
- Client Secret: Enter the Key's value from Azure App Registrations.
- Microsoft Login Endpoint: Example:https://login.microsoftonline.com
- Access Token: Enter the access token from SmartHub's OAuth page.
- Refresh Token: Enter the refresh token from SmartHub's OAuth page.
In order to get the Access and Refresh tokens, the Authorize button must be clicked, but all of the above fields must be completed (GraphUrl, ClientId, ClientSecret, MicrosoftLoginEndpoint).
If you do not wish to use Impersonate, you must move the Redirect URI to the Web section instead of the Single-page application section in your SmartHub Azure app registration. For more information, see this question and answer in the Microsoft documentation. - Click OK.
How to Register an App in Azure and Configure It
If you use SmartHub with Azure Active Directory authentication you can reuse the same App and jump to step 5.
- Navigate to portal.azure.com and log in.
- From the left side menu go to Azure Active Directory > App registrations > New registration
- On the Register an application window, specify the following:
- Name: Enter the name of the application.
- Application type: Select Web app / API.
- Sign-on URL: Enter the SmartHub's URL.
- Select API Permissions to open the settings menu panel.
- Click Add a Permission.
- Select APIs my organization uses and add the following permissions (as you type the name, it appears):
Microsoft Graph
Files.Read.All
- Click Certificates & secrets > New client secret to generate a client secret key.
- In the window that appears (shown below) enter the following information.
- Description: Enter a name for the client secret. (Note: The name is your client secret).
- Expires: Select the time period before the client secret expires from the drop-down list.
- A Value is generated after you click Add.
Metadata
In SmartHub 7.1, enhancements were made to flatten the specific properties received from the Microsoft Graph API. Depending on the Microsoft Graph response structure, this update may remove the need to map to the tree-based metadata structure from the Microsoft Graph API response. For example, refer to the following code sample for driveItem:
"hitId": "01PHA2IYQCMAFRO66NPFDJFIJ4DSU3RCHA",
"rank": 1,
"summary": "<c0>1</c0> {<c0>170B6002</c0>-<c0>CD7B</c0>-<c0>4679</c0>-<c0>92A1</c0>-<c0>3C1CA9B888E0</c0>},<c0>1</c0> <c0>22</c0> <c0>STS</c0>_<c0>ListItem</c0>_<c0>DocumentLibrary</c0><ddd/>",
"resource": {
    "@odata.type": "#microsoft.graph.driveItem",
    "size": 0,
    "fileSystemInfo": {
        "createdDateTime": "2025-05-21T13:24:03Z",
        "lastModifiedDateTime": "2025-05-21T13:24:03Z"
        },
    "listItem": {
        "@odata.type": "#microsoft.graph.listItem",
        "id": "170b6002-cd7b-4679-92a1-3c1ca9b888e0",
        "fields": {
            "id": "AAAAAJAQ92OSSERGvRIPCDjHckEHAIc6rUz16gNKkz9jW1poJXsAAAAAASUAAIc6rUz16gNKkz9jW1poJXsAA4OsY68AAA2",
            "size": 0,
            "createdBy": "Sample Name",
            "hitHighlightedSummary": "<c0>1</c0> {<c0>170B6002</c0>-<c0>CD7B</c0>-<c0>4679</c0>-<c0>92A1</c0>-<c0>3C1CA9B888E0</c0>},<c0>1</c0> <c0>22</c0> <c0>STS</c0>_<c0>ListItem</c0>_<c0>DocumentLibrary</c0><ddd/>",
            "hitHighlightedProperties": null,
            "rank": 638834321782235820,
            "author": "Sample Name",
            "lastModifiedTime": "2025-05-21T13:24:03Z",
            "contentType": "Folder",
            "mimeType": "Folder",
            "path": "https://baidev.sharepoint.com/sites/Eric1/TestSubSite1/SiteAssets/TestSubSite1 Notebook"
            }
        },
    "id": "01PHA2IYQCMAFRO66NPFDJFIJ4DSU3RCHA",
    "createdBy": {
        "user": {
            "displayName": "Sample Name",
            "email": "Sample@baidev.onmicrosoft.com"
        }
    },
    "createdDateTime": "2025-05-21T13:24:03Z",
    "lastModifiedBy": {
        "user": {
            "displayName": "Sample Name",
            "email": "Sample@baidev.onmicrosoft.com"
        }
    },
    "lastModifiedDateTime": "2025-05-21T13:24:03Z",
    "name": "TestSubSite1 Notebook",
    "parentReference": {
        "driveId": "b!S9rn_MkXxEWhYQ1Jg7nITybXyBY6rONBlVP2Baiz5uKZd5ZH8nNAQbmppPDCYW8H",
        "id": "01PHA2IYWXIKXITBTWG5HJQU7RSYRE7ETZ",
        "sharepointIds": {
            "listId": "47967799-73f2-4140-b9a9-a4f0c2616f07",
            "listItemId": "1",
            "listItemUniqueId": "170b6002-cd7b-4679-92a1-3c1ca9b888e0"
            },
        "siteId": "baidev.sharepoint.com,fce7da4b-17c9-45c4-a161-0d4983b9c84f,16c8d726-ac3a-41e3-9553-f605a8b3e6e2"
        },
    "webUrl": "https://baidev.sharepoint.com/sites/Eric1/TestSubSite1/SiteAssets/TestSubSite1 Notebook"
    }
}
When configuring the property mapper tuning stage, you now only need to provide the property names for driveItem and listItem fields, and externalItem properties for your mapping. For example, using the sample above, you would need to provide the following property names when mapping:
-
summary
-
size
-
fileSystemInfo.createdDateTime
-
HitHighlightedSummary
-
lastModifiedTime
-
createdBy.user.displayName
As you can see, properties belonging to listItem fields, such as HitHighlightedSummary and lastModifiedTime, do not require the full map to the tree-based metadata structure.
If normalizing the metadata schema is not possible, then do the following:
Use the Mapper for Query Text and Item Metadata setting to handle possible discrepancies for query text filters. For example, "test AND title:foo" might need to map to "test AND escbasetitle:foo". Use the same setting for item metadata that you need to display on the page. For example, title needs to map to both name and escbasetitle. For more information, see How to map metadata property values: Property Mapper.
If you want to show page refiners that have different names, you must have a separate refiner; one for the native entity types, and one for the external items. For example, to show the File Type refiner, you must have a File Type (for Drive items) that uses the filetype metadata and another File Type (for External items) that uses the escbasefileextension metadata. For more information, see Refiner Mapper Stage: Map Your Metadata Refiner Values.
Microsoft Search Calendar
About
Microsoft Search Calendar search engine uses the Graph API to search for event information in a user’s primary calendar using the following resource types:
Limitations
The following are limitations for the Microsoft Search Calendar search engine. If a feature is not supported by the Microsoft Search Graph API, it will also be not supported by a Microsoft Search Graph search engine. For more information, refer to the Microsoft Graph API documentation.
- Refiners are not supported by the Microsoft Search Calendar search engine.
- The Microsoft Search Calendar search engine can only return 10 events at a time.
- If you are upgrading from an older version of SmartHub, the Microsoft Search search engines must be removed and re-added. For more information on upgrading, see How to Upgrade SmartHub.
- Microsoft Search Graph API does not support excluding refiners.
Set Azure Active Directory Authentication
Set authentication to Azure Active Directory in SmartHub as described here: Azure Active Directory Authentication
Client ID Requirements
Additionally, the Client ID specified in Azure Active Directory Authentication, must belong to an application with the following permissions:
- Microsoft Graph
Calendars.Read
How to Add the Microsoft Search Calendar search engine to SmartHub
Use the following instructions to add the Microsoft Search Calendar search engine to SmartHub:
- Navigate to the SmartHub Administration page: http(s)://[web-app-url]/_admin
- Click Add New search engine.
- The search engine Settings dialogue box appears.
- Enter a search engine name.
- Select the search engine type "".
- Enter Graph Url. For example, https://graph.microsoft.com
- Authentication
- If you set Impersonate to true, security trims the results using the current user running the search
-
If you set Impersonate to false, complete the following fields and click Authorize:
- Client Id: Enter the Application ID from Azure App Registrations.
- Client Secret: Enter the Key's value from Azure App Registrations.
- Microsoft Login Endpoint: example: https://login.microsoftonline.com
- Access Token: Enter the access token from SmartHub's OAuth page.
- Refresh Token: Enter the refresh token from SmartHub's OAuth page.
8. Click OK.
How to Register an App in Azure and Configure It
If you use SmartHub with Azure Active Directory authentication you can reuse the same App and jump to step 5.
- Navigate to portal.azure.comand log in.
- From the left side menu go to Azure Active Directory > App registrations > New registration.
- On the Register an application window, specify the following:
- Name: Enter the name of the application.
- Application type: Select Web app / API.
- Sign-on URL: Enter the SmartHub's URL.
- Select API Permissions to open the settings menu panel.
- Click Add a Permission.
- Select APIs my organization uses and add the following permissions (as you type the name, it appears):
Microsoft Graph
Calendars.Read
- Click Certificates & secrets > New client secret to generate a client secret key.
- In the window that appears (shown below) enter the following information.
- Description: Enter a name for the client secret. (Note: The name is your client secret).
- Expires: Select
- A Value is generated after you click Add.
Microsoft Search Emails
About
The Microsoft Search Emails search engine uses the Graph API to search for information in Microsoft Outlook email massages using the following resource type:
Limitations
The following are limitations for the Microsoft Search Emails search engine. If a feature is not supported by the Microsoft Search Graph API, it will also be not supported by a Microsoft Search Graph search engine. For more information, refer to the Microsoft Graph API documentation.
-
Refiners are not supported by the Microsoft Search Emails search engine
-
The Microsoft Search Emails search engine can only return 10 items at a time.
- If you are upgrading from an older version of SmartHub, the Microsoft Search search engines must be removed and re-added. For more information on upgrading, see How to Upgrade SmartHub.
- In some scenarios, the total number of results that is returned by the Microsoft Graph API is incorrect. This may cause your results pagination to behave unexpectedly, such as incorrect total counts being displayed or miscalculated page numbers. For more information, see MS Graph search query searchHitsContainer Total incorrect and Microsoft Graph Search API response incorrect 'total' value in the Microsoft Q&A forums.
- Microsoft Search Graph API does not support excluding refiners.
Set Azure Active Directory Authentication
Set authentication to Azure Active Directory in SmartHub as described here: Azure Active Directory Authentication.
Client ID Requirements
The Client ID specified in Azure Active Directory Authentication above, must belong to an application with the following permissions, set in Azure:
- Microsoft Graph
- Mail.Read
How to Add the Microsoft Search Emails search engine to SmartHub
Use the following instructions to add the Microsoft Search Emails search engine to SmartHub:
- Navigate to the SmartHub Administration page: http(s)://[web-app-url]/_admin
- Click Add New search engine.
- The search engine Settings dialogue box appears.
- Enter a search engine name.
- Select the search engine type ""
- Authentication
- If you set Impersonate to true, security trims the results using the current user running the search
- If you set Impersonate to false, complete the following fields and click Authorize:
- Client Id:
- Enter the Application ID from Azure App Registrations.
- Client Secret:
- Enter the Key's value from Azure App Registrations.
- Microsoft Login Endpoint:
- Example: https://login.microsoftonline.com
- Access Token:
- Enter the access token from SmartHub's OAuth page.
Refresh Token:
Enter the refresh token from SmartHub's OAuth page.
In order to get AccessToken and Refresh token, "Authorize" button must be clicked, but it needs all above fields to be completed (GraphUrl, ClientId, ClientSecret, MicrosoftLoginEndpoint).If you do not wish to use Impersonate, you must move the Redirect URI to the Web section instead of the Single-page application section in your SmartHub Azure app registration. For more information, see this question and answer in the Microsoft documentation.
- Client Id:
- Click OK.
How to Register an App in Azure and Configure It
If you use SmartHub with Azure Active Directory authentication you can reuse the same App and jump to step 5.
- Navigate to portal.azure.comand log in.
- From the left side menu go to Azure Active Directory > App registrations > New registration.
- On the Register an application page, specify the following:
- Name: Enter the name of the application.
- Application type: Select Web app / API.
- Sign-on URL: Enter the SmartHub's URL.
- Select API Permissions to open the settings menu panel.
- Click Add a Permission.
- Select APIs my organization uses and add the following permissions (as you type the name, it appears):
- Microsoft Graph
- Mail.Read
- Mail.Read
- Microsoft Graph
- Click Certificates & secrets > New client secret to generate a client secret key.
- In the Add a client secret window, enter the following information.
- Description: Enter a name for the client secret. (Note: The name is your client secret).
- Expires: Select the period until expires.
- A Value is generated after you click Add.
Microsoft Search Chat Message
About
Microsoft Search Chat Message search engine uses the Graph API to send search queries to Microsoft 365, search for information in email messages (body and attachments), and receive emails from user's own mailbox using the following resource type:
Limitations
Note the following limitations when using the Microsoft Search Message search engine:
-
Refiners are not supported.
- Microsoft Search Graph API does not support excluding refiners.
Set Azure Active Directory Authentication
You can set your authentication to Azure Active Directory in SmartHub as described here: Filters.
Client ID Requirements
The Client ID specified in Azure Active Directory Authentication above, must belong to an application with the following permissions, set in Azure:
- Microsoft Graph
- Chat.Read or Chat.ReadWrite
- ChannelMessage.Read.All
How to Add the Microsoft Search Chat Message Search Engine to SmartHub
Use the following instructions to add the Microsoft Search Chat Message search engine to SmartHub:
- Navigate to the SmartHub Administration page: http(s)://<web-app-url>/_admin
- Click ADD NEW SEARCH ENGINE.
- The search engine dialogue box appears.
- Enter a search engine name.
- In the Search Engine field, select MS Search Chat Message.
- Authentication: Select whether to enable or disable Impersonate authentication:
- Impersonate - true
- Security trims the results using the current user running the search
- If you set Impersonate to false, complete the following fields and click Authorize:
- Client Id: Enter the Application ID from Azure App Registrations.
- Client Secret: Enter the Key's value from Azure App Registrations.
- Microsoft Login Endpoint: For example, https://login.microsoftonline.com
- Access Token: Enter the access token from SmartHub's OAuth page.
Refresh Token:Enter the refresh token from SmartHub's OAuth page
Note: To get the Access token and Refresh token, the "Authorize" button must be clicked, but it needs all the above fields to be completed (GraphUrl, ClientId, ClientSecret, MicrosoftLoginEndpoint).If you do not wish to use Impersonate, you must move the Redirect URI to the Web section instead of the Single-page application section in your SmartHub Azure app registration. For more information, see this question and answer in the Microsoft documentation.
- Impersonate - true
- Click OK.
How to Register an App in Azure and Configure It
If you use SmartHub with Azure Active Directory authentication you can reuse the same App and jump to step 5.
- Navigate to portal.azure.comand log in.
- From the left side menu go to Azure Active Directory → App registrations → New registration
- Name: Enter the name of the application.
- Application type: Select Web app / API.
- Sign-on URL: Enter the SmartHub's URL.
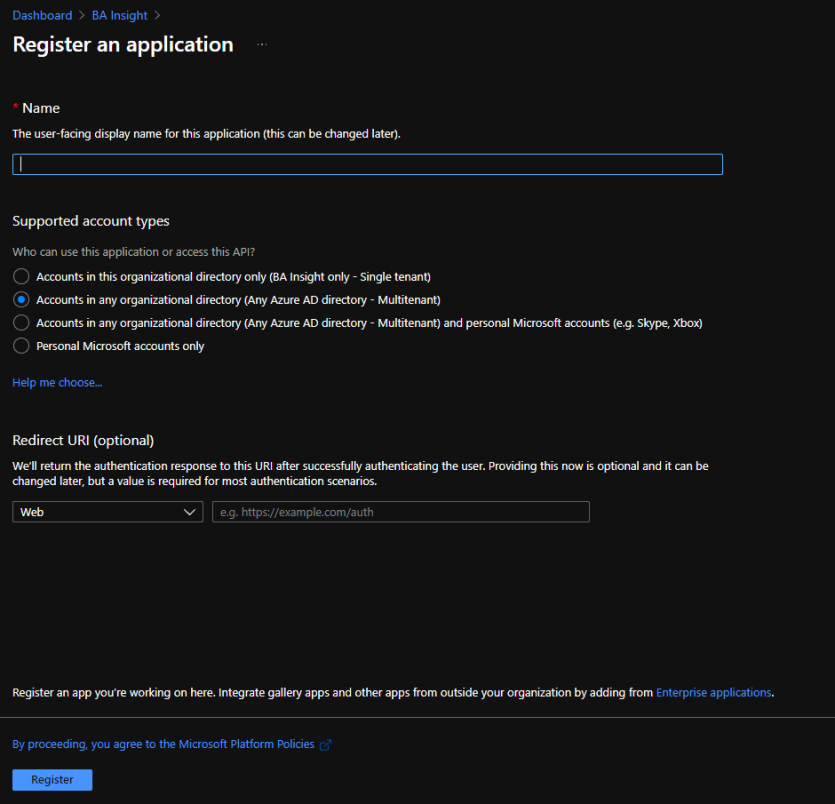
- Select API Permissions to open the settings menu panel.
- Click Add a Permission.
- Select APIs my organization uses and add the following permissions (as you type the name, it appears):
- Microsoft Graph
Chat.Read or Chat.ReadWrite
ChannelMessage.Read.All
- Microsoft Graph
- Click Certificates & secrets>New client secret to generate a client secret key.
- In the window that appears (shown below) enter the following information.
- Description:
- Enter a name for the client secret.
- Note: The nameis your client secret
- Expires: Select the period until expires.

- A Value is generated after you click Add.

- Description:
Microsoft Search Persons
About
Microsoft Search Persons search engine uses the Graph API to search for information about a person from mail and contacts using the following resource type:
Limitations
The following are limitations for the Microsoft Search Persons search engine. If a feature is not supported by the Microsoft Search Graph API, it will also be not supported by a Microsoft Search Graph search engine. For more information, refer to the Microsoft Graph API documentation.
-
Wild querying is not supported by the Microsoft Search Persons search engine.
-
Refiners are not supported by the Microsoft Search Persons search engine.
- Microsoft Search Graph API does not support excluding refiners.
Set Azure Active Directory Authentication
-
Set authentication to Azure Active Directory in SmartHub as described here: Azure Active Directory Authentication.
Client ID Requirements
-
The Client ID specified in Azure Active Directory Authentication above, must belong to an application with the following permissions, set in Azure:
-
Microsoft Graph
-
People.Read
-
People.Read.All
How to Add the Microsoft Search Persons search engine to SmartHub
Use the following instructions to add the Microsoft Search Persons search engine to SmartHub:
- Navigate to the SmartHub Administration page: http(s)://[web-app-url]/_admin
- Click Add New search engine.
- The search engine Settings dialog box displays.
- Enter a search engine Name.
- Select the search engine Type ""
- Authentication
- If you set Impersonate to true, security trims the results using the current user running the search
- If you set Impersonate to false, complete the following fields and click Authorize:
- Client Id:
- Enter the Application ID from Azure App Registrations.
- Client Secret:
- Enter the Key's value from Azure App Registrations.
- Microsoft Login Endpoint:
- Example: https://login.microsoftonline.com
- Access Token:
- Enter the access token from SmartHub's OAuth page.
Refresh Token:
Enter the refresh token from SmartHub's OAuth page.
To get AccessToken and Refresh token, "Authorize" button must be clicked, but all above fields must be completed (GraphUrl, ClientId, ClientSecret, MicrosoftLoginEndpoint).If you do not wish to use Impersonate, you must move the Redirect URI to the Web section instead of the Single-page application section in your SmartHub Azure app registration. For more information, see this question and answer in the Microsoft documentation.
- Client Id:
- Click OK.
How to Register an App in Azure and Configure It
If you use SmartHub with Azure Active Directory authentication you can reuse the same App and jump to step 5.
- Navigate to portal.azure.comand log in.
- From the left side menu go to Azure Active Directory > App registrations > New registration.
- On the Register an application window, specify the following:
- Name: Enter the name of the application.
- Application type: Select Web app / API.
- Sign-on URL: Enter the SmartHub's URL.
- Select API Permissions to open the settings menu panel.
- Click Add a Permission.
- Select APIs my organization uses and add the following permissions (as you type the name, it appears):
- Microsoft Graph
People.Read
People.Read.All
- Microsoft Graph
- Click Certificates & secrets>New client secret to generate a client secret key.
- In the window that appears (shown below) enter the following information.
- Description:
- Enter a name for the client secret.
- Note: The name is your client secret
- Expires: Select the period until expires.
- A Value is generated after you click Add.
- Description:
NetDocuments
Use the following topics to connect your SmartHub instance to the NetDocuments search engine (search engine).
Important Mentions and Limitations
Please note the following limitations before configuring your NetDocuments search engine:
| Item | Limitation |
|---|---|
| Facets |
|
| Document Title Hit Highlighting |
|
| Summary Text Exception |
|
| Search Operators |
The following search operators are not supported:
|
| Date Refiners |
|
| Search Within Refiners |
|
| Query Parameters |
|
Note: A service account can only be used with a single SmartHub instance at any one time.
Prerequisites
To correct this, set the CoveoFacets components to data-preload-values="true". This is done to the following HTML pages in your site:
-
The Results HTML page.
-
The Custom Results HTML page.
-
Any custom HTML page that use refiners.
User Access Requirements
NetDocuments security is performed using two methods:
- Security token authentication
- User account-level security trimming
After token authentication is performed, security trimming is performed against the active SmartHub user account.
- SmartHub users can only access the NetDocuments cabinets their account has permissions to on the NetDocuments side.
- The account used to configure token authentication is also used for security trimming.
- This account must have admin access (be a cabinet administrator) to all the cabinets the NetDocuments search engine is to search.
- See Verify Cabinet Administration Permissions below.
- Additionally, Administrator requirements, specifically, are specified below.
Administrator Requirements
-
The user account that configures token authentication must be an Administrator on the NetDocuments cabinets being searched.
- The user must be a cabinet administrator
- Admin access to cabinets that will not be searched is not required.
-
SmartHub requires the Admin user to have the following permissions:
- Permission to retrieve cabinets
-
Permission to READ other user's details.
-
Specific endpoints used:
"/v2/search";
"/v1/User/cabinets";
"/v1/User/{0}/info";
Verify Cabinet Administration Permissions
Verify the user account used the configure token authentication has cabinet administration permissions.
- In NetDocuments, open a cabinet that will be indexed by the BA Insight NetDocuments search engine and searched by users.
- Select the drop-down menu for the cabinet and select Cabinet Information.
- The Cabinet administrator user accounts are shown listed here. See the image below.
- The user account used for token authentication MUST be shown in this list for each and every cabinet to be searched by the BA Insight NetDocuments search engine.
User Account Requirements
Security trimming is performed at the user account level.
- SmartHub users can only access the NetDocuments cabinets their account has permissions to on the NetDocuments side.
- Security trimming is performed by the NetDocuments search engine for the user account searching NetDocuments cabinets.
- A user's account must have permission to read from the NetDocuments cabinets to successfully search them.
Cabinets
-
The cabinets you access must be in the same repository.
-
To search cabinets from multiple repositories you must configure a separate SmartHub NetDocs search engine for each repository.
-
- SmartHub only queries the cabinets the authenticated user account has access to (within NetDocuments).
How to Add a NetDocuments Search Engine
- Navigate to the SmartHub Administration page at http(s)://[web-app-url]/_admin
- For example: http://smarthub.azurewebsites.net/_admin .
- For example: http://smarthub.azurewebsites.net/_admin .
- From the General Settings page click Add New Search Engine to add your new NetDocuments search engine.
- The Search Engine dialogue appears.
- In the Type field, select Regular.
- From the Search Enginedrop-down list, select NetDocs.
- In the Name field, Enter a name for your search engine.
- In the Rank offset formula coefficients field, enter values for the Boost and Offset. Enter these values only if you selected the Rank Based mixing algorithm that is set in the Properties for SSA page.
- In the Data Center Region field, select your preferred data center from the drop-down list. The supported Data Center regions are: US, UK, DE, AU. The default data center is US.
- In the Auth Provider Email field, enter the email property of your Authentication provider used for security trimming. This property must contain the NetDocs user email. When using AAD authentication, ensure that the email claim is added as an ID token.The default "upn" might not contain the email address of the user. See How to Configure Security Trimming for Windows Authentication for info about how to create a new claim which has the user's email.
- In the NetDocuments Repositories field, enter a comma separated list of repositories. These repositories are used to make additional attribute requests to allow for deep search-within for NetDocuments description properties. If you do not configure this field, basic search-within functionality is applied.
- In the Cabinets field, enter a comma separated list of cabinets to be used for search. You can also specify "*" to search all cabinets where the user has access to.
The default value for this field is
cabinet1, cabinet2. - In the Attributes to return field, enter a comma separated list of attributes to return from NetDocuments. The default value for this field is
StandardAttributes, CustomAttributes, Locations, Descriptions, VersionsLite, CheckedOutBy, AllowCheckedOutState, EmailAttributes. - NetDocuments has identifiers for every search field. In the Facets field, you can map each facet on the page to its unique field identifier. The default value for this field is
Ext,11;Modified,5;CreatedBy,6. - In the Supported Fields field, enter a comma separated list of the most common supported identifiers. If the field identifier is not found on this list, or isn't in XXXX format, the query will return 0 results. The default value for this field is
3,4,5,6,7,8,11,17,18,19,20,27,54,55,56,250,999. - If Search All Versions is enabled, the search matches a document if any of its versions contain the user search keywords. For more information, see How to Configure Multi-version Search.
- Click Authorize, after you will be redirected to a NetDocuments page to provide credentials. See Authorization below.
Authorization
- Use your NetDocuments account credentials to log in.
- Click Allow to give the application full access to all resources.
- Note: If you have multiple repositories, and you want results from all of them you must set up a different NetDocuments search engine for each repository.
- Note: If you have multiple repositories, and you want results from all of them you must set up a different NetDocuments search engine for each repository.
- Click Authorize.
- Return to the SmartHub administration portal, and copy the code in the Authorization Code text box.
- Click Get Access/Refresh Tokens . A new page will open with the Access and Refresh tokens.
- Copy and paste the Access and Refresh tokens into the fields in the SmartHub administration portal.
- Click the OK button.
How to Configure Security Trimming for Windows Authentication
After you have configured your NetDocuments search engine, as described above, use the instructions below to insert a script to enable SmartHub to trim query results according to each user's access rights.
- Under Pipeline Stages for your NetDocuments search engine, select Add New Query Stage.
- Select Query Scripting Processor.
- Name the pipeline stage.
- Leave the Referenced Assemblies and Imported Namespaces fields empty
- Enter the following script in the Script field and replace the following variables with the appropriate values for you environment:
- var domainName:
- Enter the URL of your domain inside quotes.
- For example, "acmedomain.com"
- userContext.SetProperty():
- This value ("netDocsEmail" in the code snippet below) can be any text.
- This value needs to be added to the NetDocs Search Engine settings, replacing the already existing value in the Auth Provider Email property field.
var userContext = BAInsight.Longitude.Federator.Runtime.Security.SecurityPermissions.Load() as BAInsight.SmartHub.Core.Security.Context.JWTUserContext;
var domainName = "YourDomain.com"; // the domain of the user account
var username = userContext.GetProperty("upn", ""); // this retrieves the user name
userContext.SetProperty("netDocsEmail", username + "@" + domainName);  // this generates the user address in the required format: username@domain.com
- var domainName:
- Click OK to close the window.
How to Configure the Property Mapper with NetDocuments Properties
Perform the following steps to discover properties in NetDocuments that you can map in SmartHub:
- Login to NetDocuments with an Admin account.
- Access the Admin Console by clicking Admin from the top right drop-down menu.
- Go to the Navigation menu (top left) and select Profile Attributes.
- The Profile Attributes or similar window appears, as shown below:
- Use the property names and numbers ("Id" column) shown here in the SmartHub Property Mapper.
- Examples: MatterId,1002;
- For nested profile attributes, you can reference them by their ID preceded by their parent ID.
- Examples: MatterId, 1001.1002;
- Note: Only parent-child attributes can be mapped. There is no support for parent-child-grandchild types.
- You can also use composed property mappings that point to the specific field(s) you want returned.
For instance:- Value
- Returns the value field of the property
- Examples: ClientId, 1001.Value;
- By default, properties will be linked to the Value field
- "ClientId, 1001" is the same as "ClientId, 1001.Value"
- Returns the value field of the property
- Description
- Returns the description field of the property
- Examples: ClientName, 1001.Description;
Important! NetDocs does not support "deep" search-within for Description properties.
However, SmartHub will let you do a "shallow" search-within using the max number of facet values returned by NetDocs (top 100 values). - Returns the description field of the property
- ValueAndDescription
- Returns the description and value fields of the property with the format "description (value)"
- Examples: Client, 1001.ValueAndDescription;
- Returns the description and value fields of the property with the format "description (value)"
- Value
- Nested profile attributes can be used as composed property mappings as well, for any type of field:
- Examples: Matter, 1001.1002.ValueAndDescription;
- Note: If you are using composed property mappings, make sure that AttributesToReturn contain the Descriptions field.
- Examples: Matter, 1001.1002.ValueAndDescription;
-
You can add custom results properties in your custom settings file, under FieldstoInclude of the
ContentContainerssection:Custom Settings ExampleSH.ContentContainers = SH.ContentContainers || {};
SH.ContentContainers.CustomSettings = {
MainResults: {
FieldsToInclude: 'clickUri,title,Rank,ContentSource,FileExtension,excerpt,SDFUrl,date,DisplayAuthor,isUserProfile,isAuth,isError,HitHighlightedSummary,WorkEmail,JobTitle,Department,AboutMe,escbasecrawurl,UserName,PictureUrl'
}
};-
Custom properties include:
-
Cabinets,Repositories,Url,Email,DocId,EnvId,DocNum
-
- For nested properties, like Versions, CheckedOut or Email, you can access them via Versions.Official or CheckedOut.Name.
- Versions accepted fields:
- Annotations, AutoVersion, Count, LatestVersionLabel, LatestVersionNumber, Official, OfficialVersionLabel, OfficialVersionName, SearchInfo, TotalSize
- Note: Make sure that AttributesToReturn contains the VersionsLite field.
- CheckedOut accepted fields:
- Comment, Guid, Name, When
- Note: Make sure that AttributesToReturn contains the CheckedOutBy,AllowCheckedOutState fields.
- Email accepted fields:
- MessageId, Subject, From, To, CC, ConversationId, EmlConversationId, MessageClass
- Note: Make sure that AttributesToReturn contains the EmailAttributes field.
- Versions accepted fields:
-
Logs
By default, logs appear in the directory <SmartHub_Install_Directory>\Logging
How to Enable/Disable Hit-Highlighting
- Navigate to the SmartHub Administration page.
- Select the NetDocuments search engine.
- Modify the Property Mapper from both "Query Pipeline Stages" and "Results Pipeline Stages" sections by adding/removing the following mapping: excerpt,Highlight;
- Save the change.
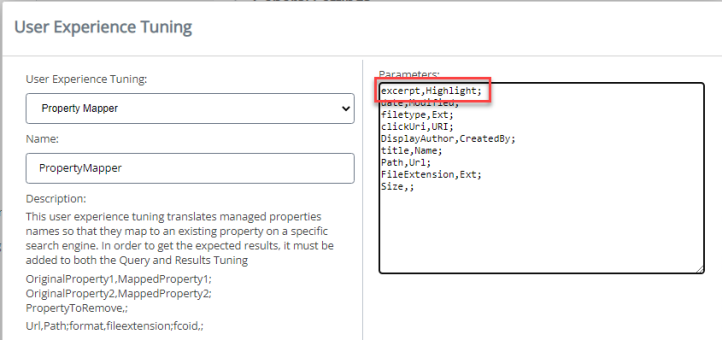
How to Overwrite the Search Query Flags
- Navigate to the SmartHub administration page.
- Select the NetDocuments search engine.
- Click Add New Query Stage.
- From the dropdown select Query Scripting Processor.
- Provide a name for this pipeline stage.
-
In the Script section add the following code:
Script
Query.ExtendedProperties.Add("NetDocsQueryFlags", "<custom_flags>");When "NetDocsQueryFlags" is present, the current flags are overwritten. This enables you to control different query flags that NetDocuments expects, such as AggregateResults when doing multi-version search.
- Compile and Save.
How to Configure Multi-version Search
About
-
When “Search All Versions” functionality is enabled, the search matches a document if any of its versions contain the user search keywords.
-
The search engine returns the latest document version that matched the search keywords together with information about all the other versions that matched the user search keywords - as you can see in the JSON example below:
Sample - Multi-version JSON response
{
    "TotalRelevantResults": 6,
    "TotalRelevantResultsIncludingDuplicates": 6,
    "TotalRelevantResultsRowCount": 1,
    "RelevantResults": [
        {
            "Properties": [
                {
                    "Name": "title",
                    "Type": "System.String, mscorlib, Version=4.0.0.0, Culture=neutral, PublicKeyToken=b77a5c561934e089",
                    "Value": "animalTest",
                    "DateTimeMode": 3
                },
                {
                    "Name": "filetype",
                    "Type": "System.String, mscorlib, Version=4.0.0.0, Culture=neutral, PublicKeyToken=b77a5c561934e089",
                    "Value": "docx",
                    "DateTimeMode": 3
                },
                {
                    "Name": "FileExtension",
                    "Type": "System.String, mscorlib, Version=4.0.0.0, Culture=neutral, PublicKeyToken=b77a5c561934e089",
                    "Value": "docx",
                    "DateTimeMode": 3
                },
                {
                    "Name": "Size",
                    "Type": "System.String, mscorlib, Version=4.0.0.0, Culture=neutral, PublicKeyToken=b77a5c561934e089",
                    "Value": "12324",
                    "DateTimeMode": 3
                },
                {
                    "Name": "date",
                    "Type": "System.String, mscorlib, Version=4.0.0.0, Culture=neutral, PublicKeyToken=b77a5c561934e089",
                    "Value": "9/9/2022 10:39:56 AM",
                    "DateTimeMode": 3
                },
                {
                    "Name": "clickUri",
                    "Type": "System.String, mscorlib, Version=4.0.0.0, Culture=neutral, PublicKeyToken=b77a5c561934e089",
                    "Value": "https://vault.netvoyage.com/neweb2/goid.aspx?id=4886-1104-6442&open=y&ver=9",
                    "DateTimeMode": 3
                },
                {
                    "Name": "Versions",
                    "Type": "System.String, mscorlib, Version=4.0.0.0, Culture=neutral, PublicKeyToken=b77a5c561934e089",
                    "Value": "{\"Count\":15,\"Official\":15,\"OfficialVersionName\":\"v15\",\"OfficialVersionLabel\":\"15\",\"LatestVersionLabel\":[15,0],\"LatestVersionNumber\":15,\"AutoVersion\":false,\"Annotations\":false,\"Versions\":[{\"Number\":15,\"Label\":\"15\",\"IsLatest\":true,\"Created\":\"2022-09-09T10:39:56Z\",\"CreatedByGuid\":\"VAULT-18SI78J7\",\"Source\":14,\"Description\":\"\",\"Name\":\"v15\",\"Official\":true,\"Locked\":false,\"Ext\":\"docx\",\"Modified\":\"2022-09-09T10:39:56.524Z\",\"ModifiedBy\":\"Daniela Birsan\",\"ModifiedByGuid\":\"VAULT-18SI78J7\",\"DeliveryRevoked\":false,\"Annotations\":false,\"Search\":{\"Hit\":true,\"NameHits\":[],\"Snippets\":[]},\"Size\":12324},{\"Number\":14,\"Label\":\"14\",\"IsLatest\":false,\"Created\":\"2022-09-09T08:26:36Z\",\"CreatedByGuid\":\"VAULT-18SI78J7\",\"Source\":13,\"Description\":\"\",\"Name\":\"v14\",\"Official\":false,\"Locked\":false,\"Ext\":\"docx\",\"Modified\":\"2022-09-09T08:26:36.592Z\",\"ModifiedBy\":\"Daniela Birsan\",\"ModifiedByGuid\":\"VAULT-18SI78J7\",\"DeliveryRevoked\":false,\"Annotations\":false,\"Search\":{\"Hit\":true,\"NameHits\":[],\"Snippets\":[]},\"Size\":12236},{\"Number\":13,\"Label\":\"13\",\"IsLatest\":false,\"Created\":\"2022-09-08T14:29:34Z\",\"CreatedByGuid\":\"VAULT-18SI78J7\",\"Source\":12,\"Description\":\"\",\"Name\":\"v13\",\"Official\":false,\"Locked\":false,\"Ext\":\"docx\",\"Modified\":\"2022-09-08T14:29:34.794Z\",\"ModifiedBy\":\"Daniela Birsan\",\"ModifiedByGuid\":\"VAULT-18SI78J7\",\"DeliveryRevoked\":false,\"Annotations\":false,\"Search\":{\"Hit\":true,\"NameHits\":[],\"Snippets\":[]},\"Size\":12172},{\"Number\":12,\"Label\":\"12\",\"IsLatest\":false,\"Created\":\"2022-09-08T12:48:01Z\",\"CreatedByGuid\":\"VAULT-18SI78J7\",\"Source\":11,\"Description\":\"\",\"Name\":\"v12\",\"Official\":false,\"Locked\":false,\"Ext\":\"docx\",\"Modified\":\"2022-09-08T12:48:01.854Z\",\"ModifiedBy\":\"Daniela Birsan\",\"ModifiedByGuid\":\"VAULT-18SI78J7\",\"DeliveryRevoked\":false,\"Annotations\":false,\"Search\":{\"Hit\":true,\"NameHits\":[],\"Snippets\":[]},\"Size\":12106},{\"Number\":11,\"Label\":\"11\",\"IsLatest\":false,\"Created\":\"2022-08-31T08:58:59Z\",\"CreatedByGuid\":\"VAULT-18SI78J7\",\"Source\":9,\"Description\":\"\",\"Name\":\"v11\",\"Official\":false,\"Locked\":false,\"Ext\":\"docx\",\"Modified\":\"2022-08-31T08:58:59.529Z\",\"ModifiedBy\":\"Daniela Birsan\",\"ModifiedByGuid\":\"VAULT-18SI78J7\",\"DeliveryRevoked\":false,\"Annotations\":false,\"Search\":{\"Hit\":true,\"NameHits\":[],\"Snippets\":[]},\"Size\":12089},{\"Number\":10,\"Label\":\"10\",\"IsLatest\":false,\"Created\":\"2022-08-29T13:09:43Z\",\"CreatedByGuid\":\"VAULT-18SI78J7\",\"Source\":9,\"Description\":\"\",\"Name\":\"v10\",\"Official\":false,\"Locked\":false,\"Ext\":\"docx\",\"Modified\":\"2022-08-29T13:09:44.136Z\",\"ModifiedBy\":\"Daniela Birsan\",\"ModifiedByGuid\":\"VAULT-18SI78J7\",\"DeliveryRevoked\":false,\"Annotations\":false,\"Search\":null,\"Size\":12118},{\"Number\":9,\"Label\":\"9\",\"IsLatest\":false,\"Created\":\"2022-08-29T11:35:46Z\",\"CreatedByGuid\":\"VAULT-18SI78J7\",\"Source\":8,\"Description\":\"\",\"Name\":\"v9\",\"Official\":false,\"Locked\":false,\"Ext\":\"docx\",\"Modified\":\"2022-08-29T11:35:46.404Z\",\"ModifiedBy\":\"Daniela Birsan\",\"ModifiedByGuid\":\"VAULT-18SI78J7\",\"DeliveryRevoked\":false,\"Annotations\":false,\"Search\":{\"Hit\":true,\"NameHits\":[],\"Snippets\":[]},\"Size\":12122},{\"Number\":8,\"Label\":\"8\",\"IsLatest\":false,\"Created\":\"2022-08-29T07:48:24Z\",\"CreatedByGuid\":\"VAULT-18SI78J7\",\"Source\":6,\"Description\":\"\",\"Name\":\"v8\",\"Official\":false,\"Locked\":false,\"Ext\":\"docx\",\"Modified\":\"2022-08-29T07:48:24.536Z\",\"ModifiedBy\":\"Daniela Birsan\",\"ModifiedByGuid\":\"VAULT-18SI78J7\",\"DeliveryRevoked\":false,\"Annotations\":false,\"Search\":null,\"Size\":12088},{\"Number\":7,\"Label\":\"7\",\"IsLatest\":false,\"Created\":\"2022-08-23T13:38:08Z\",\"CreatedByGuid\":\"VAULT-18SI78J7\",\"Source\":6,\"Description\":\"\",\"Name\":\"v7\",\"Official\":false,\"Locked\":false,\"Ext\":\"docx\",\"Modified\":\"2022-08-23T13:38:08.401Z\",\"ModifiedBy\":\"Daniela Birsan\",\"ModifiedByGuid\":\"VAULT-18SI78J7\",\"DeliveryRevoked\":false,\"Annotations\":false,\"Search\":null,\"Size\":12052},{\"Number\":6,\"Label\":\"6\",\"IsLatest\":false,\"Created\":\"2022-08-09T13:07:50Z\",\"CreatedByGuid\":\"VAULT-18SI78J7\",\"Source\":5,\"Description\":\"\",\"Name\":\"v6\",\"Official\":false,\"Locked\":false,\"Ext\":\"docx\",\"Modified\":\"2022-08-09T13:07:50.223Z\",\"ModifiedBy\":\"Daniela Birsan\",\"ModifiedByGuid\":\"VAULT-18SI78J7\",\"DeliveryRevoked\":false,\"Annotations\":false,\"Search\":null,\"Size\":12086},{\"Number\":5,\"Label\":\"5\",\"IsLatest\":false,\"Created\":\"2022-08-08T14:12:16Z\",\"CreatedByGuid\":\"VAULT-18SI78J7\",\"Source\":4,\"Description\":\"\",\"Name\":\"v5\",\"Official\":false,\"Locked\":false,\"Ext\":\"docx\",\"Modified\":\"2022-08-08T14:12:17.106Z\",\"ModifiedBy\":\"Daniela Birsan\",\"ModifiedByGuid\":\"VAULT-18SI78J7\",\"DeliveryRevoked\":false,\"Annotations\":false,\"Search\":null,\"Size\":12098},{\"Number\":4,\"Label\":\"4\",\"IsLatest\":false,\"Created\":\"2022-08-05T10:42:31Z\",\"CreatedByGuid\":\"VAULT-18SI78J7\",\"Source\":3,\"Description\":\"\",\"Name\":\"v4\",\"Official\":false,\"Locked\":false,\"Ext\":\"docx\",\"Modified\":\"2022-08-05T10:42:31.557Z\",\"ModifiedBy\":\"Daniela Birsan\",\"ModifiedByGuid\":\"VAULT-18SI78J7\",\"DeliveryRevoked\":false,\"Annotations\":false,\"Search\":null,\"Size\":12065},{\"Number\":3,\"Label\":\"3\",\"IsLatest\":false,\"Created\":\"2022-07-21T11:33:15Z\",\"CreatedByGuid\":\"VAULT-18SI78J7\",\"Source\":2,\"Description\":\"\",\"Name\":\"v3\",\"Official\":false,\"Locked\":false,\"Ext\":\"docx\",\"Modified\":\"2022-07-21T11:33:15.125Z\",\"ModifiedBy\":\"Daniela Birsan\",\"ModifiedByGuid\":\"VAULT-18SI78J7\",\"DeliveryRevoked\":false,\"Annotations\":false,\"Search\":null,\"Size\":12038},{\"Number\":2,\"Label\":\"2\",\"IsLatest\":false,\"Created\":\"2022-07-21T11:30:52Z\",\"CreatedByGuid\":\"VAULT-18SI78J7\",\"Source\":1,\"Description\":\"\",\"Name\":\"v2\",\"Official\":false,\"Locked\":false,\"Ext\":\"docx\",\"Modified\":\"2022-07-21T11:30:52.874Z\",\"ModifiedBy\":\"Daniela Birsan\",\"ModifiedByGuid\":\"VAULT-18SI78J7\",\"DeliveryRevoked\":false,\"Annotations\":false,\"Search\":null,\"Size\":12022},{\"Number\":1,\"Label\":\"1\",\"IsLatest\":false,\"Created\":\"2022-07-21T11:24:49Z\",\"CreatedByGuid\":\"VAULT-18SI78J7\",\"Source\":0,\"Description\":null,\"Name\":null,\"Official\":false,\"Locked\":false,\"Ext\":\"docx\",\"Modified\":\"2022-07-21T11:25:23.124Z\",\"ModifiedBy\":\"Daniela Birsan\",\"ModifiedByGuid\":\"VAULT-18SI78J7\",\"DeliveryRevoked\":false,\"Annotations\":false,\"Search\":null,\"Size\":11991}],\"SearchInfo\":false,\"TotalSize\":181607}",
                    "DateTimeMode": 3
                },
                {
                    "Name": "Rank",
                    "Type": "System.Double, mscorlib, Version=4.0.0.0, Culture=neutral, PublicKeyToken=b77a5c561934e089",
                    "Value": 0.0,
                    "DateTimeMode": 3
                }
            ],
            "FederatorMetadata": {
                "Federatorsearch engine": "netdocs",
                "FederatorPositionInsearch engine": 0,
                "Federatorsearch engineRank": 0.0
            }
        }
    ],
    "RelevantResultsProperties": {},
    "ResultBlocks": [],
    "RefinementResults": [],
    "EvaluationResults": [],
    "QueryTerms": {},
    "KeywordInformation": {
        "Key": "",
        "Value": ""    },
    "PerformanceInformation": {
        "search enginePerformance": [
            {
                "search engineName": "netdocs",
                "search engineTime": 893,
                "TotalTime": 893,
                "PipelinePerformance": {
                    "PipelinesPerformance": [
                        {
                            "Counters": {
                                "PropertyMapper_ProcessText_GetExpressionTree": 0,
                                "PropertyMapper_ProcessText_UpdatePropertyNames": 0,
                                "PropertyMapper_ProcessText_RenderExpressionTree": 0,
                                "PropertyMapper_Process_QueryText": 0,
                                "PropertyMapper_ProcessText_GetExpressionTree_1": 0,
                                "PropertyMapper_ProcessText_UpdatePropertyNames_1": 0,
                                "PropertyMapper_ProcessText_RenderExpressionTree_1": 0,
                                "PropertyMapper_Process_QueryTemplate": 0,
                                "PropertyMapper_MapProperties": 0,
                                "PropertyMapper_Process_ProcessCollapseSpecification": 0,
                                "PropertyMapper_Process_ProcessPropertyList": 0,
                                "PropertyMapper_Process_ProcessPropertyList_1": 0,
                                "PropertyMapper_Process_ProcessSortList": 0,
                                "PropertyMapper_Process_ProcessRefiners": 0,
                                "PropertyMapper_Process_ProcessRefinementFilters": 0,
                                "PropertyMapper_Process_CustomRefinementIntervals": 0,
                                "PropertyMapper_Process_HiddenConstraints": 0
                            }
                        }
                    ]
                },
                "Counters": {
                    "RunQuery_FederatedImpersonation": 0,
                    "RunQuery_SetLog4NetContext": 0,
                    "RunQuery_PrepareQuery": 0,
                    "RunQuery_SelectPipelineStages": 0,
                    "RunQuery_ExecuteQueryPipeline": 0,
                    "RunQuery_ExecuteResultsPipeline": 0,
                    "RunQuery_AddFederatorMetadata": 0,
                    "RunQuery_PerformanceInformation": 0,
                    "RunQuery_CleanLog4NetContext": 0,
                    "search engineThreadStart_WaitForRunQuery": 893,
                    "search engineThreadStart_OnAfterQueryExecution": 0
                }
            }
        ],
        "PipelinePerformance": {
            "PipelinesPerformance": []
        },
        "TotalTime": 0,
        "Observations": [
            "Slowestsearch engine: netdocs took 893ms"        ],
        "Counters": {
            "PreparingFederatorEngine": 0,
            "PreparingPipelineStages": 0,
            "ExecutedQueryPipelineStages": 0,
            "Preparingsearch engines": 0,
            "Querysearch engines_PrepareQueryForsearch engines": 0,
            "QueryAllsearch engines_Filtersearch engines": 0,
            "QueryAllsearch engines_search engineThreadCreationAndJoin": 894,
            "ReceivedResultsFromsearch engines": 895,
            "MixingResults": 0,
            "CloningQuery": 0,
            "ExecutedResultsPipelineStages": 0,
            "Pagination": 0
        }
    },
    "SuppressPagination": false,
    "IsNotFirstPage": false,
    "BelongToSingleSource": false,
    "TableCollectionProperties": {},
    "search engineName": "netdocs",
    "TableProperties": {},
    "PeopleSuggestions": [],
    "QuerySuggestions": [],
    "ResultSuggestions": [],
    "RefinementsInfo": {
        "RefinementsWithMoreValues": {}
    }
}Navigate to the SmartHub administration page.
Select the NetDocuments search engine.
In the Search Engine Settings modal window, add "Versions" to the Attributes to Return list.
Click Save.
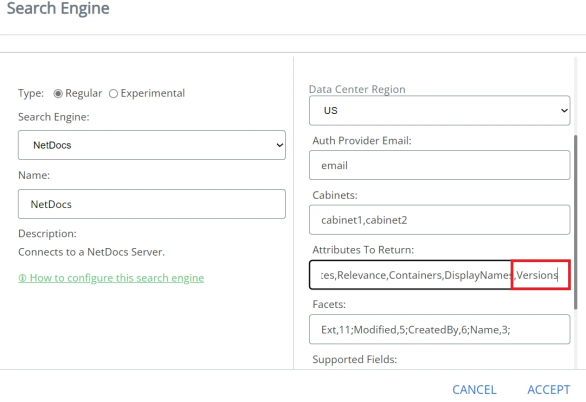
- If “Search All Versions” is enabled:
- The URL of a returned document includes the version denoted by the presence of the URL query parameter: “&ver=”
- Example:
- The URL of a returned document includes the version denoted by the presence of the URL query parameter: “&ver=”
- If “Search All Versions” is not enabled:
- The URL does not include the parameter: “&ver=”
- Example:
- The URL does not include the parameter: “&ver=”
Prerequisites
- The NetDocuments tenant used by the SmartHub search engine must have Search Versions functionality enabled.
- This is a separate NetDocuments feature that is not enabled by default.
- Make sure you have a Search Versions checkbox under the Everything field on the Advanced Search window in the NetDocuments search portal.
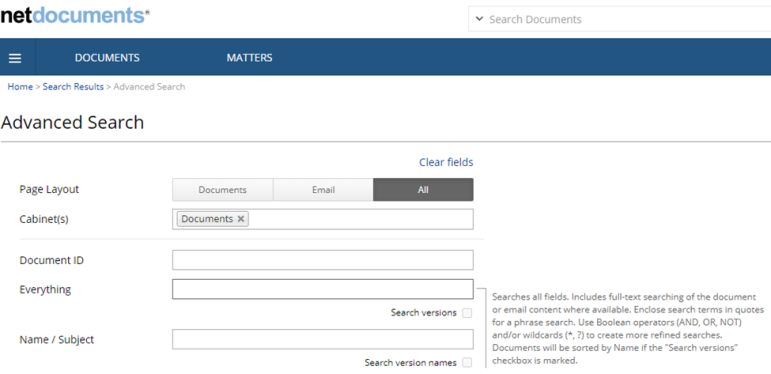
Enable/Disable "Search All Versions" functionality
- Navigate to the SmartHub administration page.
- Select the NetDocuments search engine.
- In the search engine Settings modal window, enable/disable the Search All versions slider.
- Click Save.
Generate Previews for Multi-version Search Results
Note: Starting with SmartHub 5.6, previews for NetDocuments documents will work only if you have installed SmartPreviews 3.3.
Note: The URL format for NetDocuments documents has been changed in SmartHub 5.6. This means that document URLs are no longer backward compatible with previous versions of SmartHub, thus the Smart Previews “PreviewCache“ database is obsolete. You must regenerate Previews for NetDocuments documents. See How to Remove Previews from Your Configured Storage.
Online Generation
Smart Previews online preview generation will continue to work with Search All Versions, both enabled and disabled.
Smart Preview Import Server rules are exclusive. This means that you cannot have both online preview generation and offline preview generation for the same category of documents
-
Example: Documents that are under 5 MB.
When the Search All Versions search engine option is enabled and Smart Previews rules are set to do offline preview generation (you have previews generated at crawl time only for the official version of the document), you must configure Smart Previews to do online preview generation for the other versions of the document other than the official one.
-
This is done through a SmartHub scripting stage.
-
This stage forces the online preview generation for documents that are a version different from the official versions, by changing the “PreviewStatusValue” metadata to a value of 2 as described in the topic Filters.
Note: Generating previews on-demand for large documents might take a longer time. The Ul shows the info message “Generating preview for this document is taking longer than 10 seconds. Please check back in a few minutes.”. Both the message and the default UI timeout can be configured as described in the How to Add Smart Previews to Your Results Page.
Offline Generation
Offline Generation with Connectivity Hub and NullTarget
-
Smart Previews offline preview generation will work ONLY for the “official” version of the NetDocuments documents.
-
Generating previews for any non-official version is only possible on-demand. See the above section "Online Generation" for details.
Prerequisites
- Connectivity Hub must be installed and configured.
- NetDocuments Connector must be installed and configured.
- NetDocuments connection and content must be created.
- NullTarget must be created.
Configure Offline Generation
In order for previews to be generated offline (at crawl time) using NullTarget, use these steps:
- Navigate to the Connectivity Hub home page.
- Access the Metadata page of the NetDocuments content that uses NullTarget.
- Create a new Text metadata:
- Title: PreviewUrl (do not change this name).
- Description: Add a description for this metadata.
- For example: "The url used by Smart Previews to generate preview."
- Value:
- Select Define by script
Add script:
If "Search All Versions" is enabled, add a script that uses the display URL and changes it to contain the version number:
Example: https://vault.netvoyage.com/neweb2/goid.aspx?id=4840-1183-7122&open=y&ver=3Dim url As String = Host.GetValue("spw_url")
Dim new_url As String = url & "&ver=" & Host.GetValue("OfficialVersion")
return new_url.ToLower()Note: If the display URL (escbase_url) property contains "api." you need to remove it from the URL.
Example:Dim url As String = Host.GetValue("spw_url")
Dim new_url As String = url.Replace("api.", "") & "&ver=" & Host.GetValue("OfficialVersion")
return new_url.ToLower()If "Search All Versions" is disabled, add a script that uses the display URL:
Example: https://vault.netvoyage.com/neweb2/goid.aspx?id=4840-1183-7122&open=yDim url As String = Host.GetValue("spw_url")
return url.ToLower()Note: If the display URL (escbase_url) property contains "api." you need to remove it from the URL.
Example:Dim url As String = Host.GetValue("spw_url")
Dim new_url As String = url.Replace("api.", "")
return new_url.ToLower()
- Make sure that the returned URL is lowercase.
- Save.
How to Add/Configure a Multi-Version Template
When having the "Search All Versions" option enabled, you can configure your results to show the other versions that contain the keywords the user searched for, by following these steps:
- Navigate to the directory <SmartHub_root>\modules\ContentContainers\templates..
-
Create a new HTML template for results with multiple versions.
-
Use the out-of-the-box template file resultItemWithMultipleVersionsTemplate.html file as an example.
-
Template
<div class="sh-result-item core-result">
<div class="core-result-info-wrapper">
<div class="core-info">
<span class="access-required-lock" style="display:<%= result.accessrequired ? "inline-block" : "none" %>">
<i class="sh-icon-button far fa-lock"></i>
</span>
<a class="sh-title-value sh-result-link analytics-track-openItem" target="_blank" href="<%= result.clickUri %>" title="<%= result.title %>"><%= result.title %>
</a>
</div>
<div class="core-info widgets-placeholder">
<div class="sh-field-value sh-result-item-summary">
<div><%= result.excerpt %></div>
</div>
</div>
<% var hasMultipleVersions = false;
if (result.Versions) {
var versions = JSON.parse(result.Versions);
if (versions.Count > 1 && versions.Versions)
hasMultipleVersions = true;
}
if (hasMultipleVersions) { %>
<div class="core-info versions-info">
<div class="versions-header" style="padding-bottom: 10px;" onClick="SH.$('.versions-content-<%= result.index %>').toggleClass('hidden'); SH.$('.versions-header-arrow-<%= result.index %>').find('i').toggleClass('fa-angle-down fa-angle-up')">
<div class="versions-header-text" style="display: inline; padding-right: 10px; font-weight: bold;">Other versions</div>
<div class="versions-header-arrow-<%= result.index %>" style="display: inline;"><i class="fas fa-angle-down"></i></div>
</div>
<div class="versions-content-<%= result.index %> hidden">
<% versions.Versions.forEach (function (version) {
if (version.Search && version.Search.Hit === true) {
var newUrl = result.clickUri.substring(0, result.clickUri.indexOf("&ver=") + 5) + version.Label;
var isCurrent = version.Label === result.clickUri.substring(result.clickUri.indexOf("&ver=") + 5); %>
<div class="version-item" style="padding-bottom: 10px;">
<a href="<%= newUrl %>"> <%= newUrl %> <%= isCurrent ? " (current)" : "" %></a>
<div class="open-preview-version-button sh-float-right" onClick="if(typeof BAInsight.DocumentViewer !== "undefined" && BAInsight.DocumentViewer._isMobile) {clearTimeout(BAInsight.LongitudePreview.HoverTimeoutId);} BAI.SmartPreviews.ShowDocumentPreview("<%= encodeURIComponent(newUrl)%>", "<%= encodeURIComponent(newUrl)%>", "<%=encodeURIComponent(result.title)%>", "<%=Coveo.state(SH.utils.getSearchRoot(), "ql")%>", SH.SmartPreviews.Options)">
<i class="sh-icon-button far fa-eye"></i>
<span>Preview version</span>
</div>
</div>
<% } %>
<% }) %>
</div>
</div>
<% } %>
<div class="sh-action-bar core-action-bar">
<a class='sh-result-link prettyURL sh-float-left' target="_blank" href="<%= result.clickUri %>" data-interception="off">
<span title="<%= (result.filetype||'document') + " from " + (result.contentsource || result.clickUri || 'Source') %>"><%= (SH.utils.getSourceSystemImage(result.clickUri, result.ContentSource) || result.ContentSource) %></span>
<span title="<%= result.clickUri %>"><%= SH.utils.prettifyURL(result.clickUri) %></span>
</a>
<div class="open-preview-button hidden sh-float-right" <% if(result.accessrequired) { %> style="display:none !important" <% } %> >
<i class="sh-icon-button far fa-eye"></i>
<span>Preview</span>
</div>
</div>
</div>
</div>Tip! The code block above is just an example.
-
Modify and style the template to contain information as you desire.
-
Take the appropriate settings from the DefaultModuleSettings.js file (<SmartHub_root>\modules\SmartHubResourceLoader\DefaultModuleSettings.js), and copy them into your custom settings file.
-
Use <SmartHub_root>/modules/SmartHubResourceLoader/CustomSettingsTemplate.js as a template to create your custom settings file.
-
Change the ItemTemplatePicker setting to use the template created at step 2.
PubMed
About the PubMed Search Engine
PubMed comprises more than 30 million citations for biomedical literature from MEDLINE, life science journals, and online books.
-
To learn more about PubMed, see https://www.ncbi.nlm.nih.gov/pubmed.
The following specific PubMed type search engines are available as search engines in SmartHub:
- NCBIPCCompound
- NCBIPCPathwayReaction
- NCBIPCSubstance
- NCBIPMC
- NCBIProtein
To set up PubMed as a search engine in your instance of SmartHub, use the topics below.
How to Set Up the PubMed Search Engine
Use the following steps to configure your PubMed search engine.
Add a New Search Engine to SmartHub
- navigate to your SmartHub Administration site: https://<SmartHubSite>:<port>/_admin.
- Click Add New Search Engine. The Search Engine page appears.
- Type: Select Experimental.
- In the Search Engine field, select your PubMed/PubChem search engine from the drop-down list. Refer to the list of search engines in the About section for more information.
-
Name: Enter a name for your PubMed search engine.
-
Maximum number of results to retrieve for a query: Enter a maximum number of results that you want to be retrieved for a query.
- (Search Engine) API Key:
- When you register a new PubMed account, you are given the option to create a key.
- Use that key value here.
- Supported result sources (optional):
- Add all the results sources where you want to display PubMed/PubChem content.
- Add the sources using the following syntax:
- Syntax:
<Result source ID>=pccompound;<Result source ID>=pccompound; - Example:
221c396f-c525-4fe2-a210-c58c81ffeb99=pccompound;661cca31-31ba-4021-9581-9b809a1a7faa=pccompound
- Syntax:
Configure Your SmartHub Results Page
- Your SmartHub Results page is controlled by the Results.html file, or a modified version of that file if you use a custom Results page.
- Reference the PubMed/PubChem search engine name and the Result source ID (added to the search engine set up as above)
- Example:

- Example:
PubChem Settings
If you are setting up PubChem you must also add code to your HTML page's custom settings file, (such as a custom Results page).
The fastest and easiest way to do this is using the UI Editor.
For information about how to access the UI Editor as well as who can access it, see How to Use the UI Editor.
-
From the SmartHub administration page, click UI Editor.
-
Click Select a page from the top menu.
-
Select the Results page
-
BA Insight recommends you create your own custom page (and folder) to modify and leave the default files as templates. For example: MyResultsPage.html. For more information, see How to Create Custom Pages.
-
-
Select Advanced mode from top right.
-
Select Advanced settings edit.
-
Scroll down to the PubChem custom settings section around line 225:
-
Click the link See Default Settings in the top right corner. A new browser tab opens with the available custom settings.
-
Scroll down or search for "PubChem," around line 1045. Enable PubChem and the ChemComposer:
- Add all PubChem code from and including line 1047 to your custom settings file open in the previous tab.
- Change the following settings from "
false" to "true":- Enabled
- ChemComposerEnabled
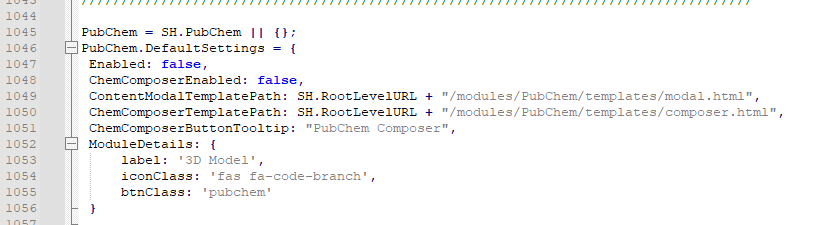
- Enable the PubChem Viewer.
Scroll or navigate to the
ContentContainerssection in your custom settings file.Comment in the ContentContainers settings shown below, if necessary.
Change the EnablePubChemViewer value from
falsetotrue. See below.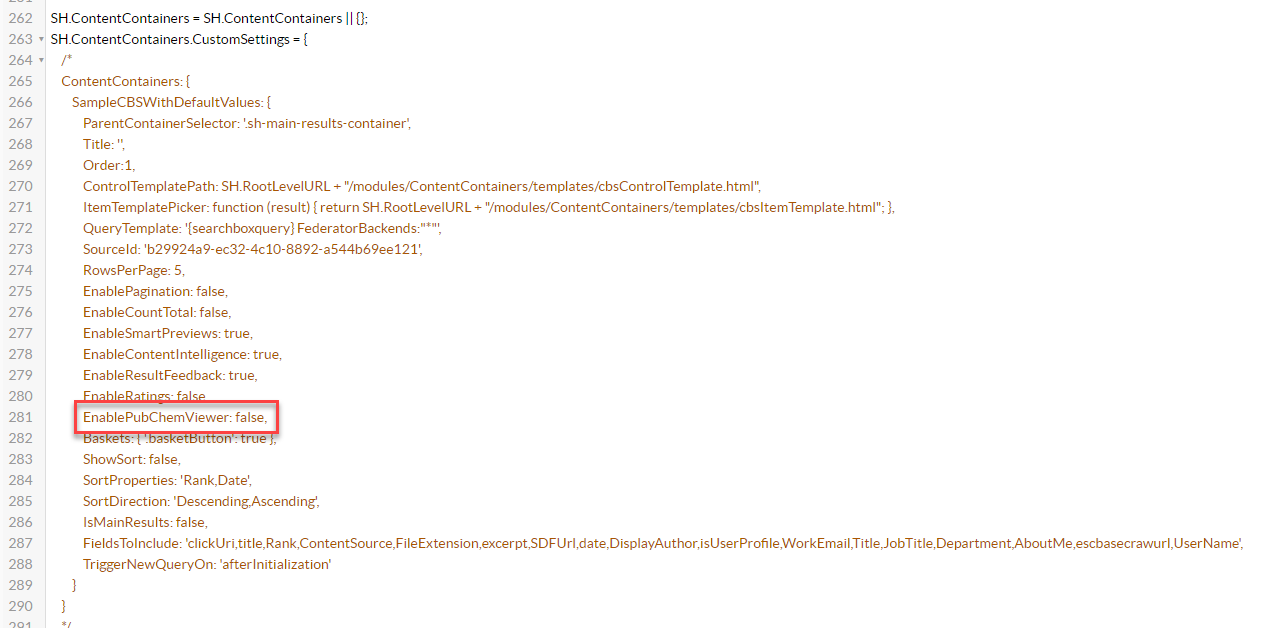
-
Click Save changes.
-
Click Preview<html_page>.html at the top of the code editor.
-
Review/test your changes in the tab that opens. Make any modifications back in the code editor.
-
Click Save changes when finished.

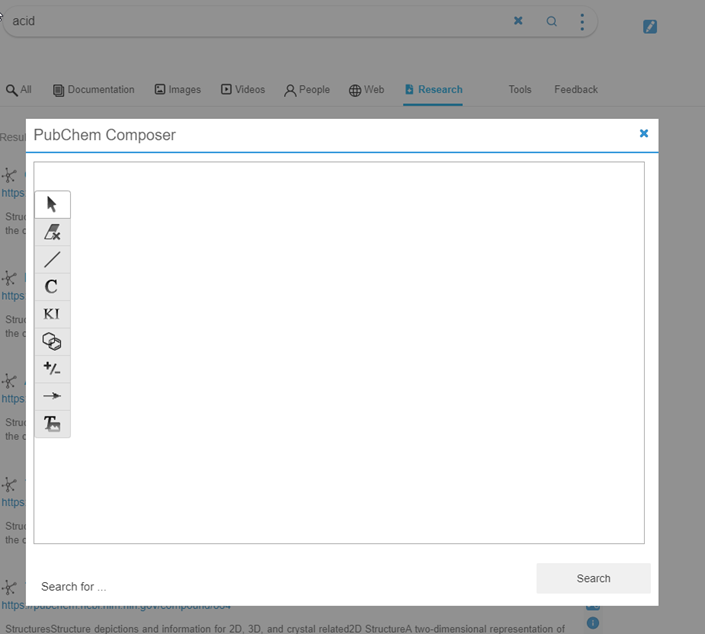
Results Page Example
Once configured, your site Results page will resemble the screenshot below: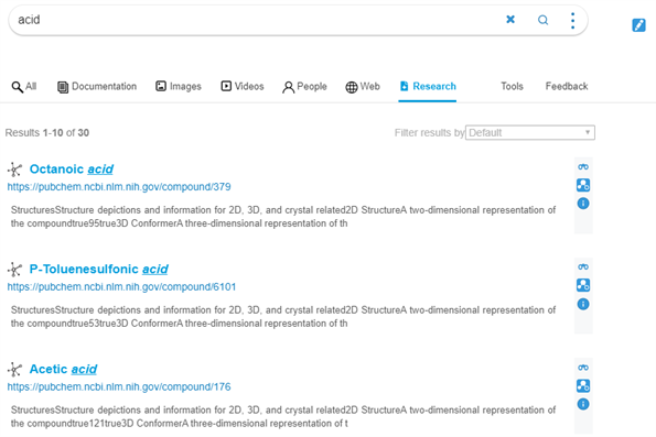
Security Trimming
Note: There is no security on PubMed content.
BA Insight SmartHub requires only an API key to access the content.
RightFind
About RightFind
RightFind Enterprise provides faster discovery and insights with immediate access to scientific literature and data and strengthens copyright-compliant collaboration.
-
For more information see: http://www.copyright.com/business/rightfind/
Limitations
The RightFind search engine does not support:
- User Impersonation
- Support previews
- File Type and Modified Date refiners
How to Set Up the RightFind Search Engine
Use the following topics to set up and configure your RightFind search engine.
Add a New Search Engine to SmartHub
- Navigate to your SmartHub Administration site:https://<SmartHubSite>:<port>/_admin.
- Click Add New Search Engine.The Search Engine page appears.
- Type: Select Experimental.
- Search Engine: Select RightFind Experimental from the drop-down list.
- Max number of results for shallow refiners: Specify the number of results the search engine uses to build the refiners
- The lower the value, the faster queries are performed. Note this can result in a less precise refiner.
- The higher the value, the slower queries are performed, Note this can result in a more accurate refiner.
- Fields to query: The RightFind index fields to query, comma separated.
- Default value: title,parentTitle,abstract.
- The full set can be obtained by checking RightFind documentation,
- RightFind Domain: The RightFind domain you want to search.
- Example: www.myrightfinddomain.rightfind.com
- User Email: The email of the user account that has access to all items.
- Password: The password for the email above.
- Access Token: The access token obtained after authenticating.
- Refresh Token: The refresh token obtained after authenticating, used to refresh the access token when it expires.
- Click Get Access Token. You are redirected to a newly opened web page.
- Click Copy to clipboard to copy the access token .
- Go back to the search engine Configuration page and paste the access token in the Access Token field
- Repeat steps 6 and 7 for the Refresh Token.
- Click Save.
- Close the web page opened during the authentication process.
Verify the Required Pipeline Stages
After the search engine is configured, ensure the Property Mapper tuning stage is configured for both the Queryand Results tuning stages for your new RightFind search engine.
If these tuning stages are missing, add them using the following steps:
- Go to the General Settings page from the SmartHub Administration page: https://<SmartHubSite>:<port>/_admin.
- Select the RightFind search engine that you just created.
- Click Add a new Query Stage.
- In the newly opened window, select the Property Mapper stage from the Pipeline Stages drop-down.
- Add a new name for this state.
- In the Parameters text area on the right side, add the properties you want to map in the format described in the left panel.
- Save and repeat these steps for the Result Pipeline stage.
Configure Your SmartHub Results Page
- Your SmartHub Results page is controlled by the Results.html file or a modified version of that file if you use a customResults page.
- Open your Results HTML page to edit.
- Reference the RightFind search engine name within a
coveo-tab-section.
See the example below:
Example:

Refiner Properties
The results can be refined by the following properties:
- authors (string)
- publicationDate (string)
- title (string)
- genre (int)
- contentId (int)
Default Refiners
One default standard refiner is already mapped to the following property:
- Display Author → authors
Note: The "File Type" and "Modified Date" refiners will not work with the RightFind search engine.
When using only a RightFind search engine, it is advised to edit the Result.html file and remove the 2 refiners from the code.
Sorting Properties
The RightFind search engine supports sorting by only one property at one time.
The properties that can be used for sorting are:
- title
- score
- pubYear
Setting up your Azure Cosmos search engine
Overview of Azure Cosmos DB as a Search Engine in SmartHub
Azure Cosmos DB is a globally distributed, multi-model database service designed for high-scale, low-latency applications. When used as a search engine in SmartHub, Cosmos DB provides a flexible, graph-friendly data layer that goes beyond traditional keyword search. By modeling content, entities, and relationships as interconnected data, SmartHub can build a Knowledge Graph that captures how information is related, not just where keywords appear. This enables richer contextual search experiences and supports advanced use cases that rely on understanding relationships between data.
Prerequisites
Note the following prerequsites:
-
You must have access to an Azure Cosmos DB resource.
Add a Azure Cosmos DB search engine to SmartHub
Delete this text and replace it with your own content.
- In the SmartHub Administration portal, click General Settings.
- In the Search Engines section, click Add New Search Engine. The Search Engine page appears.
- Select Type: Regular.
- In the Search Engine field, select Azure Cosmos
- In the Name field, enter a name for your Azure Cosmos search engine.
-
In the Rank offset formula coefficients field, enter values for the Boost and Offset. Enter these values only if you selected the Rank Based mixing algorithm that is set in the General Settings.
-
In the Host Name field, enter the endpoint URI of your Azure Cosmos DB account. This value can be found on the Keys page of your Azure Cosmos DB account.
-
In the Database Name field, enter the name of the Azure Cosmos database that stores your SmartHub search data. This must match an existing database in your Cosmos DB account.
-
In the Graph Name field, enter the name of the graph container in your Azure Cosmos database. This can be found in your database information in the Azure Cosmos Data Explorer.
-
In the Port Number field, enter the network port used to connect to your Azure Cosmos DB instance.
-
In the Access Key field, enter the primary access key used to authenticate SmartHub to your Cosmos DB account. This value can be found on the Keys page of your Azure Cosmos DB account.
-
In the Partition Key field, enter the partition key path that you defined for the graph container. This must match the partition key configured in your Azure Cosmos DB instance.
- Click the Accept button.